|
|
Post by sd40dash2 on Jul 24, 2023 11:43:07 GMT -8
Corner braces have been installed to aid in gluing and squaring. Platform walkways have also been detailed.
|
|
|
|
Post by sd40dash2 on Jul 25, 2023 14:33:13 GMT -8
2 ounces of lead sheet weight cut to fit the small interior space and held in place with screws. Step ends have also been built and installed. Everything here is finally ready for primer and black paint.
|
|
|
|
Post by edgecrusher on Jul 26, 2023 11:41:38 GMT -8
Looking really good. I'm a bit jealous of how quick you can move on a project.
|
|
|
|
Post by sd40dash2 on Jul 26, 2023 14:42:26 GMT -8
Primer really highlights the nice under frame detail.
|
|
|
|
Post by fr8kar on Jul 26, 2023 15:08:09 GMT -8
Primer really highlights the nice under frame detail. It also highlights mistakes, or in this case, the absence of mistakes. Bravo! |
|
|
|
Post by Christian on Jul 27, 2023 3:52:10 GMT -8
Primer really highlights the nice under frame detail.
Take another look at your brake rigging. The way that the cylinder is attached to the lever won't work. On the other hand, if you don't display the caboose/van upside down, who will know? The very few photos I've found of this van/caboose online show nothing of the under guts. |
|
|
|
Post by sd40dash2 on Jul 27, 2023 4:04:53 GMT -8
Primer really highlights the nice under frame detail.
Take another look at your brake rigging. The way that the cylinder is attached to the lever won't work. On the other hand, if you don't display the caboose/van upside down, who will know? The very few photos I've found of this van/caboose online show nothing of the under guts.
Yep, agreed, but this was the only way I could fit it all together so it's one of the necessary compromises. I wish I knew how the prototype handled this.
|
|
|
|
Post by Christian on Jul 27, 2023 12:58:28 GMT -8
I wish I knew how the prototype handled this. Caboose plumbing is a nightmare because of the rodding to connect hand brakes on each end of the caboose and because of the brake controls available to the conductor. Lots of rods and lots of levers make all the motion work. I'm guessing that you are actually far ahead in your modeling from the postings. So, this is for the next caboose. Vastly simplified, but has things connected in the right place. The cylinder should be mounted on a block to place the piston rod level with the levers. The connection between the brake cylinder and the lever should be a chain. (most common) An air line should run from the cylinder butt to the triple valve. I've omitted the connections to the mechanical brakes which require more levers and rods as well as the plumbing for the conductor. I love this caboose although I have no need for one. But it isn't the first thing I've thought about making that has no purpose!  |
|
|
|
Post by sd40dash2 on Jul 27, 2023 13:05:53 GMT -8
Flat black spray paint has been applied and the u/f is finally complete. Thank you to all who supported with comments and likes. Starting tomorrow, I will begin work on the carbody ends, stay tuned.
|
|
|
|
Post by sd40dash2 on Jul 27, 2023 13:15:45 GMT -8
Caboose plumbing is a nightmare because of the rodding to connect hand brakes on each end of the caboose and because of the brake controls available to the conductor. Lots of rods and lots of levers make all the motion work. I'm guessing that you are actually far ahead in your modeling from the postings. So, this is for the next caboose. Vastly simplified, but has things connected in the right place. The cylinder should be mounted on a block to place the piston rod level with the levers. The connection between the brake cylinder and the lever should be a chain. (most common) An air line should run from the cylinder butt to the triple valve. I've omitted the connections to the mechanical brakes which require more levers and rods as well as the plumbing for the conductor. Hi Christian, thank you for your suggestions and for illustrating with a modification of my image/model. I understand exactly what you are saying but unfortunately moving the cylinder to that spot will not work. See this different angle which shows the truck swing and wheels make what you are saying impossible. But yes, I will connect the brake wheel via fulcrum and chain to the rod that connects to the lever.
|
|
|
|
Post by Colin 't Hart on Jul 28, 2023 0:43:39 GMT -8
No chance they had truck mounted brake cylinders?
|
|
|
|
Post by Christian on Jul 28, 2023 3:11:50 GMT -8
No chance they had truck mounted brake cylinders? Not likely given when, where and use of existing parts by CP. Online photos are scarce and don't show much of the under stuff. But, in terms of truck clearance, prototype trucks have much thinner wheelsets and don't have to turn very much. From these photos I /might/ see a K brake setup rather than an AB brake. Other wood vans clearly have K brakes. I found a 1981 photo of an in service 1920s wood van with a K brake. The K brake combines the cylinder and reservoir and is smaller than AB's separated parts. The triple valve was much smaller. Seeing Manny's druthers, I think his model making decision was good. I obsess over those sorts of things and projects never get completed because of my fear of making a mistake. Painted black the underneath stuff all but disappears. Manny marches on! Old timers: Am I remembering a Jack Work build of this caboose way, way back? I know he did the short business car, but this one is also ringing a bell. Work was a telegrapher at Trail BC which was home for this pair of vans. |
|
|
|
Post by sd40dash2 on Jul 28, 2023 5:27:49 GMT -8
Not likely given when, where and use of existing parts by CP. Online photos are scarce and don't show much of the under stuff. But, in terms of truck clearance, prototype trucks have much thinner wheelsets and don't have to turn very much. From these photos I /might/ see a K brake setup rather than an AB brake. Other wood vans clearly have K brakes. I found a 1981 photo of an in service 1920s wood van with a K brake. The K brake combines the cylinder and reservoir and is smaller than AB's separated parts. The triple valve was much smaller. Seeing Manny's druthers, I think his model making decision was good. I obsess over those sorts of things and projects never get completed because of my fear of making a mistake. Painted black the underneath stuff all but disappears. Manny marches on! Old timers: Am I remembering a Jack Work build of this caboose way, way back? I know he did the short business car, but this one is also ringing a bell. Work was a telegrapher at Trail BC which was home for this pair of vans. Thanks Christian and agreed once again. Indeed, K or split K would have made my work much simpler. Of course, now that I've done this someone will post a circa-1980 derailment site photo showing 437110 still had the old brake system right to the end LOL. Life goes on, I did my best.
You are referring to the January 1959 issue of Model Railroader, where he scratchbuilt one of the old wood CP vans. Seems the man was a legend and an inspiration to many. Jack Work passed away on June 13, 1996.
|
|
|
|
Post by Christian on Jul 28, 2023 6:12:15 GMT -8
You are referring to the January 1959 issue of Model Railroader, where he scratchbuilt one of the old wood CP vans. Seems the man was a legend and an inspiration to many. I'm one of the many. He exploded onto the scene when I was in junior high. One of my oldest scratch-built models is his freight house. Later a kit by George Sellos long before limited edition kits. I also completed his little kingpost bridge which to this day pops up in layout photos. I started but didn't get far with his coal mine. I discovered something else in eighth grade which distracted me from model building for many years. That coal mine was a Pola kit sold under many importers over the years. Below is a photo of Work's model that is today in a museum collection. I'm beat up about the same! (That prototype mine is the reason for the shortened caboose in this build thread; short van = one more hopper.) Two things about Work that I've kept with me. First, if you can't buy it or can't afford it, make it. Second, all modeling in HO takes place in a space about the size of a sheet of paper. The rest is a dumping place for things that should be put away.  |
|
|
|
Post by cemr5396 on Jul 28, 2023 10:06:27 GMT -8
No chance they had truck mounted brake cylinders? Not likely given when, where and use of existing parts by CP. Online photos are scarce and don't show much of the under stuff. But, in terms of truck clearance, prototype trucks have much thinner wheelsets and don't have to turn very much. From these photos I /might/ see a K brake setup rather than an AB brake. Other wood vans clearly have K brakes. I found a 1981 photo of an in service 1920s wood van with a K brake. The K brake combines the cylinder and reservoir and is smaller than AB's separated parts. The triple valve was much smaller. Seeing Manny's druthers, I think his model making decision was good. I obsess over those sorts of things and projects never get completed because of my fear of making a mistake. Painted black the underneath stuff all but disappears. Manny marches on! Old timers: Am I remembering a Jack Work build of this caboose way, way back? I know he did the short business car, but this one is also ringing a bell. Work was a telegrapher at Trail BC which was home for this pair of vans. There were actually three of them. Two in Trail, one in Winnipeg. The Winnipeg van was permanently assigned to an industrial job that had some tight spots, where saving a few feet with a tiny van could be the difference between fitting in a run around or not. I believe the shorty vans had K Brakes until they were retired. A large percentage of CP's other wooden vans did. Many (most?) were never changed to AB brakes. |
|
|
|
Post by sd40dash2 on Jul 28, 2023 12:38:08 GMT -8
HAVE YOUR SAY: Christian and cemr5396 raised the possibility I may have made the wrong guess in my brake system selection. We still do not have any actual proof of which system 437110 had at the end, or clear u/f detail photos taken between 1979-82. I had to decide on one so I could complete the model but I will turn this over to you guys. What should I do; nothing, build a whole new underframe with K system or tear out the gear already built on this frame and rebuild to a K system?
|
|
|
|
Post by cemr5396 on Jul 28, 2023 12:57:22 GMT -8
In the absence of very much concrete evidence what the prototype had, I'd say it's up to you.
The obvious pro to leaving it alone is you are already done that part.
the con would be that as built it is possibly incorrect in placement if not in type.
The pro to redoing it with K brakes would be that you would get (what I think is likely to be) the correct gear that the car would have had, and due to its more compact nature that Christian pointed out it is more likely to fit properly without compromising anything.
The con, of course, is that you have to rebuild the nice underframe you just finished working on.
|
|
|
|
Post by sd40dash2 on Jul 28, 2023 15:02:53 GMT -8
Now that the u/f has been completed (notwithstanding responses to my question above), it's time to shift to measurements and styrene work on other sections of the van. CP 437110 in 1979 was upgraded with steel stepwells which I cut from the styrene strip shown here. There are two sizes of these as the inner wells have to fit in a very tight space compared to the outer wells. I also cut out the body end walls at this time as they are needed to test step alignment. Steps can only be built at the time of final assembly as one side mounts to the end wall and the other to the end sill.
|
|
|
|
Post by Christian on Jul 29, 2023 4:46:56 GMT -8
Now that the u/f has been completed (notwithstanding responses to my question above) I stalled answering this overnight so I could stew on it. All my previous posts said, "Let it alone - it's black and all but invisible." But, if it was my model I would change it while the "gettings good." The step wells you've started would not survive my fingers! That brake cylinder mounted on the center sill bothers me, a lot. At the very least I'd ditch the cylinder and leave the reservoir and triple valve plus rodding to convey that it is all there. BUT, Before doing any further destruction I'd have a K Brake on hand first to check clearance. If it won't fit, then what you already have is the solution. K Brakes are made by Grandt, Cal-Scale, Tangent, and Tichy. Tichy has both the "standard" K Brake and the separated K Brake which is even more compact, although rare in the prototype world. In the photo below I think I used Grandt, except the plumbing, retainer pipe, and rodding looks like a Cal-Scale instruction sheet. Grandt is intended for narrow gauge and is more compact in terms of levers and miscellaneous parts. Both the Tangent and Tichy sets are 50 years newer. Tichy gives lots of parts to fit lots of situations. Tangent has lever/rod assemblies intended for their pre-WWI tank car that would simplify construction with a bit of snipping here and there. Below is a photograph of an assembly I did decades ago on a scratch-built East Broad Top boxcar. Yes, longer car. Those are narrow-gauge trucks. The eight-foot measure is about all that the brake space can be compacted. With short levers standard gauge trucks can be brought pretty close to the reservoir/cylinder assembly. Maybe six feet flange to flange.  |
|
|
|
Post by Christian on Jul 29, 2023 4:54:37 GMT -8
By the way, despite my hang up over brakes I'm so darned excited by this build. There isn't enough model building on any of the popular train lists. I know that when all the work is done this is going to be a great little model of a really weird prototype.
|
|
|
|
Post by sd40dash2 on Jul 29, 2023 6:15:36 GMT -8
Thank you to Christian and cemr5396 for your thoughtful responses. I have considered them carefully and compared to the K brake parts I have on hand here. There is still a bit of time if anyone else wishes to offer some input.
The K brake system is the most natural fit for this van without a doubt. If I were to make another u/f I would use that system but that would mean the u/f I just finished wouldn't be technically correct for anything. Thus, the textbook best choice in this case would be to carefully remove AB components from the existing frame and rebuild K onto it. But then looking at my K parts and Christian's latest diagram reveals insufficient space. FYI the maximum center sill space available between inner axles is only about 5', reduced to about 2.5' between sill and frame sides when scale truck swing is taken into account. That's why the components are mounted in a nearly straight line. So even if I wanted to use the more obvious K system, analysis of the model shows there is even less space for it.
Like this post if you agree with the compromise solution of removing the cylinder as Christian describes and move on to the rest of the build as started yesterday.
|
|
|
|
Post by valenciajim on Jul 29, 2023 9:24:29 GMT -8
I am really enjoying this thread. Excellent work.
And yes, I too remember reading Jack Work's articles when I wore a younger man's clothes.
|
|
|
|
Post by Colin 't Hart on Jul 29, 2023 10:22:59 GMT -8
Thank you to Christian and cemr5396 for your thoughtful responses. I have considered them carefully and compared to the K brake parts I have on hand here. There is still a bit of time if anyone else wishes to offer some input. The K brake system is the most natural fit for this van without a doubt. If I were to make another u/f I would use that system but that would mean the u/f I just finished wouldn't be technically correct for anything. Thus, the textbook best choice in this case would be to carefully remove AB components from the existing frame and rebuild K onto it. But then looking at my K parts and Christian's latest diagram reveals insufficient space. FYI the maximum center sill space available between inner axles is only about 5', reduced to about 2.5' between sill and frame sides when scale truck swing is taken into account. That's why the components are mounted in a nearly straight line. So even if I wanted to use the more obvious K system, analysis of the model shows there is even less space for it. Like this post if you agree with the compromise solution of removing the cylinder as Christian describes and move on to the rest of the build as started yesterday. In the absence of further information, I would just continue with what you have now. |
|
|
|
Post by sd40dash2 on Jul 29, 2023 14:04:10 GMT -8
Nibbler to the rescue! Jack Burgess is right when he says good quality tools are worth every penny of their seemingly-high cost. This nibbler recommended by Jack made it very easy to carve out the walkway and door slots.
|
|
|
|
Post by sd40dash2 on Jul 30, 2023 12:13:15 GMT -8
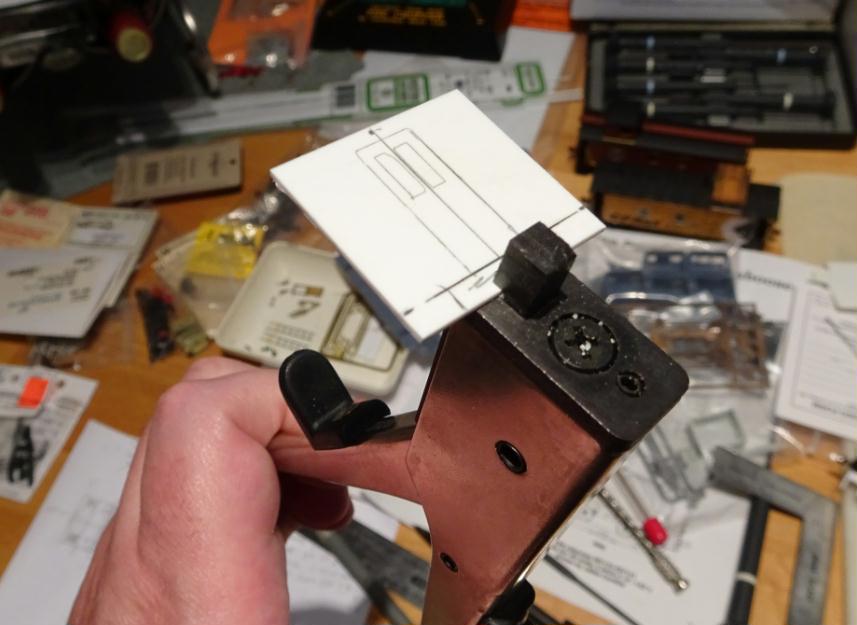
End walls were cut from plain .040 styrene (remember the final iteration of 437110 was sheathed in plywood) and roof curvature filed before nibbling. Now it's time to start planning the main and storm door installation. The styrene strip shown will soon be used to make up the door frames.
|
|
|
|
Post by valenciajim on Jul 30, 2023 13:09:34 GMT -8
Nibbler to the rescue! Jack Burgess is right when he says good quality tools are worth every penny of their seemingly-high cost. This nibbler recommended by Jack made it very easy to carve out the walkway and door slots. I agree about the nibbler. I have one and have used it many times. The tool might be expensive, but it is worth it. |
|
|
|
Post by sd40dash2 on Jul 31, 2023 15:39:23 GMT -8
Style is the same for main and storm doors. Door frames were also added and corner braces have been prepared.
|
|
|
|
Post by sd40dash2 on Aug 1, 2023 12:03:42 GMT -8
Mark locations for end wall railings.
|
|
|
|
Post by edgecrusher on Aug 1, 2023 13:28:21 GMT -8
Great start to the body work. I don't blame you for being torn on what to do with the brakes. For me its almost impossible to "un-know" something so it drives me crazy if learn something is different after I've finished a part of a build. I usually go back and change it. I'm sure thats why my builds take so long. I think I would change it while you can so it doesn't bother you later.
|
|
|
|
Post by sd40dash2 on Aug 2, 2023 9:30:28 GMT -8
Here we see the various railings that all had to be formed by hand using Tichy wire. The two wider pieces at the top are the cupola braces. Everything here is ready for paint.
|
|