|
|
Post by sd40dash2 on Oct 3, 2023 14:30:04 GMT -8
|
|
|
|
Post by sd40dash2 on Oct 4, 2023 11:39:50 GMT -8
|
|
|
|
Post by sd40dash2 on Oct 5, 2023 10:30:22 GMT -8
This 4.75 inch car needs to weigh 3.38oz according to NMRA. This isn't quite enough, one more weight should make it about right
|
|
|
|
Post by sd40dash2 on Oct 6, 2023 14:33:02 GMT -8
|
|
|
|
Post by sd40dash2 on Oct 7, 2023 11:40:52 GMT -8
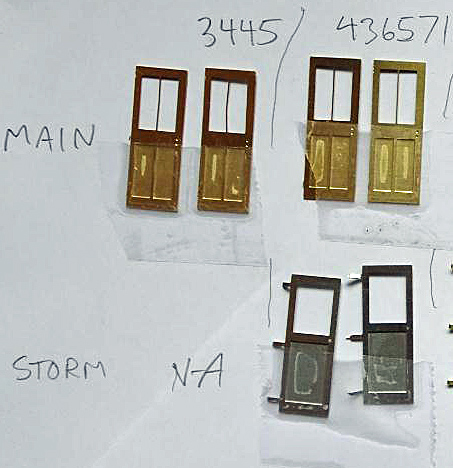
Alright, time to move from the completed under frames to the ends. Here are the three different pairs of doors needed for both wood vans.
|
|
|
|
Post by sd40dash2 on Oct 10, 2023 6:06:35 GMT -8
|
|
|
|
Post by sd40dash2 on Oct 13, 2023 15:24:14 GMT -8
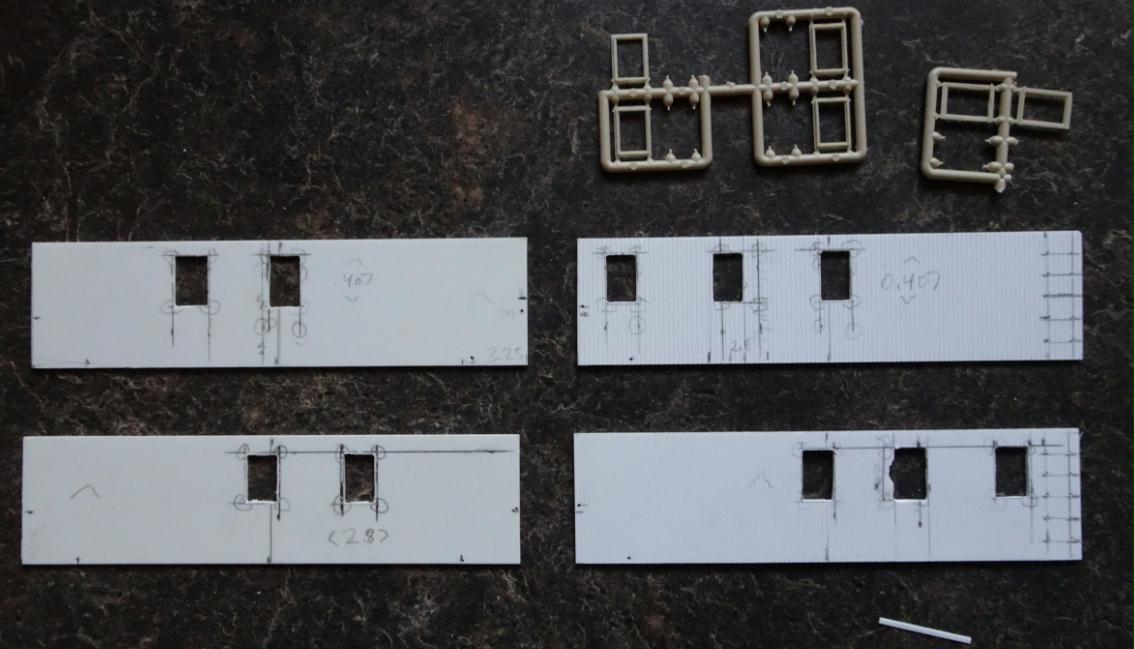
Mark locations on end walls for roof contour, walkway and door.
|
|
|
|
Post by sd40dash2 on Oct 15, 2023 6:24:57 GMT -8
Nibble out the openings. Thanks Jack Burgess for the great tool recommendation.
|
|
|
|
Post by sd40dash2 on Oct 18, 2023 4:30:17 GMT -8
Keep door close at hand and check alignment frequently, file as needed until the door fits properly. For the second van, only the windows will be removed so start those holes with exacto knife.
|
|
|
|
Post by sd40dash2 on Oct 20, 2023 4:47:34 GMT -8
First test-fit of the ends, a couple of shim strips will be needed.
|
|
|
|
Post by sd40dash2 on Oct 25, 2023 8:31:25 GMT -8
This is a good time to start bringing in some of the other components for test fitting as well.
|
|
|
|
Post by sd40dash2 on Oct 27, 2023 5:47:38 GMT -8
End wall carving and filing mostly complete, just need to add a shim or two.
|
|
|
|
Post by sd40dash2 on Oct 28, 2023 6:12:22 GMT -8
Doors and frames added, railing locator lines and spots have been carefully marked and drilling started. That will be it for the ends, onto the sides next!
|
|
|
|
Post by sd40dash2 on Oct 29, 2023 12:29:43 GMT -8
Onto the body sides, once the locations have been marked it's time to start carving out the windows.
|
|
|
|
Post by sd40dash2 on Oct 30, 2023 15:40:37 GMT -8
This is all the carving possible with the knife. Curved corner grab holes have also been marked and drilled; extensions were drilled after this photo was taken.
|
|
|
|
Post by sd40dash2 on Oct 31, 2023 16:50:00 GMT -8
With the exception of a minor repair, all window filing is complete. Unfortunately the nibbler doesn't fit these windows so I had to build them the hard way.
|
|
|
|
Post by Christian on Nov 1, 2023 5:50:21 GMT -8
With the exception of a minor repair, all window filing is complete. Unfortunately the nibbler doesn't fit these windows so I had to build them the hard way. Three different strategies for cutting windows when the nibbler doesn't fit. - Laminate thinner stock over the thick. This lets you simply use a knife to cut the holes. The thicker underlayer can have larger holes.
- Use narrow chisels to punch out the openings. This is what I usually do. On one of my earlier construction threads (that I can't find) I showed a narrow chisel that I ground from a 16d nail. That chisel/punch has cut a lot of small openings.
- Knife score the opening and then score an "X" corner to corner. Twirl the knife point in the center to open up a bit of a hole. Then punch out the triangles. This works when there is enough surrounding material that the main plastic doesn't distort to the breaking point. It has not been successful for me other than with Evergreen styrene and N Scale Architect/Slater's Plastikard brick sheets. Pikestuff and Walthers, forgetaboutit!
- Yes, I have filed them open. Often. But not when there are a bunch.
|
|
|
|
Post by sd40dash2 on Nov 1, 2023 13:35:36 GMT -8
Carefully measure and mark 4' plywood widths on one pair of sides.
|
|
|
|
Post by sd40dash2 on Nov 2, 2023 5:07:08 GMT -8
Next TimeThree different strategies for cutting windows when the nibbler doesn't fit. - Laminate thinner stock over the thick. This lets you simply use a knife to cut the holes. The thicker underlayer can have larger holes.
- Use narrow chisels to punch out the openings. This is what I usually do. On one of my earlier construction threads (that I can't find) I showed a narrow chisel that I ground from a 16d nail. That chisel/punch has cut a lot of small openings.
- Knife score the opening and then score an "X" corner to corner. Twirl the knife point in the center to open up a bit of a hole. Then punch out the triangles. This works when there is enough surrounding material that the main plastic doesn't distort to the breaking point. It has not been successful for me other than with Evergreen styrene and N Scale Architect/Slater's Plastikard brick sheets. Pikestuff and Walthers, forgetaboutit!
- Yes, I have filed them open. Often. But not when there are a bunch.
Hi Christian, thanks very much for participating in the thread and offering some excellent modelling alternatives!
Chisel discussion follows...
|
|
|
|
Post by cpr4200 on Nov 2, 2023 8:04:06 GMT -8
That 90 degree chisel is nice, but 3/8" is like 3 feet in HO. How does that help?
|
|
|
|
Post by Christian on Nov 2, 2023 8:10:29 GMT -8
On your 2nd point, I have this in my shopping cart at amazon.ca 3/8" is huge. The photo below is my chisel rack. I also have some pricy Hasegawa and Dspiae chisels not shown and not used for punching out holes. #1 is a chisel that I ground from a 16d nail set into a wooden doll head. #2 is a linoleum carving knife that I have used, maybe, once this century. #3 is like the chisel in your photo but each side of the cut is about 0.080" #s 4-9 are miniature wood carving chisels that my brother bought circa 1950. They have been sharpened many times through the years. They are nominally 1/4". I found sets on Amazon costing whatever you would like to pay. The Arkansas stone I use to sharpen them as well as sharpen my knife blades is way too expensive now. But there are plenty of alternatives. (Which are better - old habits die hard) Grit blocks, glass files, water stones, ceramic rods, and abrasive papers. #10 is an oddity that I use a lot. It is a burnisher tool used by cabinet makers for putting a burr on cabinet scrapers. It's a very hard piece of chrome steel. Again, not I tool I'd suggest running out to buy. The shank of a drill bit works just as well for modeling purposes. I use it to smooth etched parts and as part of the sharpening routine for some tools. Any time you need to press really hard and smooth.  |
|
|
|
Post by sd40dash2 on Nov 2, 2023 8:38:59 GMT -8
Yikes, thanks for the warning guys, I have removed that from the cart. For some reason I am having a hard time finding a tiny right angle square chisel that would lend itself to being hammered in .040 sides to more easily carve windows. I do have the exacto chisel blade but I don't think that's the best tool for this application. FYI I prefer to shop on amazon.ca if at all possible due to outrageous parcel shipping rates from most other vendors. Wish there was a smaller nibbler. I appreciate the input thus far!
|
|
|
|
Post by Christian on Nov 2, 2023 10:09:10 GMT -8
|
|
|
|
Post by sd40dash2 on Nov 2, 2023 10:16:04 GMT -8
^ Perfect, thanks very much, added to cart!
|
|
|
|
Post by Christian on Nov 2, 2023 10:17:08 GMT -8
|
|
|
|
Post by sd40dash2 on Nov 2, 2023 11:13:09 GMT -8
Are there any right angle corner chisels in the last two sets? I'm closely inspecting the photos and don't see one. The sets seem to have all the shapes except the right angle. I did find some of those but they were huge, like 1" and such, nothing small for HO windows. Even google isn't helping, seems this isn't my day.
|
|
|
|
Post by Christian on Nov 3, 2023 4:51:45 GMT -8
|
|
|
|
Post by sd40dash2 on Nov 3, 2023 15:31:29 GMT -8
This is a paper punch I found, not sure what the business end is made of, prod desc says it can make square holes in up to 8 sheets of paper at a time which is a bit short of the .040 styrene side thickness. Just not sure how effective this would be on styrene. Wish Micromark would bring back their 3/16" steel right angle punch tool.
|
|
|
|
Post by edgecrusher on Nov 6, 2023 13:52:47 GMT -8
I'm still really impressed with this project, especially having so many going at once. I lose my patients pretty quickly when I have to make multiples of anything. I have no doubt I'd be in debt for a laser if I was faced with a project like this. Keep up the great work.
|
|
|
|
Post by sd40dash2 on Nov 7, 2023 18:16:42 GMT -8
After scribing out the simulated plywood joints, this van will be ready for primer and paint.
|
|