|
|
Post by onequiknova on Mar 11, 2014 9:00:55 GMT -8
A future project of mine is to build Rock Island E6 #630. The project will involve designing some photo etch parts, but before I spend a bunch of time designing parts, I wanted to make sure I could fix the BLI windshields to my liking. Unlike their E7 and E8, BLI really blew the windshield area on their E6. The windshields on an E6 should be the same as the F units.   The BLI unit has a raised eyebrow, surprised look. The windshield post is a bit narrow as well. 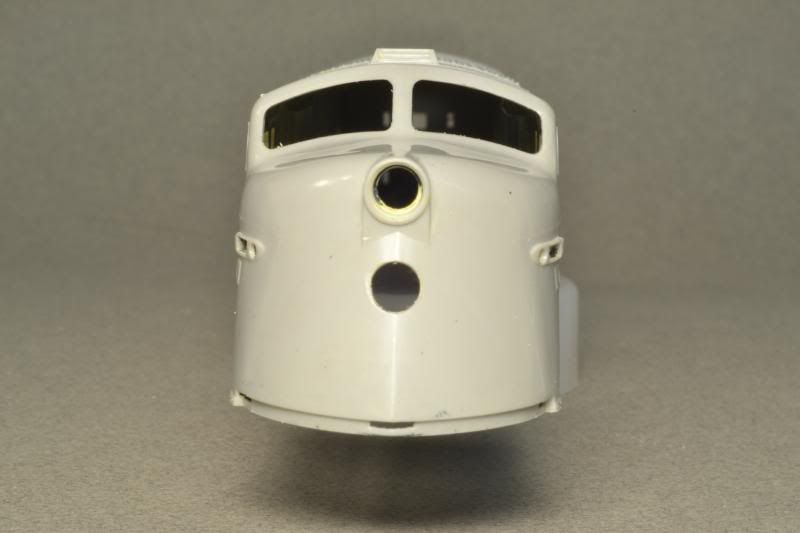 I borrowed a page from Donnell's BB F7 thread, and reshaped the windshield openings to fit Highliner windshield glass. First thing you need to do is fill in the original windshield openings and sand them flush. I like to give the area a coat of primer to be sure everything is smooth. 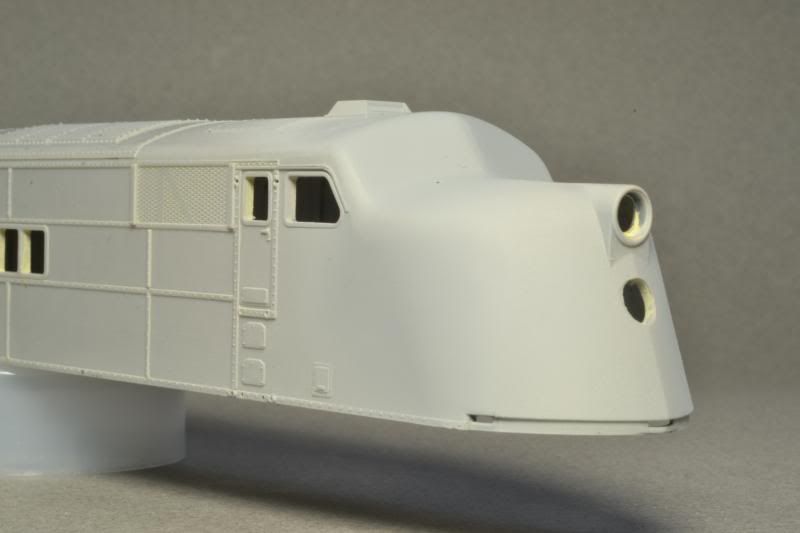 Note in this photo, the roof slopes upward from the pyramid shaped box toward the top of the windshield. This should be flat. I'll reshape this area later. 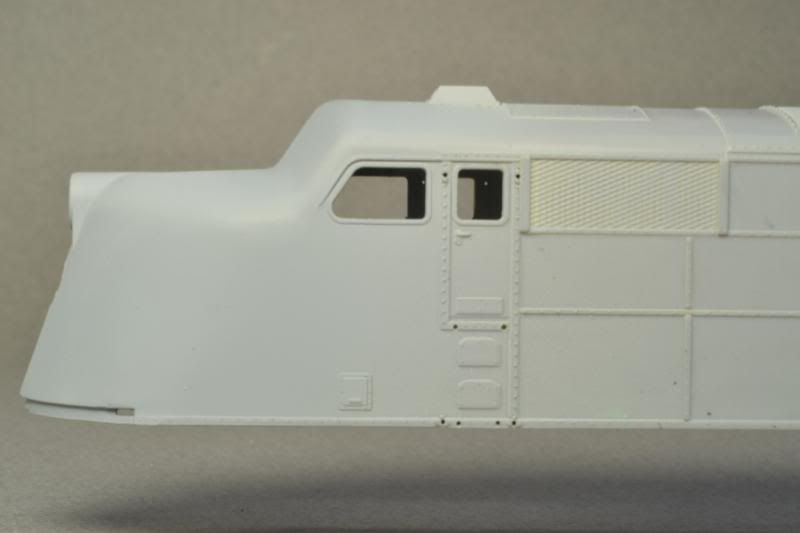 I used double sided tape to hold the Highliner glass to the shell while I traced them with a pencil. 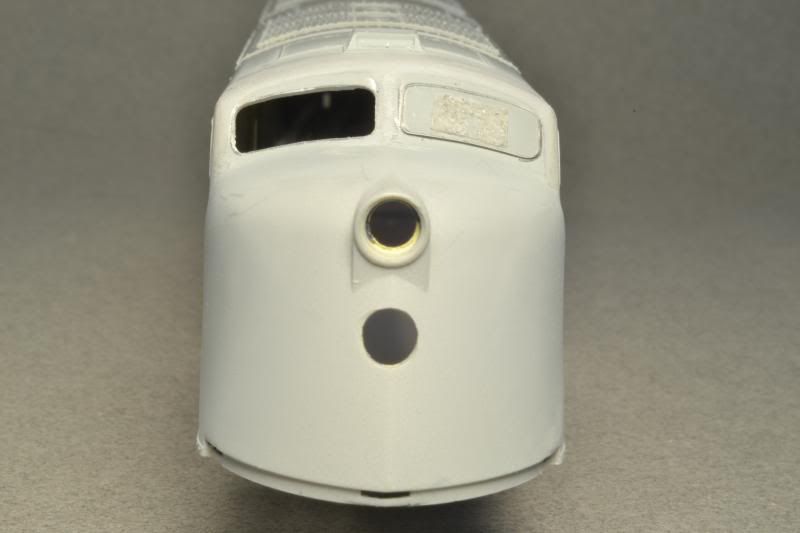 And the new openings. The number boards were carved from a BLI E7 nose and reshaped to fit the E6 nose. 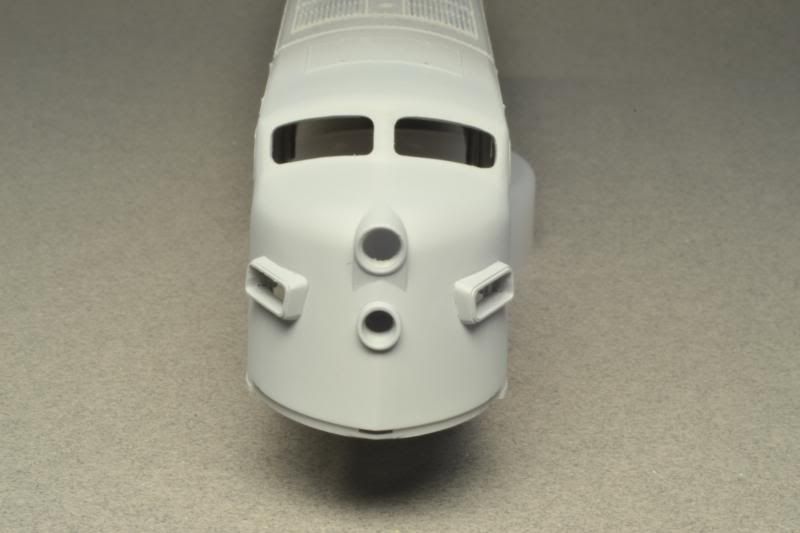 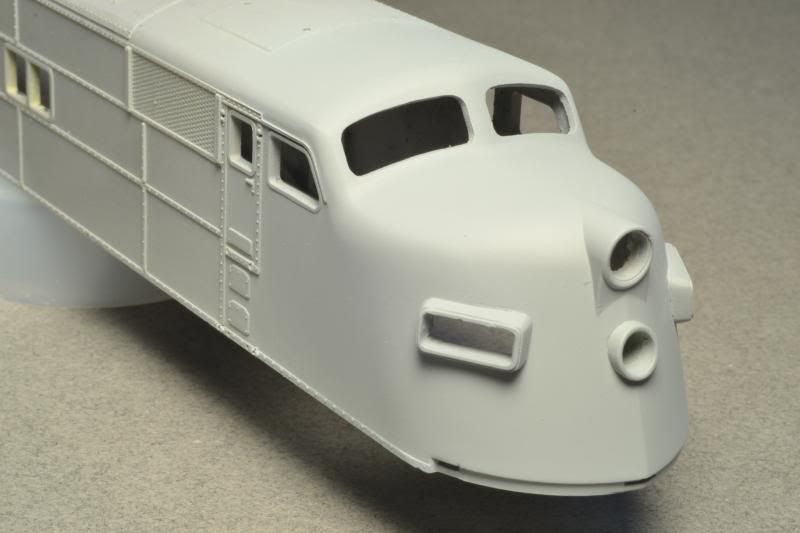 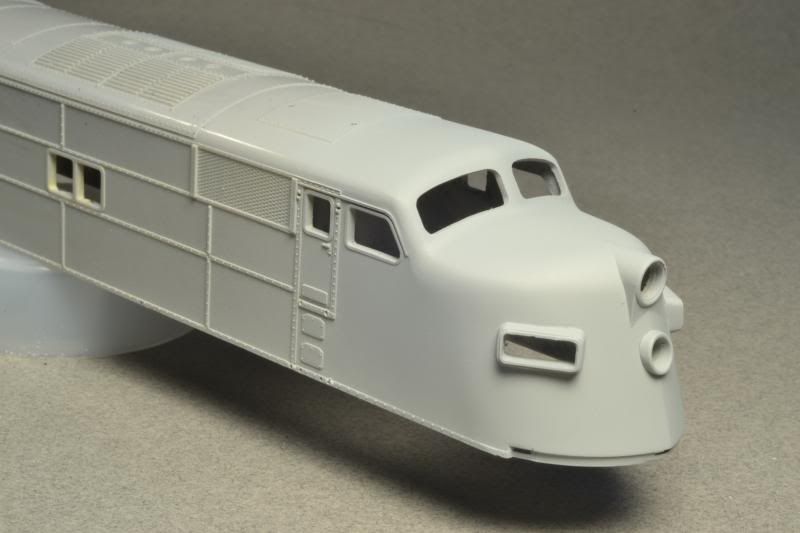 Note the roof has been flattened and the curve above the windshield has been softened. 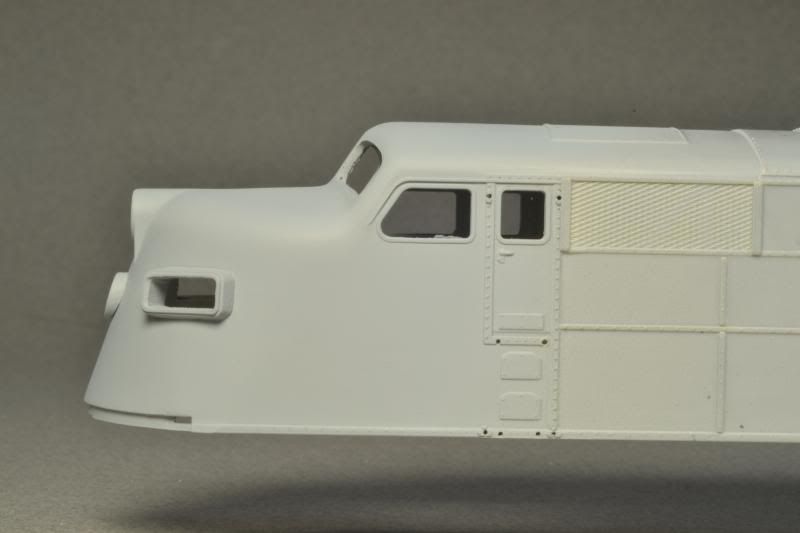 Original roof line. I'm still not 100% happy with it, but it's looking better. I think I need a little more shaping to the roof over the windshields. |
|
|
|
Post by kentuckysouthernrwy on Mar 11, 2014 10:02:55 GMT -8
Looks good so far, nice job on the windows.
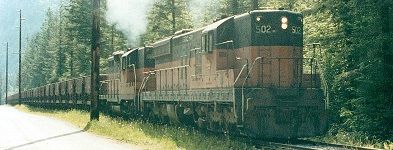
Nice shot of the Flexi-van operation in the first photo.
|
|
|
|
Post by buffalobill on Mar 11, 2014 10:22:26 GMT -8
John: You are getting to be quite the expert on EMD E unit nose jobs. Very nice.
Bill
|
|
|
|
Post by nebrzephyr on Mar 11, 2014 12:59:35 GMT -8
Outstanding job on everything!!! I've done a fair bit of kit bashing but I would never believe I could reshape those windows. Wow!!!
ob
|
|
|
|
Post by onequiknova on Mar 11, 2014 13:05:40 GMT -8
Thanks guys. I need to chamfer the edges of the windshield openings to get rid of that sharp edge. I forgot to do that before shooting the primer.
|
|
|
|
Post by princessofthecape on Mar 11, 2014 13:16:11 GMT -8
This is really excellent work.
|
|
|
|
Post by railthunder on Mar 11, 2014 14:24:32 GMT -8
I'm anxious to see how this turns out and so far the results look promising. I also have a pair of BLI E6As that are being held for future rebuild into SCL units. I noticed the windshield errors in both the BLI and the Proto units. I wound up buying a Proto E6 inexpensively to test ou the methods. I bought several of the Laser Kits that at the time were made for Athearn Blue Box F7A units. They had one kit that fixed the huge blue box windows with plugging them in. My thought was to plug and sand the BLI openings to get the right fit and look. Your approach looks equally encouraging.
|
|
|
|
Post by rockisland652 on Mar 11, 2014 14:29:49 GMT -8
Another project from The Master.
|
|
|
|
Post by onequiknova on Mar 11, 2014 14:34:10 GMT -8
Thanks guys.
This project won't be going much further until I get a few other projects finished. I just wanted to be sure I could fix the windshields.
|
|
|
|
Post by TBird1958 on Mar 11, 2014 15:59:29 GMT -8
Beautiful work, as always. Thank you for sharing!
|
|
|
|
Post by tankcarsrule on Mar 11, 2014 16:13:46 GMT -8
You sir, are a plastic surgeon!
Regards, Bobby
|
|
|
|
Post by rockisland652 on Mar 13, 2014 13:16:39 GMT -8
You sir, are a plastic surgeon! Regards, Bobby Nope. He puts on a clinic for ones who aspire to be. |
|
|
|
Post by bar on Mar 14, 2014 10:08:44 GMT -8
Ya know, cab unit noses that are off are like pornography -- we know it when we see it. To do beautiful work like that without a 3D example or drawing? Awesome!
|
|
|
|
Post by trebor on Mar 14, 2014 13:36:02 GMT -8
Oh bow and prEy to Altoona. I don't see flaws in commercial models usually until pointed out by yoooooooz guys.
I like your photos, but maybe at some point you can post a few shots of tour tools, equipment and work facility? I would remodel my garbage pile to suite.
|
|
|
|
Post by trebor on Mar 14, 2014 13:38:17 GMT -8
Ya know, cab unit noses that are off are like pornography -- we know it when we see it. To do beautiful work like that without a 3D example or drawing? Awesome! Well MP36's and all post F40PH noses ARE pornography! |
|
|
|
Post by onequiknova on Mar 14, 2014 17:25:06 GMT -8
Thanks guys. Trebor, My work space is nothing spectacular. 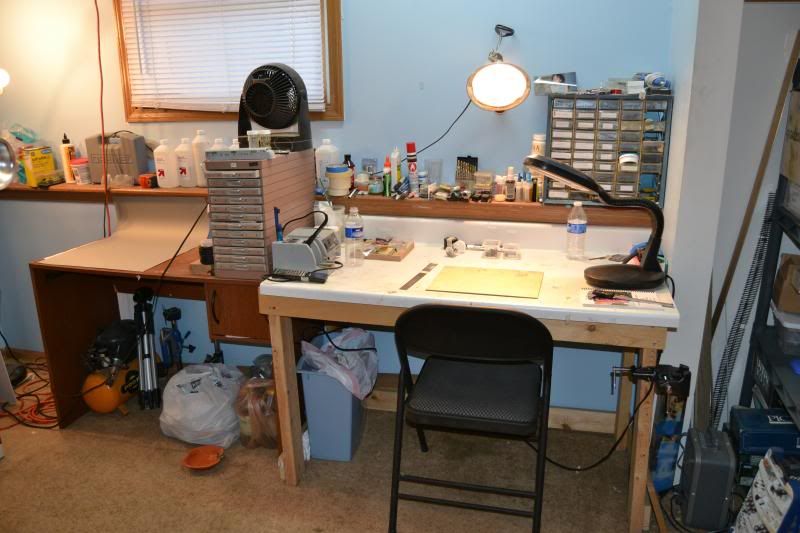 My tools are nothing out of the ordinary. Just basic hand tools like needle files and Xacto knives. I do most of my rough plastic cutting using a Dremel with a rotary file. These are some of my improvised sanding tools used on this project. 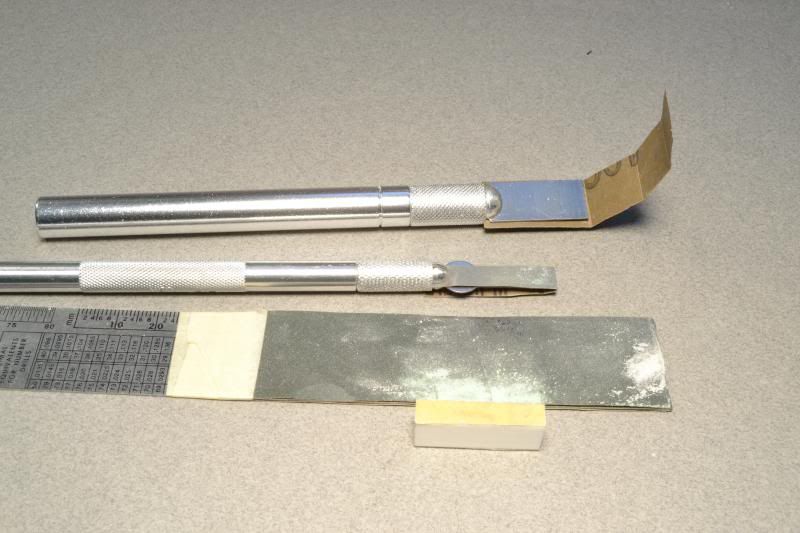 A pair of Xacto chisel blades with the edge dulled. I cut stripes of paper and lock one end in the handle along with the blade. Fold the paper over and hold the other side tight with your finger. As the paper wears, cut a length off the "locked" end of paper and repeat. The styrene block was made when I shaved the port holes from the side of my E7 project. It allows you to get right next to the batten strips without ruining them. It has 400 grit on one side and 600 on the other. The other "tool" is just my scale ruler with some paper folded over and taped. It's good for large areas like getting rid of the slope on the roof. After initial shaping with one of the tools above, I'll refine and smooth the curved surfaces using the tip of my finger with a piece of sand paper. The soft backing of my finger will knock down and smooth any ridges and jerkiness caused by shaping a curved surface with a flat object. Some times you don't need any tools. For instance, the 45 degree number boards were reshaped to fit the E6 nose by simply laying a piece of sand paper grit side up on the nose of the E6, then sanding the number boards up and dowm an the paper until a perfect fit is achieved. |
|
|
|
Post by mountaineer on Mar 14, 2015 14:01:57 GMT -8
A future project of mine is to build Rock Island E6 #630. The project will involve designing some photo etch parts, but before I spend a bunch of time designing parts, I wanted to make sure I could fix the BLI windshields to my liking. Unlike their E7 and E8, BLI really blew the windshield area on their E6. The windshields on an E6 should be the same as the F units. The BLI unit has a raised eyebrow, surprised look. The windshield post is a bit narrow as well. I borrowed a page from Donnell's BB F7 thread, and reshaped the windshield openings to fit Highliner windshield glass. First thing you need to do is fill in the original windshield openings and sand them flush. I like to give the area a coat of primer to be sure everything is smooth. Note in this photo, the roof slopes upward from the pyramid shaped box toward the top of the windshield. This should be flat. I'll reshape this area later. I used double sided tape to hold the Highliner glass to the shell while I traced them with a pencil. And the new openings. The number boards were carved from a BLI E7 nose and reshaped to fit the E6 nose. Note the roof has been flattened and the curve above the windshield has been softened. Original roof line. I'm still not 100% happy with it, but it's looking better. I think I need a little more shaping to the roof over the windshields. |
|
|
|
Post by bar on Mar 14, 2015 14:13:41 GMT -8
Impressive, the kind of artisanal handwork that has become a lost art for this hobby. And a nice change from the arguing over diesels and freight cars and ads masquerading as posts that dominate this board. Not that I'm complaining.
|
|
|
|
Post by mountaineer on Mar 14, 2015 14:39:10 GMT -8
A future project of mine is to build Rock Island E6 #630. The project will involve designing some photo etch parts, but before I spend a bunch of time designing parts, I wanted to make sure I could fix the BLI windshields to my liking. Unlike their E7 and E8, BLI really blew the windshield area on their E6. The windshields on an E6 should be the same as the F units. The BLI unit has a raised eyebrow, surprised look. The windshield post is a bit narrow as well. I borrowed a page from Donnell's BB F7 thread, and reshaped the windshield openings to fit Highliner windshield glass. First thing you need to do is fill in the original windshield openings and sand them flush. I like to give the area a coat of primer to be sure everything is smooth. Note in this photo, the roof slopes upward from the pyramid shaped box toward the top of the windshield. This should be flat. I'll reshape this area later. I used double sided tape to hold the Highliner glass to the shell while I traced them with a pencil. And the new openings. The number boards were carved from a BLI E7 nose and reshaped to fit the E6 nose. Note the roof has been flattened and the curve above the windshield has been softened. Original roof line. I'm still not 100% happy with it, but it's looking better. I think I need a little more shaping to the roof over the windshields. |
|
|
|
Post by mountaineer on Mar 14, 2015 14:46:50 GMT -8
Just stumbled on this thread. Excellent workmanship and your use of the Highliners windshields was the correct choice as they are dead-on. BUT The BLI windshield area is the actual problem here. There appears to be reasonably accurate "droop" and "rake" angles on the BLI E6 windshield area, but the sweep-back (as with the wings of a passenger jet) is hopelessly inadequate making the thing appear too "flat faced." About 10 years ago and just for grins, I modified a P2K Slant-Nosed E6 (more "needle nosed" is that model!) by filling the "cheeks" area with JB Weld and the grafting of a Highliners F Unit windshield area itself. Someone on here said the E's and F's windshields were not the same. Well they were up until the Phase II F7 which had the surrounding area about the windshields slightly change for an external gasket. But up until then they were the same stamped components from 1937! Rather crude and blotched in unpainted form with equally crude low resolution images, but that said here's what it looks like:   Kind of gets the "feel" of the original in my view! Perhaps something you might want to consider ?? |
|
|
|
Post by onequiknova on Mar 14, 2015 19:28:19 GMT -8
I noticed the lack of sweep you mentioned after I did the windshields. The BLI also suffers from the thin cheeks you mentioned. I think BLI just coppied the poorly done Proto nose. Whenever I get around to building this E6, I planned to do just what you did by splicing on the front of a Highliner cab and building up the cheeks somehow.
|
|
|
|
Post by WP 257 on Mar 14, 2015 19:44:03 GMT -8
Wow. Ok, the work looks really really nice, but this is way more than I'd ever want to begin to get into. (Have tried heavily kitbashing my own Reading gondolas and was not happy with the results, so I just don't do this stuff.)
|
|
|
|
Post by stevef45 on Mar 14, 2015 22:12:40 GMT -8
impressive stuff. to my untrained eye, it looks like there is still a bit of a hump on the roof by the windshield line.
|
|
|
|
Post by buffalobill on Mar 15, 2015 4:07:39 GMT -8
John; really nice start on the E-6 modifications. I am not sure I would bother with the Highliner windshield graft. With all of the Rock Island's safety appliances, and modifications, the windshield/nose is busy enough you don't notice the issues. Bye the way nice graft job on the number boards. This will turn into another of your works of art.
Bill
|
|
|
|
Post by mountaineer on Mar 15, 2015 8:51:56 GMT -8
impressive stuff. to my untrained eye, it looks like there is still a bit of a hump on the roof by the windshield line. As the late great Marty Feldman said: "What hump?" Lol, no, there's no hump as it's been block sanded to the precise roof contour which was virtually the same regardless. There really isn't too much work to doing this, just the guts really to attack an expensive model with a razor saw. That said, I have ordered a BLI Undec in H0 from Wm K. and will do the same once again, as I have an idea for an almost "unknown" E6 paint scheme and radical B Unit to go behind it, hopefully for an upcoming magazine article. I have 2 unpublished original color shots taken back in 1939 already in my collection to do this one up right! |
|
|
|
Post by mountaineer on Mar 15, 2015 9:30:04 GMT -8
John; really nice start on the E-6 modifications. I am not sure I would bother with the Highliner windshield graft. With all of the Rock Island's safety appliances, and modifications, the windshield/nose is busy enough you don't notice the issues. Bye the way nice graft job on the number boards. This will turn into another of your works of art. Bill Sorry Bill, but sincerely, I cannot agree with your comment. What would then be the point of doing what we are doing here? I have been at this sort of stuff, what I describe as serious modeling for almost 50 years now. Over that time and in my view, there has evolved an unfortunately detrimental misconception about the best way in which to approach doing a truly convincing model, of any given subject matter. To my mind it goes like this: Correct Form and contour are visible from a great many feet away, while when viewed from that same distance, a myriad of details adds nothing to improve the appearance but adds clutter, period. Therefore, the objectively best approach to doing a model is to very accurately render the contours and overall shape and only then add the necessary detail to this essentially convincing basic form. For example: Many years ago one of the airplane plastic magazines showed an insanely super-ultra detailed 1:24 (BIG) P51 Mustang model done from a British Airfix kit. So I went out and bought one I found on sale. Opened the box looked at it and found the wing which was extremely thin looking on the prototype P51 was about 1/4" actual too thick! It was the very same with the fuselage. So out came the X-Acto and I sliced away and away and away..... until I got really tired of working on it, so it all stopped there at that point. BUT, what I had at that point in time, even when viewed from across a room was absolutely a real P51! That super-ultra detailed model in the magazine, was covered inside and out (even inside the spinner!) with an incredible amount of "jewelry" or to others, "junk," but it looked like nothing more than a caricature of a P51 from a given distance with tons of clutter. I'd imagine your comment is really coming from the point of view of the anxiety of messing up an expensive model such as one of these Chinese made "E6's." That 's the reason I never bought one of these BLI E6's before, but hey... it really isn't all that tough to do what I did on that P2K E6 and I do love the original slant nose look, which has truly only been captured by the now defunct and astronomically priced "Railway Classics" E3, 4's and 6's in brass. Out of my budget to be sure so ; Here I Go! |
|
|
|
Post by mountaineer on Mar 15, 2015 9:51:14 GMT -8
Wow. Ok, the work looks really really nice, but this is way more than I'd ever want to begin to get into. (Have tried heavily kitbashing my own Reading gondolas and was not happy with the results, so I just don't do this stuff.) I'd just run the BLI engines and be happy. As I said with Buffalo Bill, what's the real point of all this? The windshields of an E or an F are "the eye's" of the carbody "face." One's own eyes therefore go right to those windshield's contours and their either correct or incorrect rendering. On the BLI E6 out of the box, those windshields simply put, are actually very toy-like, far more of a caricature and not at all an accurately scaled model. I actually find the nose painful to look at as a result. This is especially the case when running any plastic E6 along side my Athearn Genesis purple ACL F-2s, equipped with the smaller early number boards and what with the truly perfectly rendered nose on that one, (those are Highliners shells remember.) So once again, this comes down to No Guts, No Glory. (A book on Combat flying F86's over Korea, By Boots Blessy) |
|
|
|
Post by WP 257 on Mar 15, 2015 11:38:55 GMT -8
deleted
|
|
|
|
Post by rockisland652 on Mar 15, 2015 19:10:04 GMT -8
The craftsmen of EMD had several engineering marks that they had to hit in order for the bulldog cabs produced at other locations to fit onto the frame. I have seen photos of bulldog cabs lined up at Plant 2 in Chicago where they were made. The F unit tribute in Classic Trains show how the cabs and frame came together. They were remarkably consistent.
And, yes, the Highliner F puts about all others in second place. That is not even debatable.
|
|
|
|
Post by Great-Northern-Willmar Div on Mar 15, 2015 20:06:27 GMT -8
The craftsmen of EMD had several engineering marks that they had to hit in order for the bulldog cabs produced at other locations to fit onto the frame. I have seen photos of bulldog cabs lined up at Plant 2 in Chicago where they were made. The F unit tribute in Classic Trains show how the cabs and frame came together. They were remarkably consistent. And, yes, the Highliner F puts about all others in second place. That is not even debatable. As a former working member at IRM, I know you could have taken the windshield glass out of the E5A and put it in the E9A or the F7A or FP7A. Those windshield openings were as close to exact as possible. There are modelers like John(onequiknova) who are not satisfied with "close enough or good enough". They get a tremendous mount of satisfaction out of the hobby of model railroading in accurately reproducing the prototype in HO scale. If this means rebuilding noses to achieve complete accuracy this is what they will do. In plain simple words, these modelers really sweat the details. |
|