|
|
Post by fr8kar on Nov 17, 2014 13:46:00 GMT -8
The recent Accurail PS 4750cf covered hopper announcement has sure stirred up some good discussion. In this age of super-detailed, fragile and expensive made-in-China ready-to-run freight cars, the Accurail 4750 proves there is still a place for moderately-detailed, inexpensive cars and that even when they are manufactured in North America the price can still be competitive. Moreover, the Accurail 4750 is nicely proportioned and with a little work, can improved to look at home with the more expensive super-detailed cars from Exactrail, Athearn and Tangent. The same can be said of the longtime Accurail staple, the ACF 4600cf covered hopper. Like the new 4750, the 4600 captures the look of the prototype with crisp tooling. The handholds are molded on the body and the ladder rungs are cast thick like old Athearn blue box and MDC Roundhouse shake-the-box kits from years ago. The roofwalk is also molded as part of the body, and although it isn't see-through like photoetched metal roofwalks on today's models, it isn't so thick as to be a distraction. However, Plano Model Products makes photoetched roofwalks for those who wish to replace them. Each time a new model is announced, there is always the chorus of modelers lamenting their choice not being the one selected (guilty as charged!). The ACF 4600cf covered hopper is one that's commonly mentioned at such times. Personally, I'd rather see a model we don't have at all - like a 70s or 80s era carbon black hopper, for example - since Accurail's model can serve as a good starting point to make some variations of the prototype. So, I'd like this thread to be a place to discuss ways to improve the Accurail ACF 4600 and a place to show off your efforts with this model. For my part, I have two that I've upgraded in the past and three that are on the bench now. First, here's one that's basically stock other than the ladder rungs and handholds. I replaced the handholds with Detail Associates parts and the ladder rungs with 0.010" diameter styrene rod. This is the first Accurail 4600 I ever bought and one of the first cars I ever weathered. It must be at least twenty years old by now: 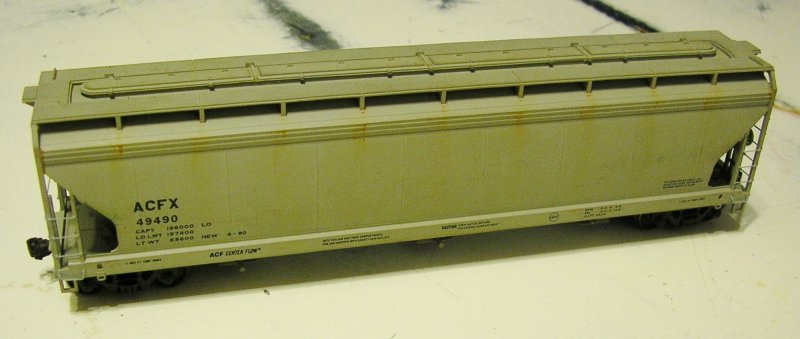 Here's a detail of the ladder rungs, which have been painted but not weathered to match the rest of the car (yet): 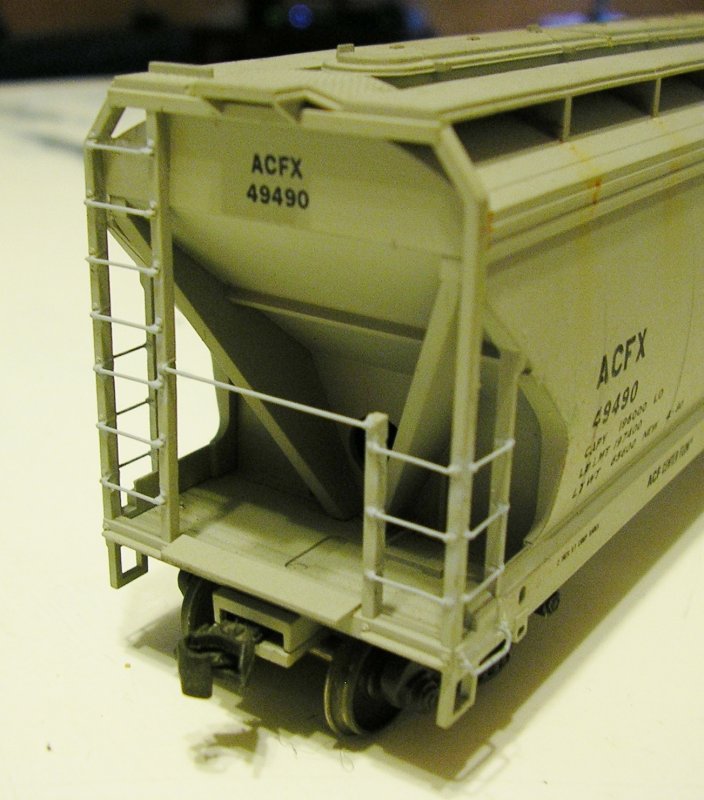 Here is another Accurail 4600, but this one got the Plano roofwalk along with the ladder rung treatment:  Naturally, only after I finished the model did I learn these prototypes had the Apex roofwalk pattern instead of the Morton round hole pattern (tsk, tsk...): 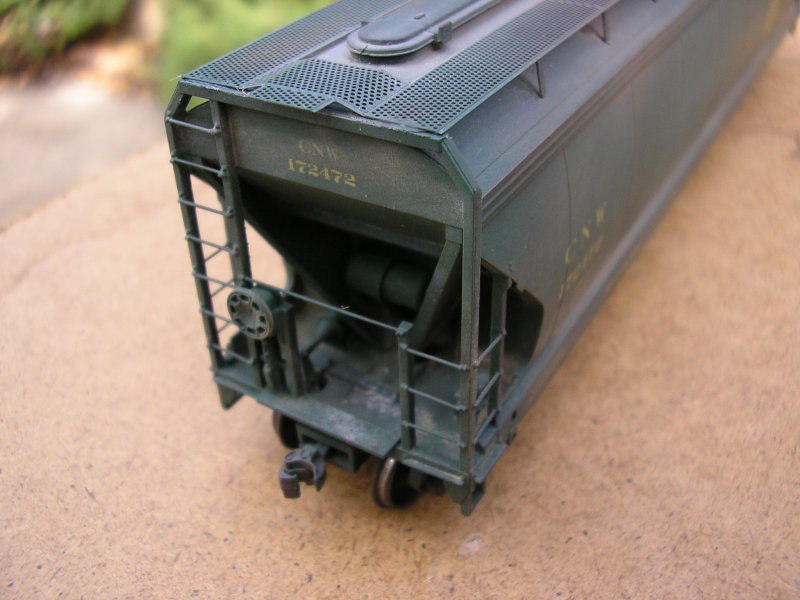 One of the biggest complaints about the roofwalk on these is how difficult it is to remove. It's actually not that bad; the majority of it comes off with some flush-cutting nippers, but you'll need a file and some patience to get rid of it over the ends. Here's a shot of a factory painted model that I've just recently performed surgery on: 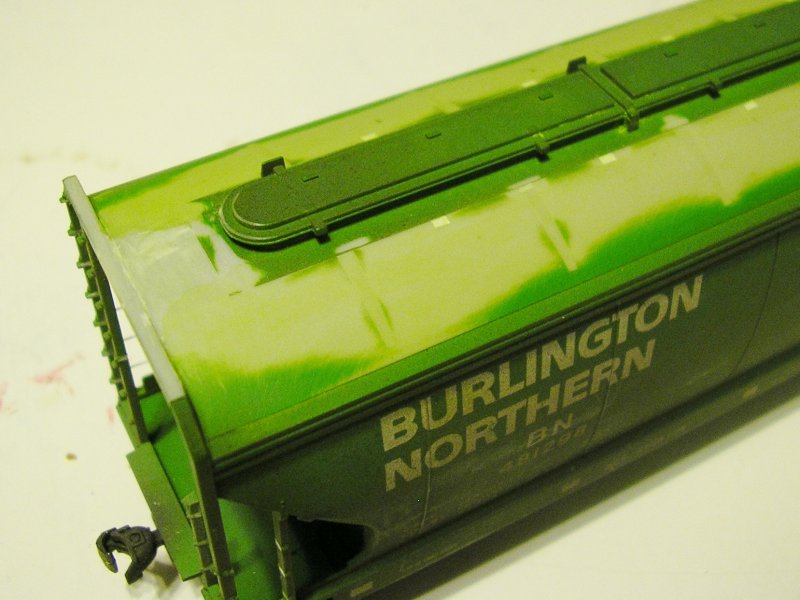 You can see where the vertical supports were along the length of the roof and the little nubs near the trough hatch located between each set of vertical supports. Those were the easy parts to nip off. The ends where the gray plastic is visible along the top of the end cage and the top of the roof are the only places where you have to file the carbody to shape. It's not a difficult task, but you have to be patient and clean your file regularly. You don't want to push hard and get too aggressive, either, since once you get going it comes off quickly. I stop and check the shape regularly when I'm doing this part to ensure I don't go too far: Here is another view of a different car: 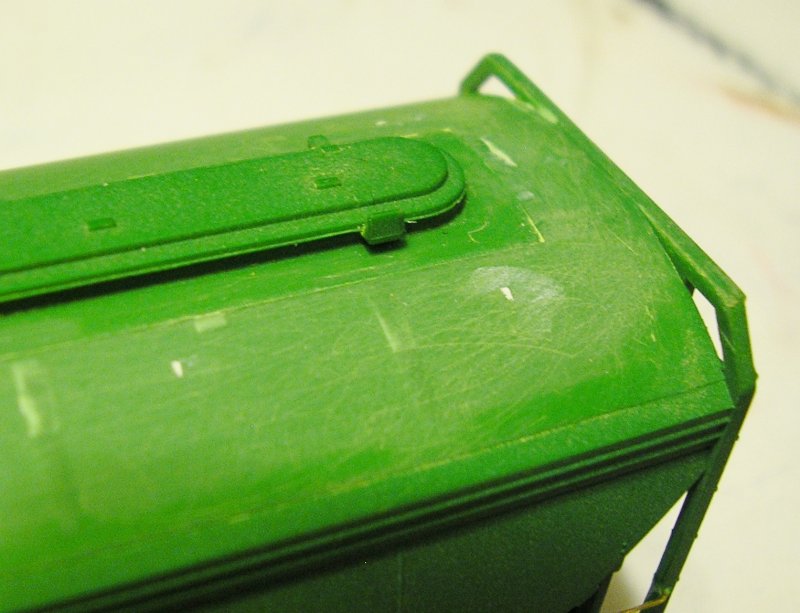 So far all these cars have been improvements on the prototype Accurail chose for their model, a post-71 prototype with a pair of stiffening ribs near the roof. The early cars have a single stiffening rib a little lower on the carbody side and the panel with the two stiffening ribs on later cars is shaped a little differently:  The upper panel has been reshaped with a chisel blade and a lot of scraping. The new stiffening rib is 0.030" triangular styrene rod. This view shows how the weld seams have been removed as well as the new stamped trough hatches (a drop-in fit from an Athearn RTR FMC 4700cf covered hopper; formerly the same model by MDC Roundhouse): 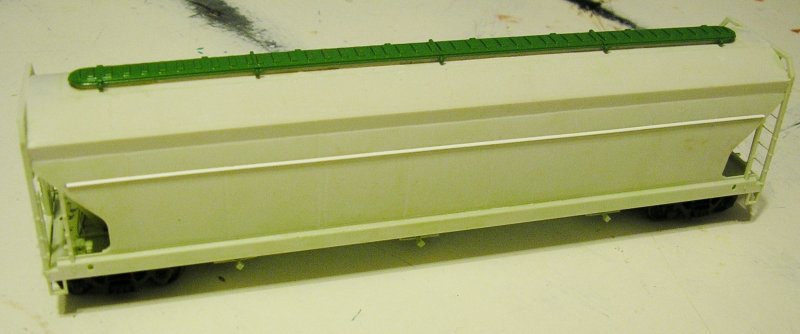 Well, that's all I have for now, but I'll update the thread as I add roofwalks and finish installing more ladder rungs. Feel free to add your own photos and descriptions of work you've done to the Accurail 4600. |
|
|
|
Post by nebrzephyr on Nov 17, 2014 16:08:31 GMT -8
fr8kar......thanks for sharing your mods. I'll anxiously look forward to your updates. Bob
|
|
|
|
Post by TBird1958 on Nov 17, 2014 17:32:37 GMT -8
Looks great so far! Very inspiring.
|
|
|
|
Post by atsfan on Nov 17, 2014 17:39:18 GMT -8
I hacked at one and didn't have good luck with nippers for the roof walks
Yours look nice.
|
|
|
|
Post by catt on Nov 17, 2014 17:47:51 GMT -8
Nice work,I really like the ladder rungs that is something that can be used on a lot of other covered hoppers too.What I want to know is how do you keep the new ones lined up while the glue is setting up.A start to finish how to would certainly be helpful and appreciated.
|
|
|
|
Post by fr8kar on Nov 17, 2014 18:11:46 GMT -8
Thanks for the positive feedback, everyone.
atsfan, I get the majority of the material off with the nippers, but use an X-acto chisel blade (without the handle - I never use the handle with a chisel blade) to do the clean up work. I get it as close as I can to completely flush before sanding to avoid taking unintended material off the surrounding part.
Johnathan, are you asking how the ladder rungs stay lined up? I use Tamiya Extra Thin cement, which dries very quickly. I cut each rung just a wee bit long and use the cement to melt the end into place on one end (about 15 seconds). Then I position the other end of the new rung in place and apply cement there. After another 15 seconds I stretch the rung away from the first joint pushing it toward the second joint. It sounds a little weird, but after doing it a hundred times you figure it out! By the time I've moved to the next rung, the previous one is dry.
|
|
|
|
Post by lvrr325 on Nov 18, 2014 0:00:51 GMT -8
I still sell a fair amount of the older kits. And a fair amount of the Accurail and Bowser. Not going to get rich off them, but I wish I could get more.
|
|
|
|
Post by drolsen on Nov 18, 2014 6:42:59 GMT -8
Ryan, those models look great. Thanks for starting this thread. I was going to bring up the topic of a future ACF 4600 model, and why I'd like to see Tangent produce it, but I don't want to derail this discussion, so I'll talk about modeling. I started working on one of these cars several years ago following Ken Edmier's excellent 2-part article in the April and May 2006 issues of Model Railroading (I still miss that magazine). His approach is a lot of work - it involves combining the parts (end cages and hopper bays) from an Intermountain ACF 4650 to upgrade the Accurail model. I think the hopper bay substitution is a little too much work, but the thinner end cages are a nice improvement. However, I'm going to attempt to use the cages and ladders from an extra Athearn ACF 2790 on mine, which is handy because it comes with its own grab irons. I made quick work of the side walkways by cutting first right under the running boards with a pair of Xuron rail nippers (an old beat up set). They don't quite reach all the way, so I completed the cut with a chisel blade. A couple more cuts at the ends of the sides with the rail nippers separates the side running boards. After that, I use a larger pair of curved toenail clippers to snip off the remains of the running board supports. They match the curve of the roof almost perfectly, leaving only a little bit of material to remove with the chisel blade. The ends of the walkway are a lot more work, as Ryan described. The one other thing I have to add is that, according to Ken Edmier, the model should not actually have the raised area underneath the roof hatches. This was apparently added to make the hatches line up with the overly thick molded running boards. When I was preparing to install the Plano walkway, I looked at that and asked Ken about it. Since the Plano parts are thinner and sit lower, he advised me to lower the hatches by shaving off the raised section molded into the roof and removing the corresponding spacer on the underside of the hatches. That kind of held up my project when I went back to do that, so I haven't gotten to the point of installing the walkways yet. Edit: Here are some photos of the CSX hopper I'm modeling that show how the roof hatches sit down a little lower on the roof: CSXT 247396: drolsen.rrpicturearchives.net/rsPicture.aspx?id=584959I wish I could share some model photos, but I'm deployed again and don't have my models here. If this discussion is still going on in a few months, I'll try to share some photos when I get home. Dave |
|
|
|
Post by fr8kar on Nov 18, 2014 8:12:04 GMT -8
Thank you, Dave. I remember you mentioning you'd like to start a thread and I figured your deployment would play a role in how much you could share. You are one of the modelers I had in mind when I said I'd like to see others participate in the build-show-and-tell part of this thread. Just to make sure this thread is still around, I'll save starting the CB&Q car with the high handbrake until you return.  I have been corresponding with another modeler who referenced the Ken Edmier article, although I haven't seen it myself. I wasn't aware of the issue with the hatches, so thanks for pointing that out; it sounds like a pretty easy problem to correct. But using the hopper bays from the Intermountain model was a little more than I wanted to do. Part of my goal here is to see what can be preserved and worked with on the original Accurail model. That approach ties in with what I do with the end cages. I've also heard about using the end cages from the Athearn two-bay car, but the last time I checked they were a little pricey, especially when you have a bunch of these to do. If the cost isn't too much of an issue, they are certainly a big improvement to the model's appearance. My approach of replacing just the rungs is an evolution from an earlier trick I'd been using for years on other cars from Athearn blue box to the recent Trainman Thrall 4750 hoppers: that is, thinning the end cages by gently carving away excess material with a sharp no. 11 blade. This Athearn blue box 4740 shows the results of carving down the heavy end cage: 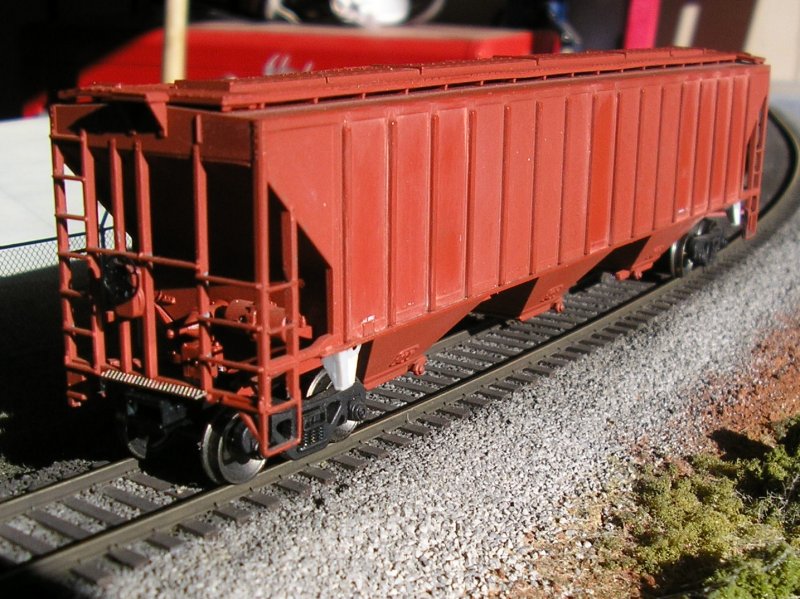 The trouble with this technique - apart from it being very easy to make a mistake and take off too much material - is that you really can't get all the excess material off. Removing the rungs and working the vertical parts thinner from the inside of the cage is much more effective and gets you in the same ballpark as a replacement end cage. Of course, it is a lot of tedious work, but that's part of what I enjoy about these upgrade projects. |
|
|
|
Post by buffalobill on Nov 18, 2014 8:16:33 GMT -8
Ryan: Really nice job on the Accurail 4600's. I did a couple with Plano roof walks a few years ago, but have not tried the Ladder upgrades. I never contemplated replacing them with the Intermountain end cages like the article Dave mentioned. I did upgrade an Athearn 5250 Center Flow with Front Range end cages, and Plano roof walks a bunch of years ago. Just doing the integrated roof walks on the Accurail car were enough of a hassle. Your technique using styrene rod to replace the cast on ladder rungs and details is very interesting. I might just screw up my courage and try one.
I also liked your modifications on the pre 1971 car. It is interesting to see your methods.
I think for a common car, like the Pullman PS2 3 Bays, and the ACF's there is room for both a Detailed model, Tangent, Exact Rail, Athearn etc. and a less Detailed model like the Accurail or the legacy kits in the marketplace. Though I would agree with an earlier comment that there are a number of other Prototype cover hopper cars that are out there that could be done, the Ingalls and Portec cars for example. We will see if anyone decides to do a high end 4600 or 5250, or one of the oddball grain cars. We can hope.
Bill
|
|
|
|
Post by drolsen on Nov 18, 2014 9:25:16 GMT -8
Thank you, Dave. I remember you mentioning you'd like to start a thread and I figured your deployment would play a role in how much you could share. You are one of the modelers I had in mind when I said I'd like to see others participate in the build-show-and-tell part of this thread. Just to make sure this thread is still around, I'll save starting the CB&Q car with the high handbrake until you return. Thanks a lot - I'm definitely interested in early ACF 4600s too - I want to model one of the ex-C&O cars with tall side ladders and high brake wheels. I picked up a couple of the undec Athearn cars for a good deal, and I ended up with more of them than I'll ever use anyway, so I'll probably sacrifice a couple of them. I'm going to see if there's anything else I can do with the body shells in terms of modeling other ACF prototype too. However, my main thought process is that it takes me so long to kitbash a model like this that someone will undoubtedly produce a high-quality ACF 4600 model before I get more than one or two of them finished! I definitely agree on the hopper bays after going through the trouble of doing the Intermountain / Accurail kitbash. It looks nice, but you'll never really see the detail underneath. I'm more interested now in trying to figure out how to model the bolt-on discharge hatches that many CSX hoppers are equipped with (possibly with Atlas ACF 4650 parts): CSXT 246770: drolsen.rrpicturearchives.net/showPicture.aspx?id=1746519Dave |
|
|
|
Post by drolsen on Nov 18, 2014 9:28:00 GMT -8
Bill, I would definitely love to see models of some of those other 4750 prototypes. I think the only drawback though is that there are more potential ACF 4600 roadnames and paint schemes than all those other variants combined, so a manufacturer is more likely to choose to make a new version of that model than one of those others (kind of like Tangent did with the PS 4750). Here's hoping, though!
Dave
|
|
|
|
Post by buffalobill on Nov 18, 2014 11:50:05 GMT -8
Dave: I wholeheartedly agree, a high end ACF 4600 is one car I would definitely like to see produced, in at least two versions, pre and post 1971. The ACF 5250 is another high volume car that we could us a decent model of. Likewise the GATX 4180 CF Airslide. All of these have been done before, 21 to 46 years ago. But the older die work is somewhat lacking in this day and age. Same with a later 80's Trinity 4750 for BN and CSX. I know everyone is not up for $40 plus covered hoppers, but I am taking the fewer- better cars, rather that more of mediocre path. I have been dumping older cars and reinvesting in newer, more detailed cars for a couple of years. I am aware of the three foot rule, but my layout, when it gets built, will end up showcasing the equipment, so that's where my money is going.
Bill.
|
|
|
|
Post by catt on Nov 18, 2014 13:01:22 GMT -8
If I might slide in a trainset covered hopper here and ask for some suggestions.This is one of my TYCO cars I like how it has turned out so far with the only mod being body mount couplers.I do plan on doing the ladder rung replacement at a later date ,but what I am looking for is some ideas on adding a lower rung on the stirrups with out performing major surgery.

|
|
|
|
Post by tom on Nov 18, 2014 13:36:23 GMT -8
|
|
|
|
Post by fr8kar on Nov 18, 2014 13:43:18 GMT -8
Johnathan, I'd use the extras that come with the undecorated Tangent kits to add those stirrups. You get two options with each kit, so each kit has a leftover set of the style you didn't use. Plus, you get to build a great kit! If you keep an eye out, you can find them for less than retail from time to time. I bought a bunch of them from somebody who figured out quickly he was more interested in buying the RTR version than building the kit (I can relate sometimes!).
Speaking of Tangent and other high quality RTR models, I agree: we need a good quality version of the ACF 4600cf and 5250cf covered hoppers in early and late versions. I'd probably still do this kind of work on the cars I already have, but going forward I'd reward any manufacturer who stepped up to the plate with a high quality RTR version with several purchases.
|
|
|
|
Post by SCL618 on Nov 19, 2014 11:57:13 GMT -8
That approach ties in with what I do with the end cages. I've also heard about using the end cages from the Athearn two-bay car, but the last time I checked they were a little pricey, especially when you have a bunch of these to do. If the cost isn't too much of an issue, they are certainly a big improvement to the model's appearance. The trouble with this technique - apart from it being very easy to make a mistake and take off too much material - is that you really can't get all the excess material off. Removing the rungs and working the vertical parts thinner from the inside of the cage is much more effective and gets you in the same ballpark as a replacement end cage. Of course, it is a lot of tedious work, but that's part of what I enjoy about these upgrade projects. If you can locate Detail Associates 6431 End Frame & Ladders ACF Center Flow Covered Hopper, it may be a good alternative to the Athearn parts. The difficulty is determining if these are built for the lower Plate B 4600 vs. the taller Plate C 4650. I am definitely interested in seeing your work as it'll serve as motivation to get a 4600 on my roster in L&N colors. Thankfully, Microscale now has appropriate decals for nearly all varieties of modern L&N covered hoppers which makes the task much easier. L&N 241213L&N 241495L&N 241783L&N 241791In looking at several of these photos, I am struggling with how to construct the reinforced jacking pad and webbing to service the trucks. Plano offers nothing like it and it appears to be an early phase feature, as some of the later 4600s do not have this detail. Some interesting 4600 cuft covered hopper notes from my files: All cars built through 1968 have truck mounted brakes Post-'68 built cars have either truck of body mounted cylinders Cars built before September 1966 have full height side ladders and high mounted brake wheel Post-'66 cars have partial side ladders and a low brake wheel 4600s built through 1971 have prominent angle rib stiffner running the length of the car side When initially constructed the carsides were composed of two long steel sheets, plus the cut out end panels, although 5 steel sheets were used on some cars built in 1971 Beginning in 1972, the sides were fabricated from 6' wide steel sheets and the angle rib stiffner was eliminated and replaced with the beading ACF 4600s feature 7 side panels plus the end sheets The 9 running board supports on the Accurail model are typical of cars built in 1975, while earlier cars utilized 13 running board supports All 4600s utilize straight gravity or gravity-pnuematic outlets Most cars utilized a long continuous hatch, though some were constructed with six 30" round hatches, and others utilized three separate hatches as repairs were needed |
|
|
|
Post by catt on Nov 20, 2014 11:55:58 GMT -8
One of my GVR,ACF 4600s. car at this point is straight from the box except for the decals by Highball Graphics.I am currently working up a upgrade plan inspired by this thread.   |
|
|
|
Post by fr8kar on Nov 20, 2014 13:46:46 GMT -8
Looking forward to it, Johnathan!
I got the grit blasting done on the two factory painted BN cars shown above. It shouldn't be longer and I'll have enough work done on them to warrant some photos. I am running low on 0.010" styrene rod, but another shipment is on its way. Hopefully by Monday I'll be getting some real work done.
I don't know that it warrants its own thread, but I've done some similar upgrades to the old MDC Roundhouse FMC 4700, trying to make it compare favorably to the Athearn RTR version. The ladder rung upgrade looks even better on that car. Maybe I'll show it off on Sunday...
|
|
|
|
Post by scl1234 on Nov 20, 2014 13:49:25 GMT -8
I wonder whether the height of the Accurail model is prototypically accurate for an ACF 4600 (Plate B) or whether the height is more correct for the ACF 4650 (Plate C). I don't trust the "Plate C" paint/decal that Accurail applies to some of these cars.
Has anyone measured one?
|
|
|
|
Post by Spikre on Nov 20, 2014 14:41:53 GMT -8
the CF4600 is Lower and Longer than the CF4650. the Accu-Rail CF4600M should be close to the correct length and height. put one next to an Atlas or IMRC CF4650M for a comparison. Spikre 
|
|
|
|
Post by jbilbrey on Nov 20, 2014 17:33:58 GMT -8
I wonder whether the height of the Accurail model is prototypically accurate for an ACF 4600 (Plate B) or whether the height is more correct for the ACF 4650 (Plate C). I don't trust the "Plate C" paint/decal that Accurail applies to some of these cars. Has anyone measured one? While I am a fan of Accurail, I will be one of the first to tell anyone that they use a bit of "creative license" when it comes to them choosing the paint schemes for their various cars. Here is a good example: Accurail's [..CSX..] HopperPrototype [..CSX..] HopperI typically try to match their models' paint and lettering with the prototype before purchasing the kit to avoid surprises such as above. James Bilbrey LaVergne, TN |
|
|
|
Post by Spikre on Nov 20, 2014 18:40:35 GMT -8
James, sure that CSX had a number of slightly to majorly different schemes on their CF 4600 cars. so by chance ,,Accu-Rail should get close to at least 1 scheme ? Spikre 
|
|
|
|
Post by jbilbrey on Nov 20, 2014 19:24:29 GMT -8
Spikre,
Correct. I have two more Accurail 4600's in CSX paint that are much closer to the prototypes. One differs from the prototype only in the spacing of the roofwalk supports. The nice thing is that Accurail didn't just change the roadnumbers between the two runs. There are variations in the placement of the logo, the size of the reporting marks etc. AFAIK (and this is a big IF), none of the 4600's were painted into the "Grain Express" scheme, and I have not seen any examples wearing the boxcar logo, yet.
James Bilbrey LaVergne, TN |
|
|
|
Post by catt on Nov 21, 2014 5:17:19 GMT -8
Please do I have several of these cars too.As for the .010 rod I need to get some but the way the weather is right now I can wait.
|
|
|
|
Post by fr8kar on Nov 24, 2014 11:31:28 GMT -8
I did a little grit blasting: 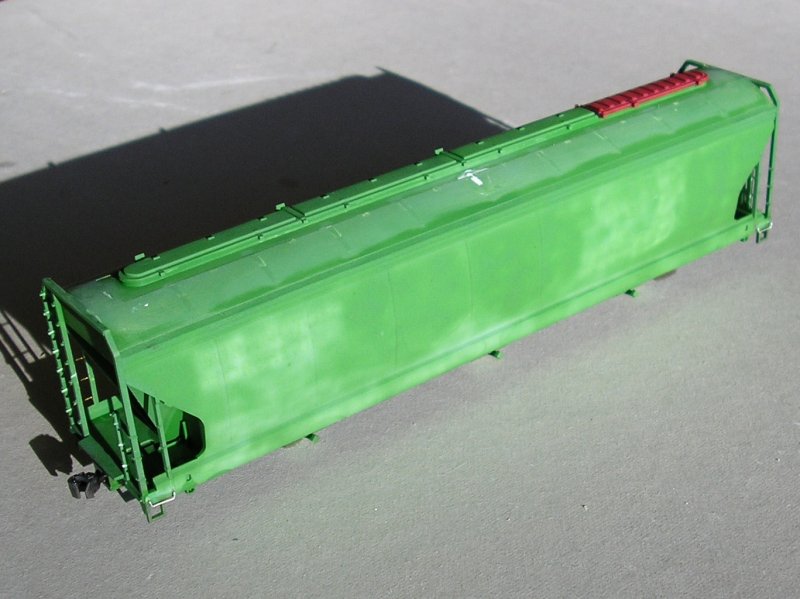  After taking these photos I trimmed down the raised lip underneath the hatches. Now they sit quite a bit lower. Next up, adding the Plano roofwalks... |
|
|
|
Post by fr8kar on Nov 25, 2014 15:15:39 GMT -8
All three ACF 4600s I have under construction now have Plano roofwalk mounts added to them. The early style features an alternating thick/thin arrangement, a closer spacing and a greater number of mounts than the later style, which has all mounts the same width. The ACF 4600cf roofwalk kit from Plano comes with the medium width mounts, so if you're modeling an early version with the alternating thick/thin style, you'll need part number 119 in addition to the roofwalk. The Plano instructions are very thorough and informative, so if you decide to use their parts, be sure to read through the instructions. I learn something every time I open up a new Plano part I've never used before. In this case, I had to locate where the mounts closest to the ends would be located on the drill template, then divide the distance between them evenly to properly space the mounts. The drill template is setup so that you can use it to accurately locate the mounts along the roof but set your own spacing according to your chosen prototype. Here you can see the difference between the early and late mounts. Roofwalks themselves will be added in the wee hours of the morning when it gets cold in the garage:  |
|
|
|
Post by tom on Nov 26, 2014 13:39:13 GMT -8
All three ACF 4600s I have under construction now have Plano roofwalk mounts added to them. The early style features an alternating thick/thin arrangement, a closer spacing and a greater number of mounts than the later style, which has all mounts the same width. The ACF 4600cf roofwalk kit from Plano comes with the medium width mounts, so if you're modeling an early version with the alternating thick/thin style, you'll need part number 119 in addition to the roofwalk. The Plano instructions are very thorough and informative, so if you decide to use their parts, be sure to read through the instructions. I learn something every time I open up a new Plano part I've never used before. In this case, I had to locate where the mounts closest to the ends would be located on the drill template, then divide the distance between them evenly to properly space the mounts. The drill template is setup so that you can use it to accurately locate the mounts along the roof but set your own spacing according to your chosen prototype. Thanks for the hint on using the Plano 119 part for the earlier version of the late version of this car (did I get that right?). Yes I agree that the instructions are very helpful and the parts are engineered very well. Seeing your models under construction is getting me interested in modeling another upgraded 4600! |
|
|
|
Post by fr8kar on Nov 26, 2014 14:41:41 GMT -8
Roofwalks installed this morning before work and photographed this afternoon (long day): 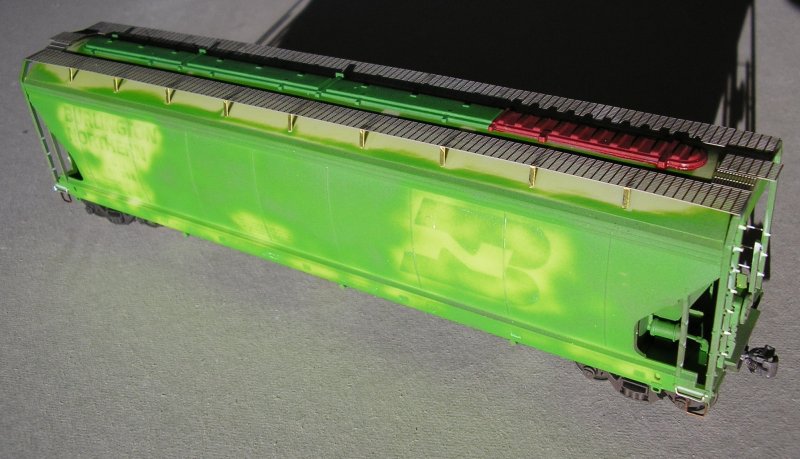   A couple of them have A-line stirrups installed; I'll get to the third one later. I also need to make some gussets for the roofwalk ends so they don't just hang there in space. Now I need to find the missing brake cylinder off the one in the middle. Where did that thing go? |
|
|
|
Post by fr8kar on Nov 26, 2014 14:45:32 GMT -8
Thanks for the hint on using the Plano 119 part for the earlier version of the late version of this car (did I get that right?). Yes I agree that the instructions are very helpful and the parts are engineered very well. Seeing your models under construction is getting me interested in modeling another upgraded 4600! You're welcome, Tom. If you do build another one, feel free to add it to this thread or create your own. I know I'm not the only one who enjoys seeing your work. I asked Keith (of Plano) if I could get an extra fret of the supports that come with the 5250 set and he pointed out part number 119. Doh! I should add that I'm not certain when the change from alternating narrow and wide supports was made to all the same medium width. As always, it's best to consult prototype photos. I had to pick a bad order ATSF 4600 out of a cut of cars today and it was the later style hopper with the twin stiffening ribs but it had the alternating supports. |
|


