|
|
Post by grabbem88 on Dec 24, 2014 5:06:15 GMT -8
A dab of CA glue is your best freind on cast ditch lights and class lights especially with clumsy fingers..
|
|
|
|
Post by calzephyr on Dec 24, 2014 9:28:05 GMT -8
Forgot to add that the radiator grilles on the RPP shell are wrong. Too short and shifted to the rear. I Cannoned these and corrected the placement. Jim Nice work on the SD40-2 and the GP60M. Both of those units are my favorites. I hope to see the Fast Forty painted and in use between two Centennials. Larry |
|
|
|
Post by stevef45 on Dec 24, 2014 19:21:13 GMT -8
Al, I didnt take his post as a slam towards you at all. I took as a suggestion on how to get the led into the housing. I did start the led process, i got the front and rear headlights in. Its 1 resistor per side right? One front and one rear? I just had to correctly guide him for future reference that's all. Rob, "explore" all things model railroad related and then you may one day stumble upon those great LEDs by Monsterrailroad. Here is how I do the ditch lights on my OWN models. I use one Resistor 680ohm for both LED lights. But I use one resistor for each headlight LEDs. Since I have converted over to MOSTLY TCS A4X and A6X decoders I do not need resistors on my non sound units. But on Tsunami sound units I do it that way. I've only gotten as far as the headlights on my tunnel motor. The snoot nose on these thigns is a beaatch to do. I had to open the holes slightly to and smooth out the clear rod to get it in there. I used formular 560 to hold them in. I'll check later to see how they are. I have 1 resistor on the front headlights and one for the rear, this is correct right? I'll try and work on the front ditch lights this weekend. My 2 year olds daycare is closed all next week so modeling on my days off is going to be nearly impossible except late at night. |
|
Guck
New Member

Posts: 6 
|
Post by Guck on Dec 26, 2014 13:27:30 GMT -8
Al, I don't think Rob was saying anything bad about MOnster LEDs. He was just saying how to install the LED's into the engine ( at least that's how I read it) But if some one wants to make LED for themselves, And they don't have the money to buy MOnster LEDs. You can put LED's into a engine for about 4 dollars when you build them you self. I should know I've been doing the LED conversion for years now.
|
|
|
|
Post by MONSTERRAILROAD on Dec 26, 2014 16:21:01 GMT -8
Al, I don't think Rob was saying anything bad about MOnster LEDs. He was just saying how to install the LED's into the engine ( at least that's how I read it) But if some one wants to make LED for themselves, And they don't have the money to buy MOnster LEDs. You can put LED's into a engine for about 4 dollars when you build them you self. I should know I've been doing the LED conversion for years now. Whaaat? I had made multiple videos showing people how to make LEDs so there is no need to try and educate me about how much it cost to make leds. 95+% of people can afford a mere $15 engine upgrade without having to spend hours making a few LEDs or buying $64 per engine upgrade from Ulrich models. |
|
|
|
Post by grabbem88 on Dec 26, 2014 17:02:49 GMT -8
Wow. I have yet seen a topic ever stay on topic let alone arguing about nothing...lol
|
|
|
|
Post by Donnell Wells on Dec 26, 2014 17:17:30 GMT -8
Al, your way is but one of many...now back to our regularly scheduled topic.
Donnell
|
|
cmarchan
New Member
Amtrak SDP40Fs - we GOT them!
Posts: 18
|
Post by cmarchan on Jun 3, 2015 19:52:07 GMT -8
|
|
|
|
Post by SantaFeSammy on Jun 4, 2015 3:35:18 GMT -8
Some very nice work in this thread. Here’s a factory painted Athearn RTR GP40X. I’ve changed out all of the fans, added lift rings all around, changed all of the cab roof details and added pilots details on both ends and windshield wipers. This was from the first run of GP40X’s so I also relocated the headlight from between the numberboards and added ditchlights also.  |
|
|
|
Post by atsfan on Jun 4, 2015 5:47:24 GMT -8
Some very nice work in this thread. Here’s a factory painted Athearn RTR GP40X. I’ve changed out all of the fans, added lift rings all around, changed all of the cab roof details and added pilots details on both ends and windshield wipers. This was from the first run of GP40X’s so I also relocated the headlight from between the numberboards and added ditchlights also. Oh I like this ! |
|
djh4d
Full Member
Posts: 205
|
Post by djh4d on Jun 4, 2015 11:14:20 GMT -8
Most have seen this one before. But it goes to show that Athearn RTR can look really good with a little bit of work 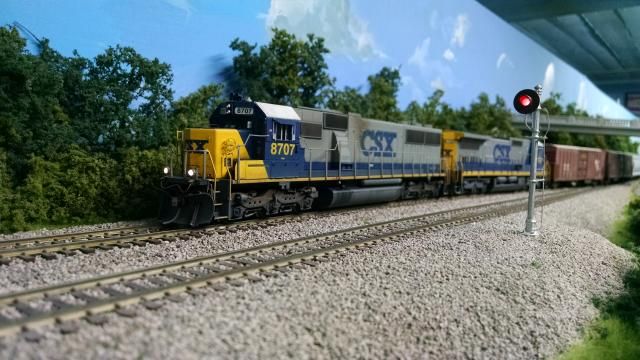 Details on 8707: correct snow plow ditch lights coupler cut levers mu hoses mu cable correctly placed mu receptacles painted roof weathered to prototype around 2004 Many of my Athearns get a similar treatment, except now they get windshield wipers if they don't come with them. -Dave |
|
|
|
Post by jbilbrey on Jun 6, 2015 17:31:55 GMT -8
My ESPEE SD45T-2:
 ESPEE 9355 by James Bilbrey, on Flickr ESPEE 9355 by James Bilbrey, on Flickr
Basically, I tried to follow the steps in the following link:
Detailing a R-T-R SD45T-2
It has DA cut levers, the DW detailing kit and other parts (fuel & air tank details, MU and air hoses, etc.), and Plano lift rings.
James Bilbrey LaVergne, TN |
|
|
|
Post by riogrande on Jun 6, 2015 17:37:27 GMT -8
James - sweet tunnel motor! I've got two of her sisters from that run #9358 and 9363 along with the earlier 9316 and 9325 - they are must have's for SP fans! Thanks for the link to the detail info. Thankfully the snow plow that comes with those four Athearn units are the improved version which looks great - I don't think it's necessary to replace it with the metal one. The earlier release for sure need replacing.
|
|
|
|
Post by jbilbrey on Jun 6, 2015 17:56:51 GMT -8
Riogrande,
Thank you. As you could imagine given that I'm in TN, ESPEE 9355 is a real oddball in my roster. I at least have one of the IM cabooses to go with it, but I now need to find a R-T-R SD45 or wait for the Bowser SD39. Until then, I keep it around as they made as far east as the Eastern KY coal fields [on the L&N] on occasion.
I probably swapped out the plow because at one point I was going to detail a GP40X to go with it. It had that horrible first-generation plow that you were talking about. However, I sold the locomotive before getting around to detailing it as well.
James Bilbrey LaVergne, TN |
|
|
|
Post by riogrande on Jun 6, 2015 18:10:18 GMT -8
I think the RTR SSW SD45's are floating around if you hunt; those were put out on the market not long ago. I have a couple of the SD40T-2 from the very first RTR run and they came with the aweful plows too; I've gotten one of the newer plows for one so far #8277, still need one for 8287.
|
|
|
|
Post by jbilbrey on Jun 6, 2015 18:44:44 GMT -8
I think the RTR SSW SD45's are floating around if you hunt; those were put out on the market not long ago. I have a couple of the SD40T-2 from the very first RTR run and they came with the aweful plows too; I've gotten one of the newer plows for one so far #8277, still need one for 8287. You're right; I've found some of the last run of SSW SD45's still on the market. For example, Trainworld should have them in stock:
SSW SD45
Eventually, I'll get another six-axle EMD to go with the SD45T-2. I'm just in no hurry to detail the second locomotive despite already having most of the detail parts on hand.
James Bilbrey LaVergne, TN
|
|
|
|
Post by riogrande on Jun 7, 2015 5:46:59 GMT -8
Athearn has another run of SD40T-2's coming next year which includes the 8200 series of SP tunnel motors
|
|
|
|
Post by NS4122 on Jun 7, 2015 7:50:10 GMT -8

I purchased a pair of Athearn NS SD40E's and added/changed some details for more accuracy.
The Roof A/C unit was replaced with a more accurate DW 235-159.
The external electronics (cab signals?) box and Helper Link boxes were scratch built from Evergreen styrene
The coupler lift bar was A chopped up DA 2211
Also added was a DW MU cable for Helper link and A-Line windshield wipers.
Not seen but added were LOKsound EMD 645F sound decoders.
 |
|
|
|
Post by JohnJ on Jun 7, 2015 9:21:41 GMT -8
Here's my latest RTR upgrade. For my needs, these units don't need much. I give them windshield wipers, rooftop lift rings, a grab iron on the pilots, and a trainline air hose, in addition to putting on the included fuel tank details. BTW, this is my first purchase from Trainworld and I was very pleased with the experience. S/H was a bit pricey at $15 but I ordered on Wednesday and got it on Friday.  |
|
|
|
Post by antlorch on Jun 7, 2015 12:26:02 GMT -8
Here is a RTR SD50 I built a few years ago for a friend. Attachments:

|
|
|
|
Post by antlorch on Jun 7, 2015 12:34:45 GMT -8
Here is a RTR SD60 for my free-lance road. Attachments:

|
|
|
|
Post by antlorch on Jun 7, 2015 12:40:01 GMT -8
This is a favorite of mine I am building. SD44LEO is what I call this. RTR SD45T-2 with a SD60M wide cab added. scratch built electrical cabinet. |
|
bigzmn
Junior Member
Posts: 91
|
Post by bigzmn on Jun 7, 2015 13:43:25 GMT -8
This isn't an RTR unit. It started as an Athearn blue box SD40-2 that I detailed and painted between 15 and 20 years ago. I recently found it in a storage box with some damage. I wasn't sure if I should part it out and scrap it, or rebuild it. I decided to rebuild it. I originally replaced all the cast on lift rings and grab irons with wire replacement parts. I also built new handrails with cast brass stanchions and brass wire. Now I'm replacing the old solid fans with Cannon parts. I also rebuilt the drive with a can motor and new Athearn flywheels and hex drive shafts. I'm actually in the process of re-rebuilding two of them. Chris Z.    |
|
|
|
Post by fr8kar on Jun 8, 2015 9:01:13 GMT -8
My biggest beef with Athearn RTR models is the handrails. I can live with a little bending, flexing or stretching, but what I saw on the (RPP-based) RTR SD40 was more than I could tolerate. So, I kept the good handrails and bent new long hood side handrails:   |
|
|
|
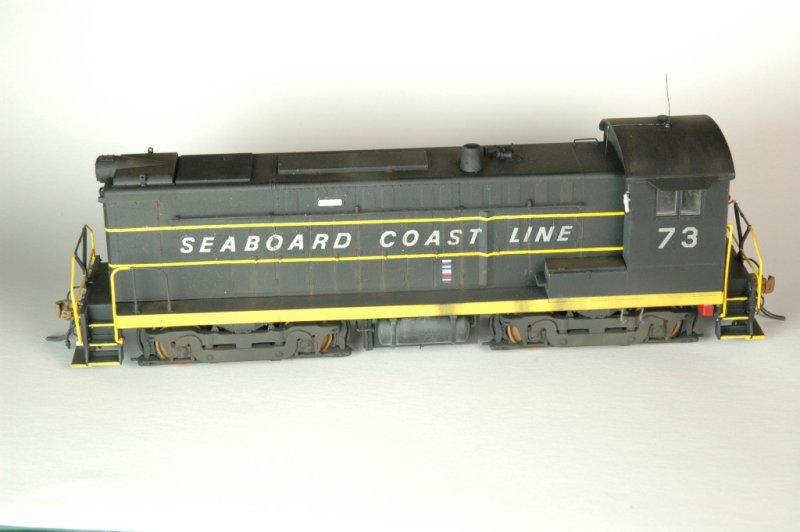
Post by antoniofp45 on Jun 10, 2015 5:26:41 GMT -8
Carl, That is outstanding work! Stirs up a lot of fond SCL memories for me. The weathering is realistic and not overdone and the high level of prototype detailing makes it hard to believe that this was originally an Athearn BB. Please consider taking outdoor photos of this beauty and posting it on a new thread. Here's my entry; an old Blue Box U33B modified to a SCL U36B with Utah Pacific Stanchions, scratch built front stanchions and pilots, grab irons, upgraded decal stripes and lettering  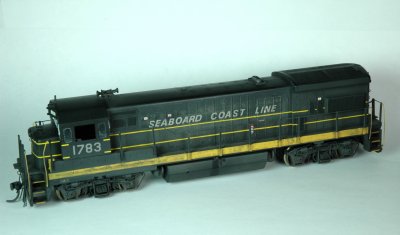 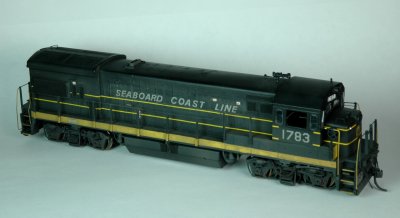 |
|
|
|
Post by TBird1958 on Jun 30, 2015 12:24:24 GMT -8
|
|