|
|
Post by riogrande on Sept 27, 2015 7:05:22 GMT -8
Swing coupler pockets in the kit look similar to what the Athearn 85' flat cars used. I cut the nubs off and glued them to the under-frame so they are fixed now. I figured since I'm using a minimum 32 inch radius curves and #6 minimum turnouts with #8 turnouts for cross overs, they'd run ok - they seemed to manage ok what I have run them. With a 50' box car, I'm surprised they went with the swing draft gear.
|
|
|
|
Post by mlehman on Sept 27, 2015 8:10:21 GMT -8
Jim,
The kit comes with standard draft gear. I'm using the Athearn parts instead of the Walthers cushion draft gear kit that Rob recommended because they're what I have on hand. I've cut off the extended mount that clips over the bolster on the Athearn 86' kit and will be gluing it in place of the stock couplers. First I'm trying to get some NBWs on them to provide a little detail, but may not quite be able to pull this off. As is, there are three bolts in a vertical row on the Keystone, but think I only have room for 2. But they won't swing, just stick out.
|
|
|
|
Post by mlehman on Sept 27, 2015 11:01:52 GMT -8
Here's how I handled the "cushioned draft gear."  You can see the original mount location. I used the back hole to run a Kadee screw into, plus I glued the trimmed Athearn draft gear, so it's secure.  It seems to project a little too far, but don't forget the end is not yet in place.  Once the end is applied, it actually turned out to be maybe 3" to 4" short, although I don't have measurements to work from. Not really a problem, because having it closer to the truck centers helps in those sharp curves.  Looks decent for a scrap box special, which is within my budget  I then realize at this point I should've filled some holes in the B end part, so will get back to that. Also, just a note on removing the BL paint. An hour soak in 91% alcohol allowed quick and easy scrub off with a toothbrush. Oh, and the end doesn't look that scummy, just odd glare off the gloss paint. It's not perfect, but considerably better than in the pics. |
|
|
|
Post by mlehman on Sept 27, 2015 23:57:48 GMT -8
Worked my way through the rest of the assembly, then decided to wait until I was fresher to cut and apply decals.   It also needs tackboards on the doors, cut levers, and a few other delicate things. |
|
|
|
Post by mlehman on Sept 28, 2015 9:29:17 GMT -8
Now it's looking really Rio Grande-ish...  The Kadee decals are a real pain to cut, because you can hardly see them in contrast to the backing paper, but they look sooo good once you get them in place. Not sure if I can dup everything I see, but the bulk is here. End lettering beyond roadname/number may be iffy. Don't have a clear pic to see what it says and every car looks like it had something different. The stenciling on the doors show less variation, but still unclear text in most cases. I may just skip rather than obsess about it. Was able to correct capy to 145,000 lb (the PS 50' is either 100,000 or 110k). Also found some roller bearing trucks to go underneath. So I'm pretty happy with how my scrap box special is turning out. Once the Dullcote and some light weathering goes on, my Earl Schieb special paint will even look better. |
|
|
|
Post by mlehman on Sept 28, 2015 12:41:29 GMT -8
|
|
|
|
Post by mlehman on Sept 28, 2015 20:59:11 GMT -8
Looks like ImageShack is belly-up right now. So will do one pic as an attachment. Will post more once ImageShack is working again... And ImageShack is back. I deleted the image from the attachement server so the space could be reused and substituted the usual goodness... The rest of my pics in other threads should also be back or will be soon. What a relief! 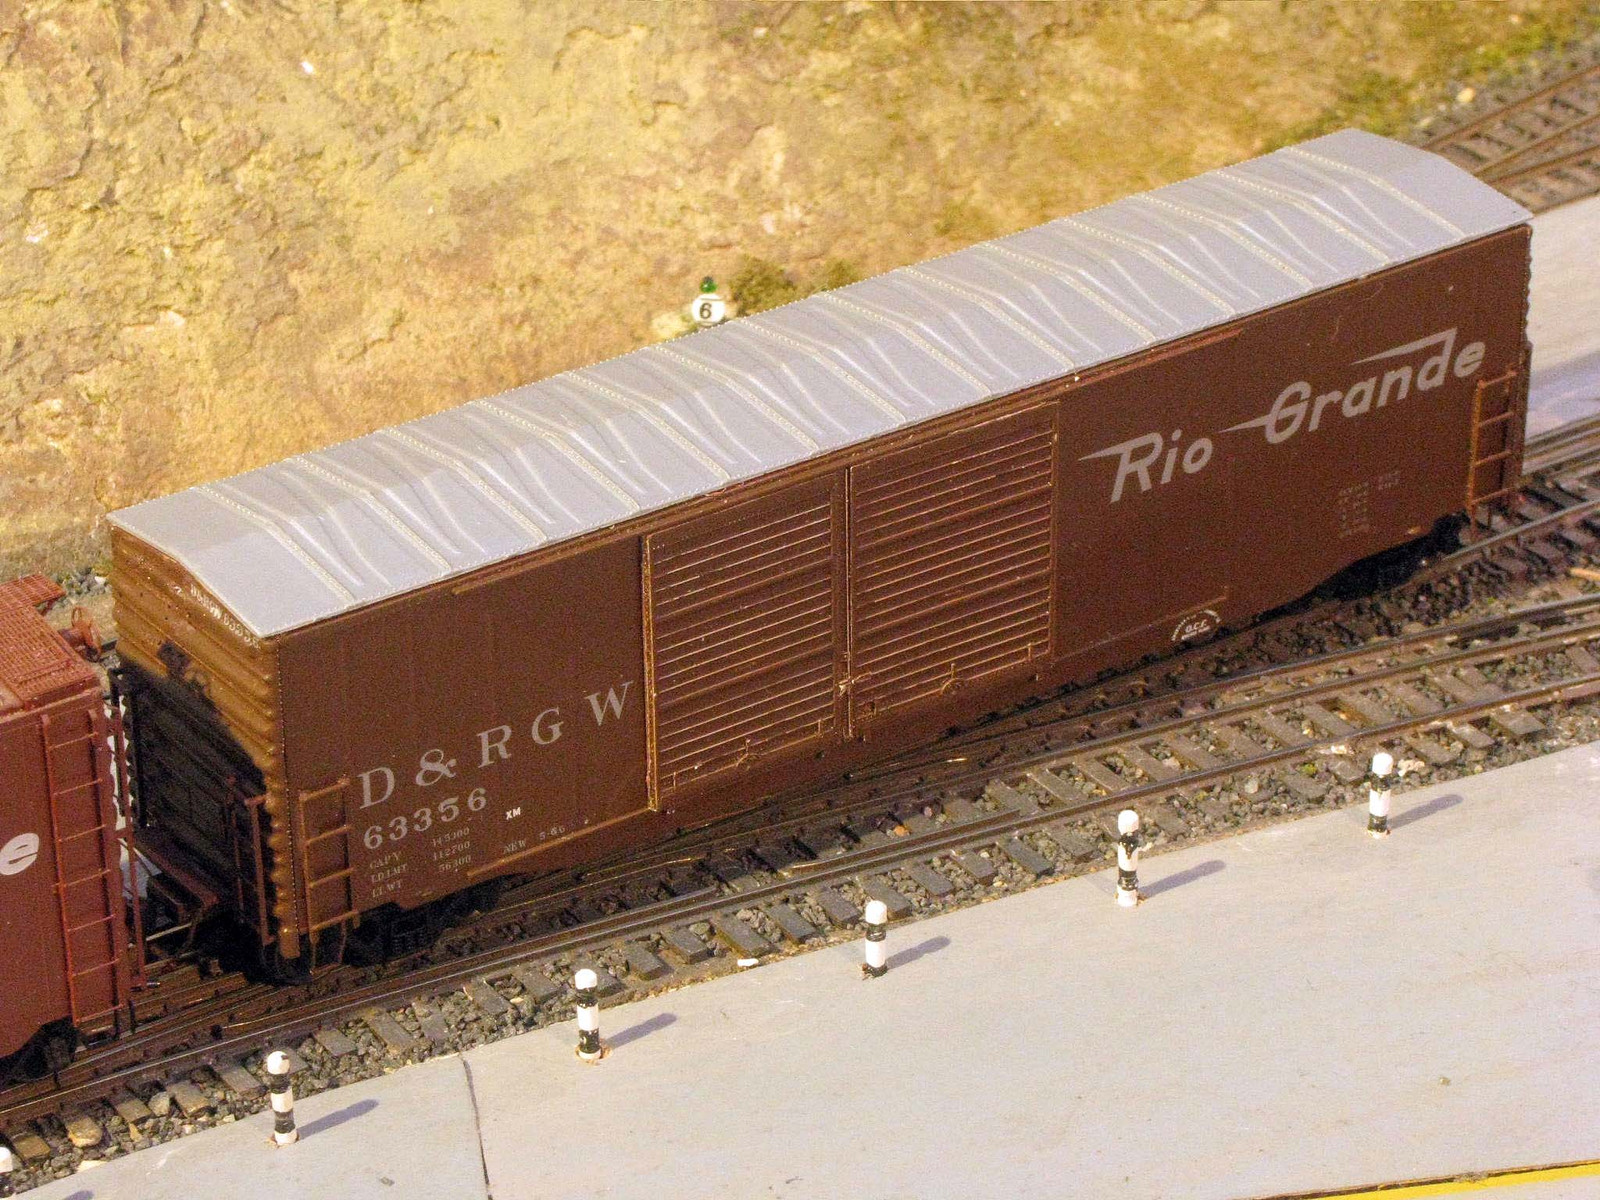 I did not attempt to scribe new weld seams, choosing to leave the de-riveted and smoothed down ribs to represent the welded sides. They don't quite match, for instance there are 4 panels to the left of the doors on the prototype, but 5 on the model. Figured I'd leave well enough alone. The stamped panels thus just have to make do with that, too. Not sure how you'd represent that other than building new laminated sides, which is getting close to scratchbuilding. This a not a show model. It's meant to run, be handled, etc, a 90% model. For a scrap box special, it's all good. I'm holding off on weathering to see if I'm able to turn up some more info on the lettering so I can maybe add that. I did come up with the distinctive ACF markings, though. Also would like to work the area around where the high ladder and brake wheel mounted on the B end over some more, too, as my quickee patch job was less than ideal in filling all the mounting holes. I'm still debating on sealing the doors for several reasons, but they would look better if I did. Speaking of which, I forgot to add the tack boards on the right doors, so am doing that now. |
|
|
|
Post by mlehman on Oct 1, 2015 0:01:09 GMT -8
Sorry most of my pics are missing, fellows. They're trapped by the great ImageShack meltdown. It looks to be several more days before they get it mopped up. Until then, here's another attached pic with a side view. 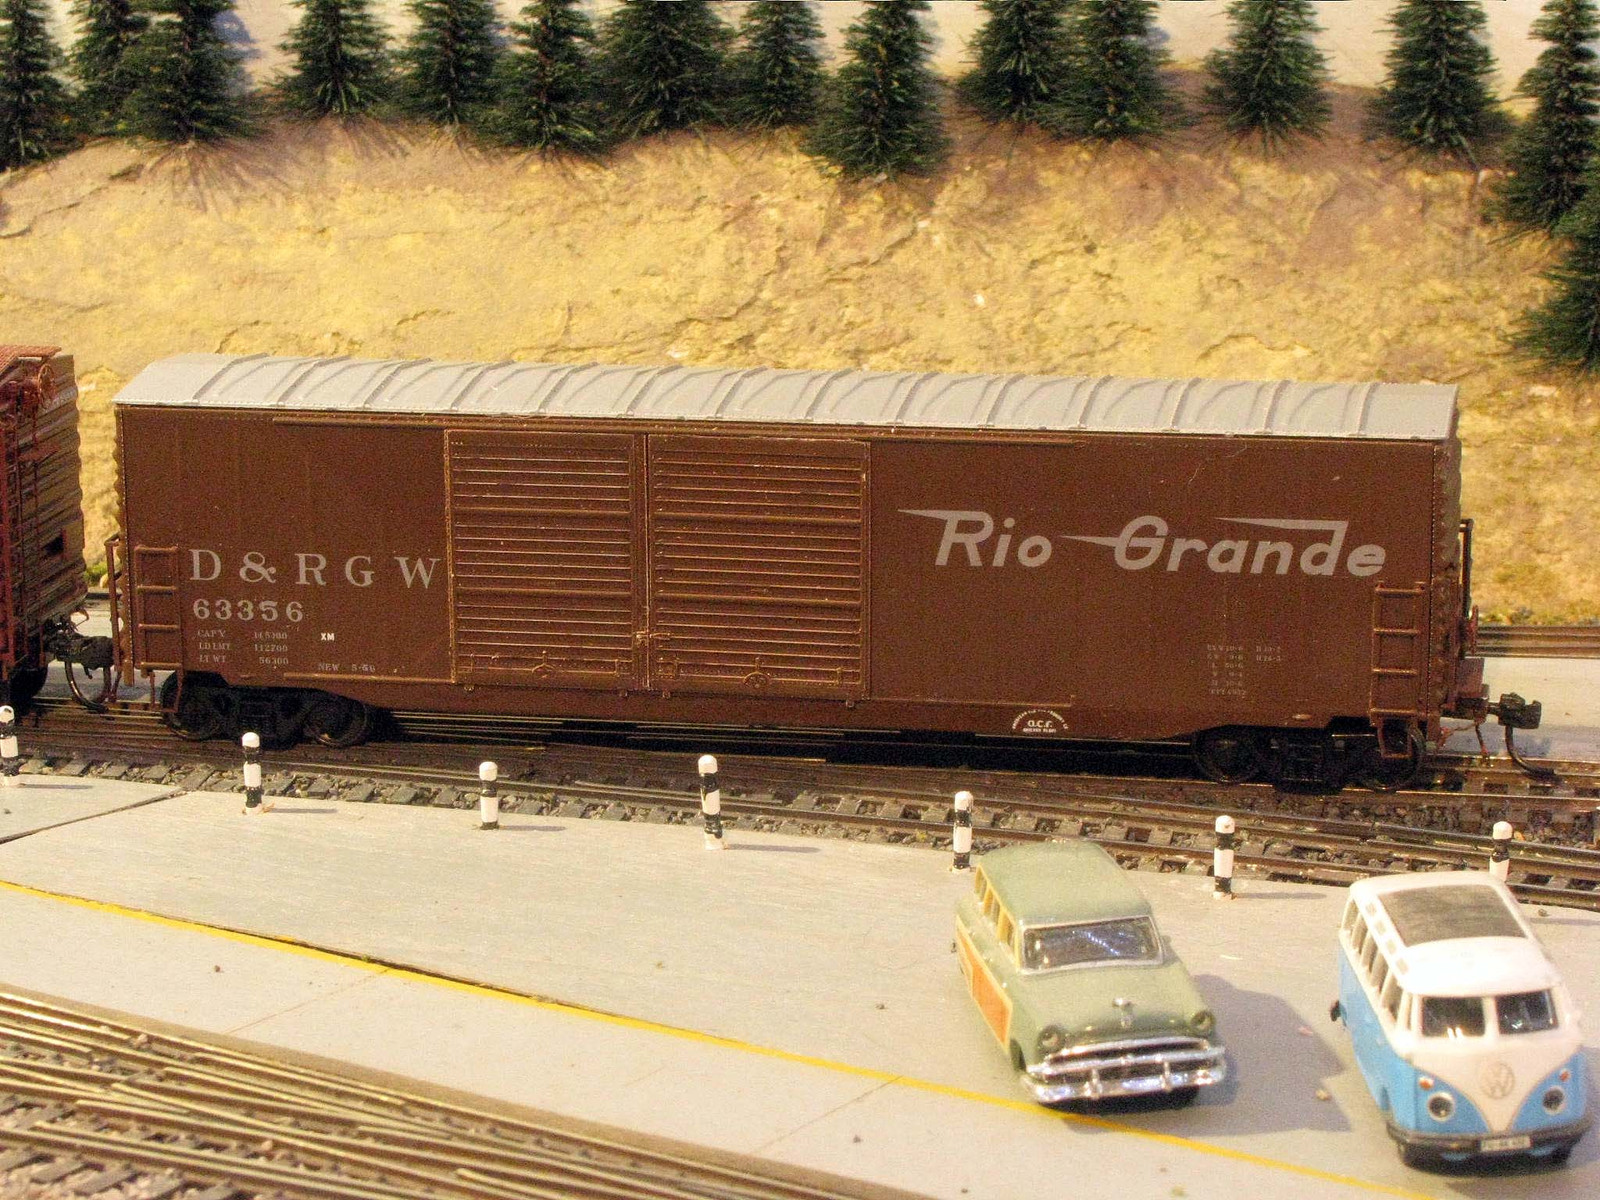 This one shows the PS and ACF cars side by side.  |
|
|
|
Post by mlehman on Oct 1, 2015 18:41:09 GMT -8
And a couple more just to give this a bump to let folks know the pics are back here. Thanks to everyone who came by to take a peek even when there wasn't much to see. I'd be happy to answer any questions about what I did. Overall time was about 6 hours over 4 days.   I really enjoyed this build. It's not as exacting as some do here. I've got no budget for sweet etchings right now. But a man's junk box can prove handy. How's yours feeling?  |
|
|
|
Post by Spikre on Oct 5, 2015 10:30:40 GMT -8
Mike, actually like Your Courage for running that Strange looking Geep !! yes Virginia,Rio Grande had Non-EMD locos also !! they may have down graded then quickly,but they did have them. which did they turn in switchers quicker,the RS-3s,or the H15-44s ? will be waiting for an RS-3 or 2 next !! Spikre
|
|
|
|
Post by mlehman on Oct 5, 2015 11:26:27 GMT -8
Spikre, Hmm, strange looking Geep? My only standard gauge strange looking EMD is this one  Narrowgauge is an entirely different matter, where all kinds of strange diesel motive power abounds. Both the F-Ms and the RS-3s were mostly Utah engines, so coverage and my knowledge of them is a little sparse. I suspect the biggest factor in their increasing use as switchers, despite being examples of light road power, was the fact that the Alcos could MU, at least with each other. Strapac (who's not always 100% accurate) says the F-Ms drew light road assignments for the first 15 years, but that the Alcos fell into disfavor early due to road failures. I suspect that the trainmaster felt pretty confident an F-M could generally find it's way home on its own, but that even as switchers the Alcos had to be kept close to home just in case they failed and needed rescue. Given my Four Corners Division depicts a Rio Grande secondary main under conditions of traffic growth, we kept units like the F-Ms on, instead of sending them to scrap in 1966. |
|
|
|
Post by Spikre on Oct 5, 2015 13:04:01 GMT -8
 Mike, was saying that the F-M was a strange looking GP unit !! but seems that Rio Grande just didn't like the RS-3s even after converting them to the Water Cooled Turbos. RS-3s that had 1st class maintinance lasted well on those roads into the 70s, Southern,EL,D&H,C&NW,GB&W,B&M,CNJ,Reading,WM,etc, throw in RS-2s on D&M,TP&W. and others. since Rio Grande only had 5 units,and most parts were incompatable with PAs 16 cylinder 244s,they got rid of both by the late 60s. the F-Ms may have been considered more reliable since they weren't Turbo-Charged, an item many roads didn't appreciate unit 60s EMDs like GP30/35s and SD35s. by the 645 line of 1966 the EMD Turbos were Standard on most roads. and SD units arnt GPs !! even if they are SD39Ls. neat unit does it run on 3' trackage ? Spikre 
|
|
|
|
Post by mlehman on Oct 5, 2015 15:09:19 GMT -8
SNIP and SD units arnt GPs !! even if they are SD39Ls. neat unit does it run on 3' trackage ? Spikre Oh, yeah, that why I called it a strange looking EMD... I thought of narrowgauging it, but the gear towers were too thick. Resin doesn't lend itself well to those anyway, the drive is considered the weak spot of these otherwise very slick units from Kaslo Shops. Thinning it further was simply off the table as too risky. I have thought of building a NG chassis by cutting some bar stock and adding NWSL parts like I did for one of my other NG diesels, but it would be a honking big beast for the loading gauge. Things bigger than a NW2M...  ...need to be more petite like the graceful Alco, the DL-535E.  |
|
|
|
Post by dtinut on Oct 5, 2015 16:20:47 GMT -8
Melman, I'd look for a FR or branchline 50' ddbow - welded. Order the 7 & 8'. Doors from KD. Use some .010 or .005" acetate to make the pressed panels each side of door. I think Bob Rivard or someone did a car like this in RMJ, as I recall reading the article some time back when I had a sub. Some of the D&RGW cars were sold to AnnArbor. This ones on my list too. Brian SNIP Careful with the NYC car. Branchline produced an NYC specific version of their kit with the Despatch shops roof and unique ends. The roof has two rectangular stampings per panel, and the end has corrugations that look somewhat like a Pullman end. That car's pretty much limited to representing an NYC or successor road car. If yours has the diagonal panel roof and improved dreadnaught ends you're good to go. Just confirmed I've got the NYC special features with BL #1105. I may see what the ebay gods can turn up rather than hack the GN car, as nothing else on hand to serve. Cut the 8' door down to 7' -- still thinking on that one. I really don't want to clean up a bunch of cut through ribs and not sure I can cut along the side reinforcement and looks right doing it that way, either. IIRC from similar discussions, stottman is right, there is no suitable commercial part available.  And is a narrowed door really close to correct anyway? Looks good enuf to do that to my eye, but maybe there's something I'm missing there that's bigger than simply being narrower?[/quote |
|
|
|
Post by mlehman on Oct 6, 2015 6:44:17 GMT -8
Brian,
Thanks for the tip about finding a welded car to start with. Would save a lot of scraping, so if the budget allows and I do another it would be easier to start with one of those.
Getting a better rendition of the stamped panels next to the doors is certainly going to take some precise work to laminate and build them up, but seems doable if I can find some .005" material. I looked at the .010" stuff I have on hand in abundance and it looked to me that it would seem too thick done with that. That's the main reason I punted on that for this build.
I have some old RMJs, but if it was a more recent build (post-2000) probably don't have that one. Will look it up if I do another.
|
|
|
|
Post by wp8thsub on Oct 6, 2015 10:38:38 GMT -8
Getting a better rendition of the stamped panels next to the doors is certainly going to take some precise work to laminate and build them up, but seems doable if I can find some .005" material. I looked at the .010" stuff I have on hand in abundance and it looked to me that it would seem too thick done with that. That's the main reason I punted on that for this build. I think I used .010" for the panels on my NW car. I don't like messing with .005" styrene if I can help it, as it deforms so easily with solvent cement. Modeling the panels was actually quite simple and fast. I marked the rectangular outside shape and the cutout with rounded corners for each one on the styrene sheet. I then cut the center of each panel out, carefully handling the knife around the curved corners. Once those were removed, I did the straight cuts around the outside edges and severed the panels from the sheet. I made some extras and picked the best ones. I made templates with the rounded corners out of thicker material so I could mark and cut with them. The prototypes usually have at least two shapes for the stampings, one that's a rectangle and the other (for the ones adjacent to the doors) is either a trapezoid or otherwise has some angled edges next to the doors. For the templates, cut with straight edges and then round the corners. |
|
|
|
Post by mlehman on Oct 6, 2015 13:12:06 GMT -8
Rob, Yeah, sounds easy, but known my klutz-factor  I'm sure I'll eventually get what I need hacked into shape. I looked at the .010" stuff and I just thought it looked too thick once laminated. That's why I think it would be worth trying with .005. I haven't done any calcs, don't have what those dimples measure, but my eye just tells me it looks too thick. Maybe I should be thinking that it's thicker? "Honey, do these pants make me look thick?" I was actually thinking of something like a spray 3M product to bond the .005" stuff. I'm not sure about 77, things stay too flexible. So something like that but more tacky/tenacious, with a mask of the open areas to make it easy to keep neat and place and bond. I was actually pleased with the effect of shaving the rivets and smoothing around the door to create the impression of the stamping. Of the pics I've seen, about half were in light that wouldn't show the difference and many in the other half were probably taken with the intent of highlighting the panels. So I'm OK with my model there without too much effort..or at least the effort to rush into building a better one. But that's kind of the way I operate. If I can build it pretty good today with what I have on hand and what I know, and turn out something good, why accumulate the perfect stuff, to build the perfect model, all while losing momentum? My stuff is likely nowhere near perfect, but there's a lot of it and it's satisfying to see it in action. And it's not a critique of the way many do things, as being able to do it your way is one of the things that makes it a great hobby. I have accumulate/build projects like that myself, it's just that I like to practice a more freestyle approach to the hobby at times, if you will. This was a great project for sharpening my skills in several areas, so taking it light on details that needed lots of work let me save a bunch of time redoing thing I already know I can do, but which are tedious and unnecessary to coming up with a convincing model of this car. Of course, one fellow's unnecessary is the next guy's gotta-have, and that's when you getta invoke the good-enough rule. |
|
|
|
Post by bdhicks on Oct 6, 2015 21:29:36 GMT -8
Usually when I apply .005" styrene, I drill holes in whatever I am mounting it to, then attach the styrene with CA through the holes. The trick is finding a way to hold the styrene to the work that keeps it flush and also doesn't wick the CA onto the surface.
|
|
|
|
Post by mlehman on Oct 6, 2015 21:43:16 GMT -8
Brian,
OK, thanks, that's another trick to keep in mind.
The nature of this may be a problem for that method, with the lamination going along mostly the edges of the panel and the similarly raised vertical reinforcing sections. The material we're bonding on this isn't very wide for the most part.
On the other hand, CA could be applied along the edge and allowed by capillary action to seep back under the .005".
|
|
|
|
Post by Spikre on Oct 9, 2015 9:24:49 GMT -8
 what is Really Needed is Styrene Sheet in .007 or .007.5. white,black,gray,and clear would be usefull. Spikre
|
|


 I'm sure I'll eventually get what I need hacked into shape.
