|
|
Post by Christian on May 8, 2016 5:14:04 GMT -8
This is another piece of archeology making it's Internet debut. Likely built in 1978 it has been boxed since about 1980. I have no recollection of either the prototype nor the magazine source of the elevations. 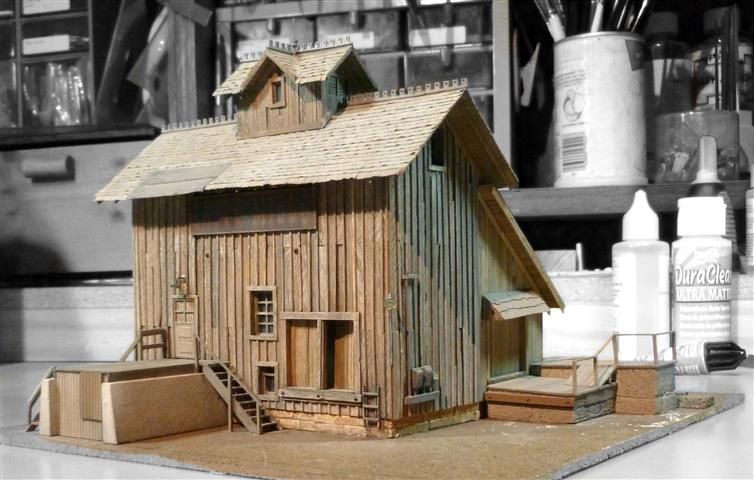 Built from individual boards glued to a foamcore box and Styrofoam blocks. The boards were cut from the slash that accumulates around a table saw. Some Campbell parts as well as shake roofing. Bits of Grandt Line details as well as unknown details here and there. Don't get disconcerted; the roadbed is H0n3 – the mill is not that large! The stain is brush cleaning turps dry brushed with gray acrylic. As well as the natural aging of wood. All you have to do is plan ahead 38 years! 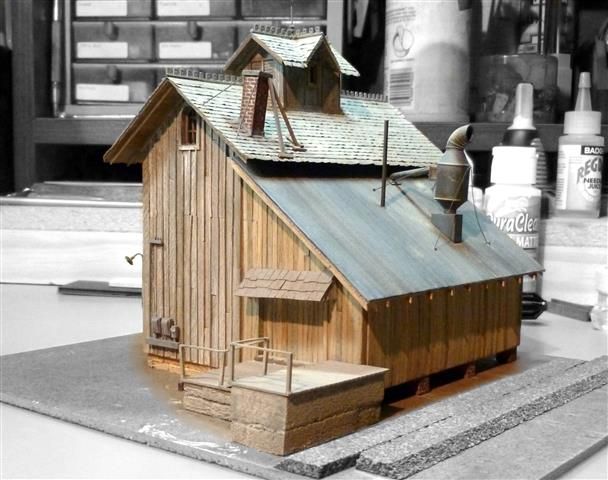 |
|
|
|
Post by mrsocal on May 8, 2016 6:00:49 GMT -8
Very impressive.
|
|
|
|
Post by TBird1958 on May 8, 2016 7:28:16 GMT -8
It's a Cab Hop Sunday, class unit 5300, one of only 5 SD-7 units on the Rio Grande leads caboose 01475 on a local in afternoon sun. Most of the D&RGW's early SD units worked local service and heavy switching jobs at outlying points in Utah. 5300 was a regular sight in Helper, UT. as the switcher, it was favored for it's ability to move an 84 car cut of empty hoppers on the west lead. Caboose 01475 is a welded version of the the D&RGW's standard design constucted in their Burnham, (Denver, CO.) shops, the yellow stripes indicate a radio equipped car and were intentionally a different color than the Aspen Gold ladders and grabs. I can only imagine how hot it must have been to ride across the central Utah desert in a non air conditioned 26 ton heat sink, no thanks! The models are LLP2K and the caboose from Overland Models belongs to our moderator Jim Fitch.   |
|
|
|
Post by mlehman on May 8, 2016 8:07:02 GMT -8
Christian, Just love that building. I may get some inspiration from it for some upcoming builds. It would be good to know if built from a plan, but around here, we don't need no stinkin' plans, we just build them anyway.  Mark, Nice shot, assuming Jim's caboose went there to get dirty?  If you're modeling the last quarter-century or so, cabooses mean little. before that, they are part of the vital visual signature of a specific prototype. With the custom steam fading into the cookie-cutter look of diesels, albeit, distinguished largely by the paint and details, a RR's cabooses were probably the most distinctive sign of place and prototype you can find. Here's a switcher at Dove Creek with another Overland gem. 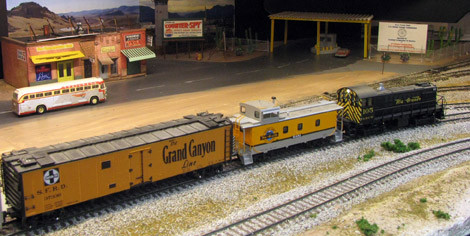 At Durango on the dual-gauge. 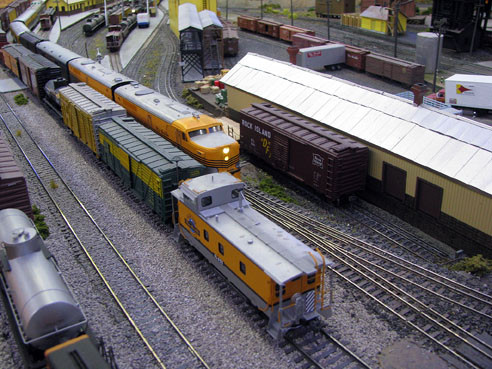 Narrowgauge is no exception to this rule. So long as you stick to Rio Grande, there's a really great selection available. At under $80, Blackstone makes this affordable. 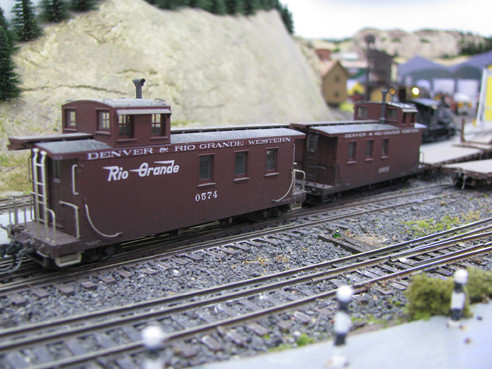 |
|
|
|
Post by riogrande on May 8, 2016 8:13:32 GMT -8
Recovering from a migraine this morning. Christian, very nice work on the building, built way back when I was just in my first year of college! Well done! Mark, nice cab hop scene. I've always liked the SD's and I've seen a lot of photo's of them working in Utah in singles. Nice looking caboose there!  Would it be I could have Mark weather much of my rolling stock! He does a very nice job - perfect for the time period as well. That caboose languished for a number of years unpainted so finally getting some cloths. |
|
|
|
Post by mrsocal on May 8, 2016 8:24:13 GMT -8
Cool stuff as always. I have spent the last couple of days tinkering with one of these Manitu Aluminum passenger cars to see what I can do and how fare I can take them. Been concentrating on the end of car. I need to buy some more Walthers diaphragms I am done to just 1.   |
|
|
|
Post by tony45324 on May 8, 2016 8:42:17 GMT -8
Everyone..great work this week! Jim, glad you kicked that migraine to the curb,, those are no fun.. Here is a B/W version of a recent pic from a module I built..  |
|
|
|
Post by dti406 on May 8, 2016 9:08:40 GMT -8
I managed to get some cars done these last couple of weeks:  Intermountain ART Reefer Kit, Painted with Scalecoat II Reefer Yellow, Boxcar Red and Black Paint, then lettered with Champ Decals. ART was owned by the Wabash and MP and would look right at home on Bear's car ferry.  Athearn ACF 2970CF Covered Hopper Kit, painted with Scalecoat II MofW Gray and lettered with Herald King Decals. The RI Covered Hoppers came with trough hatches rather than the circular hatches and were in sand service at Ottawa, IL.  A few weeks ago I did a Savannah and Atlanta Boxcar in the modernized paint scheme after the Southern absorbed the railroad, here is the car in the as delivered paint scheme. Intermountain 40' PS1 boxcar, painted with Scalecoat II Boxcar Red and lettered with Champ Decals.  I acquired an undecorated Red Caboose coil car, so I purchased a decal for it, so it is painted with Scalecoat II Black and IC Orange, then decaled with Dan Kohlberg's decals. The IC put the car number on the hoods, I wondered how long the hoods stayed on the same car? Thanks for looking! Rick J |
|
|
|
Post by valenciajim on May 8, 2016 9:21:04 GMT -8
I tried some Pan Pastel weathering for the first time this week. This was a steam locomotive that I purchased at the auction at last year's NMRA Convention in Portland. The loco was already slightly weathered, but the weathering was not done very well. The locomotive also is a poor runner, I will have to add some Bullfrog Snot to improve performance as the drive wheels slip. I applied the Pan Pastels and then covered the entire loco and tender with a coat of Dullcoat. The entire process took about fifteen minutes. The colors in the photo are little more green than they appear to the naked eye in real life.   |
|
|
|
Post by TBird1958 on May 8, 2016 10:09:32 GMT -8
Recovering from a migraine this morning. Christian, very nice work on the building, built way back when I was just in my first year of college! Well done! Mark, nice cab hop scene. I've always liked the SD's and I've seen a lot of photo's of them working in Utah in singles. Nice looking caboose there!  Would it be I could have Mark weather much of my rolling stock! He does a very nice job - perfect for the time period as well. That caboose languished for a number of years unpainted so finally getting some cloths.
Ha! yeah Jim, I spend way too much time building models and not working on benchwork and track already 
|
|
|
|
Post by riogrande on May 8, 2016 10:57:28 GMT -8
Mark, you get great results! Some of the flat part kits like your orange IC and the red CB&Q are unique freight cars that stand out too! Keep up the good work and when the inspiration its, work on the layout. Last week since the cardboard strips are mostly done I shifted to plaster cloth. Just got started on it but didn't have any photo's until today: 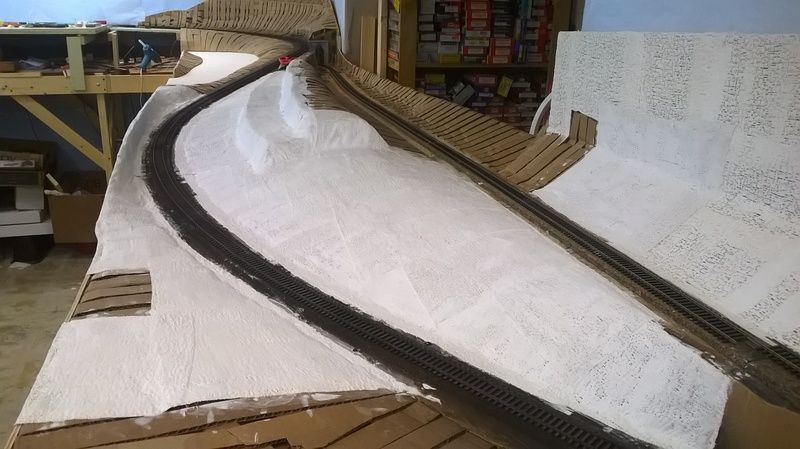 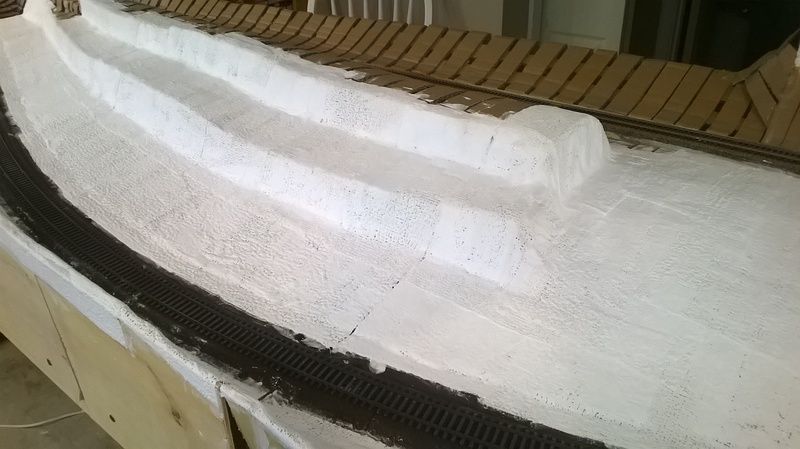 |
|
|
|
Post by TBird1958 on May 8, 2016 11:42:54 GMT -8
That's looking really nice Jim! I'm jealous, and need to get my butt in gear!
|
|
|
|
Post by fr8kar on May 8, 2016 12:08:45 GMT -8
I'm getting a little closer to the finish line on the first of my four 3D printed cabooses:    I've done more work since taking the photos. Hopefully next week it will be done. |
|
|
|
Post by riogrande on May 8, 2016 13:30:49 GMT -8
Mark, Thanks for the kind words. I've waited a long time to try some of these things out - better late than never.
Ryan. Great job on the 3D printed Cotton Belt caboose. Looks really great!
|
|
|
|
Post by fr8kar on May 8, 2016 17:18:14 GMT -8
Thanks, Jim. It's been fun iterating the design and creating new parts for the caboose bodies.
I really like all the caboose photos this weekend. Nice work everyone.
|
|
|
|
Post by mlehman on May 8, 2016 18:04:33 GMT -8
Ryan, It just turned into a theme all its own somehow. Always good to remember the caboose and not let it fade from memory. Beautiful work on your Cotton Belt cab. I'm sure you've told us, but what are the other three you're building now? There were multiple options and I've lost track. Jim, Nice work, I'm sure you're feeling the energy now. At least this was the point that really got me excited with what I was building after so much infrastructure that had to come first before the fun really started  |
|
|
|
Post by fr8kar on May 8, 2016 18:32:10 GMT -8
Thanks, Mike. The four I have under construction are DRGW 1518, SOO 65, ATSF 999700 and this one, SSW 41. I also have the underframe of SLSF 1200 started, but I haven't ordered the body parts for it. It's notable for being the only Frisco caboose with Rockwell trucks.
When I finish all these I want to build one of the MKT cabooses in the 100-124 series. By that time I hope Athearn gives us some GP39-2s to use with it.
I've had many people email me with requests to do different variations on the ICC EV body, so when I've been able to get enough data to do it, I've made the variations. At this point I think I'm up to 36 unique extended and standard cupola bodies each specific to a particular railroad and series, all of which are made of various combinations of sides, ends, roof and cupola parts, along with battery box, brake rigging and vent details.
I can tell you I understand why the big manufacturers are so gun-shy when it comes to making the definitive model of these cabooses: every railroad had their own version or versions. BN inherited several and made up their own versions post-merger and Soo Line had five versions, just to name two railroads. Tooling up so many options would be very expensive. Tooling up one option, as Atlas did, is okay for those who can live with the difference between the model and their prototype. It's been a great starting point for a few of my models and is a requirement for any of the bodies I've designed. Buying brass was okay as long as these cabooses were being produced, but now isn't much of an option. So I just couldn't wait around any more. I'm getting older and these cabooses are a big part of what I model, so I took matters into my own hands. But I would certainly welcome a high quality mass produced model if Athearn, Scale Trains, Exactrail or somebody like that was willing to invest the money to do it right.
|
|
|
|
Post by jonklein611 on May 8, 2016 21:02:42 GMT -8
Thanks, Mike. The four I have under construction are DRGW 1518, SOO 65, ATSF 999700 and this one, SSW 41. I also have the underframe of SLSF 1200 started, but I haven't ordered the body parts for it. It's notable for being the only Frisco caboose with Rockwell trucks. When I finish all these I want to build one of the MKT cabooses in the 100-124 series. By that time I hope Athearn gives us some GP39-2s to use with it. I've had many people email me with requests to do different variations on the ICC EV body, so when I've been able to get enough data to do it, I've made the variations. At this point I think I'm up to 36 unique extended and standard cupola bodies each specific to a particular railroad and series, all of which are made of various combinations of sides, ends, roof and cupola parts, along with battery box, brake rigging and vent details. I can tell you I understand why the big manufacturers are so gun-shy when it comes to making the definitive model of these cabooses: every railroad had their own version or versions. BN inherited several and made up their own versions post-merger and Soo Line had five versions, just to name two railroads. Tooling up so many options would be very expensive. Tooling up one option, as Atlas did, is okay for those who can live with the difference between the model and their prototype. It's been a great starting point for a few of my models and is a requirement for any of the bodies I've designed. Buying brass was okay as long as these cabooses were being produced, but now isn't much of an option. So I just couldn't wait around any more. I'm getting older and these cabooses are a big part of what I model, so I took matters into my own hands. But I would certainly welcome a high quality mass produced model if Athearn, Scale Trains, Exactrail or somebody like that was willing to invest the money to do it right. You could be the Rapido of cabooses... |
|
|
|
Post by fr8kar on May 9, 2016 1:00:20 GMT -8
You could be the Rapido of cabooses... LOL! I think Shapeways' pricing will prevent that. You have to really want one of these cabooses to 3D print them. By the time you get the donor Atlas caboose, the sides, ends, roof, cupola and detail parts from Shapeways, then paint, decals and whatever miscellaneous details you need, you're at least $150 into one caboose. Over $100 of that goes to Shapeways. I'm hopeful the price goes way down, because I have at least half a dozen bay window cabooses I'd like to do after all these extended vision bodies, not to mention several freight cars. |
|
|
|
Post by riogrande on May 9, 2016 3:52:24 GMT -8
Ryan, I look forward to seeing your D&RGW caboose!
|
|
|
|
Post by Christian on May 9, 2016 3:54:21 GMT -8
I think Shapeways' pricing will prevent that. You have to really want one of these cabooses to 3D print them. I'm surprised nobody has taken them on. Although the Shapeways price for the services offered doesn't seem to me to be that much out of line. Never the less, saving a few dollars here and there would seem to be the sort of stuff that excites model railroaders. |
|
|
|
Post by stottman on May 9, 2016 7:06:49 GMT -8
What about having resin castings made from your 3D printed masters?
|
|
|
|
Post by dtinut on May 9, 2016 7:41:52 GMT -8
What about having resin castings made from your 3D printed masters? If you wanted to build more than one, then purchasing a set of Shapeways parts, and using them as masters would certainly be the best way to make it affordable. Regards, Brian |
|
|
|
Post by Chet on May 9, 2016 8:47:31 GMT -8
I picked up this brass Consolidation from a friend who need some bucks fast. It was lettered for Santa Fe, but I repainted it for my freelance railroad.   |
|
|
|
Post by stottman on May 9, 2016 10:19:51 GMT -8
What I mean was for "fr8kar" to do it. There are companies that will contract and make cast resin parts. Based on what a cast resin boxcar sells for (even with its low production and detail parts), it would be much more economical then mass production of 3D printing.
Just depends on how far he wants to take his business.
I am sure from a "part time business" aspect Shapeaaways is much easier (upload file, profit), but just an idea...
|
|
|
|
Post by fr8kar on May 9, 2016 14:10:13 GMT -8
I picked up this brass Consolidation from a friend who need some bucks fast. It was lettered for Santa Fe, but I repainted it for my freelance railroad. View Attachment View AttachmentNice work, Chet. The second photo looks real! |
|
|
|
Post by fr8kar on May 9, 2016 14:28:43 GMT -8
I have considered casting my own parts or having someone else do the work. I don't have the equipment or expertise to do it on my own. I don't know of any reputable vendors who do this type of work or what criteria to evaluate them, either. But if I could solve that problem, I would definitely offer cast parts. That being said, if anyone knows a good resin casting service that can deliver parts similar in quality to Rail Yard urethane kits, I'm all ears.
I'm not very interested in using Shapeways to make money so much as to make this stuff available. It's a challenge to me to create the parts and if someone else can use them I'm happy to make them available. That's why I try to concentrate on the unusual.
The prospect of someone using my printed parts to offer their own resin cast copies for sale without my permission is something I hope I don't have to deal with, but if it happens I won't be the first whose printed models suffered the same fate. I'm not sure there is any protection against such piracy, other than continuing to make parts for models that simply aren't commercially viable in a mass produced version.
|
|
|
|
Post by riogrande on May 13, 2016 9:20:27 GMT -8
|
|
|
|
Post by Christian on May 13, 2016 10:53:27 GMT -8
Christian, Just love that building. I may get some inspiration from it for some upcoming builds. It would be good to know if built from a plan, but around here, we don't need no stinkin' plans, we just build them anyway.  Sorry I missed this earlier - something shiny out the window I guess. Three possibilities for the plans. 1 - Harry Brunk Up Clear Creek on the Narrow Gauge series. 2 - Harold Russell plan in Model Railroaded for some quaint little up state New York town. Or, 3, neither of those. For guesstimating it's 4.5" by 4.5" by 4.5 inches in HO. Awfully convenient which makes me suspect Brunk. |
|
|
|
Post by Paul Liddiard on May 13, 2016 11:55:48 GMT -8
Jim Fitch: I talked with the guy who designed these for Shapeways, and he agrees that the windows are a little big...he might make inserts to correct the discrepancy.
|
|