|
|
Post by onequiknova on Aug 18, 2012 14:11:46 GMT -8
I'm starting a build of Rock Island's E8 #654 that will be based off of a BLI undec E8. I'll document the build here and share some tips and tricks along the way. Here's the prototype.  First things first, I'll start with the major body mods. I need to blank the port holes and remove D/B fan. Instead of just showing a picture with the port holes blanked, I wanted to show my method of achieving near perfect results for blanking the port holes. A lot of guys struggle with this including myself at one time. I want to apologize for the picture quality, my work bench light plays havoc with my camera. Obviously the first thing you need to do is shave off the protruding window frames. I use a # 17 chisel blade for this. The next step is where a lot of guys go wrong. After shaving off the raised detail, it may look flat, but it's not. If you try using filler over the shaved area, you'll never get it flat. Here's a good way to assure the area is completely flush with the surrounding panel. Here I have used a Sharpie and colored in where the window frame was. This will aid in finding the high spots. I left a little more of the frame than normal to highlight the technique. 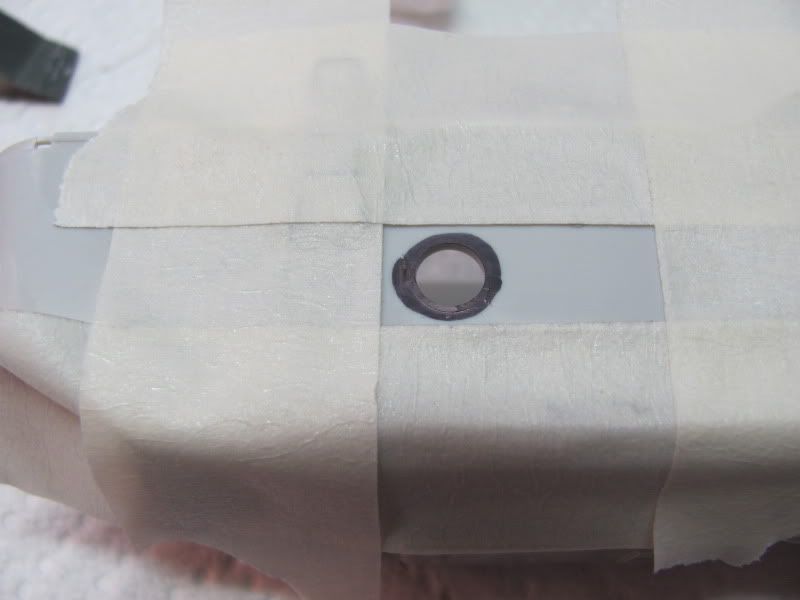 Once you start sanding, you can easily see the remains of the window frame. 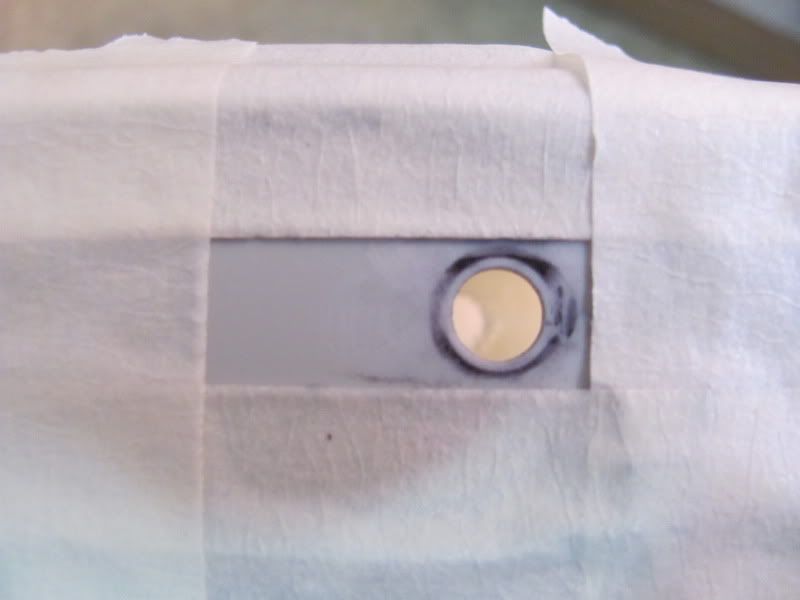 Keep sanding until all of the high spots are gone. You'll see a few spots where some Shapie ink remains. Those are nicks from the chisel blade that will fill in just fine with filler. BTW, All the sanding thus far has been done with a small strip of 400 grit folded over the end of a #17 chisel blade to form a straight edge to sand with. A flat piece of paper is critical to achieving good results. 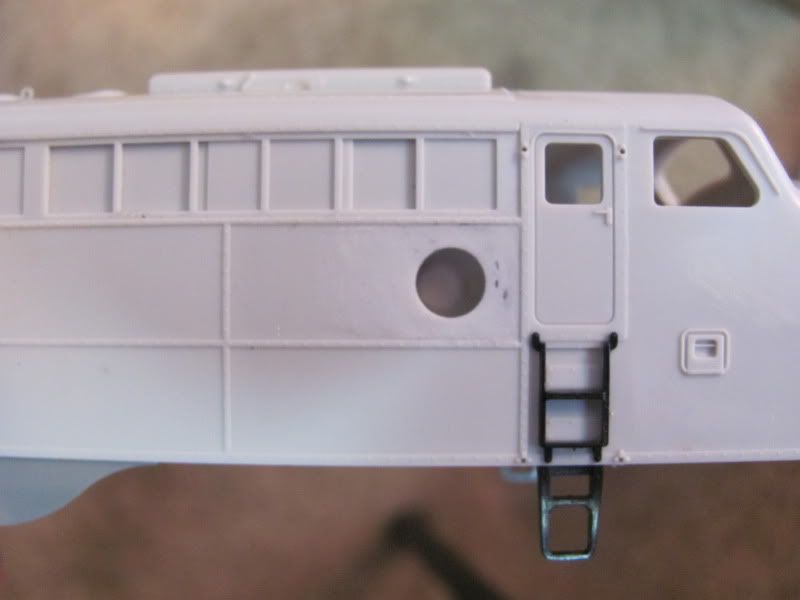 Once that parts done, now it's time to fill the hole. I have a set of leather punches that has just the right size for BLI's port holes. I use it to punch out plugs from .040 styrene. The plugs are glued from inside the shell. Here the plug has been glued and weathering powder rubbed on the area as another round of guide coat. (I don't use a Sharpie here because you won't get all the ink out of the seam, and that may cause problems later when it comes time to paint. Excess weathering powder can be washed out of cracks and crevasses after sanding.) You need to make sure the plug is as flush as possible with the outside of the shell. This will save sanding time. Use the powder as a guide and sand with 400 until the plug is completely flush with the surrounding panel just like before. You basically want to sand until all the weathering powder is gone. The plug to the left has already been sanded flush. 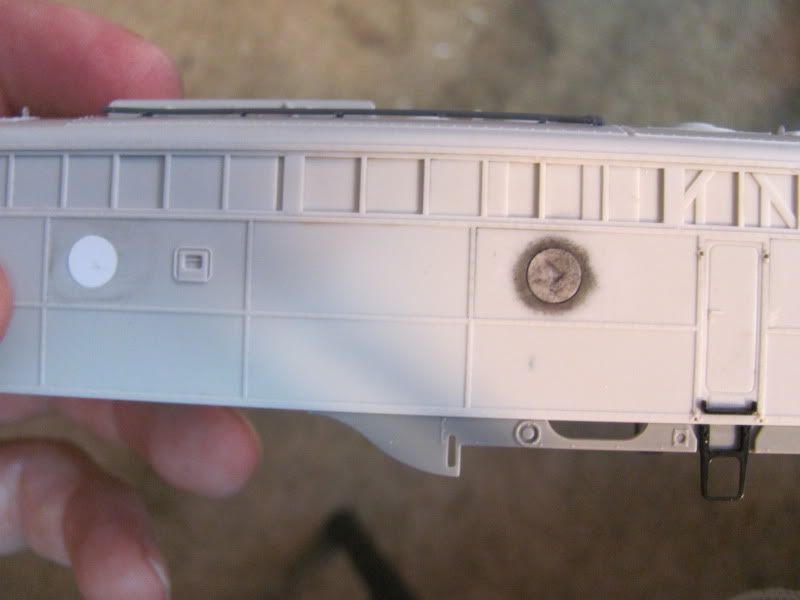 All that's left is a round of body filler. I forget to take a picture after sanding the filler, but you should have very little if any remaining when finished sanding. All the leveling work was done to the plastic, so you won't have to hide anything with filler except the nicks and scratches. I use the chisel blade to apply the filler nice and thin. No need to glob it on, it will only create more work. Now hit all your sanding scratches with 600 grit, and prime. I just spot prime the areas I'm working on. No need to prime the entire shell at this point Here are the results. It's hard to tell, but there is little evidence of a port hole in person. 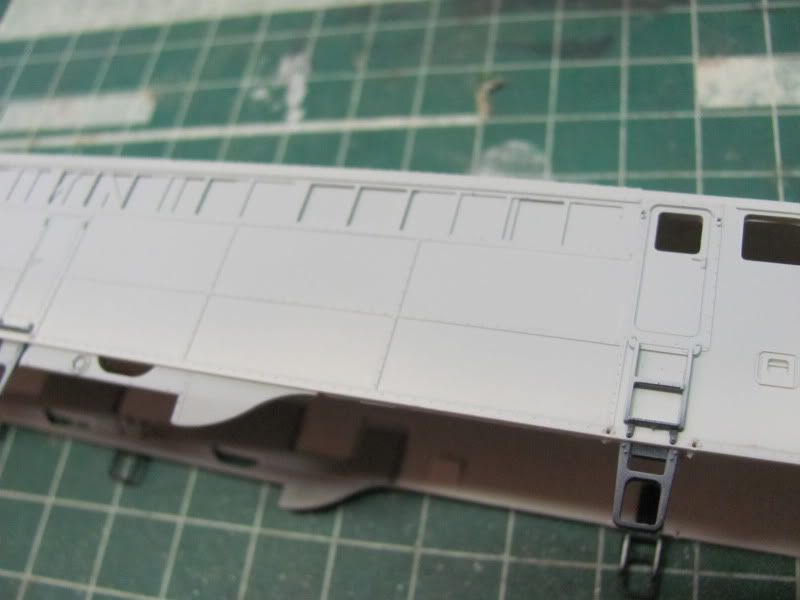 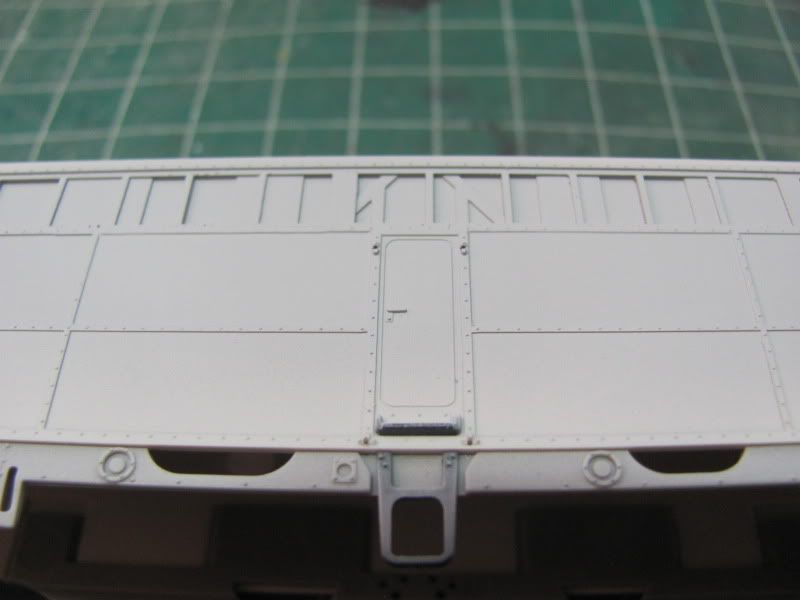 If there are any small defects remaining, you can use some 400 grit and lightly sand the primer down. Follow that with 600 grit, and then re-prime. The first coat of primer will act as a filler for any minor imperfections. More to come..... |
|
|
|
Post by antoniofp45 on Aug 18, 2012 15:03:29 GMT -8
Excellent body work and tutorial!  Good tip regarding the use of a guide coat as it's the same basic principle use for prototype body work. I'm looking forward to seeing your progress on this classic race horse that remained in these colors in commuter service well into the Amtrak era. BTW: Does the prototype #654 still exist? Her sister, #652, was restored some years back and at last report was in the Rock Island scheme. |
|
|
|
Post by onequiknova on Aug 18, 2012 15:09:18 GMT -8
My other hobby is classic cars, so I've done my fair share of bodywork. That's probably where I got the idea for the guide coat. Though in auto body it's usually used to block sand primer.
654 Was cut up after shut down. 652, which wore a gaudy Bicentennial scheme in the later 70's, was preserved after shutdown and was repainted into it's original rocket paint. It still wears the same paint, although it's a little worse for wear. It along with E6 630 were recently purchased by a museum in Iowa.
|
|
|
|
Post by railthunder on Aug 18, 2012 15:19:28 GMT -8
Thanks for your terrific post on doing a model start to finish. These type of posts are what will keep the forum very strong. Bravo!
|
|
|
|
Post by roadkill on Aug 18, 2012 16:40:57 GMT -8
I like that method of filling portholes... I'm about to start building a pair of EL E8s, also using BLI units, and EL was big on eliminating portholes.
|
|
|
|
Post by railthunder on Aug 18, 2012 17:24:47 GMT -8
I also meant to ask do you know what size/model# your leather hole punch is? I've seen several, but want to make sure I get the right one.
|
|
|
|
Post by onequiknova on Aug 18, 2012 19:20:52 GMT -8
I don't have a part # or know the brand name. I bought them at a yard sale and threw the package away. The inside diameter of this particular punch measure .225". A few swipes with a file to the porthole and the plug is a nice press fit.
The one problem with using these punches on styrene is the plug gets stuck inside the punch. You'll need to push it back out though the backside, which can tend to distort the plug, so you'll probably need to punch a few holes to get a usable plug.
|
|
|
|
Post by railthunder on Aug 18, 2012 21:08:58 GMT -8
I don't have a part # or know the brand name. I bought them at a yard sale and threw the package away. The inside diameter of this particular punch measure .225". A few swipes with a file to the porthole and the plug is a nice press fit. The one problem with using these punches on styrene is the plug gets stuck inside the punch. You'll need to push it back out though the backside, which can tend to distort the plug, so you'll probably need to punch a few holes to get a usable plug. Great information. I've seen there are plenty on that auction site that may work including variety packs etc. On a different note is the air horn you're going to use a brass part or making your own with Detail Associates? The air horn looks similar to the GM&O ones on their E7As. I wonder if it's the same type. |
|
|
|
Post by buffalobill on Aug 19, 2012 7:34:09 GMT -8
Neat looking build. I am thinking about doing two of the BN E-9-AU's, the Morrison Knudson rebuilt Commuter units in the 9900 series. Many of the processes are the same. I will have to figure how to do the louvers in the back though.
Bill
|
|
|
|
Post by onequiknova on Aug 19, 2012 8:01:11 GMT -8
Neat looking build. I am thinking about doing two of the BN E-9-AU's, the Morrison Knudson rebuilt Commuter units in the 9900 series. Many of the processes are the same. I will have to figure how to do the louvers in the back though. Bill I built one of those years ago, but it's pretty rough by my current standards. I have one on my to do list. I would look into Archer louver decals for the louvered panels. |
|
Deleted
Deleted Member
Posts: 0
|
Post by Deleted on Aug 19, 2012 8:34:14 GMT -8
Neat looking build. I am thinking about doing two of the BN E-9-AU's, the Morrison Knudson rebuilt Commuter units in the 9900 series. Many of the processes are the same. I will have to figure how to do the louvers in the back though. Bill I built one of those years ago, but it's pretty rough by my current standards. I have one on my to do list. I would look into Archer louver decals for the louvered panels. I used Plano EMD switcher louvers  Hard to see the louvers because of the "Metra" lettering.  |
|
|
|
Post by rockfan on Aug 19, 2012 10:03:13 GMT -8
Are you going to do the "wings" paint job as in the picture? Let us know.
|
|
|
|
Post by onequiknova on Aug 19, 2012 10:07:19 GMT -8
Next up is blocking off the D/B fan. My first idea was to replace the entire hatch with a genesis hatch, but I decided to try this approach first. The old hatch was removed and a new plug cut from a scrap Intermountain F7 shell. The plug has slightly more arch that the BLI roof, so some sanding was in order to match the roof contour after the plug was glued in place. 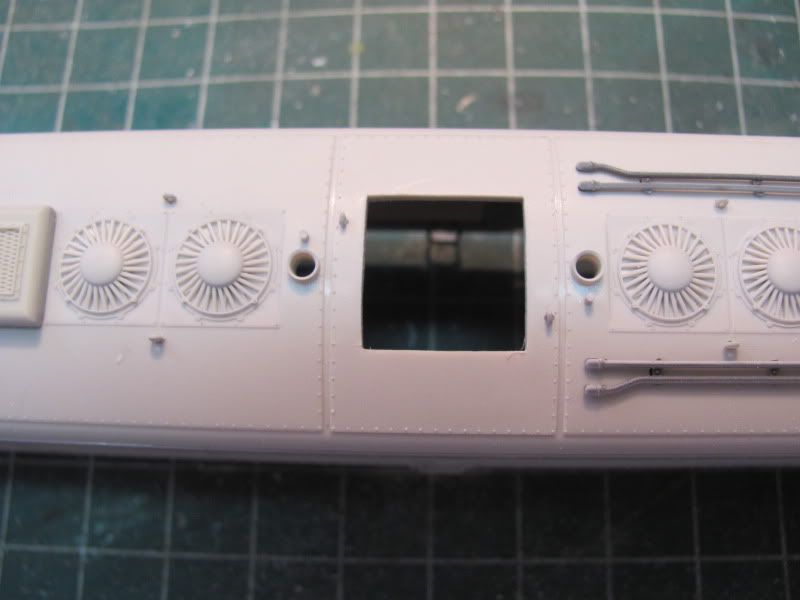 New plug glued in. I got a little carried away with the file, but the gap will be filled in with glue. 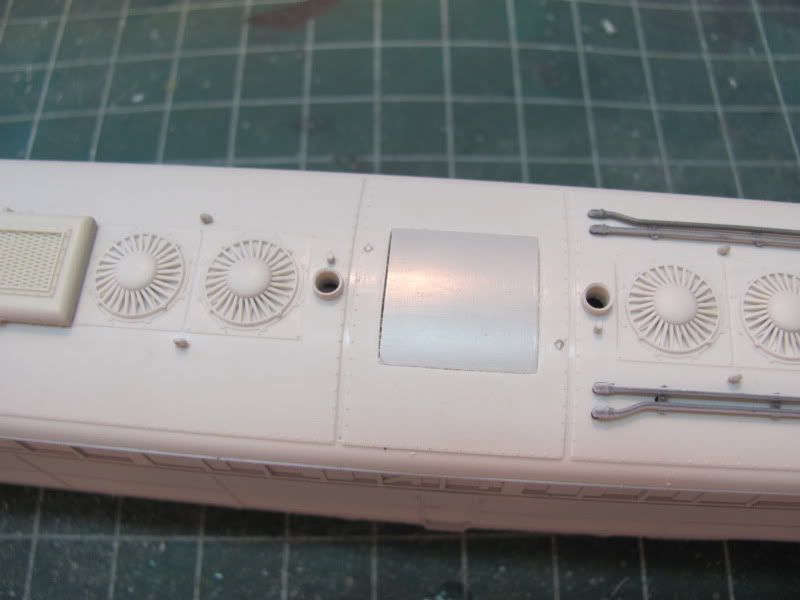 Plug was then sanded to shape using the weathering powder method to find the high spots. 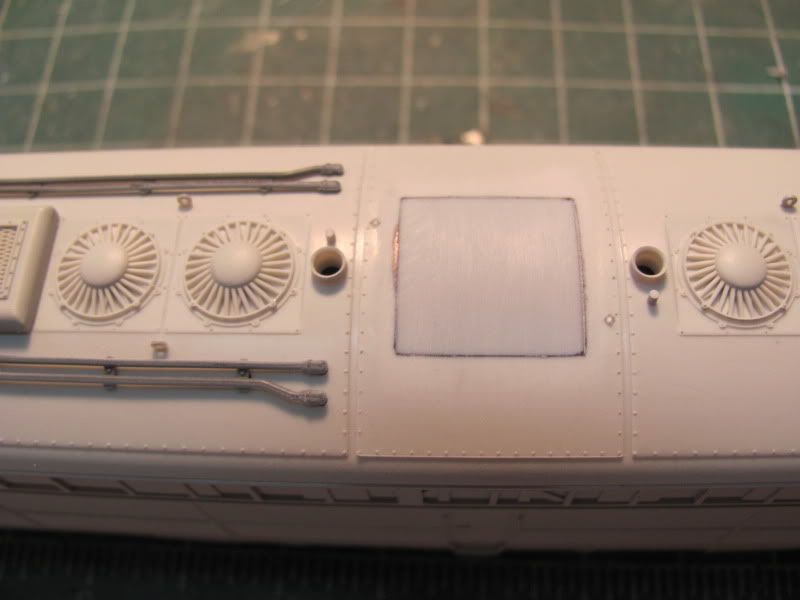 A light coat of filler was applied. Once sanded very little remained. 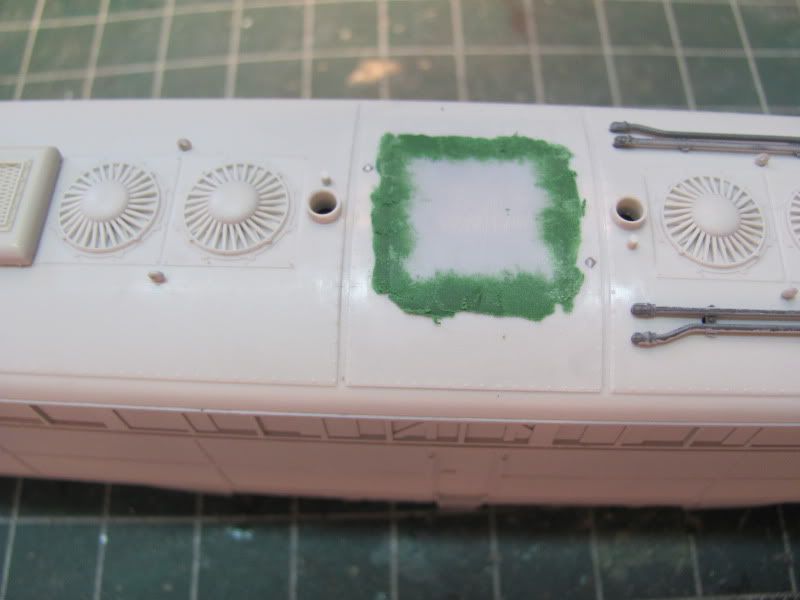 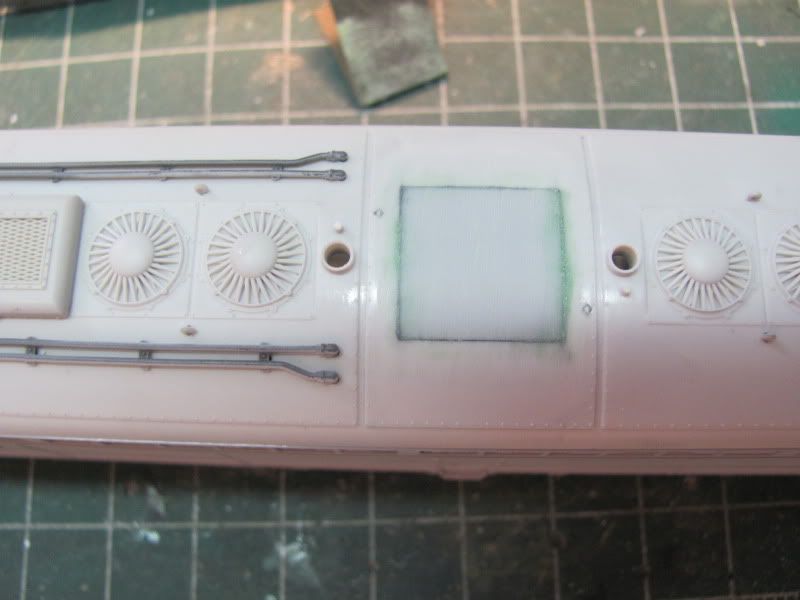 In primer. There is a slight shadow left that should disappear with some sanding and another coat of primer.  |
|
|
|
Post by onequiknova on Aug 19, 2012 10:23:13 GMT -8
Are you going to do the "wings" paint job as in the picture? Let us know. Yes. |
|
|
|
Post by rockfan on Aug 19, 2012 10:32:22 GMT -8
Awesome.
|
|
|
|
Post by buffalobill on Aug 19, 2012 11:59:13 GMT -8
Jim: Good looking Metra unit. John, this is going to end up as very detailed instructions for the BN build. Cool.
Bill
|
|
|
|
Post by onequiknova on Aug 19, 2012 12:34:07 GMT -8
Next up are the sand hatches. The prototype had their hinged lids removed, so I'll have to modify mine to match. First I take a 1/16" drill bit in my Dremel and open up the inside of the hatch large enough to fit a file inside. 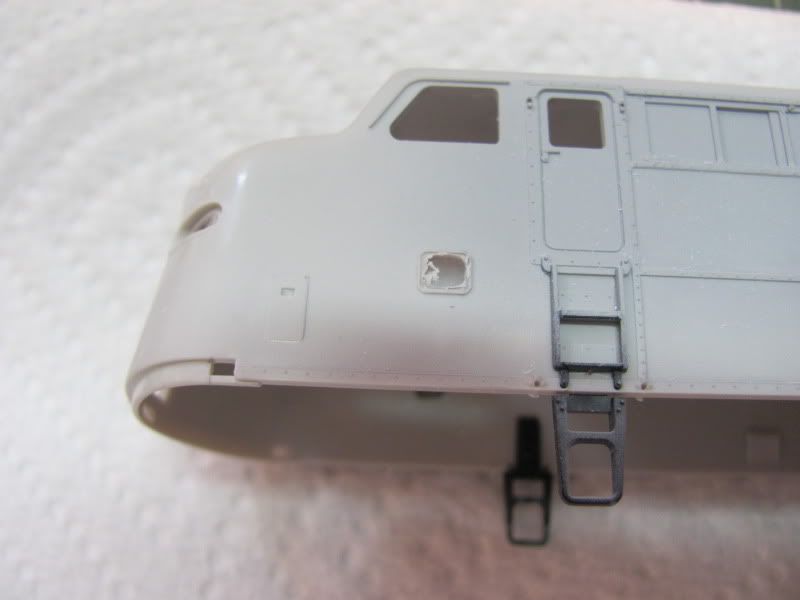 Opened up with a square jewelers file. Note I left the raised lip around the edge, like on the prototype. 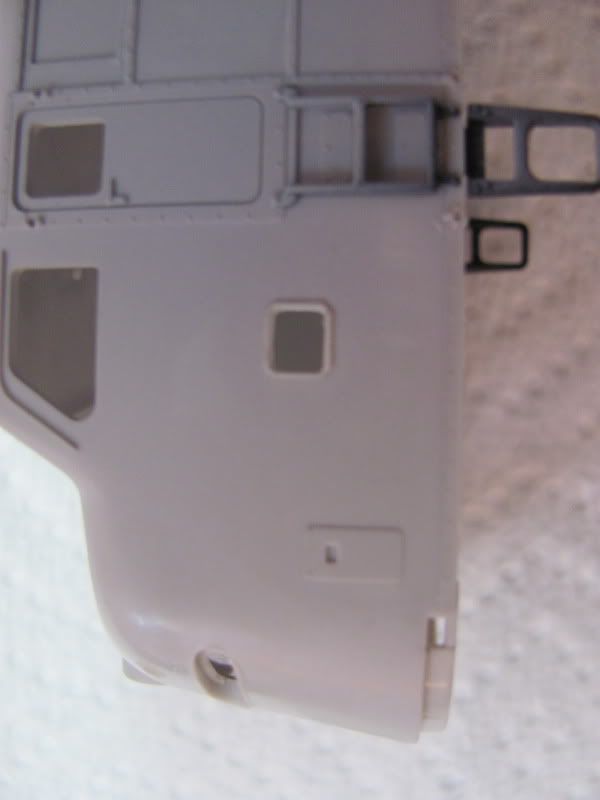 Next I cut and shape a piece of .010" styrene to fit flush in the opening. You want it flush with the outside on the bottom, with the top resting on the inside of the shell. 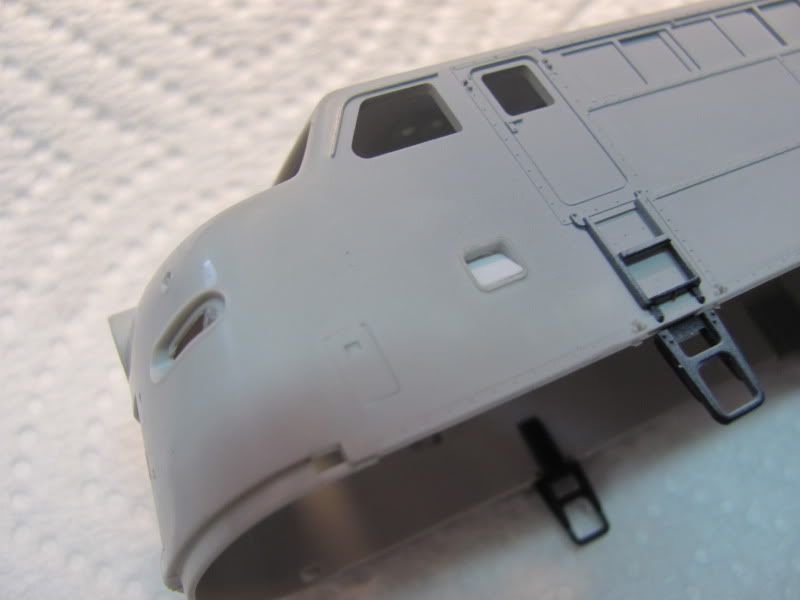 And finally, the new hatch cover. I used an MU block off plate out of my detail parts box, but they could be made from a small square of styrene as well. they stand slightly proud of the surface. Note in this picture the louvers on the lower part of the nose have been removed per prototype. 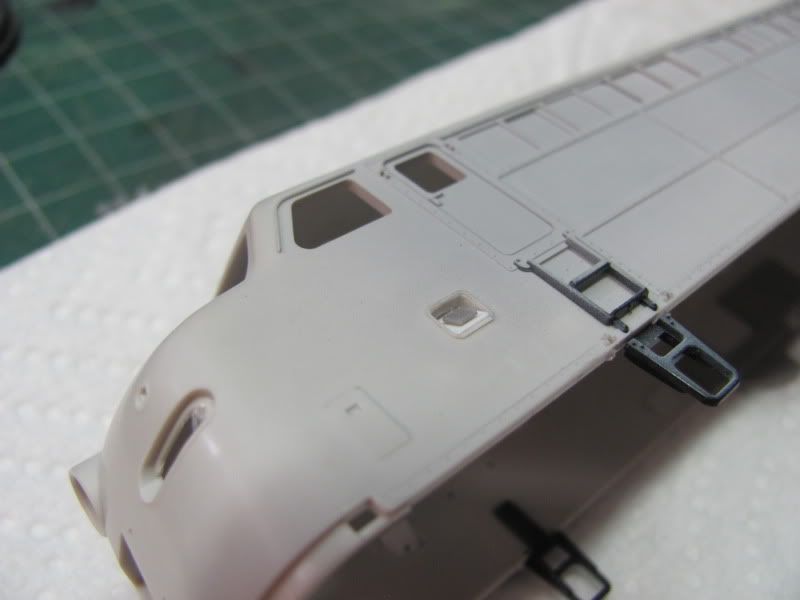 |
|
|
|
Post by onequiknova on Aug 19, 2012 14:13:11 GMT -8
Next I decided to tackle the pilot. I'm going to use a Highliner freight pilot. There is one little hiccup however. The BLI's pilot has the anti-climber molded to the pilot, while the Highliner is molded to the shell.  It's a fairly easy fix of cutting the anti-climber from the BLI pilot and grafting it to the Highiner pilot. The fit will be seamless once painted. 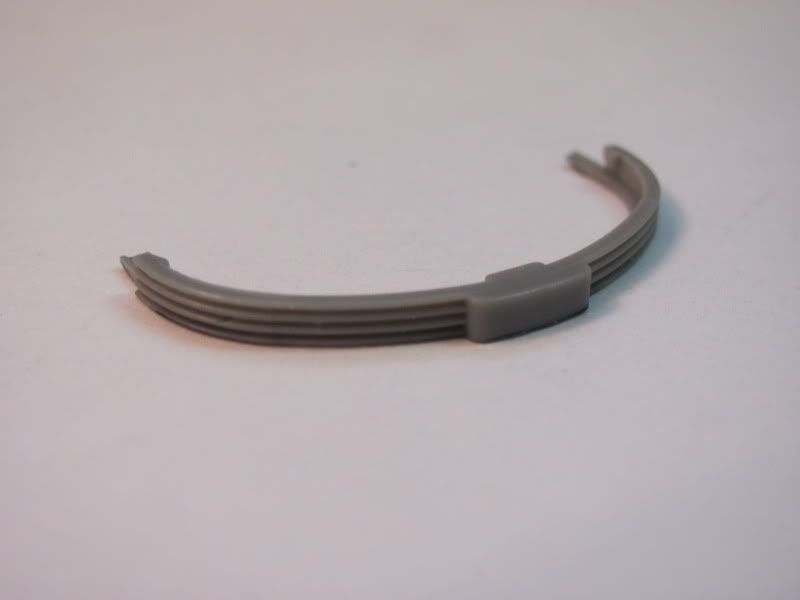 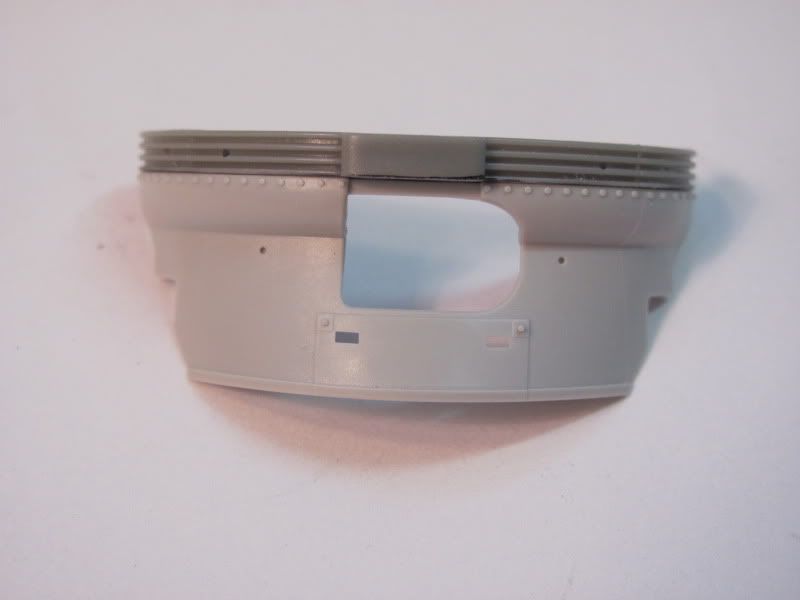 Due to the way the anti-climber interlocks with the shell, I can't glue anything together until I'm ready to permanently mount the pilot to the shell. 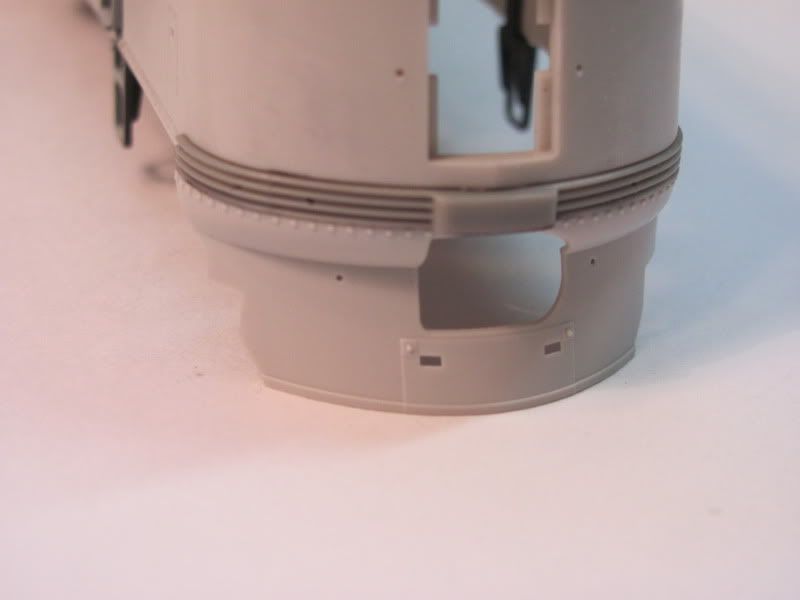 On a side note, I asked my girlfriend if she could tell where the windows used to be, and she couldn't see anything until I told here to look inside the shell. ;D |
|
|
|
Post by onequiknova on Aug 19, 2012 17:48:54 GMT -8
Some more work on the pilot. I was a bit leery of carving out the M/U pockets, but decided to tackle it now before I changed my mind. I used a very small chisel blade to carve them out. I also filed off the lower "hatch" on the pilot and removed the material at the bottom for access to the steam lines like on the prototype. 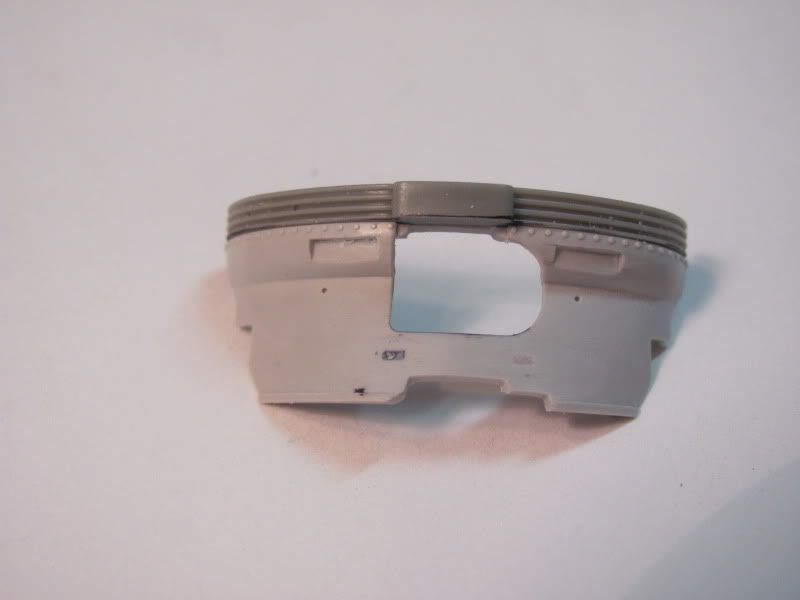 |
|
|
|
Post by onequiknova on Aug 20, 2012 17:12:56 GMT -8
Hopefully someone's still watching this. Work continues on the pilot. The MU hoses are those cheap Detail Associates hoses that were heated up and shaped to look like gravity is actually pulling on them. The air lines are DW (and look HUGE next to the MU hoses) with a small styrene bracket glued behind the pilot to mount them to. The cut bars are scratch built from .015 brass wire with DA brackets. I used eye bolts near the coupler opening to hold the long leg in place under the coupler. Just like the prototype, they're uneven and abused. I may have to do some tweaking once I try to mount the couplers. 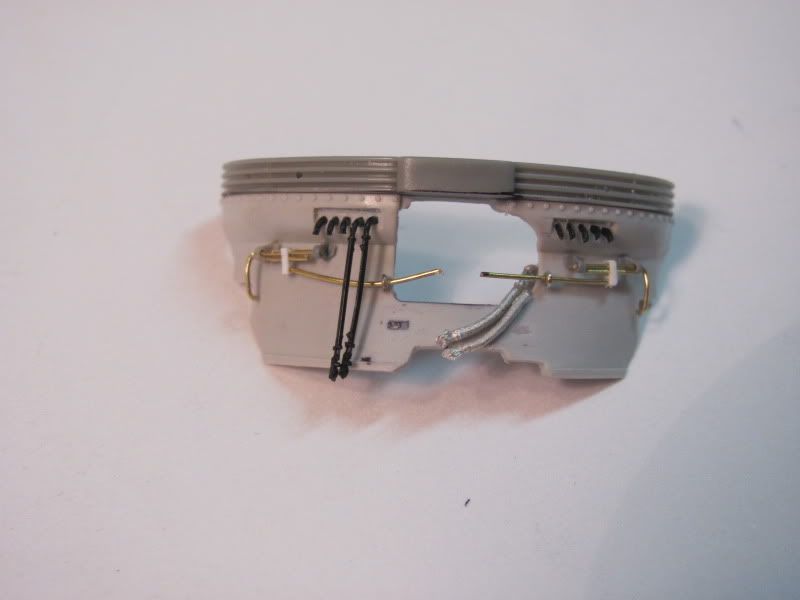 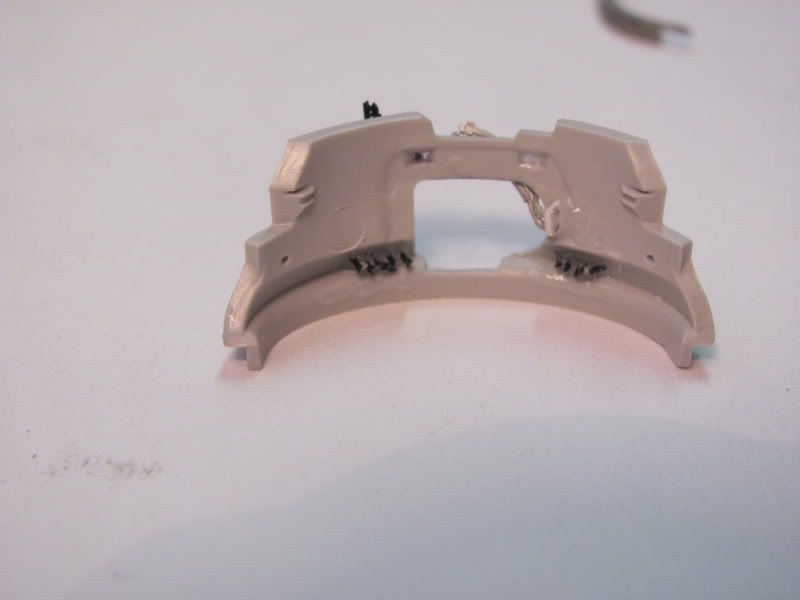 |
|
|
|
Post by buffalobill on Aug 20, 2012 17:21:35 GMT -8
John: Looking good, like the job you did on the pilot. Going to be one nice E unit when you are done.
Bill
|
|
|
|
Post by onequiknova on Aug 20, 2012 17:50:09 GMT -8
Does anyone have a decent picture showing how the etched pilot steps are supposed to be folded and mounted?
|
|
|
|
Post by dhs12001 on Aug 20, 2012 18:30:15 GMT -8
John
I assume you mean the hi-liner parts.
I'll pdf the Instructions to you tomorrow.
Dave
|
|
|
|
Post by onequiknova on Aug 20, 2012 18:43:31 GMT -8
Dave,
Yes, I'm referring to the Highliner parts. I would appreciate the instructions if you've got them.
Thanks.
|
|
|
|
Post by onequiknova on Aug 23, 2012 17:24:23 GMT -8
This forum seems to be getting more popular! This thread was already buried on the second page. After finishing the pilot, (thanks to Mr Street for sending the Highliner instructions), I moved to the rear of the unit. BLI installs a diaphragm on the back of their E8, but the diaphragm on 654 was LONG gone by this time. Removing the diaphragm from the model leaves me with this. 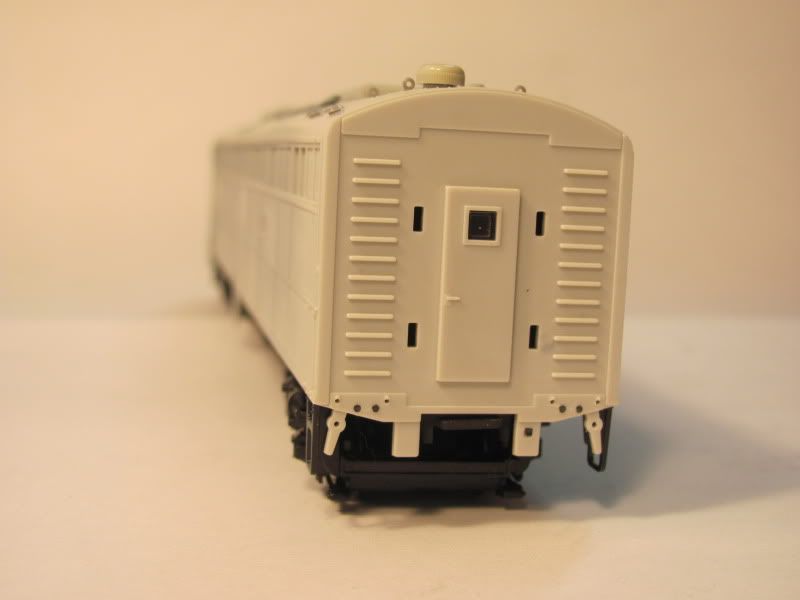 Yikes! Obviously something must be done. On my AB6 I cut up an Intermountain F7 shell for this part, but that was pretty costly. Luckily I found Details west sells this part in their F/E unit detail kit. 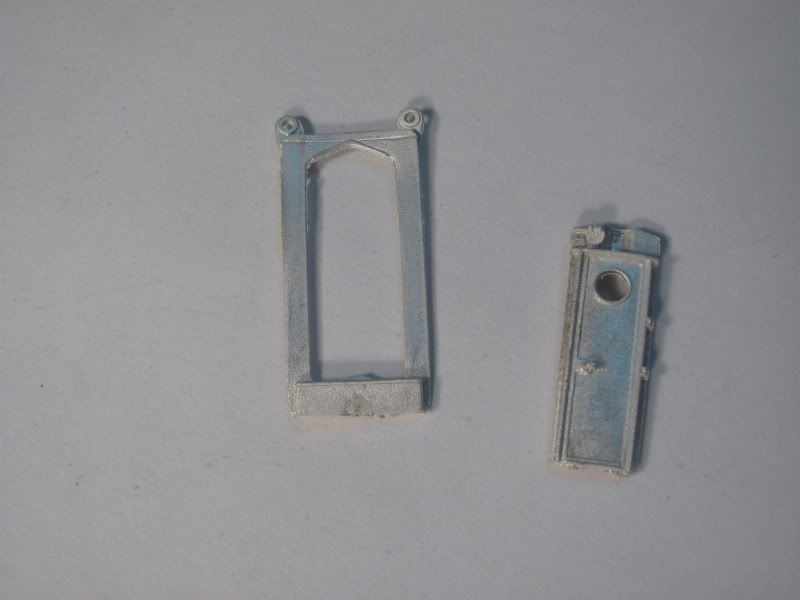 Of coarse this part was made to fit a blue box F7, so some slight modifications are needed. Here I have cut out the original door and plugged the holes that mounted the diaphragm. The DW door is installed after cutting off everything above the door. 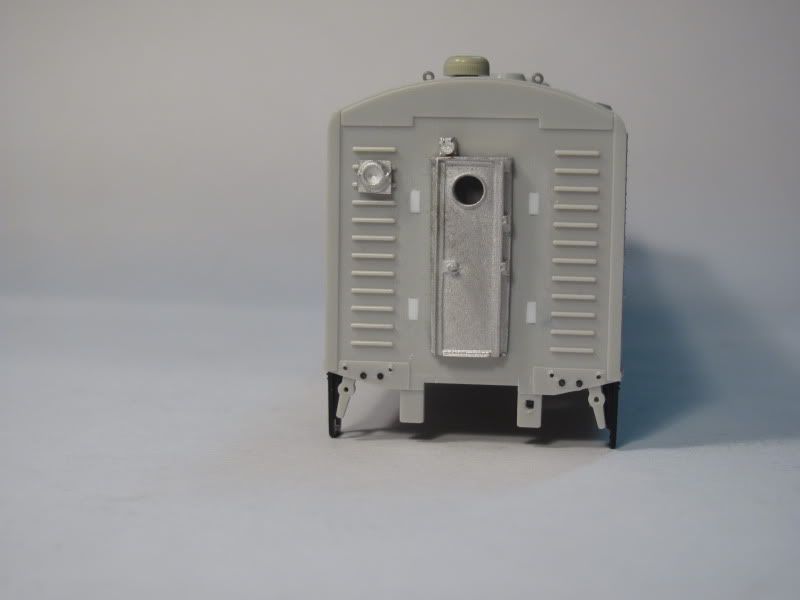 I don't know the technical name for this next part, but it's meant to glue on top of the big blob of plastic on the back of an Athearn F unit, therefore it's just a flat plate. On the prototype, this part sit on top of the collision posts, which the BLI unit lacks, so I had to build my own. I represented them with .040x.080 styrene strip. 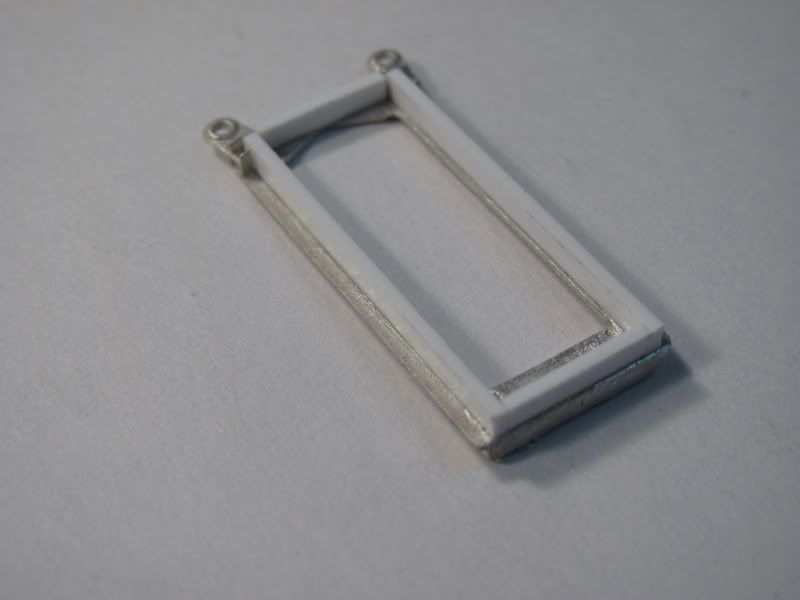 And finally all glued together. The back up light came with the detail kit and the MU plug is another DW part. [ 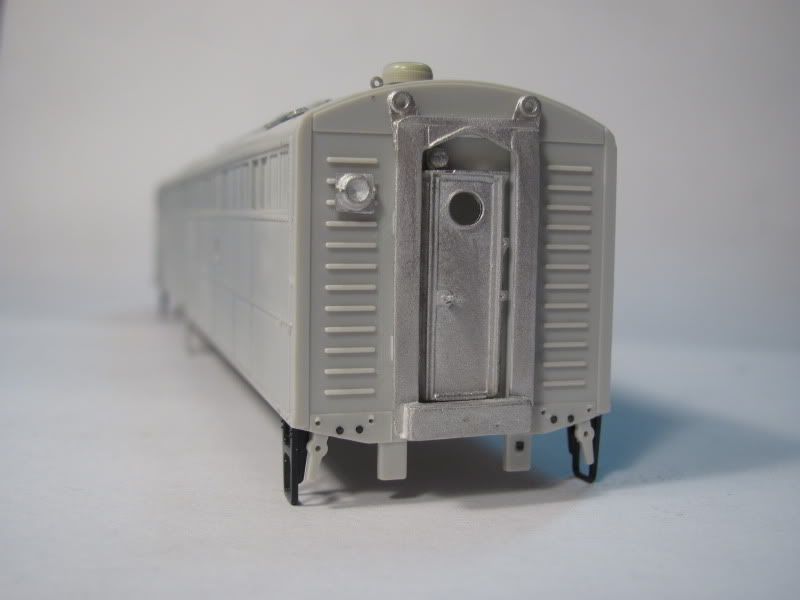 A shot of the nose with some details already added. The nose door is a Highliner part, (with an Intermountain handle), which is a nice fit except for one thing. The BLI nose has a much more pronounced point on it's nose. A few minutes with a file and sandpaper, brought it down to an acceptable level. I wasn't happy with the location I put the ladder grabs, so I removed them to relocate them. That's where the putty is from. The skirts were also removed and IMRC stirrups glued in place. 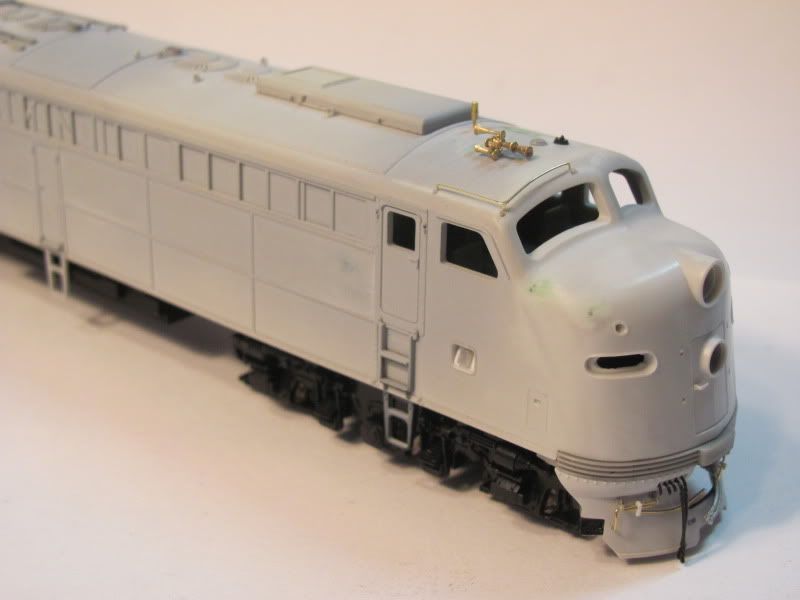 I'm hoping to be painting by this weekend. |
|
|
|
Post by rockfan on Aug 24, 2012 8:48:40 GMT -8
Other than "Rocket" paint I think the red/yellow "wings" is one of the best on a RI passenger unit!
|
|
|
|
Post by valenciajim on Aug 24, 2012 11:47:54 GMT -8
This is an outstnding thread!
|
|
|
|
Post by buffalobill on Aug 24, 2012 13:32:27 GMT -8
John: It is lookin good. It should be a spectacular model once its painted and the final details are in place.
Bill
|
|
|
|
Post by onequiknova on Aug 25, 2012 11:38:52 GMT -8
I'm still finishing up the final details. I've got the nose grabs and walkways done. One issue I had with the walkways was they get in the way of masking the wings, so I wanted a way to be able to leave them off for paint, but not have to risk gluing them to a fresh paint job. I came up with this.. The walkway is made from a .60x.60 brass L with the side that mounts to the body filed down to .040, so you end up with a .040x.060 L. Small scraps of styrene form the bracing and DW NBW casting act as locating pins so I can glue the walkway on from inside the shell after it's painted. 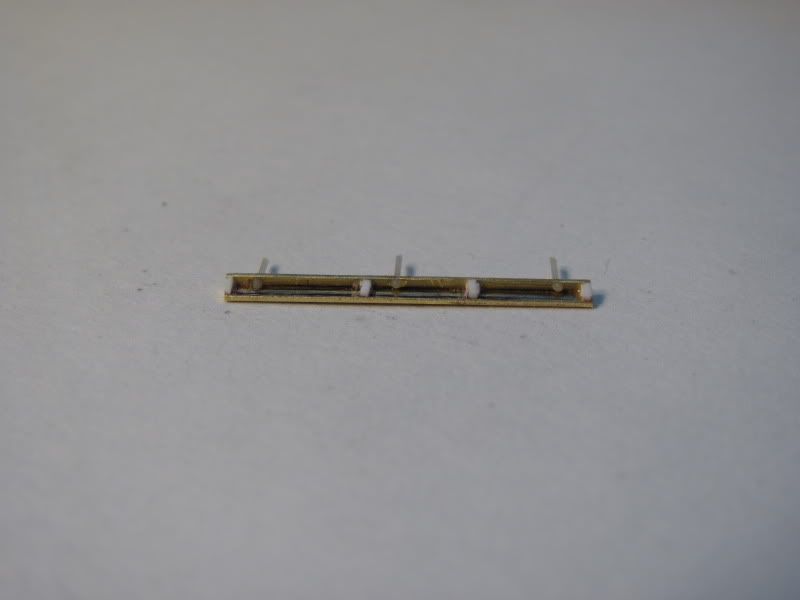 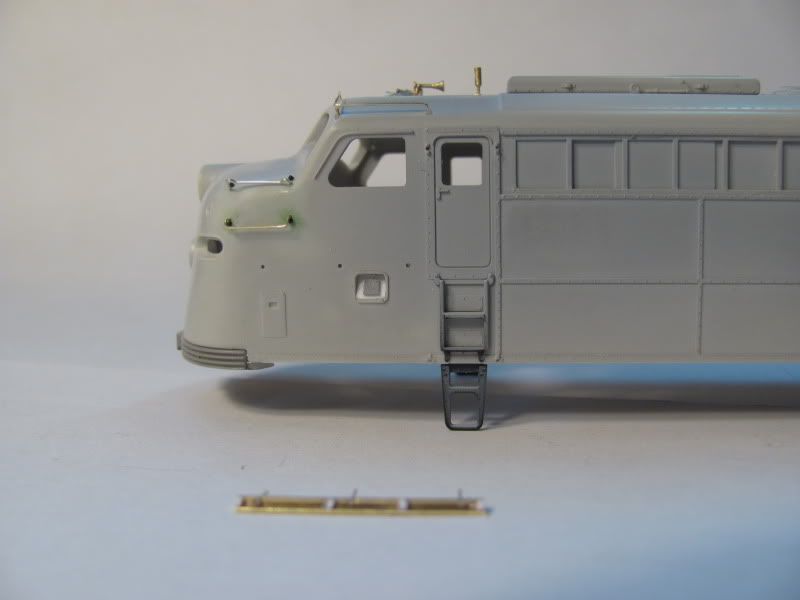 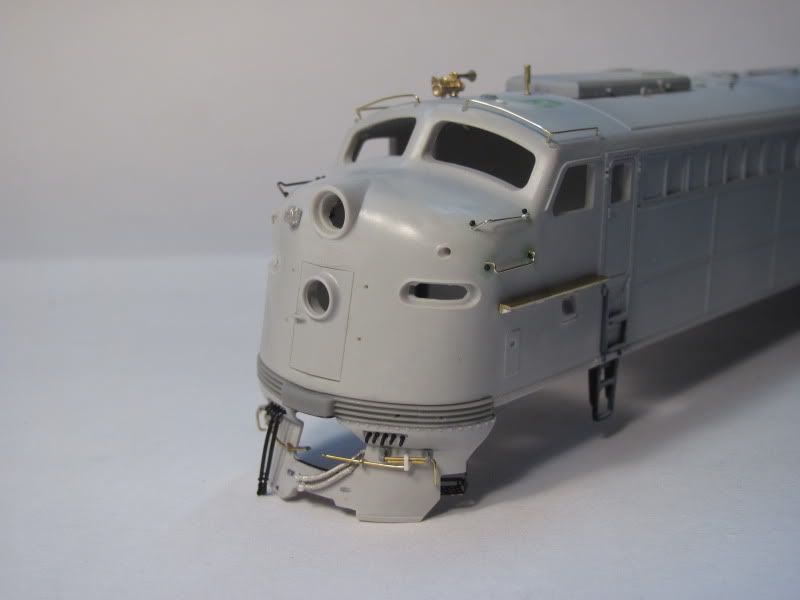 The rear also received it's draft gear, which also came in that D/W F unit detail kit. The MU hoses are DW as well. 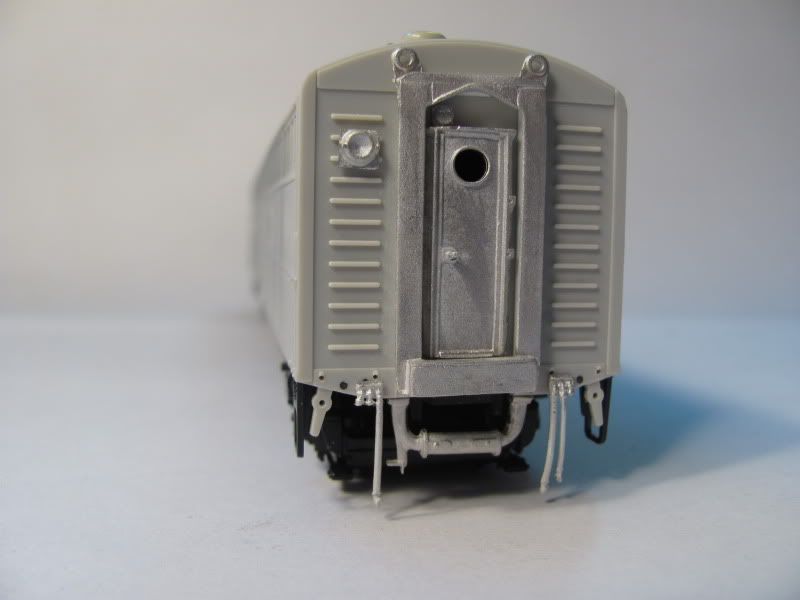 |
|
|
|
Post by stevef45 on Aug 25, 2012 18:37:50 GMT -8
awesome work! I love seeing build threads like this.
|
|


