|
|
Post by Judge Doom on Mar 10, 2013 0:13:10 GMT -8
Well, doesn't hurt to try. Here's an SW1200RS I recently completed. Still missing a few minor details (cut levers, MU, etc). Converted from a Proto 2000 SW9 with extensive work to retrofit Flexicoil sideframes on the stock Proto trucks. TLT paints and Microscale & Black Cat decals.   (Some might have seen it before, I posted it elsewhere recently) |
|
|
|
Post by shoofly on Mar 10, 2013 1:42:31 GMT -8
This one might look a little familiar to Donnell  I've been tasked to rebuild the track on a module. Part of that, I felt, was moving the crossover from the #1 yard track and siding and moving it from the siding to the main. Turnout rebuilding includes upgrading the CVT turnouts with heel blocks (they tie the points to the closure rail and mount to the stock rail, they sturdy up the wobbley part of a turnout), and replacing the stock CVT throwbar with the proto87stores pcb and photoetched point braces (heel blocks and point braces all on same fret). The following photos show from after things were torn up and new switch ties laid. Overhead of the crossover early in reconstruction  The new heel blocks can be seen in this photo. Missing points but the majority of rail has been relaid. Old crossover ties visible to the left. I kept the ties but laid straight rail through them. Mainline is to the right  Points installed using P87stores etchings. You can see how the heel blocks hold the three critical parts (points, closure, and stock rail) of a turnout together  Looking down the relaid crossover from main to siding/drill. You might notice a few standard ties replacing a couple of the turnout ties. I saw the SP did that very same thing in oxnard yard a ways back. Thought it'd be cool to model that "hodge podge" tie replacement.  Also cleaning up the joints with Free-mo tie endplates which is simply a solid PCB that has ties milled into it  Almost done..more photos later today, but first some sleep ChrisP |
|
|
|
Post by Brakie on Mar 10, 2013 2:17:40 GMT -8
I needed loads for my Walthers 65' millgons so,I decided to do something different and off the well beaten track. I added a pack of N.J.Internation crane boom sections to one of my orders and here's the end result.I still need to add banding. 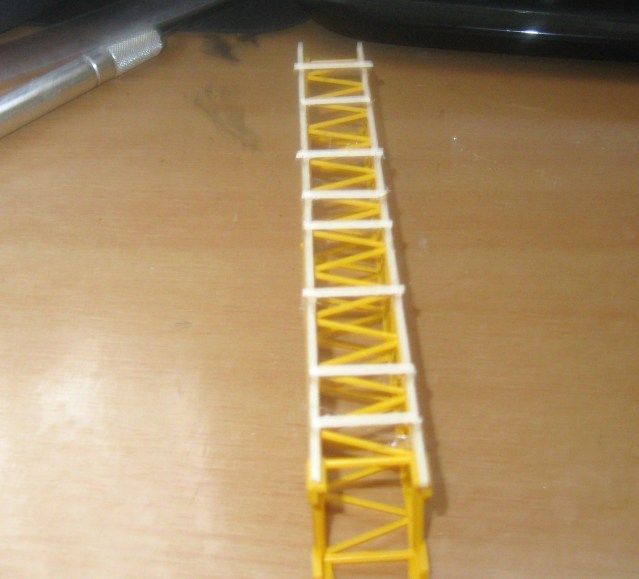  |
|
|
|
Post by dti406 on Mar 10, 2013 6:00:06 GMT -8
Finally finished some cars and managed to get some pictures taken!   This was a project I started a while ago, used a McKeen 12 Panel Triple hopper and cut the middle four sections out and glued the remaining parts together, also cut and spliced the frame and added an airline under the side of the car. Painted with Scalecoat II Black and lettered with Mark Vaughn Decals. These twins were of 65 Ton Capacity which was very close to the 70 Ton Capacity of the Triples. The NYC rebuilt several hundered of their old Twin Hoppers into these 65 Ton Cars in two seperate Lots, one for the NYC & TOC and the second #107H for the Perioa & Eastern. Please note the decal shows the incorrect date stenciled on the prototype of 73-3-66.  This Thrall Car is a standin for one of the 10 Greenville cars owned by the DT&I, it does have the same general shape and rib configuration as the Greenville car. I added an Eastern Car Works Gon Cover as the Athearn one is too short for a proper 52'6" Gon. Painted with Scalecoat II Black Paint and lettered with Herald King Decals.  Atlas 3910CF Cylindrical Covered Hopper, painted with lightened EL Gray and lettered with Mark Vaughn Decals. I think this is the best Railroad Owned Covered Hopper Paint Scheme. Thanks for looking! Rick J |
|
|
|
Post by fr8kar on Mar 10, 2013 6:40:08 GMT -8
Here's an Athearn RTR SD40 I've been working on: The wavy, too short Athearn side handrails replaced with brass 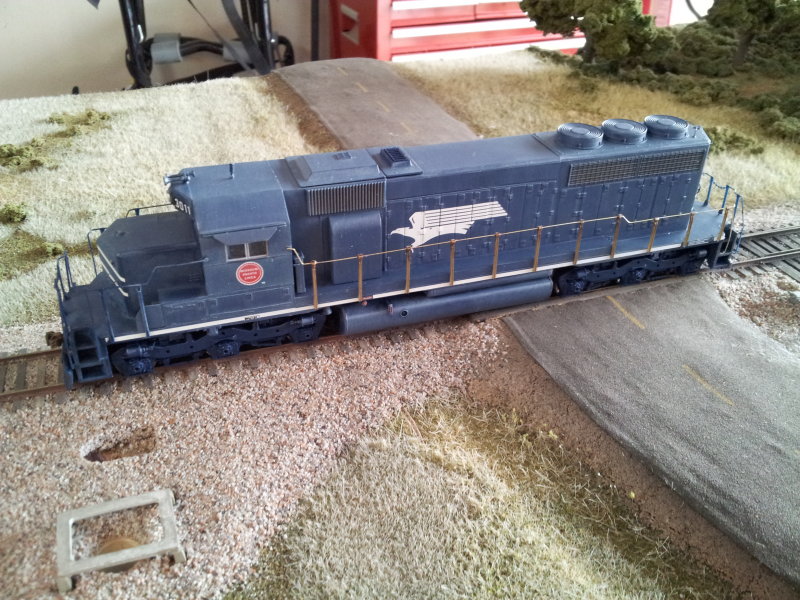 Handrails painted   Here's a shot showing the first pass at a fade  More weathering and decals to come to model it when it was one of the double eagles... |
|
|
|
Post by Chad on Mar 10, 2013 7:49:42 GMT -8
|
|
|
|
Post by nebrzephyr on Mar 10, 2013 7:52:10 GMT -8
Here's a couple old Roundhouse and Athearn hoppers I did, adding Plano roof walks and re-badged for my private grain hauler. Bob   |
|
|
|
Post by mlehman on Mar 10, 2013 8:29:57 GMT -8
I've got a couple of pics of my in-progress build of a car destined to join train of cars built by members of the HOn3Chat Yahoo group. Strictly tongue-in-cheek, the point is to gently poke some fun at the rivet-counters and what we like to call, ahem, the Grumpyfish that are too busy counting rivets to actually have some fun with their modeling. I wasn't able to attend, but the first annual entry of the train as a display at the National Narrow Gauge Convention was received, with puzzlement, irritation, and bemusement, especially when it temporarily took over the Blackstone display loop and a few thought these oddments somehow represented newly announced rolling stock releases. The base for the car is an out-of-production Micro-Trains coal car, in this case factory-decorated as a non-existent DB&W coal car. I did some erasure of unneeded graphics, yielding a car decorated as "DW 200." This is in honor of the Chat crew's favorite beer, Durango Brewing Co. "Durango Wheat" that we usually refer to as "DWs." The Silvertongue Southern decals were done as a custom run by one of our members. The slogan is what it is, I can only say further explanation is probably not needed -- and probably not desired here to keep it family-friendly...  The car is a combination observation, lounge and hot tub car. I've still got to add beer coolers, barstools, and "crew" among other things. Some sort of overhead cover is also needed, to keep the scantily clad crew from developing sunburn.  Anyway, here it is as I begin adding details, with a test fill of the hot tub underway in Silverton. 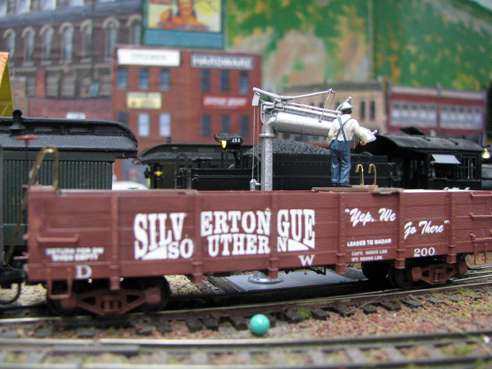 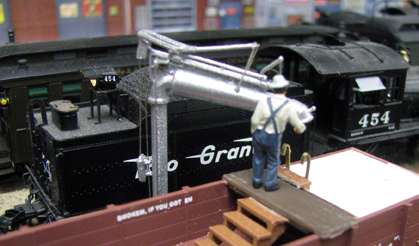 |
|
|
|
Post by selector on Mar 10, 2013 9:07:55 GMT -8
It's a steep ramp to this foundry's doors, but that's what the local terrain demands. A night shot, one of about two or three diesel images I have of my old layout.  Crandell |
|
|
|
Post by kentuckysouthernrwy on Mar 10, 2013 9:25:57 GMT -8
Since this is a reboot, I'll repost some shots of things I've done this winter and weren't seen a lot. #333 was the last Alligator purchased by the Kentucky Southern and is the last in the old paint scheme. I used weathering keys off most of the images of RSD-15s in Railpictures, especially a couple of them in the old simplified LS&I Maroon and soot scheme.  These are a group of cabooses I added to the KYSO fleet: Atlas Trainman relettered from D&H 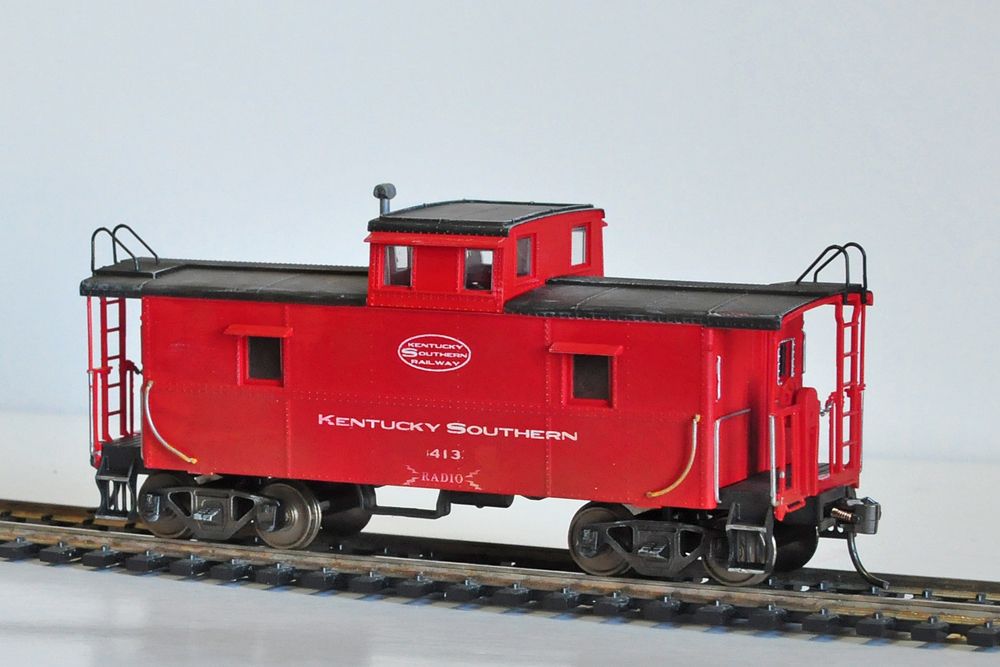 Atlas NKP style undec 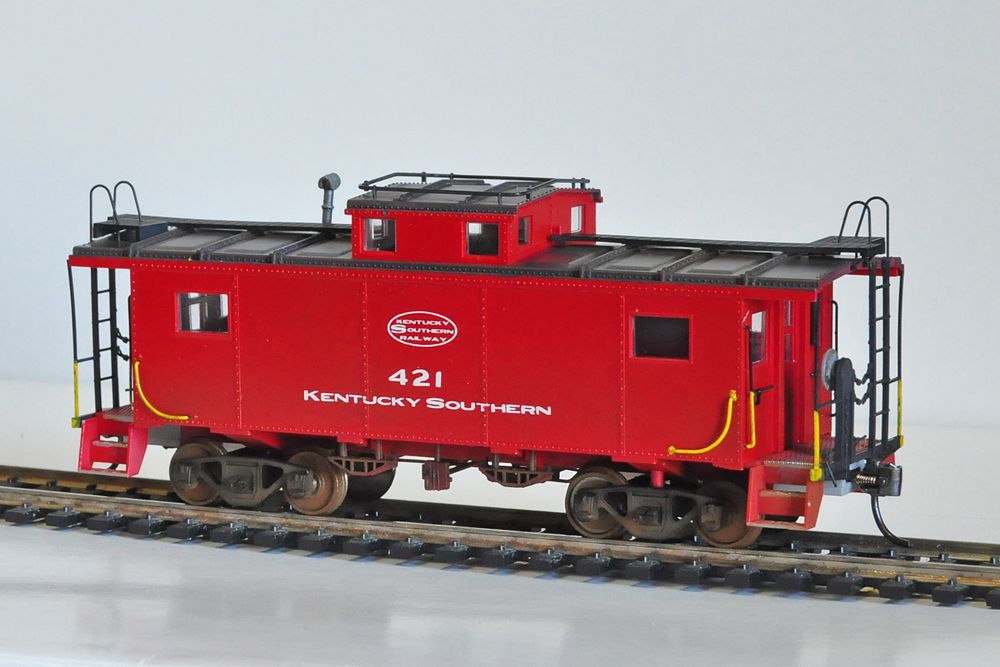 Walthers baywindow relettered from N&W 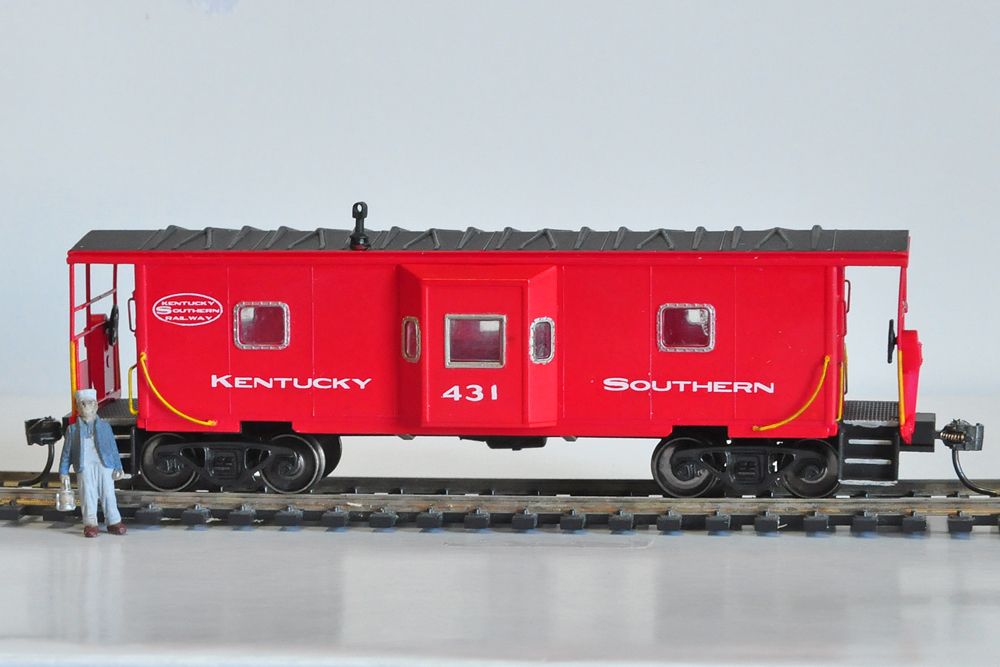 Railyard Models Missouri Pacific style mainline short baywindow caboose. Resin and etched metal kit 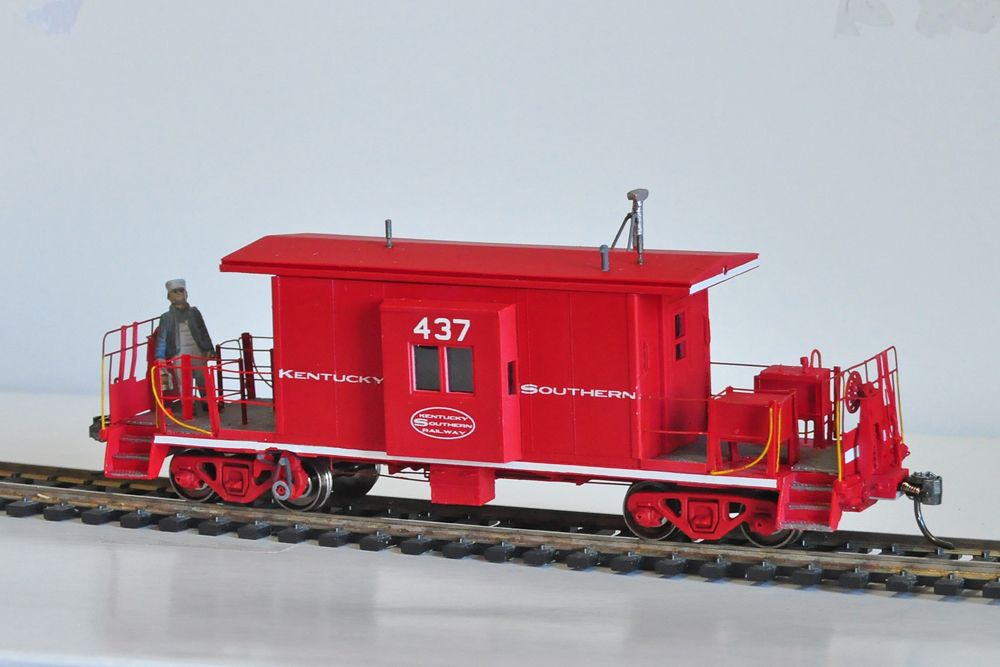 Kentucky Southern decals by Highball Graphics, the mopac caboose has Railgraphics decals I believe I used for the stripes and substituted my KYSO decals for the Mopac lettering. |
|
|
|
Post by marknycfan on Mar 10, 2013 10:13:04 GMT -8
Nice work all around gentlemen, Rick J, when did the NYC make those 65-ton cars? Also, real nice Kentucky Southern equipment!
|
|
|
|
Post by dti406 on Mar 10, 2013 10:43:17 GMT -8
Nice work all around gentlemen, Rick J, when did the NYC make those 65-ton cars? |
|
|
|
Post by surlyknuckle on Mar 10, 2013 12:30:48 GMT -8
Lots of good stuff, guys. Keep it coming. Rich, did you solder, or glue the wire to the stanchions? Are they Smokey Valley parts? Thanks. Here is a work-in-progress SOU 86-footer I've been working on. Before:  After the roof & one side were done:  And I recently got an old Gyralite 20585 operating after it was brought back from the dead:  Happy modeling!-Jeffrey |
|
|
|
Post by rockisland652 on Mar 10, 2013 12:39:22 GMT -8
I took a quiz and got a 'B'...  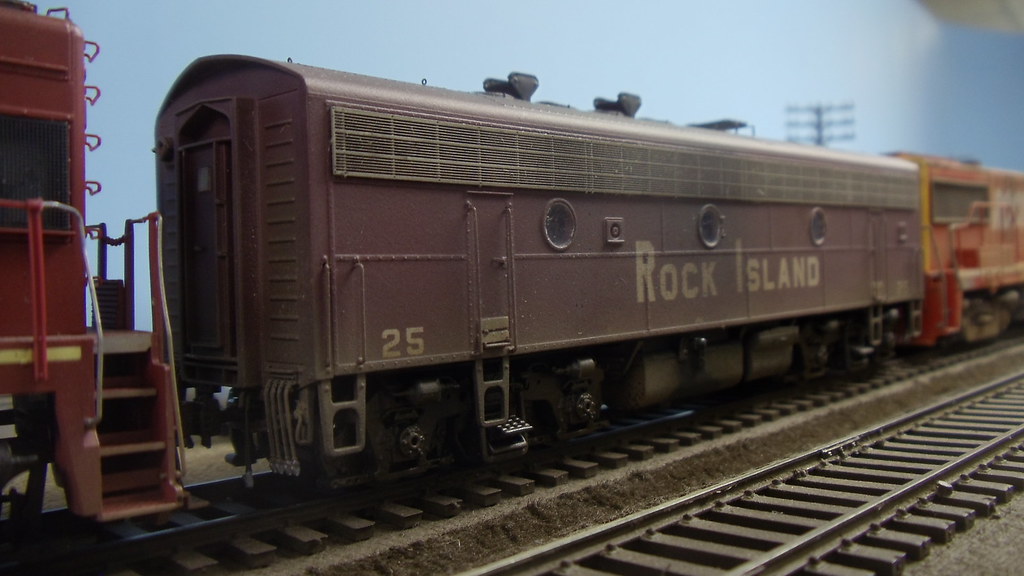 |
|
|
|
Post by fr8kar on Mar 10, 2013 16:46:47 GMT -8
Jeffrey, the wire is soldered to the stanchions. I tried super glue years ago and found that I was always making repairs. Soldering the handrails is (almost) forever.
First I tin the stanchions and then glue them in place on the model. For the conductor side, I made the bend at the end of the blower duct then soldered the wire to the stanchions working my way each direction toward the cab and the stepwell making the other bends in place. When I get to the last little bit, I trim the wire to fit and make the last bend.
|
|
|
|
Post by JohnJ on Mar 10, 2013 19:33:12 GMT -8
Good stuff so far, everyone. I love seeing others' great work. Inspired by my taking delivery recently of a brand-new Bowser Century 630 in Penn Central paint, I finally decided to dig out the original Stewart Hobbies C630 in PRR colors that's been sitting in a drawer upstairs for probably the last 10 years. I tackled the Reading version of this unit many years ago, and it was enough work to make me wait another 10 years before doing it again. Remember, these are the pre-"Executive Series" models and lack most add-on details. Still, pretty nice units if you care to spend some time on them. This effort was inspired by an article in one of the hobby publications years back, can't remember which one. This one got: - New PRR keystone decals applied over the too-dark originals - Cab numbers and numberboard decals - the original Stewart Centuries were all unnumbered. I chose the unit number as 6323 is depicted in "Penn Central Power" as running in pure PRR paint into 1969, the year I model. - PRR "Radio Equipped" decals from Raritan Bay Hobbies - Alco lift rings - Coupler cut bars - Pilot grab irons, hand-bent from wire. - MU and trainline hoses - Curved nose grabs, hand-bent from wire. - Various grabs on the nose and rear of the unit - Windshield wipers - Sinclair antenna - Silver paint around the cab side windows - Yellow paint on the step edges - GE speed recorders on all axles on the left side of the unit - major hassle and the biggest task of the project - Single speed recorder on front truck on right side - Various warning placard decals - ACI labels - Mounting bracket for the horn, still have to procure the horn - Molded-on hand brake trimmed off; need to find the brakewheel detail Bowser did correctly on my new PC unit. Not sure if Bowser is selling parts for this new release; I'll call to find out. - New drivetrain splines - I ordered these years ago from Stewart; they shipped them out to me free as the original design was defective. The unit runs great now. Left to do:- Procure and install correct horn - Procure and install correct brakewheel - Dullcote - Handrail installation. Stewart supplied black glossy handrails with the model; I'll probably wind up painting them Brunswick. I tested brush-painting the railings Floquil Brunswick last night with good results; they don't seem prone to the paint flaking off. - Installation of window glass, numberboards, couplers, etc. - Teaming the unit with my PC C630 on unit coal! Any thoughts on horns for a unit like this? I need all bells facing forward as in this pic: www.rr-fallenflags.org/prr/prr6324jra.jpgHere's my model: 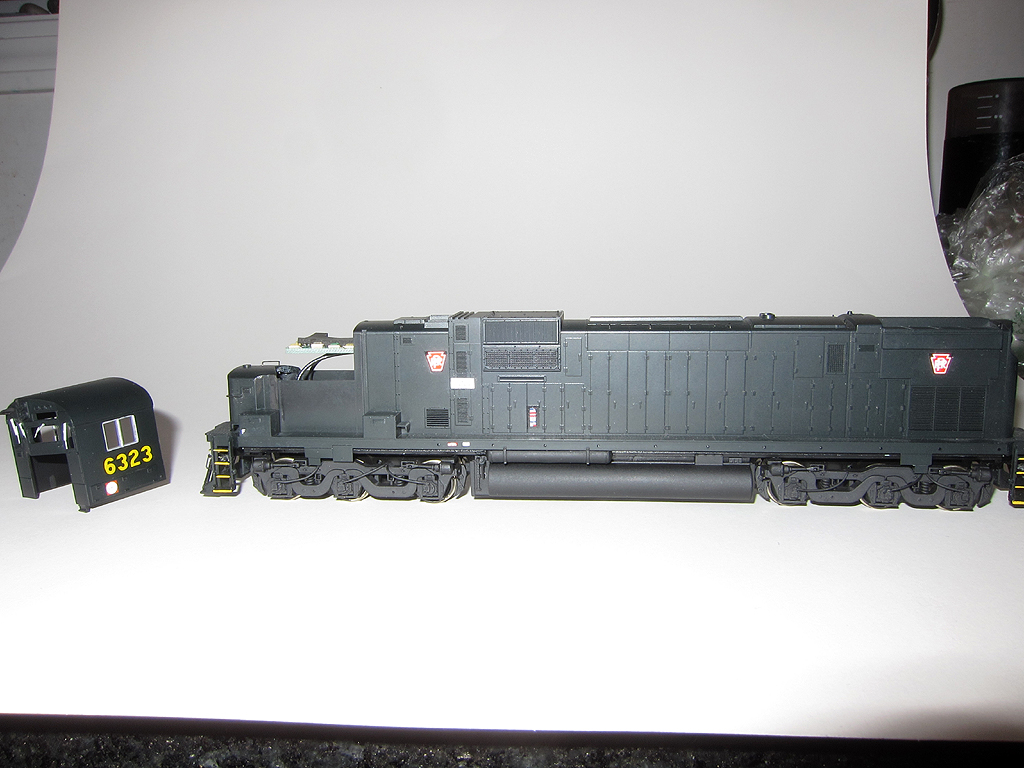 |
|
|
|
Post by fr8kar on Mar 10, 2013 20:37:57 GMT -8
Alright, I have another minute....
Chad, your SP Alco looks great.
Crandell, we have a steel customer with a grade like that. It takes a pair of Gensets shoving hard to get six or seven loads up into their spots.
Tom, I'd say you got a B+ with that one. Nicely done.
Jeffrey, I'm looking forward to seeing the completed Southern beast of a boxcar. I've got one of those myself and still haven't figured out what to do with it.
|
|
|
|
Post by bdhicks on Mar 10, 2013 21:01:24 GMT -8
I've got two projects just about ready to paint. First off is a BNSF smurf, 2044: 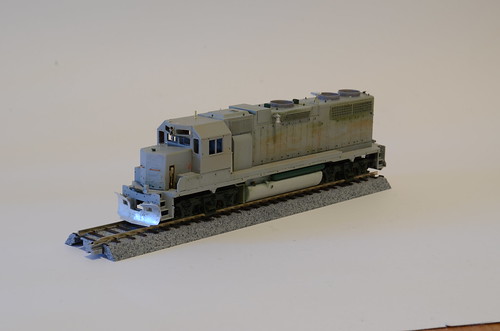 I didn't have to do much to this model, just put on Cannon fans and add the unit-specific details like the horn, bell, and antennas. The next is a bit of foolishness on my part, an attempt at Cannonizing a RPP CF-7:  I think I ended up making the hood a bit too long, and I'm not sure that the door height works out, but I think it looks better than the old RPP tooling. |
|
|
|
Post by shoofly on Mar 10, 2013 21:32:09 GMT -8
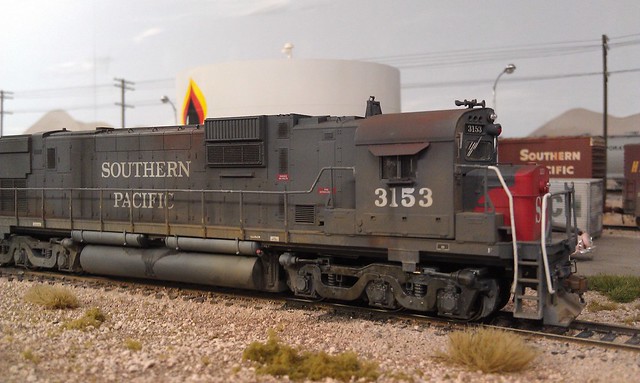
An SP GP9R 3841 ties down on the El Centro house track after a full day of shoving a work train around for turnout maintenance and tie replacement.  New headblocks, throw bars, heel blocks, and lots of spikes  New end tieplates, new ties inserted, lots of filing-spiking-gluing....damn my fingers hurt LOL  It's all scenery, detailing and reballasting the new track from here  ChrisP |
|
|
|
Post by nightmare0331 on Mar 11, 2013 6:40:31 GMT -8
I'm a day late...was wrapped up all day yesterday, but figured nobody would mind if I joined the party. RCH...I like the Mopac unit! I built a few SD40's back in the day which I thought were neat since they weren't my normal modeling thing...   Tom K...I like the B unit. The U28B in front of it looks...familiar. I do hardly any painting anymore, but found some time recently to finish a reworked Kato SD40-2 that's been sitting around in pieces for 6 months or so... (has a new Cannon nose and Cannon fans, lots of Detail Associates and Details West parts, PSC beacon, Tichy wire grabs, etc.)  ...and after paint...   I always question my logic while decaling why I pick safety yellow c units...it's always fun doing 100+ decal jobs...it looks cool when it's done though I suppose. (the decals are a combination of Microscale, Highball Graphics and Shellscale decals.) Enjoy! Kelley. www.dufordmodelworks.com |
|
|
|
Post by fr8kar on Mar 11, 2013 7:09:21 GMT -8
Nice work, Kelley!
|
|
|
|
Post by petehuse on Mar 11, 2013 8:45:47 GMT -8
White Castle night lighting. Added 1.5v bulbs in tiny brass tubing over the windows. Actually looks more like a White Tower. Attachments:
|
|
|
|
Post by MONSTERRAILROAD on Mar 11, 2013 10:20:05 GMT -8
These are two Walthers kits I built last month. Nice Stucco technique with a spray can on the Hobby Shop. It is Rustoleum Textured (white or sand) color.   |
|
|
|
Post by shoofly on Mar 11, 2013 11:56:34 GMT -8
I like that stucco technique!
ChrisP
|
|
|
|
Post by stevef45 on Mar 12, 2013 3:59:37 GMT -8
Slowwwwwly working on building 5 more Athearn RTR SD60's to be painted into NYSW.  Metal lift rings for the DB hatch.  DW k5la horns and horn stand. Believe it or not, one of the cheepest parts is holding me up, the horn stands. Ran out. lol  Also working on a custom kitbashed NJ Transit GP40PH-2B using Cannon parts and athearn frame, walkway's for multiple loco's. Spliced walkway with cutdown dash 2 anticlimber and weed cutter plow.  Tunnel motor anticlimber from Cannon on the rear and new 2600 gallon tank from athearn.  This project will be a long time to finish. |
|
|
|
Post by fr8kar on Mar 12, 2013 6:44:26 GMT -8
stevef45, I see many good things coming from these builds. I'm very intrigued by the GP40PH-2B.
|
|
|
|
Post by stevef45 on Mar 12, 2013 8:45:01 GMT -8
stevef45, I see many good things coming from these builds. I'm very intrigued by the GP40PH-2B. The NYSW models will get done alot sooner the the NJT one. The small parts are whats holding me up. Im not going super crazy with detail parts on them. Just basic stuff to make them as close to prototypical as they can be. The NJT unit. Im still debating on whether to wait for cannon & co. to release those precut hood sides or do it myself. The whole long hood from the cab to the rear will need to be built. I have all the parts, its just building enough courage to tackle it. And one downside is the frame might be a fraction to long so im debating on whether to cut and splice it back together or just say hell, its close enough. And it will get sound from tsunami for the 645 primemover and if those generator sound decoders from the athearn reefers are available seperate i'll get one of those and shoehorn it in for the catepillar HEP unit |
|
|
|
Post by nebrzephyr on Mar 12, 2013 13:17:20 GMT -8
Steve...nice looking start on the SD60's. If I might ask whose part is the lift lugs around the dynamic brake fan.
Bob
|
|
|
|
Post by Spikre on Mar 12, 2013 13:26:55 GMT -8
Steve, just say its Close Enuff !! why complicate things ? and who would know anyway ? 2cents from here. Spikre
|
|
|
|
Post by stevef45 on Mar 12, 2013 17:26:24 GMT -8
Steve...nice looking start on the SD60's. If I might ask whose part is the lift lugs around the dynamic brake fan. Bob a member on diesel detailer had them made and knew I was building a few SD60's so he did a larger order. |
|