Deleted
Deleted Member
Posts: 0
|
Post by Deleted on Nov 6, 2013 20:40:48 GMT -8
A closer look at the new etched steps and reworked plow. 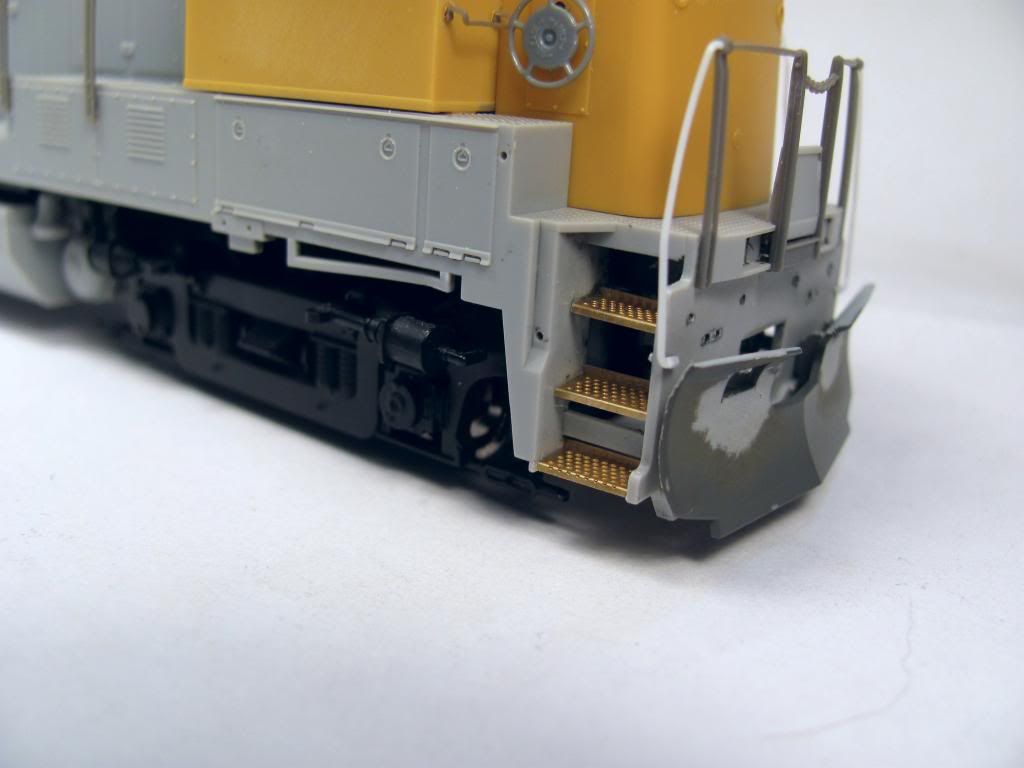 Your plow is unrealistic, it has no Rock Island "charm"..... aka beat, banged, bent, dented and filthy......You need to get out your torch and rumple it up a bit...... |
|
|
|
Post by onequiknova on Nov 6, 2013 21:01:05 GMT -8
A closer look at the new etched steps and reworked plow. Your plow is unrealistic, it has no Rock Island "charm"..... aka beat, banged, bent, dented and filthy......You need to get out your torch and rumple it up a bit...... It would be cool to build a plow out of thin brass so it could be creased and dented. Hmmmm... |
|
|
|
Post by onequiknova on Nov 23, 2013 21:52:14 GMT -8
I figured I'd add this GP35 to this thread since I plan to paint them simultaneously. This Phase II GP35 started out as a Kato Phase Ia GP35 painted for Pensy. I used Brian Banna's technique for stripping a Kato, and it worked great. You can see it here. You can use either a phase 1a or 1c, but not a phase 1b, since the door latches are different. I didn't plan to go as far as I did with the Cannon parts, but a "perfect condition" Ebay score turned out to be anything but. Who ever assembled it needs to put down the glue bottle. A couple overall views. Note the hood, sill, cab and nose are not glued together yet, so don't mind the gaps. 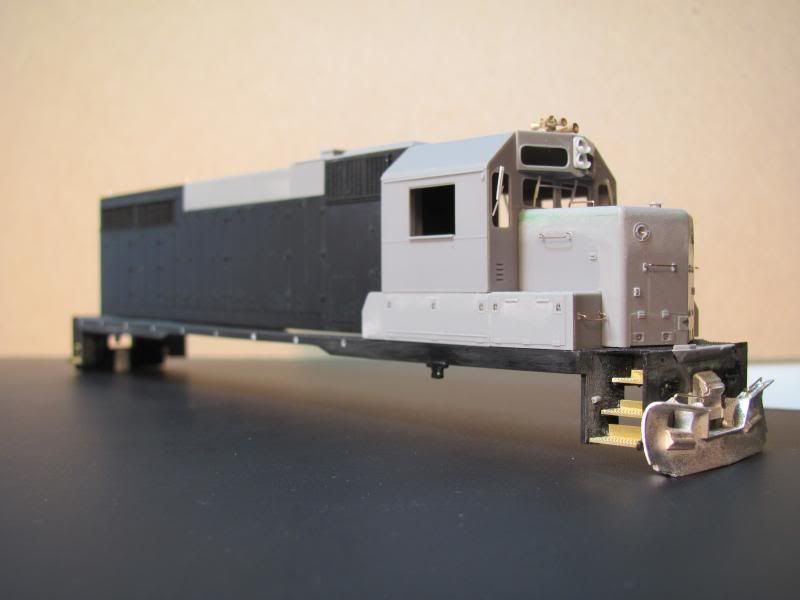  The main spotting features of a phase 2 GP35 are the thin sill over the fuel tank along with the taller slope topped tank, single row of louvers on the battery box (though early phase 2's still had 3 rows) and the raised inertial filter hatch. Seen here is the modified Kato sill, which has had the fuel filler eliminated and the sill thinned over the fuel tank. Since The Kato hand rails will be replaced with bent wire railings on cored Athearn plastic stanchions, the original mounting holes had to be plugged and new holes drilled. 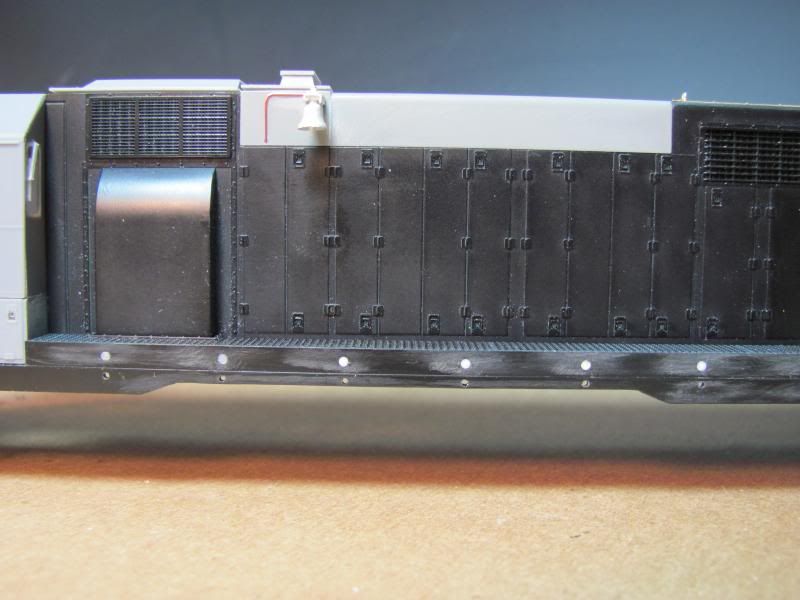 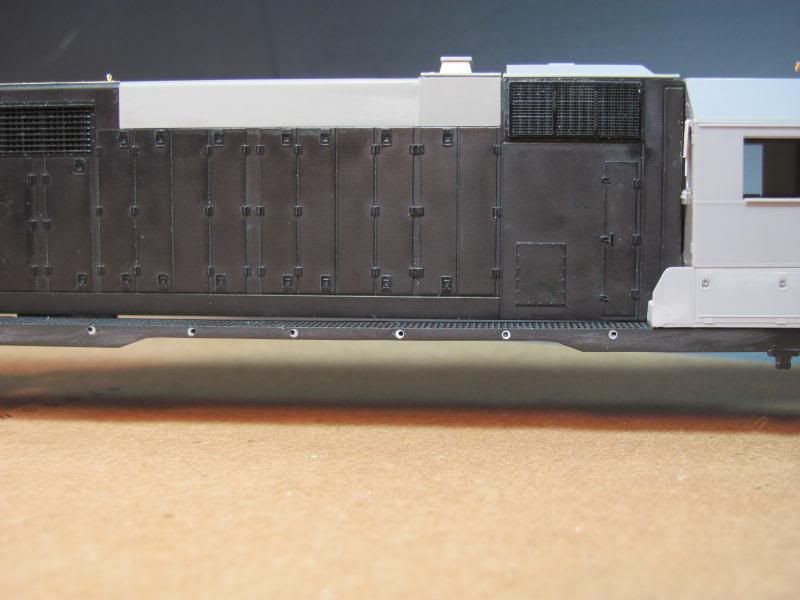 The Cannon inertial hatch and exhaust hatch. Bell is DW part with the air line removed and a new one bent from magnet wire. 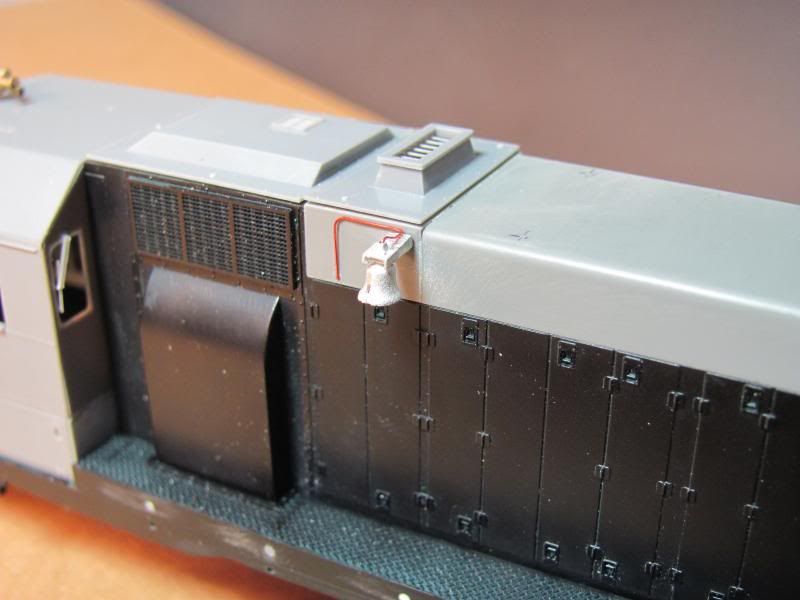 The previous owner tried to install some after market sand fillers and completely obliterated the rear of the fan hatch, so Plano to the rescue. The Cannon end was needed because the original grab iron holes looked like they were opened up with a hot poker. 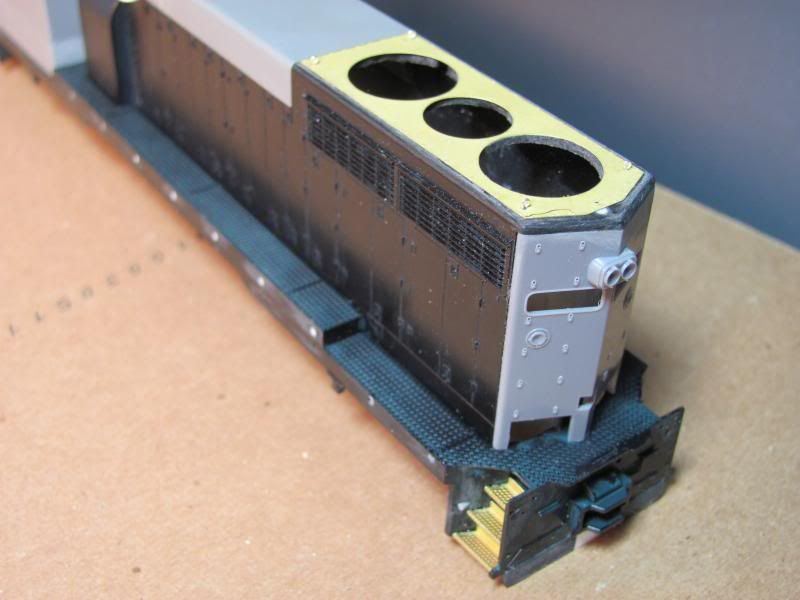 The oversized lug Kato molded into the step well for the end of the handrail was removed and a less conspicuous lug was installed. The etched steps are Cannon.  The front pilot was dress up with a DW scale buffer and plow, along with a Cannon anti-climber to fix some glue damage.  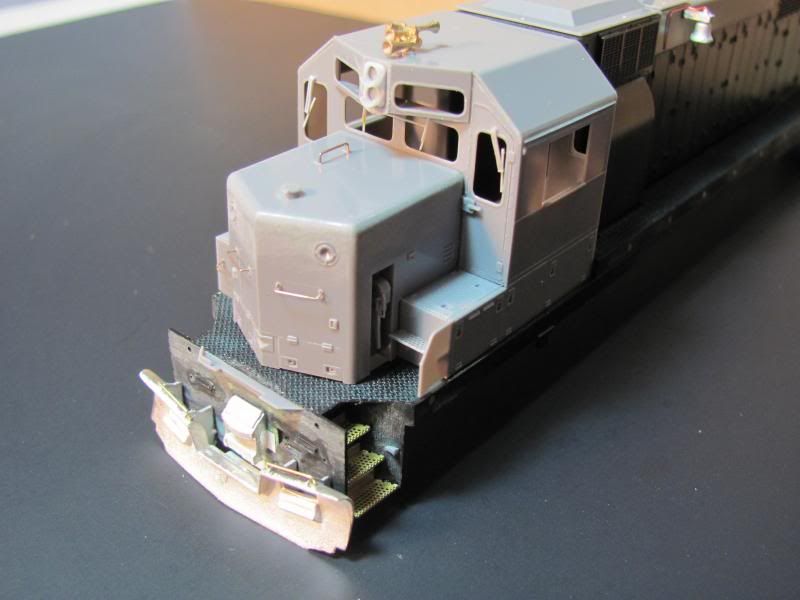 |
|
|
|
Post by SOMECALLMETIM on Nov 24, 2013 14:43:59 GMT -8
Great looking builds and I appreciate the in progress photos. Hmmm...I do have an undecorated Kato GP35 sitting around. Debating to build a Mopac GP35, Mopac GP35m, or a RI GP35.
|
|
|
|
Post by tom on Nov 24, 2013 17:38:50 GMT -8
Greet modeling and I am really enjoying seeing the progress on the U-boat. Not too many modeling info on these U-boats and I really like the open radiator grill!
Did you start with an undec or strip the paint off a painted one?
|
|
|
|
Post by roadkill on Nov 24, 2013 18:04:12 GMT -8
It appears to me that the fuel tank is too short causing the bottom of the tank to sit too high off the rails, but I'll have to do some investigating before I can say for sure. I don't believe that the tank's too short, unlike EMD's when a GE has a slammer capacity tank it was shorter vertically vs. the horizontally shorter tanks on EMD's. |
|
|
|
Post by onequiknova on Nov 24, 2013 18:24:50 GMT -8
Greet modeling and I am really enjoying seeing the progress on the U-boat. Not too many modeling info on these U-boats and I really like the open radiator grill! Did you start with an undec or strip the paint off a painted one? The model was kind of a hodge podge of parts that I picked up at a train show. It started as a Union Pacific U28, hence the yellow cab and nose, but the seller had swapped the long hood for an undec U30 long hood. |
|
|
|
Post by trebor on Nov 24, 2013 19:26:48 GMT -8
Great looking builds and I appreciate the in progress photos. Hmmm...I do have an undecorated Kato GP35 sitting around. Debating to build a Mopac GP35, Mopac GP35m, or a RI GP35. Do like I do, buy 2 more with the "intent of doing all three.  |
|
Deleted
Deleted Member
Posts: 0
|
Post by Deleted on Nov 24, 2013 20:39:47 GMT -8
|
|
|
|
Post by onequiknova on Nov 24, 2013 21:33:19 GMT -8
I like the wings too, but they were gone by my time period. I still need to nail down a number. It'll either be block lettering or heralds only.
|
|
Deleted
Deleted Member
Posts: 0
|
Post by Deleted on Nov 24, 2013 21:58:10 GMT -8
I like the wings too, but they were gone by my time period. I still need to nail down a number. It'll either be block lettering or heralds only. So I assume that seeing you give us some "butter knife" and "rocket" to enjoy ain't ever going to happen? |
|
|
|
Post by buffalobill on Nov 29, 2013 12:44:18 GMT -8
John, great thread. I am planning to do something similar for a pair of Club runners. An ex NYC n/b/b GP-35, along with a U-33-B. I have a Great Northern GP-35 which will be stripped soon, and a Life Like U-Boat, plus the Atlas U-33-C shell. Build on, I need the tutoring. Yours are going to look great. Mine will be basic black.
Bill
|
|
|
|
Post by onequiknova on Nov 29, 2013 17:51:47 GMT -8
Thanks Bill. Good luck with your projects. It was pointed out to me that the entire sill was thinner on the Phase II GP35 and not just above the tank like I stated earlier. After comparing the Kato sill to an Atlas GP40 sill, I determined an extra .025" needed to be removed from the sill above the trucks. The first picture shows the difference. The portion to the right of the jacking pad has been thinned, the left hasn't been touched yet. After examining some proto pics, I need to extend the notch in the sill farther back toward the rear of the engine. It should taper down near the fourth stanchion from the rear. 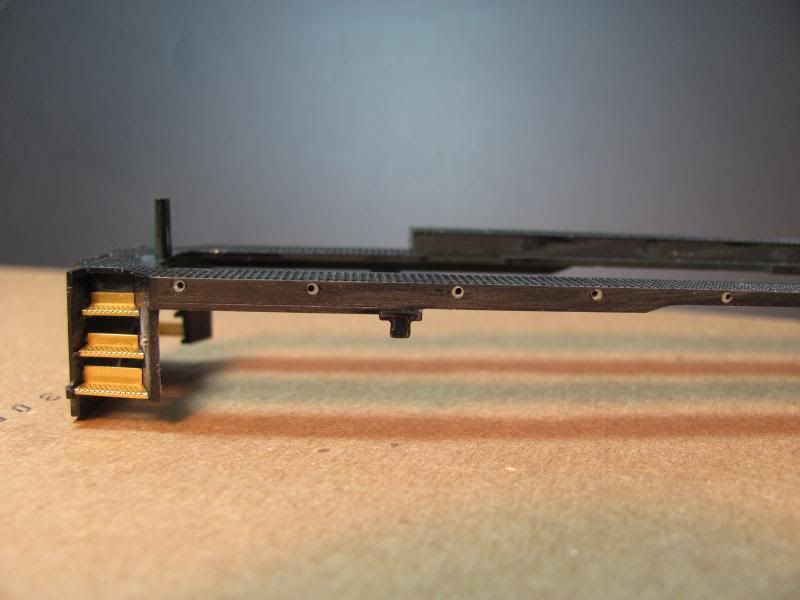 Thinning complete. I plan to replace the jacking pads with Railflyer parts. 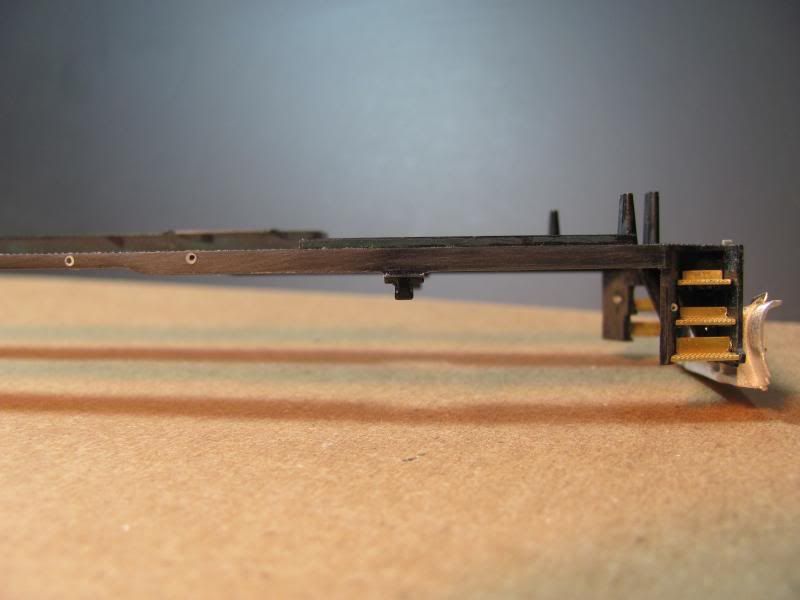 I then turned my attention to the frame. I removed the unrealistic angled frame that Kato molded into all their EMD frames for a while there. (sorry, no before pics) No mill here, just a 4 1/2" angle grinder with a 36 grit flap wheel. I also removed the small sections of fish belly frame molded in front of and behind the fuel tank. 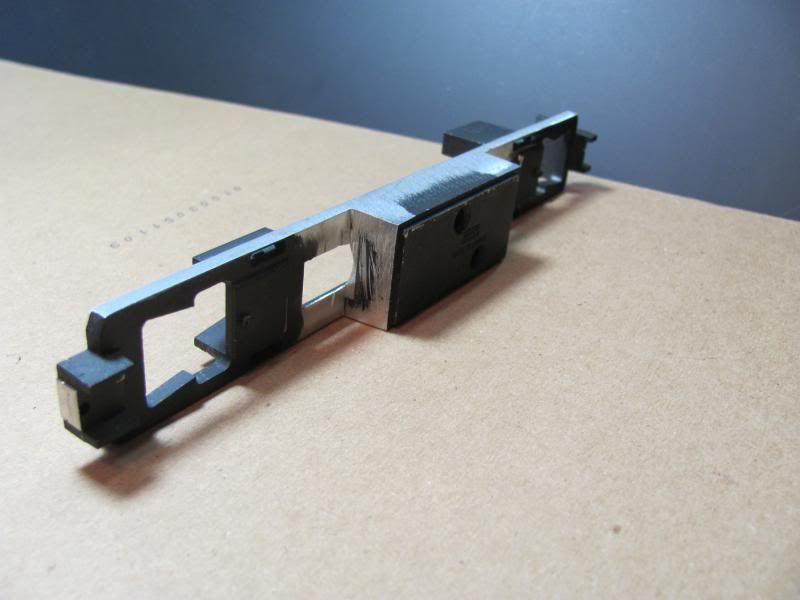 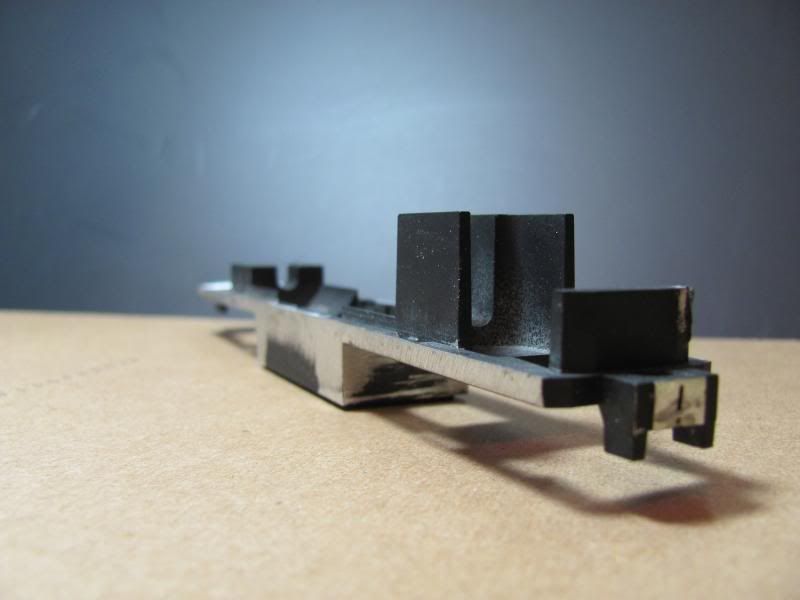 Grinding the frame flat allows for 1/8" styrene C channel to be glued to the frame to represent the prototypes frame rails. 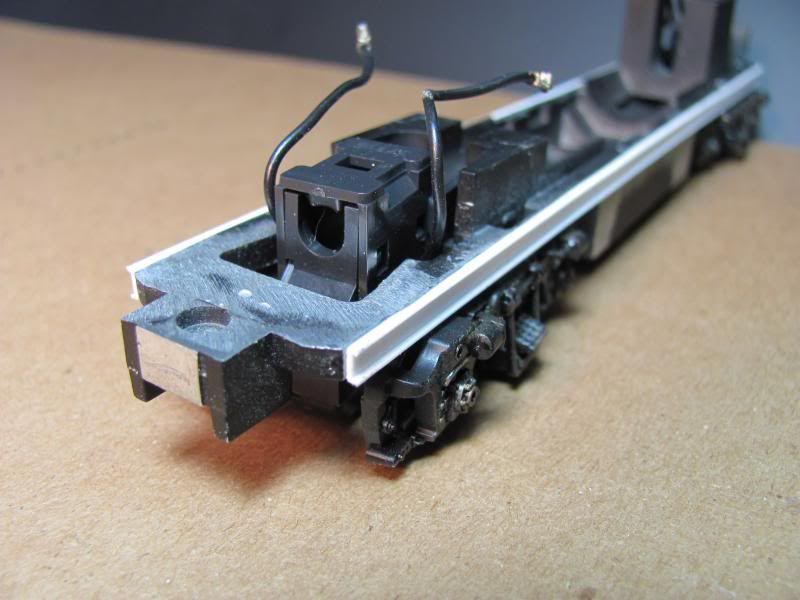 I'll be using a modified Atlas tank for this project. It's going to take some work to make it fit the Kato chassis.  |
|
|
|
Post by onequiknova on Nov 29, 2013 18:13:59 GMT -8
I like the wings too, but they were gone by my time period. I still need to nail down a number. It'll either be block lettering or heralds only. So I assume that seeing you give us some "butter knife" and "rocket" to enjoy ain't ever going to happen? A handful of GP7/9/18's lasted til the end wearing pinstripes, and I do plan to build one, but it'll be pretty ratty looking. A few F7's lasted til their scrapping in some version of the butter knife scheme as well. |
|
bigzmn
Junior Member
 
Posts: 91
|
Post by bigzmn on Nov 30, 2013 14:11:44 GMT -8
The front pilot was dress up with a DW scale buffer and plow, along with a Cannon anti-climber to fix some glue damage.   I've been looking at the DW scale buffers and I actually installed a pair on an Athearn locomotive I'm working on. But I haven't figured out how to mount the couplers (I use Sergents) or the body shell. Chris Z. |
|
|
|
Post by onequiknova on Nov 30, 2013 15:37:27 GMT -8
My plan was to trim some material from the front of a Kadee box and use a scale headed whisker coupler mounted to the frame. The coupler shanks should keep the body on the frame. Something similar should be possible with a Sergent coupler.
|
|
|
|
Post by onequiknova on Dec 1, 2013 19:14:13 GMT -8
More work on the sill and chassis. First up was to remove the deck overhang over the step wells. I don't know when this feature was eliminated from the 35 line, but it doesn't exist on the Rock Island units. This pic shows the overhang.  Removed.  This view shows the modification from above. The overhang on the right has been trimmed, while the left side has yet to be cut. 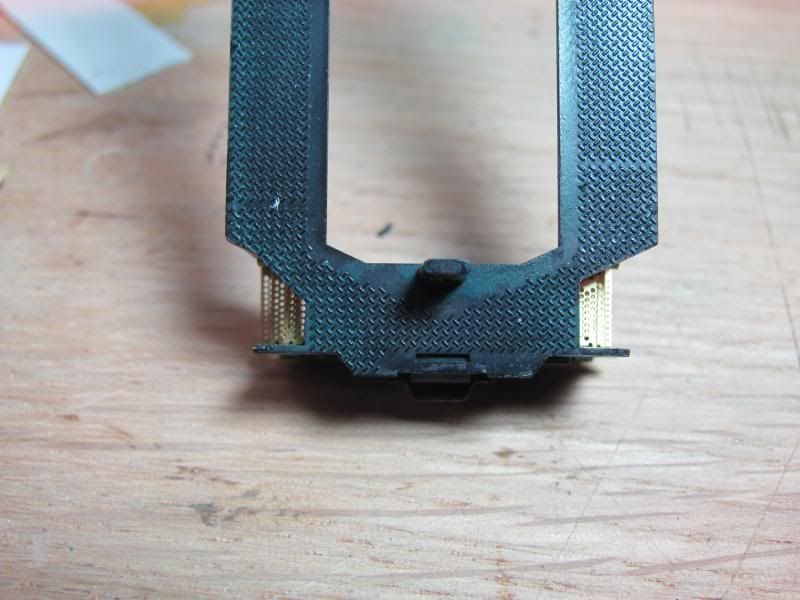 These next set of pics show a few more changes. The narrow sill over the fuel tank has been lengthened toward the front and rear, the jacking pads have been removed and the Atlas fuel tank fitted. 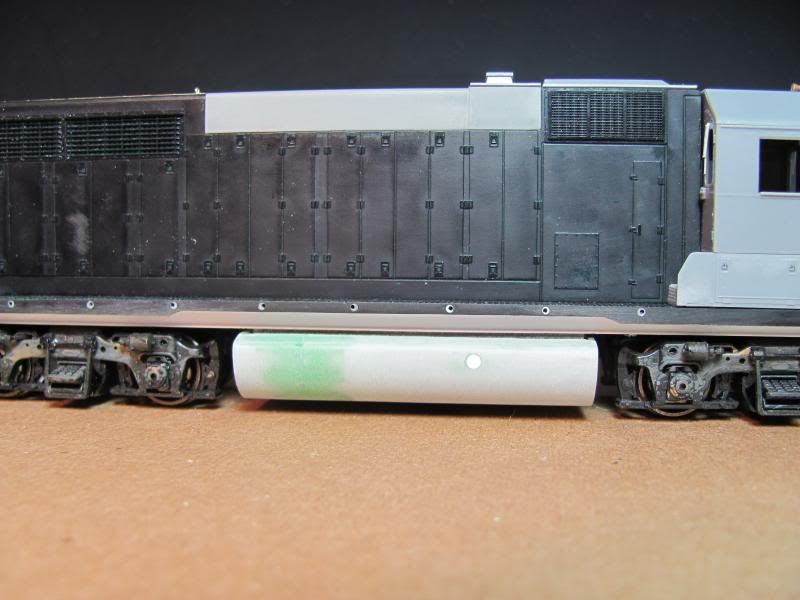 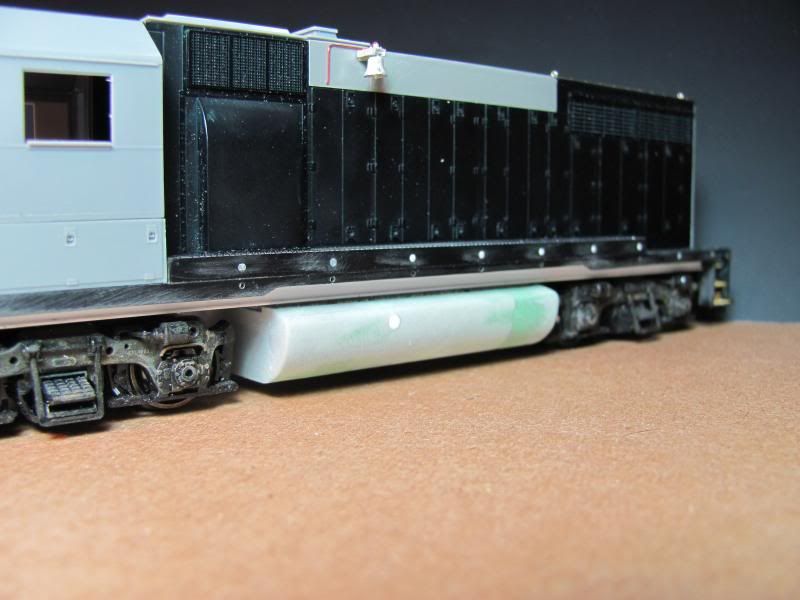 The fuel tank was a real pain. The Rock Islands GP35 had a 3000ish Gallon fuel tank. As far as I know, that size isn't available, so I started with two small Atlas GP38/40 tanks and sliced and diced them to come up with the right sized tank. I didn't want to cut the Kato chassis to fit the tank, so I had to make the Atlas tank mount similar to the old Kato tank. In hindsight the Atlas tank was about the worst choice for this. A Kato SD40-2 tank or an Athearn tank would have been easier. The Atlas tank is very thick on the bottom, where as the Kato tank is only .040" thick on the bottom. What I had to do was mill the inside of the Atlas tank to get it to sit at the right height. this pic show the amount of material removed from inside the Atlas tank. The rectangular hole in the bottom was transferred over from the Kato tank and cut out before the tank was milled. 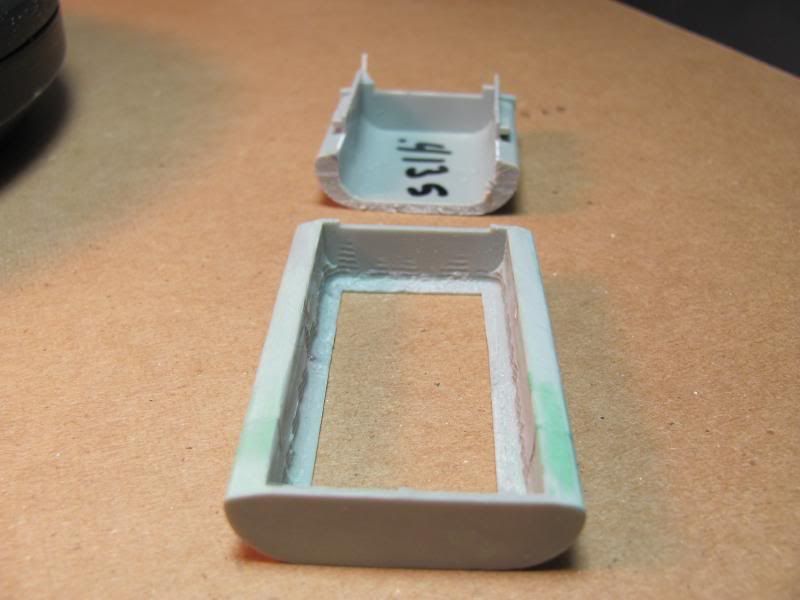 I don't own a mill, so I used my Dremel drill press with a rotary file in the chuck. The tip of the bit was set .040 from the base of the drill press, then I just slipped the tank under it to mill off the material. 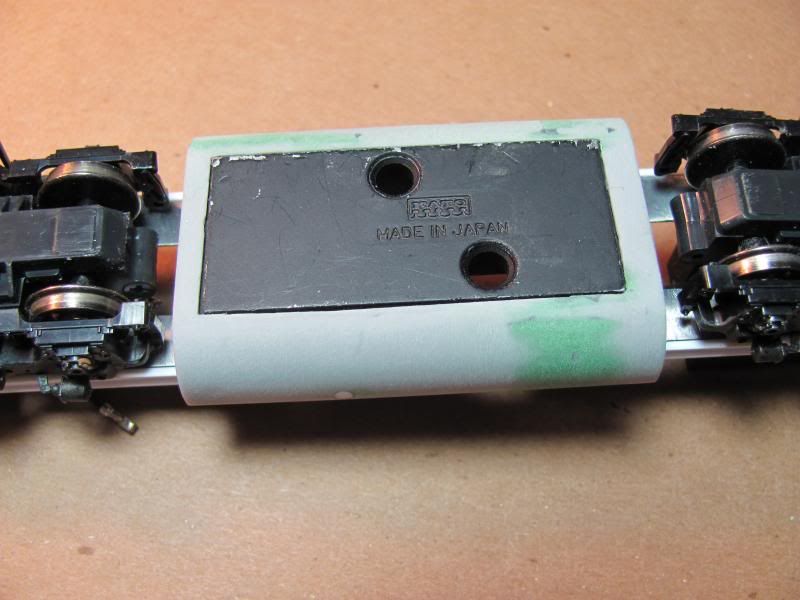 This last pic shows the beginning of fitting a Railflyer etched walkway tread kit, which was designed for a GP38/40. It'll be worth the effort to get rid of the over sized kato tread.  |
|
|
|
Post by carrman on Dec 1, 2013 21:17:07 GMT -8
The late Atlas SD35 fuel tank is a 3,000 gallon tank. I'm using some for MILW GP40's.
|
|
wsor
Full Member
   The Route of the Ruptured Duck
Posts: 138
|
Post by wsor on Dec 3, 2013 9:36:05 GMT -8
Walthers had some Railflyer GP35 tread kits sitting in the showroom yesterday, scratch and dent pile... Didn't seem to be anything wrong with them.
|
|
|
|
Post by TBird1958 on Dec 3, 2013 9:58:22 GMT -8
Great project! Thank you for sharing pics of the build, I really enjoy the attention to detail - in particular the sill. Kato units need a lot of work there, I've done a few similar and had access to a mill, your method is better. Very inspirational, thank you!
|
|
|
|
Post by onequiknova on Dec 3, 2013 14:28:24 GMT -8
Walthers had some Railflyer GP35 tread kits sitting in the showroom yesterday, scratch and dent pile... Didn't seem to be anything wrong with them. Thanks, but I already sliced and diced the GP40 set. Who knew the porches were shorter on a GP35 that a GP40? |
|
|
|
Post by onequiknova on Dec 6, 2013 15:19:31 GMT -8
|
|
Deleted
Deleted Member
Posts: 0
|
Post by Deleted on Dec 6, 2013 16:06:09 GMT -8
I'm passed with impressed with your work John, I'm speechless!!! Words can not begin to express what you are doing on this GP35. A talentless wretch like myself can only hope that someday I may possess a fraction of your ability.
|
|
|
|
Post by edwardsutorik on Dec 6, 2013 16:57:39 GMT -8
A talentless retch like myself can only hope that someday I may possess a fraction of your ability. I'm a'thinkin' that you might want to add a "w" to "retch". That said, I also just picked up this thread. And it reminded me of Mel Thornburgh and Bob Darwin from the olden days, when I was a lad. I will also say, that that is a very big compliment. I used to pick up my MR and see what these guys were doing and. Well, I was intimidated. But, wow, I was inspired! You can DO this? Well, I found that I (that would be me) really could. If I actually applied myself. And my nether regions. THANK YOU, for sharing this work. Ed |
|
Deleted
Deleted Member
Posts: 0
|
Post by Deleted on Dec 6, 2013 19:08:24 GMT -8
A talentless retch like myself can only hope that someday I may possess a fraction of your ability. I'm a'thinkin' that you might want to add a "w" to "retch". That said, I also just picked up this thread. And it reminded me of Mel Thornburgh and Bob Darwin from the olden days, when I was a lad. I will also say, that that is a very big compliment. I used to pick up my MR and see what these guys were doing and. Well, I was intimidated. But, wow, I was inspired! You can DO this? Well, I found that I (that would be me) really could. If I actually applied myself. And my nether regions. THANK YOU, for sharing this work. Ed I corrected my spelling. I knew when I wrote it that it didn't look "right" but spell check said it was okay! |
|
|
|
Post by onequiknova on Dec 6, 2013 20:45:29 GMT -8
Thanks Jim, but judging from the work you've done, I believe you're just as talented. Me going the extra mile doesn't really take anymore talent, just more time and maybe guts to try new things. Like cutting the groove in that sill. I figured for sure I'd be filling that back in with filler, but it turned out pretty good. In the end it's all just cutting and drilling plastic.
|
|
|
|
Post by SOMECALLMETIM on Dec 7, 2013 21:07:24 GMT -8
Watching your progress on the phase II GP35 helps to illustrate the little things you miss in prototype photos until someone else models it and then it opens your eye to the detail. Great work. I really enjoy your progress and have been saving your steps in a document to reference later.
|
|
bigzmn
Junior Member
 
Posts: 91
|
Post by bigzmn on Dec 11, 2013 8:56:23 GMT -8
My plan was to trim some material from the front of a Kadee box and use a scale headed whisker coupler mounted to the frame. The coupler shanks should keep the body on the frame. Something similar should be possible with a Sergent coupler. I'll have to try something different since this didn't work out to well. It turns out that Sergent couplers are a little shorter in length than Kadee or KDC "scale" couplers so they don't stick out quite far enough from the pilot. Time to fill the screw hole and re-drill it a little bit closer to the pilot. Chris Z. |
|
|
|
Post by trebor on Dec 11, 2013 15:31:32 GMT -8
Watching your progress on the phase II GP35 helps to illustrate the little things you miss in prototype photos until someone else models it and then it opens your eye to the detail. Great work. I really enjoy your progress and have been saving your steps in a document to reference later. A long time ago I learned that photos of models are brutally candid in showing flaws. If the model stands up to close ups, you've done a great job. |
|
|
|
Post by onequiknova on Dec 12, 2013 21:19:24 GMT -8
Thanks guys. I'm still plugging away below the walkways. It seems to be taking forever. I finished the air tanks and piping on both sides. The pipe hangers are made from .012" brass wire smashed in a vice, then annealed so it can be bent around the pipe. The air filters on the prototype are like nothing I've seen offered, so I turned them from plastic rod. The valve in front of the air tank is a PS part. The emergency shut off buttons are just a square of .005 brass. Inside the hole is a piece of .010" rod to simulate the button.  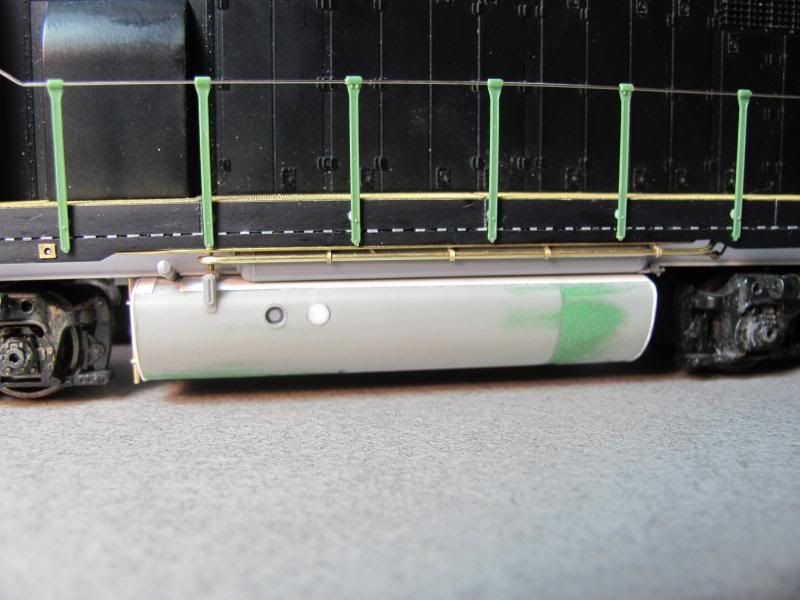 The pilots have also been detailed. Don't mind the nasty looking cannon hood end. I had a glue accident and ill be replacing the end. I also started bending the handrails using the cored Athearn stanchions. These still need some tweaking. 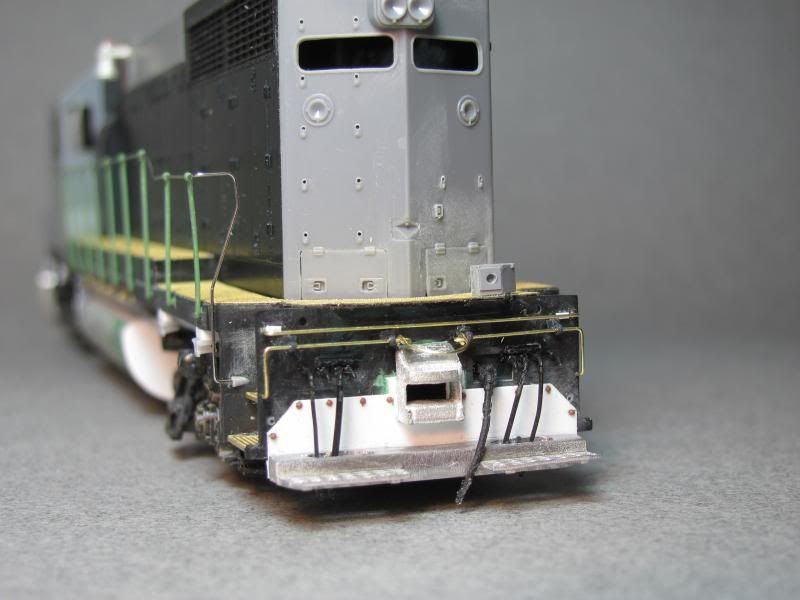 Note the latch catches on the Cannon nose were shaved off and moved to the inboard location per the prototype. The cut bars, front and rear are three pieces like the prototype, but my camera can't focus that close.  I've also fitted the Railflyer GP style jack pads on top of a piece of .040" styrene.  |
|