|
|
Post by mlehman on Jan 5, 2014 11:18:24 GMT -8
Time for some SPF, given the deepening snow outside. Hope you're warm and cozy.  On warmer evening last summer in the mountains... 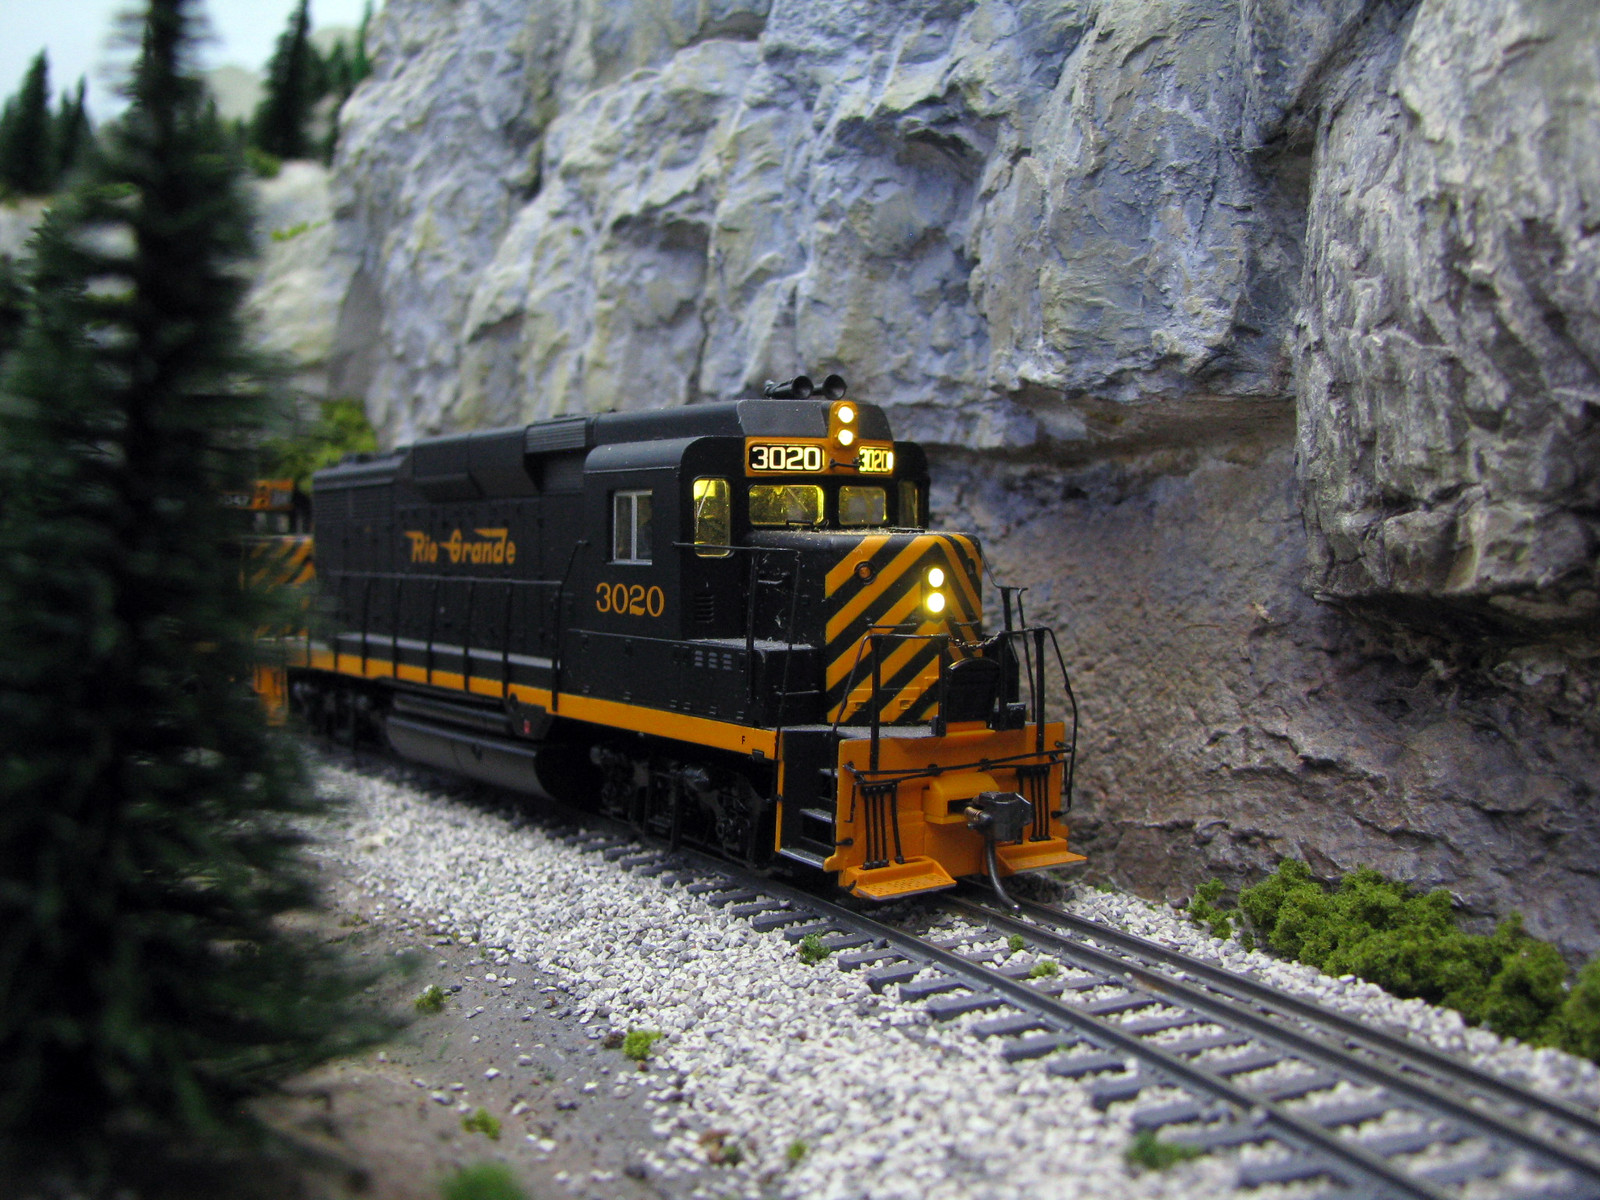 The hobos have long since departed to warmer climes, probably in a boxcar Pullman. 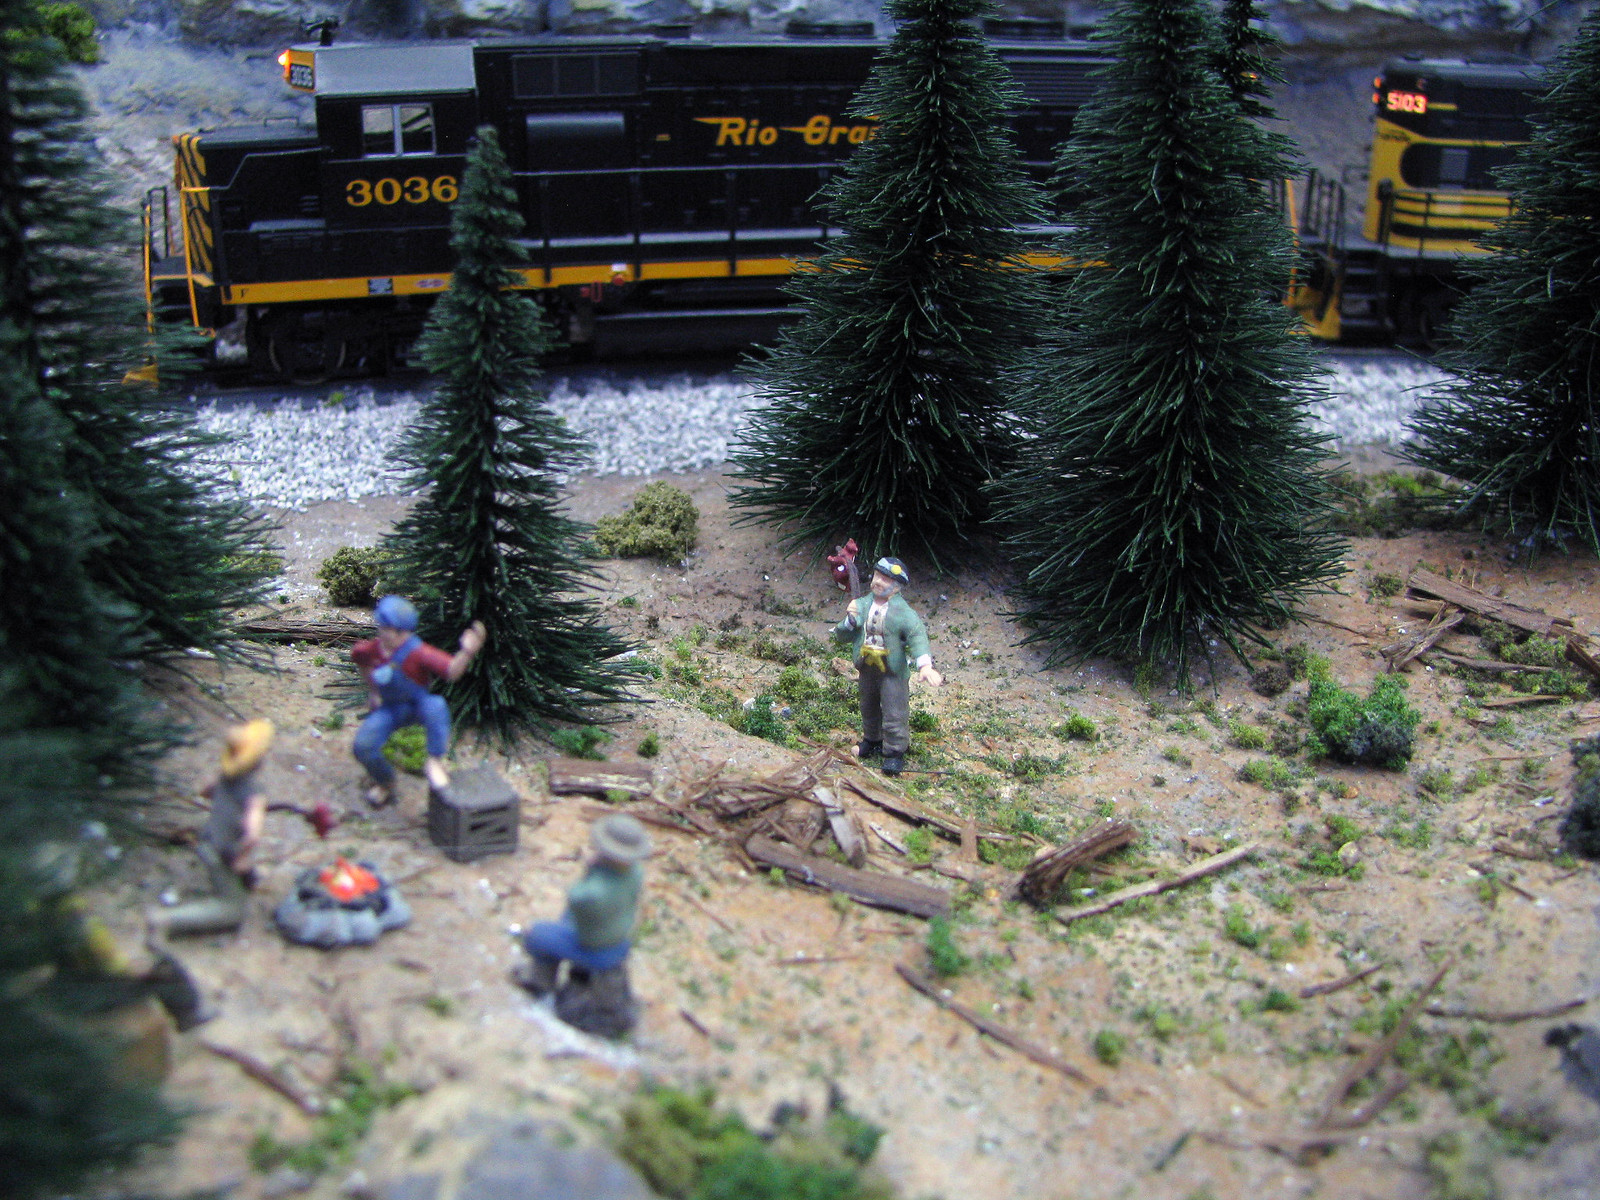 Even farther into the mountains at Animas Forks, where things were warm last summer at the Haymarket Tram, the miners work beneath the snows and rock all winter, although train service can be interrupted for weeks during the worst of winter. 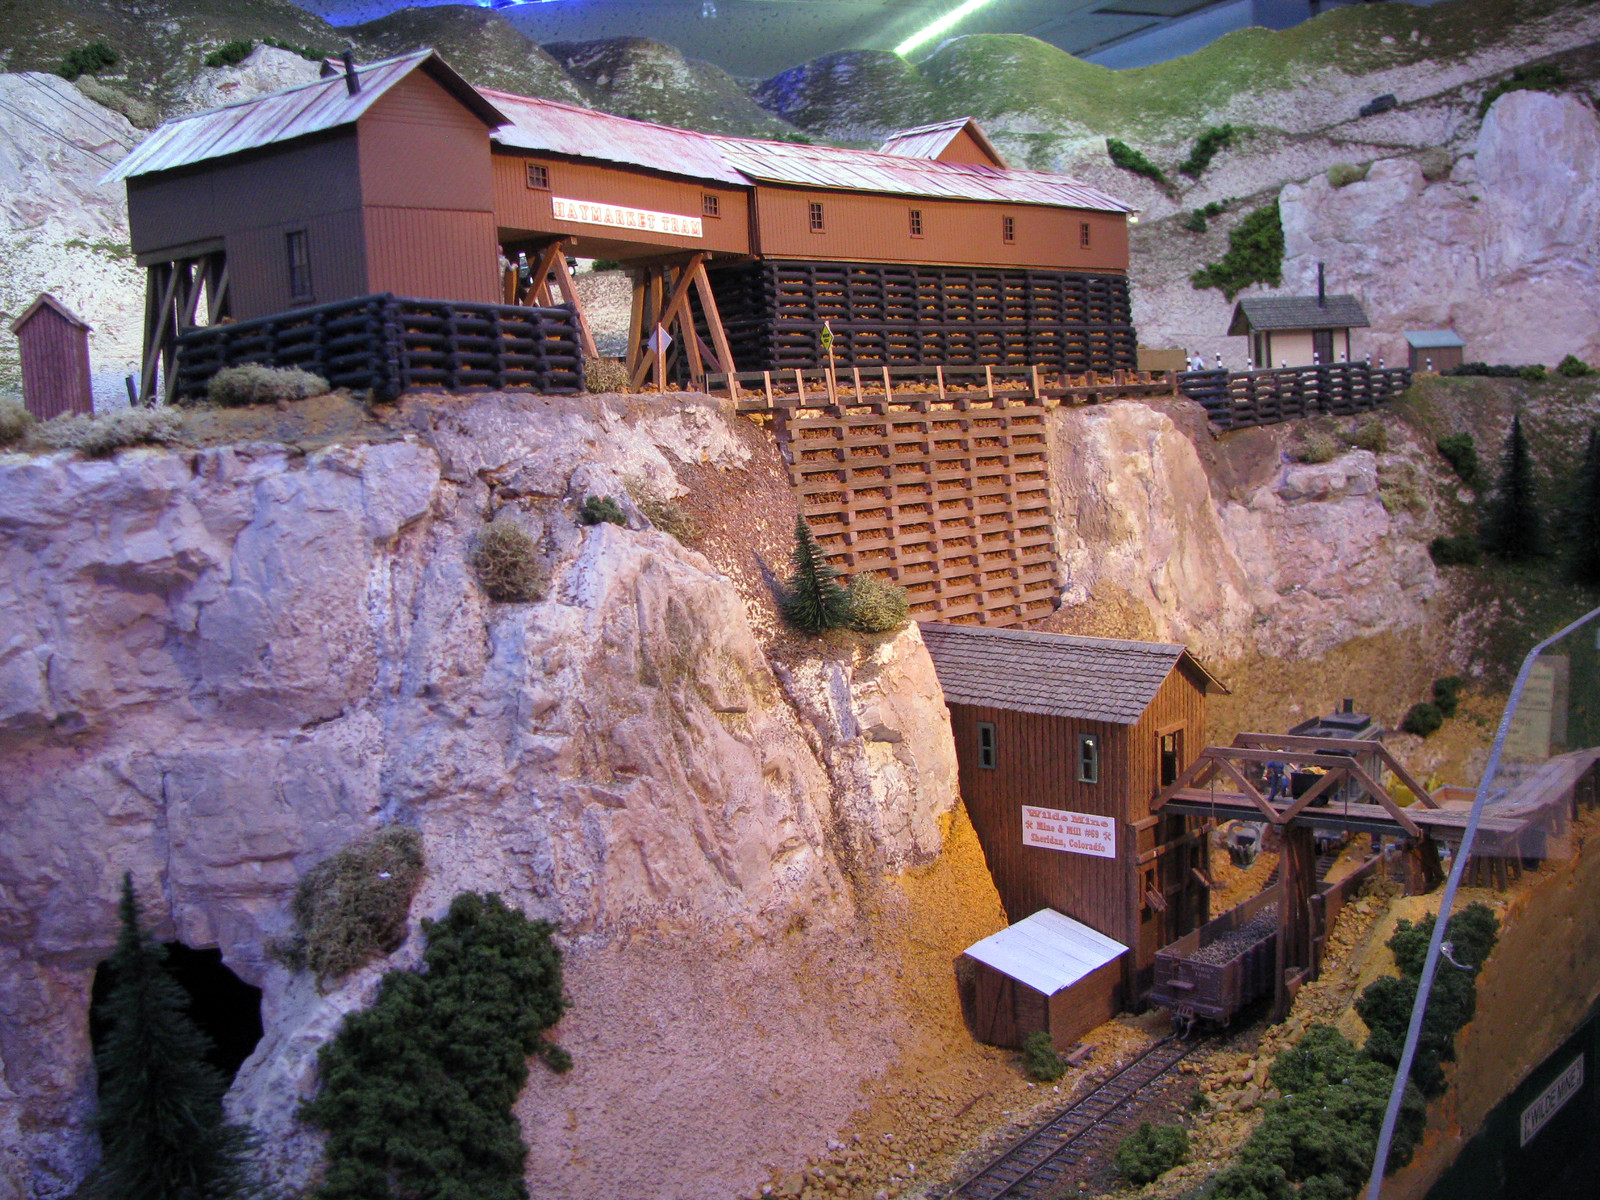 |
|
|
|
Post by railfan4life on Jan 5, 2014 12:58:41 GMT -8
Mike, great shots! Love the lighting. Wish I could get that type of look in my basement. Gotta love the Grande going thru the Rockies.
|
|
|
|
Post by railfan4life on Jan 5, 2014 13:04:41 GMT -8
It's still nice and sunny at Palmer Lake. At least my version of it. 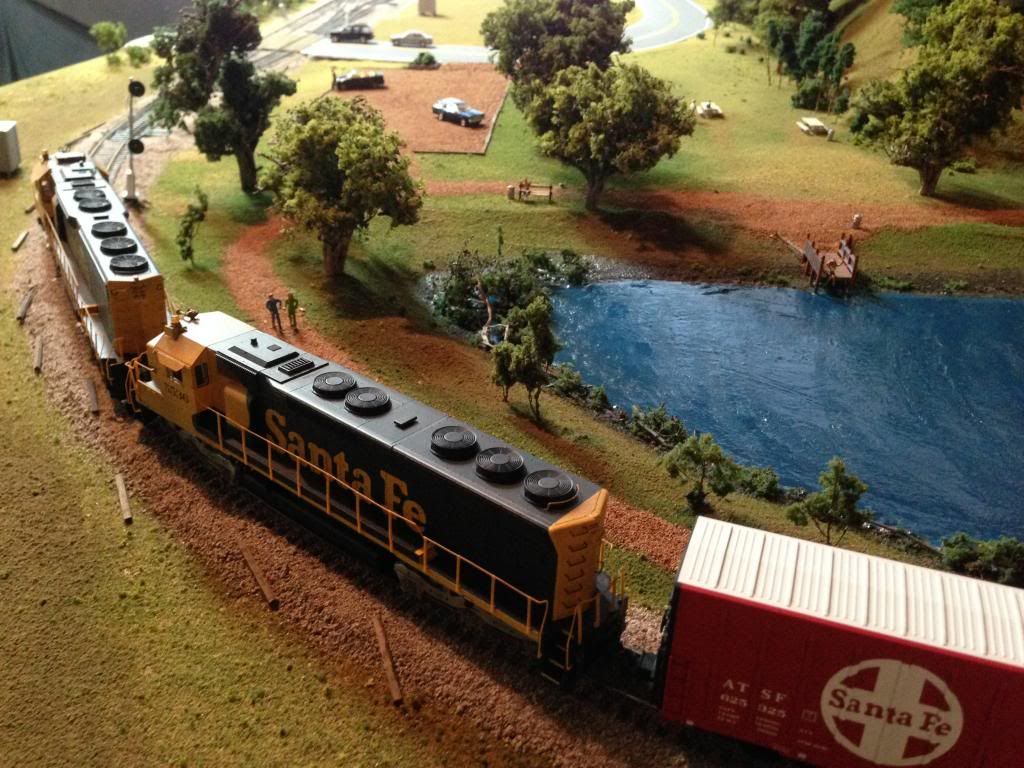 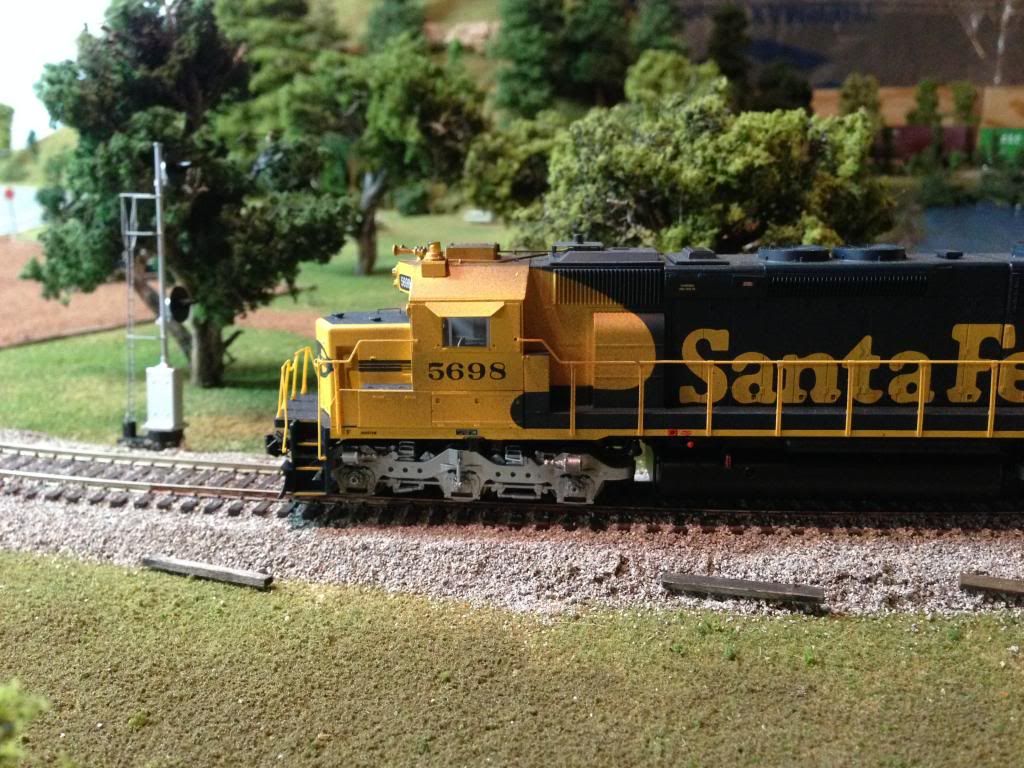 |
|
|
|
Post by rockisland652 on Jan 5, 2014 13:37:24 GMT -8
First semi-completed unit of 2014: 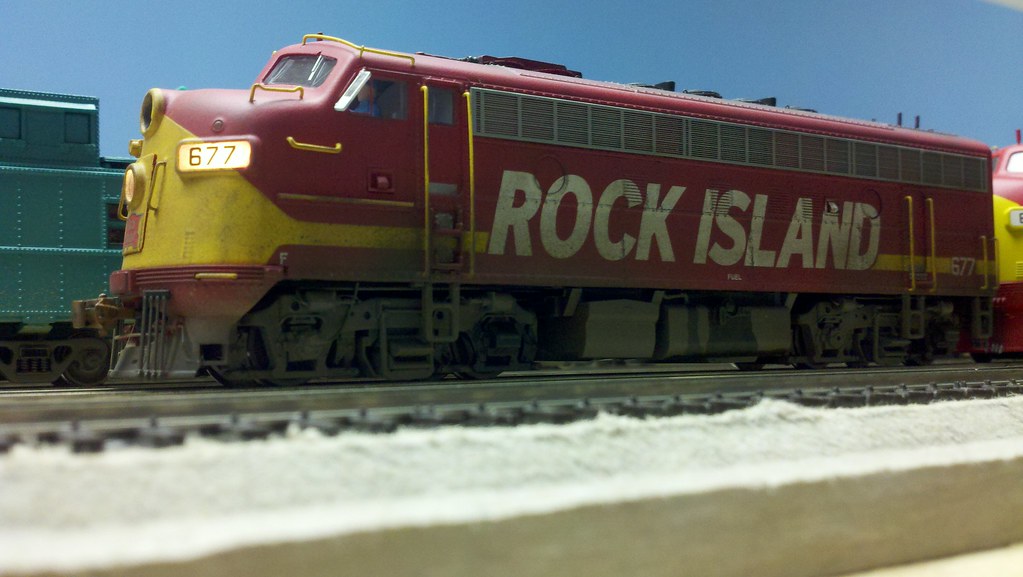 This one's an out of the box HEP F7 from Walthers. I bought one out of appreciation that anyone would go through the trouble to put out a unit so modified. I am grateful that Walthers chose to follow through with this project. For years we had Pullman bilevel cars circulating around with nothing to pull them, nothing appropriate anyway. Interestingly, Trueline Trains has an MP36 coming out in Metra colors. Those Model Metra units will have nothing appropriate to pull, as there are no decent models of Metra rolling stock out there, unless you have the guts to really tackle a cars kit is resin, and, as Jam Master John (onequiknova) has famously shown us, there is much to be fixed on those models. So the pendulum is swinging the other way. Budd Bilevels, anyone? The Walthers Proto F7's also leave a bit to be desired. This is no Highliner or Genesis F. The roof contour is the same as previous efforts and it curves a bit too much. This has a negative effect on the cab windows and prevents them from being close to the prototype. The RI paint was put on backwards, with the red put on first and the yellow and white layered over the red. This results in heavy looking paint and obscured details. What better way to bring the details back than some weathering? Of course. And what better weathering candidate than an old, beat up, Rock Island commuter F? Some details had to to be fixed and I managed to fix some of them. The steps, trucks, and tank were the starting point. Walthers chose to have those items painted black a la CNW units. I can see their point, as many RI pictures I have seen of these engines show more filth than paint below the frame. Heck, they might just as well have been painted black under all that grime. I added brake lines bent from brass wire and drilled out the brake cylinders to take them. After removing the truck frames, I painted them (gasp!) UP Harbor Mist Gray. I reckoned it was close enough to my other RI F units' gray, plus I knew that weathering would be applied, making the gray almost as irrelevant as the original black they arrived in from Walthers. I also painted the wheels RR tie brown to make them blend in with the weathering. Turning to the shell, I removed all the cab and headlight 'glass'. Next, I replaced the weird Proto horn with a Details West P5. Then, I drilled the headlights out, as they had a 'lip' cast into them that made them look too small. They looked fine after drilling. Then, I sprayed the shell, truck frames, and fuel tank with Acryl Flat. Then I hit everything with pan pastels, filthing everything nicely. Another shot of clear flat sealed in the filth layer. Next, I hit the roof and stacks with some airbrushed oily black and added some straight up to the fuel tank (every weathered RI F7 photo I have shows leaking fuel all over the tanks). Next, I turned to a problem I have not really solved: those LED lights up front. They might last forever, but they are way too bright to the point of being obnoxious. It is near impossible to take a photo of the lit numberboards and still see the numbers due to the brightness of the LEDs. Also, the age of the big bulb centered in an F unit headlight casing went out with the Truman administration, and since this is a 1970's model, the twin sealed beam headlights were used in the nose door with a Mars light in the upper casing. from the inside of the shell, I put in a styrene square with two holes drilled out to represent the headlights. After painting the insert gray, I spread some canopy glue on the holes to act as 'lenses'. Testing revealed the insert working correctly, but the LEDs stick out too far, pressing the nose door out of place. I'll have to work on this more before I put Highliners glass over the headlights. The Proto 'glass' has a tube cast in it that would work fine with the Truman era headlights, but not with the replacement bezel substitute, hence the Highliner glass treatment. Finally, reassembly. A little touch up here and there. She is shaping up to be not such a bad little engine. |
|
|
|
Post by TBird1958 on Jan 5, 2014 13:42:39 GMT -8
It's a D&RGW kind of day! This is an indoor shot of one of my Genisis GP-9's lit with a halogen PAR Lamp, it's weathered with some chalks and a little bit of airbrush.  My Hi Tech Ugly Duck, painted with SMP Accu-Paint and a hodge podge of decals, again chalks and airbrush.  The Morning Sun Pullman Standard book has many shots of new auto parts cars that show a very noticable "wave" in the welded panels, I'm having a little fun with the airbrush and some clear gloss cote  |
|
|
|
Post by dti406 on Jan 5, 2014 14:38:21 GMT -8
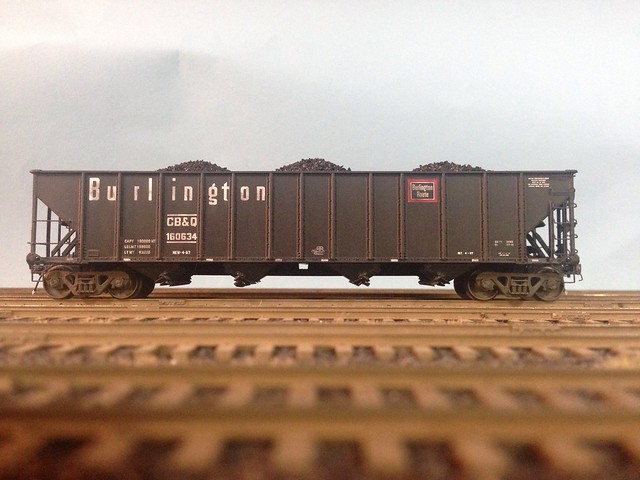
Since I have not finished anything recently I thought I would show some of my favorite builds! URL=http://s765.photobucket.com/user/dti406/media/Hoppers/Trains030613005_zps333d7190.jpg.html]  [/URL]  The NYC rebuilt some 50 Ton Twin Hoppers into 65 Ton Twin Hoppers which were only 5 ton less than the 70 Ton Triples that were standard at that time. I have also shown a 50 Ton Twin next to the 65 Ton Twin for a size comparison. I cut and spliced a 100 Ton McKeen Greenville car to make this car. Mark Vaughn supplied the decals to finish this car.   My Kitbash in a box an Eastern Car Works 3500CF GATC Dryflow Covered Hopper. A lot of cutting and fitting, added airlines and lettered with Oddballs decals.    Moloco GATC RBL Boxcar, first picture shows all the underbody detail, I learned a lot about building brake gear, piping etc from bulding this car. Painted with Floquil Medium Blue and lettered with Mark Vaughn Decals. Thanks for looking! Rick J |
|
|
|
Post by TBird1958 on Jan 5, 2014 14:40:46 GMT -8
Rick,
I like that Q dry flow car, the Wabash box is a beauty too!
|
|
|
|
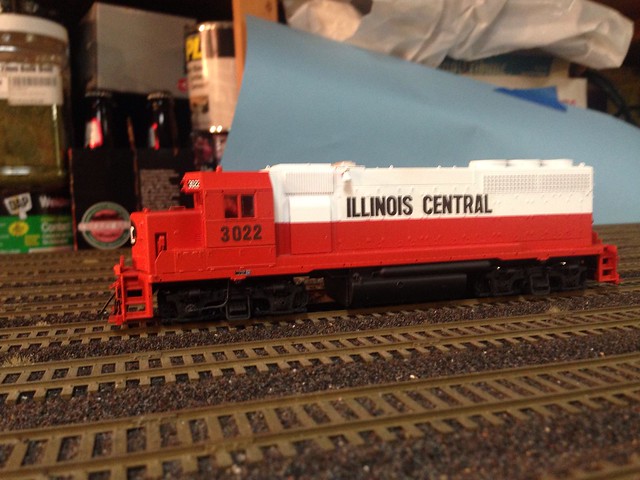
Post by icrr3067 on Jan 5, 2014 16:15:09 GMT -8
|
|
|
|
Post by fr8kar on Jan 5, 2014 16:58:51 GMT -8
The Morning Sun Pullman Standard book has many shots of new auto parts cars that show a very noticable "wave" in the welded panels, I'm having a little fun with the airbrush and some clear gloss cote Wow, this is very nicely done. Can you elaborate more on how you achieved this look? |
|
|
|
Post by buffalobill on Jan 5, 2014 17:06:26 GMT -8
Rick nice job on the GATX Dry Flow Covered Hopper. its a car that needs to be done in HO. Also like that Moloco GATX RBL in Wabash blue.
Tom nice job on the Rock F unit. With some work the Walthers- Proto F's look pretty good.
Mike and Big- T Bird like the Rio Grande units, also the wrinkle effect on that Pullman 86' car is great. Its not just the smooth side Pullman cars, the PS-5344 CF Box cars have the same effect as they age.
Nice work.
Bill
|
|
|
|
Post by tankcarsrule on Jan 5, 2014 17:50:23 GMT -8
This is the smallest of my scratch built tank cars. At 2225 gals, it's quite a contrast to the 47,000 gal eight axle VICX tanker.  |
|
|
|
Post by TBird1958 on Jan 5, 2014 20:56:32 GMT -8
The Morning Sun Pullman Standard book has many shots of new auto parts cars that show a very noticable "wave" in the welded panels, I'm having a little fun with the airbrush and some clear gloss cote Wow, this is very nicely done. Can you elaborate more on how you achieved this look? Thank you First, the stock Walthers finish is very dull except for the surface of the lettering, I use an Iwata HP-C and Testors gloss cote that has a little Du Pont 3602 lacquer in it. I hold a 3x5 file card on the weld seam an make a stroke with the airbrush that starts on the file card - I start on the right side if the car and work left, a strong light source is very helpful while you're working. You can't really go wrong here either, if the car gets too glossy you can always come back over it with some dullcote. Love that tank car model Bobby Pitts! |
|
|
|
Post by dti406 on Jan 6, 2014 5:08:24 GMT -8
Thanks T-Bird and Bill for the complements. I have one more of the Dry-Flow kits and I will be doing that one in Wabash. There is only one picture of a Wabash Dry-Flow and that one is on the Car Ferry across the Detroit River so it is not very helpful in the lettering layot, although Mark Vaughn's decal has a good layout of the placement.
I just wonder at how many of the Dry-Flow kits are laying around unbuilt, after making all the cuts it is a relatively simple kit to build after that.
Rick J
|
|
|
|
Post by kentuckysouthernrwy on Jan 6, 2014 8:27:42 GMT -8
Heavy snow and wind in Michigan on the 5th, CN dispatch told this train to pass by the Cory Yard SW of Lansing and proceed to Lansing where there was someone cleaning switches. Here he passes the yard at Cory then hits the snow at Billwood Hwy. 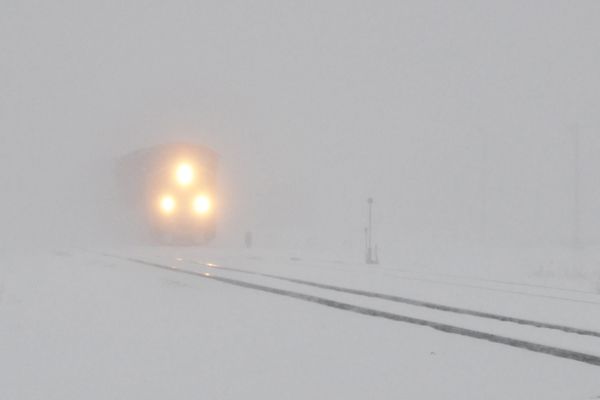 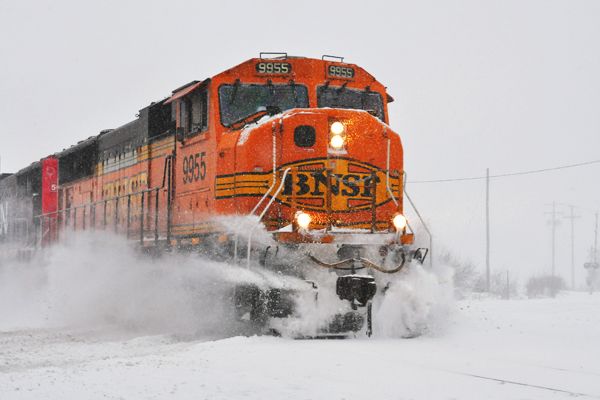 The snow and wind was vicious. My 4x4 Tacoma, relentless. |
|
|
|
Post by peoriaman on Jan 6, 2014 9:12:37 GMT -8
This is the smallest of my scratch built tank cars. At 2225 gals, it's quite a contrast to the 47,000 gal eight axle VICX tanker. View AttachmentBobby that tank car is un- friggin'-BELIEVABLE!!! Words escape me. |
|
|
|
Post by rockisland652 on Jan 6, 2014 10:53:01 GMT -8
For the curious, here is a side by side comparison of Proto and Highliner noses. 676 was custom built for me many years ago and I still lack the courage to weather it. 677 is my weathering project du jour.  This is a schizophrenic locomotive. Walthers made great effort to make it RI to the point of getting the sand box fillers at least close to right. Good, good Walthers. However, Walthers criminally left the P5 horn off the Tsunami board. Bad, bad Walthers. You get a time out for your insolence.  |
|
|
|
Post by onequiknova on Jan 6, 2014 11:09:29 GMT -8
For the curious, here is a side by side comparison of Proto and Highliner noses. 676 was custom built for me many years ago and I still lack the courage to weather it. 677 is my weathering project du jour. This is a schizophrenic locomotive. Walthers made great effort to make it RI to the point of getting the sand box fillers at least close to right. Good, good Walthers. However, Walthers criminally left the P5 horn off the Tsunami board. Bad, bad Walthers. You get a time out for your insolence. I was wondering if you were going to pick one of those up. It looks pretty good. Too bad they didn't do 675. |
|
|
|
Post by tankcarsrule on Jan 6, 2014 11:49:11 GMT -8
Mark, Peoriaman, I'm glad you like the car. I built it from an article in MR that was long and detailed.
Thank you both for your kind words.
Regards, Bobby
|
|
|
|
Post by rockisland652 on Jan 6, 2014 14:32:04 GMT -8
I was wondering if you were going to pick one of those up. It looks pretty good. Too bad they didn't do 675. I am still looking for a 675, just one from the Highliners camp. Better locomotive shell overall I think. Darn near impossible to beat really. For those not already bored to tears by my posts this week, here is a side by side nose comparison from head on. Note that 677 has a giant LED in the upper headlight casing, bright as the sun too. Too bright, in fact. Note the contours of the cab windows, as the Highliner shell just seems to have it right. I also think that 677's cab glass leaves a bit to be desired and Walthers, in their infinite wisdom, put the windshield wiper on the cab glass a la BLI. To allow the arm to get above the window frame, there is a notch at the top of each window. The coupler is too high, but I think that one's mine, as I may have put the plastic sandwich coupler box on upside down. I do think that Walthers has the number board font correct. 676 is not without issues too. The number board font is too narrow and the shell sits too high, as the porthole clips are worn and no longer hold it down. I have to replace that part. Everything else is top notch though. 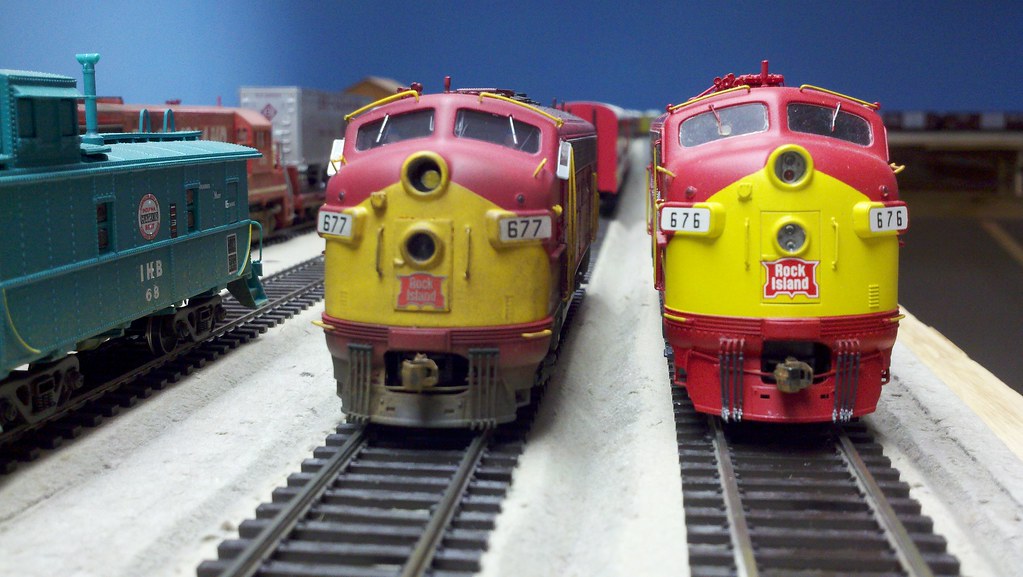 |
|
|
|
Post by buffalobill on Jan 6, 2014 14:44:58 GMT -8
Tom: Both very nice locomotives- now you need Rock Bi-level trains for both. However, unless you are modeling #676 just out of the paint shop- she needs a bit of weathering. No Rock Island unit was ever that clean. I have a LL-Proto Pennsy F-7 AB set- you are right it is not as nice as the Highliner- Genesis shell, but it still is much better than most other units out there. BLI, Stewart, Intermountain and the original Athearn.
Rick: Your CBQ car is impressive, my ECW Dry Flow kit never made it much further than opening the box. Away the kitbash in the box went, and maybe someday it will surface when I have time.
Bill
|
|
|
|
Post by rockisland652 on Jan 6, 2014 14:55:11 GMT -8
Tom: Both very nice locomotives- now you need Rock Bi-level trains for both. However, unless you are modeling #676 just out of the paint shop- she needs a bit of weathering. No Rock Island unit was ever that clean. I have a LL-Proto Pennsy F-7 AB set- you are right it is not as nice as the Highliner- Genesis shell, but it still is much better than most other units out there. BLI, Stewart, Intermountain and the original Athearn. Bill Actually, I have a fleet of red cars for these two, plus #662. We need Budd cars. I agree, the Walthers unit is not such a shabby locomotive at all...well...except for the nasty LEDs. They're almost as intense as a laser pointer. 677 is stock Proto with details and weathering. I think she captures the mid 70's state of the F-7 on the RI. 676 is a custom made Highliner and though she remains unprototypically clean, I have yet to obtain the courage to weather it. |
|
Deleted
Deleted Member
Posts: 0
|
Post by Deleted on Jan 6, 2014 15:38:17 GMT -8
Note that 677 has a giant LED in the upper headlight casing, bright as the sun too. Too bright, in fact. Finally someone else that says the LED's in the current crop of Proto E's and F's are too damn bright. The Mars light effect with the LED also sucks pond water in my humble opinion. |
|
|
|
Post by riogrande on Jan 6, 2014 15:58:12 GMT -8
Tbird, Nice job as always. Are those Hi-tech ugly ducklings still available? The PRR auto box car looks very convincing, I still need to pick up a few of the early PRR and NYC 86' box cars for the Ford FAST!
|
|
|
|
Post by TBird1958 on Jan 6, 2014 16:38:22 GMT -8
Tbird, Nice job as always. Are those Hi-tech ugly ducklings still available? The PRR auto box car looks very convincing, I still need to pick up a few of the early PRR and NYC 86' box cars for the Ford FAST! Thanks Jim, That Ugly Duck is from the original production of undecs, I had Jim Eager's D&RGW freight car book and pieced together some decals for it - I guess it's more than 10years old now, not too much box-rot has set in  |
|
|
|
Post by mlehman on Jan 6, 2014 17:07:00 GMT -8
Note that 677 has a giant LED in the upper headlight casing, bright as the sun too. Too bright, in fact. Finally someone else that says the LED's in the current crop of Proto E's and F's are too damn bright. The Mars light effect with the LED also sucks pond water in my humble opinion. If locating and swapping out the responsible resistors on the board isn't feasible -- I wouldn't touch them if they're SMDs myself -- try plumbing in additional resistance to the positive side of the LEDs in question. That will tame them down. I have a couple of sets of DCC/sound P2K F units and the LEDs on them seem about right. But I run my DCC system set at 12.5 volts. This leads me to believe that not too much additional resistance will soften them for you. Or just give the command station an adjustment and enjoy all around cooler running. |
|
|
|
Post by peoriaman on Jan 6, 2014 17:31:50 GMT -8
Heavy snow and wind in Michigan on the 5th, CN dispatch told this train to pass by the Cory Yard SW of Lansing and proceed to Lansing where there was someone cleaning switches. Here he passes the yard at Cory then hits the snow at Billwood Hwy. Reminds me of the fog we had a couple weeks ago. This is on the CP ex-Milwaukee Road. 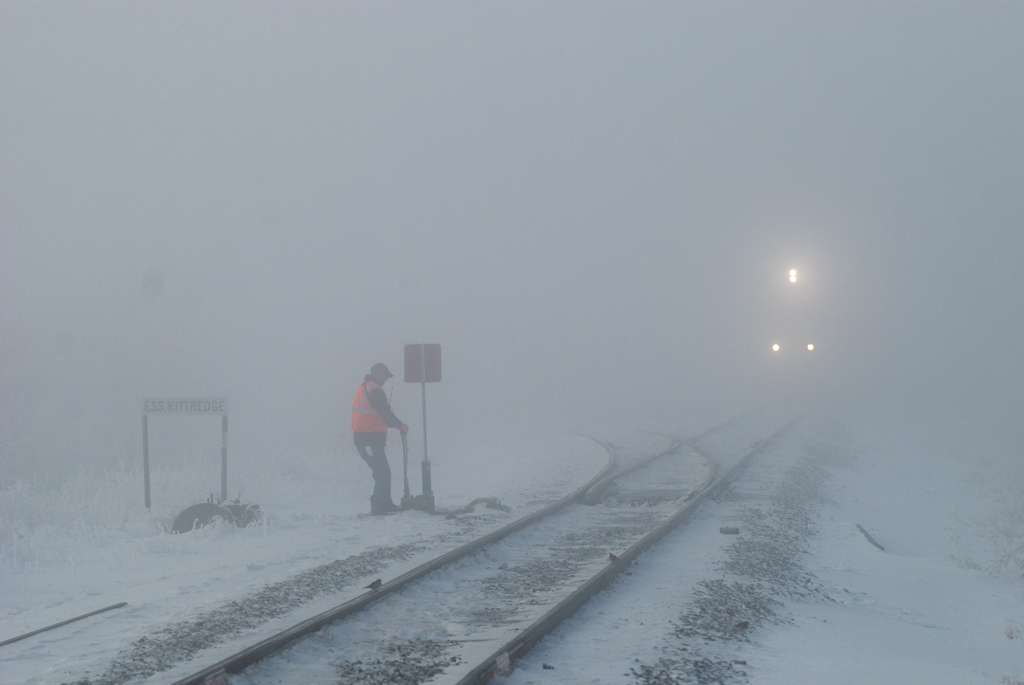 |
|
|
|
Post by riogrande on Jan 6, 2014 18:27:40 GMT -8
Thanks Jim, That Ugly Duck is from the original production of undecs, I had Jim Eager's D&RGW freight car book and pieced together some decals for it - I guess it's more than 10years old now, not too much box-rot has set in Everything you show epitomizes what I'd love to see running on a D&RGW layout! Outstanding! |
|
|
|
Post by fr8kar on Jan 6, 2014 18:49:29 GMT -8
Thank you First, the stock Walthers finish is very dull except for the surface of the lettering, I use an Iwata HP-C and Testors gloss cote that has a little Du Pont 3602 lacquer in it. I hold a 3x5 file card on the weld seam an make a stroke with the airbrush that starts on the file card - I start on the right side if the car and work left, a strong light source is very helpful while you're working. You can't really go wrong here either, if the car gets too glossy you can always come back over it with some dullcote. Thanks for the breakdown. I'll have to give that a whirl. |
|
|
|
Post by dtinut on Jan 7, 2014 16:54:49 GMT -8
I have several kits laying around to build, Concor, Walthers, and a couple of the Athearn RTR in undec/kit form. Was looking for inspiration, and found a Rock Island airlside I thought would be cool, as I found several photos on the web (Fallen Flags was the best source) and I started hacking. I removed all the ladder rungs, and plugged the holes in the roof, and got rid of the brake equipment, and started filling and drilling, and this is what I came up with:   I painted it a light grey (pollyscale undercoat gray mixed with reefer white) and I add a little Future to the paint to provide a gloss finish so I don't have to do that too, before decalling. Mask Island had the decals to do this car. I then weathered the car using chalks and a little airbrushing to finish it with some dullcoat. Parts: Concor airslide kit .015" brass wire kato roller bearing 70T trucks Kadee couplers and roofwalk straight pins (for the turndowns on the hatches) MI decals Found another looking thru my MS Chessie Frieghtcars in Color book, and found a Chessie (C&O) airslide I liked, so I did another one. Removed all the grabs, and replaced with wire, added some of the missing plumbing, and gave it a coat of Enchantment Yellow. Decals are pieced together from MS Chessie covered hoppers, and a set of Dan Kohlberg PRR decals (airslide info)   Regards, Brian I have a few more I am working on, but they have to wait now, as I have some other stuff lined up ahead of them. Brian |
|
|
|
Post by tankcarsrule on Jan 7, 2014 18:41:35 GMT -8
Very nice work Brian!
Regards, Bobby
|
|