|
|
Post by mlehman on Feb 2, 2014 7:47:58 GMT -8
One of this week's bigger projects was installing more LED lighting in my passenger cars. That included a Tomar "San Juan" drumhead on the "Durango," where the LED helps it run much cooler and last longer than the tiny bulb Tomar supplies. 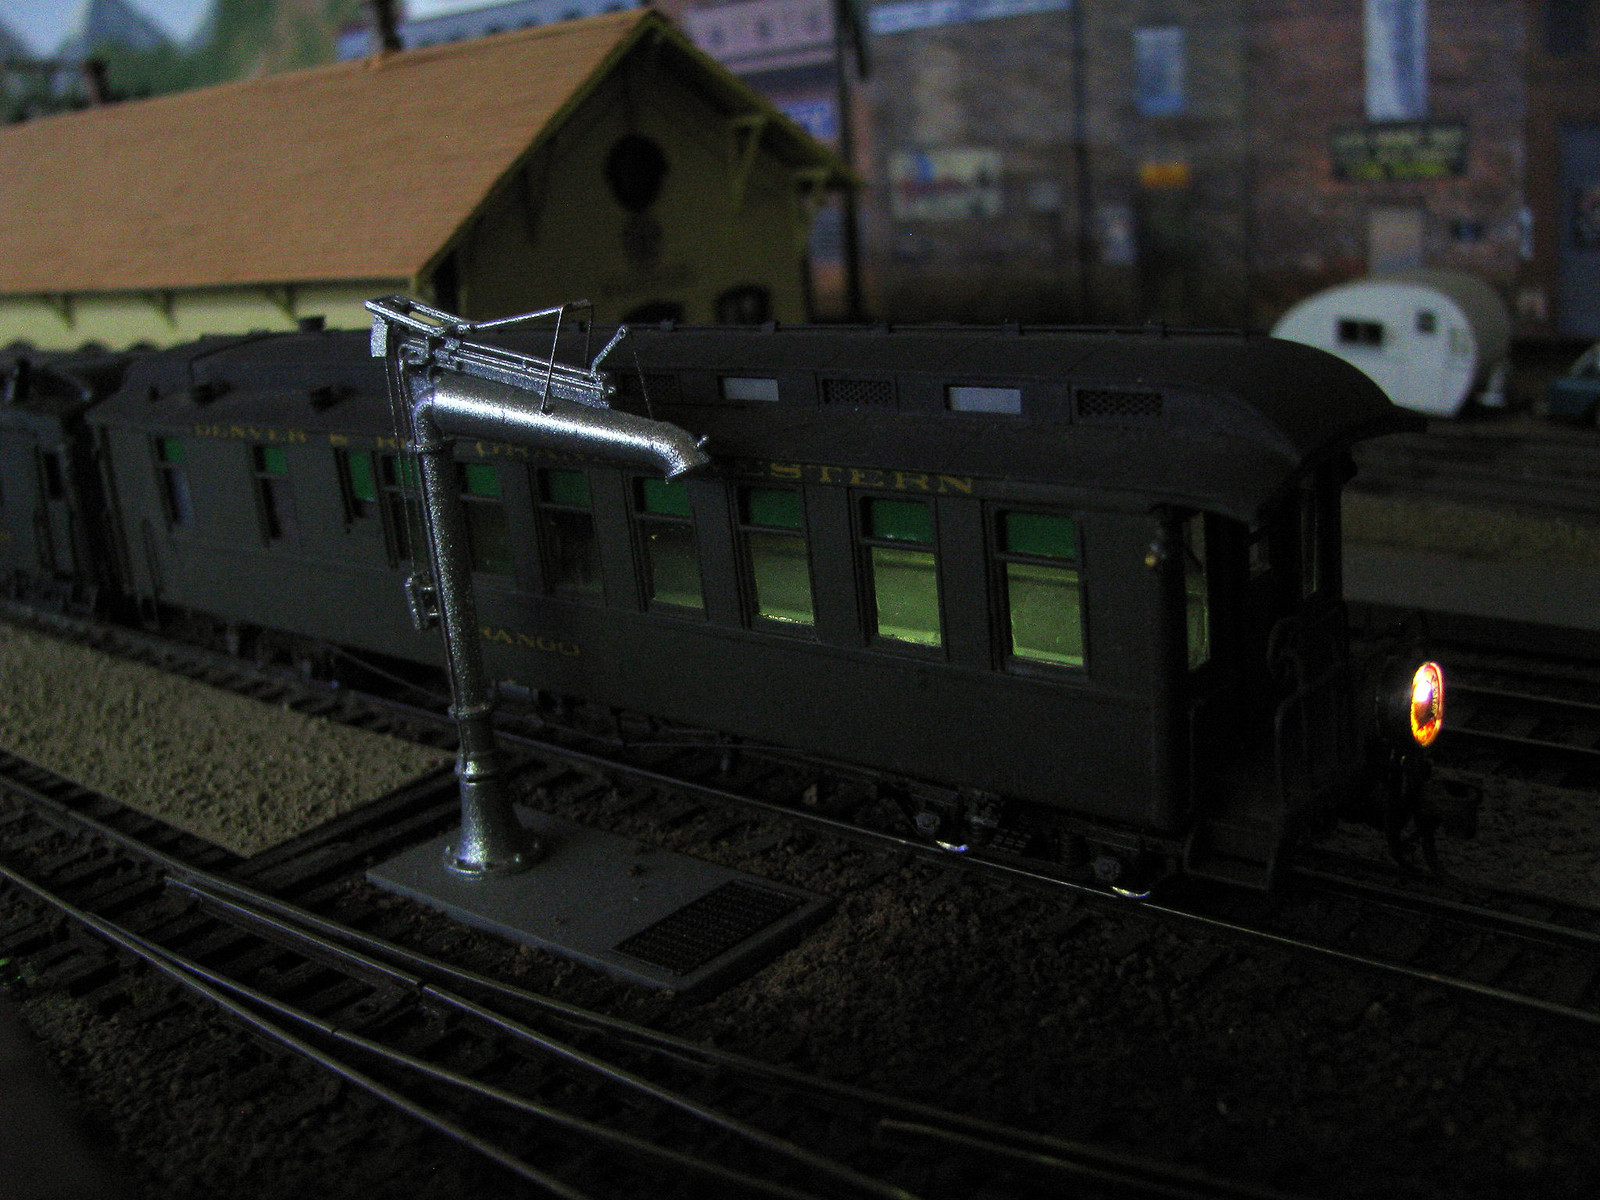 I wrote this up, along with pointing to some sources of cheap LEDs in this thread in the DCC forum: atlasrescueforum.proboards.com/thread/2132/cheap-updating-tomar-drumheads-lightingGot a good deal on some distressed plastic, so built some steel loads. 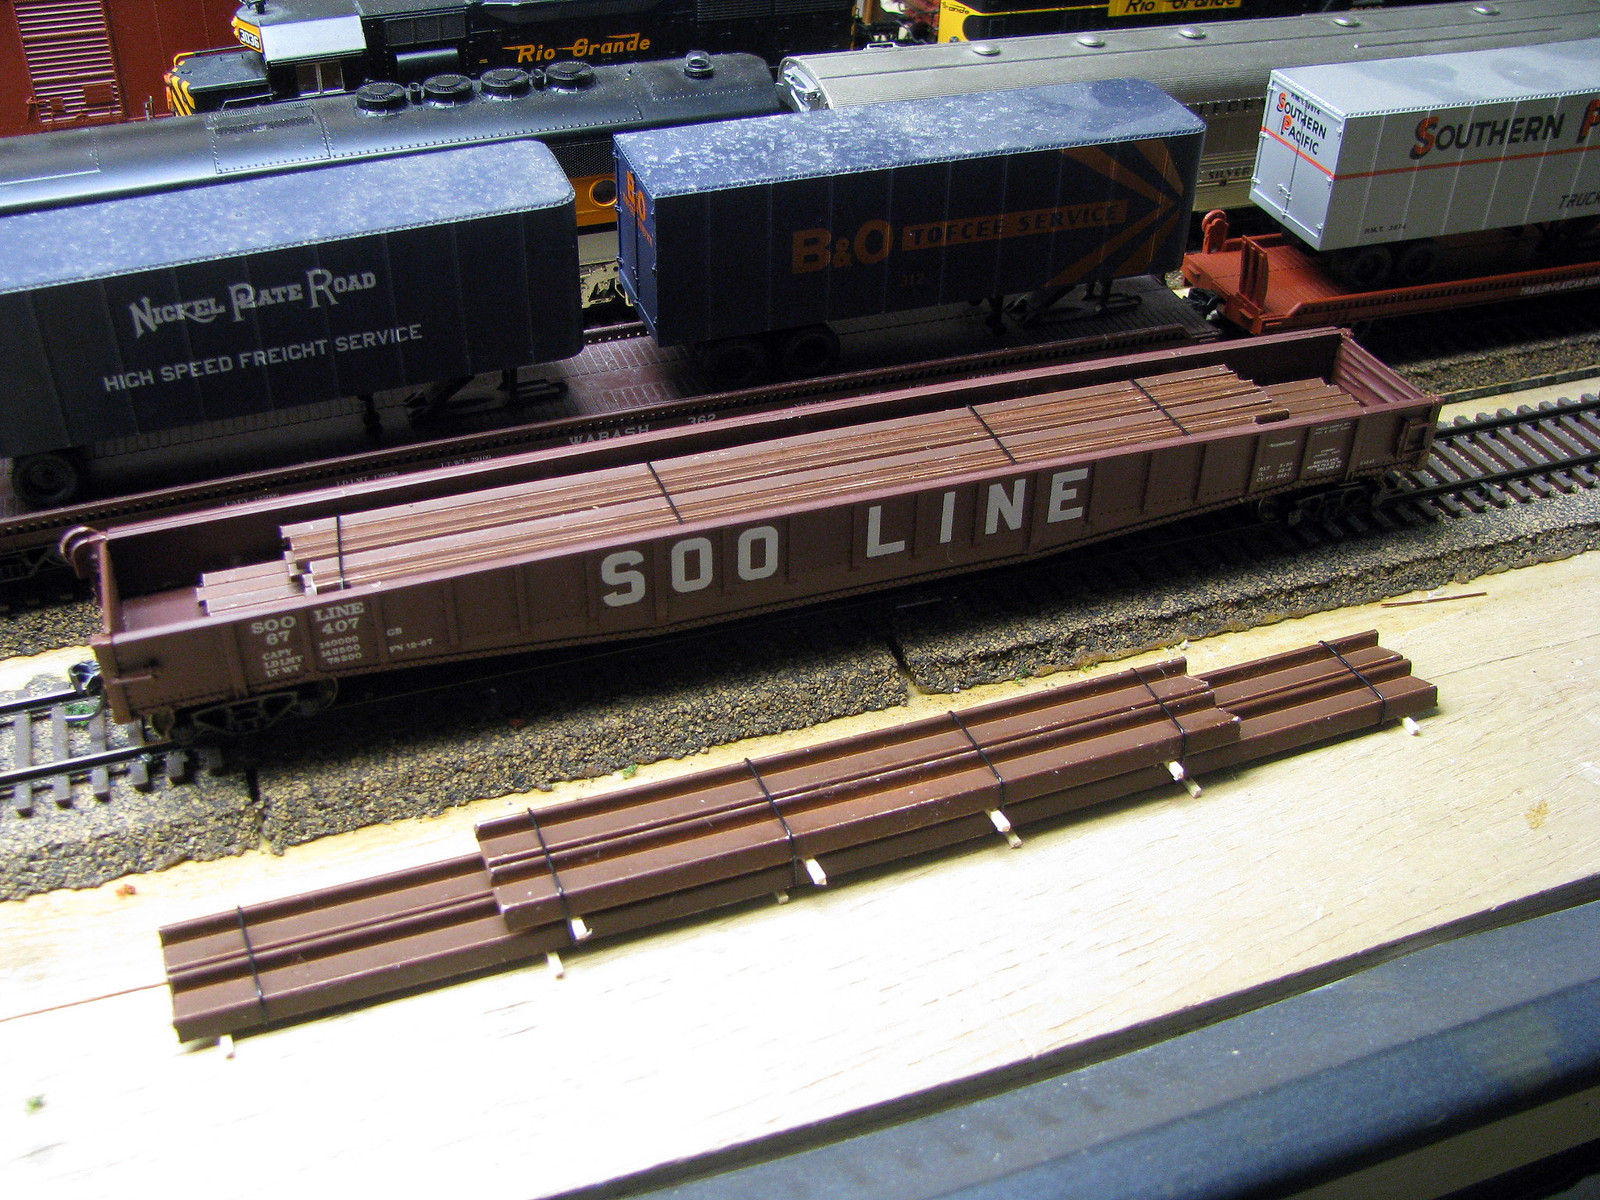 To facilitate more traffic through staging, I converted all its tracks from the power-routing of DC days to full-time power as I ready the layout for an ops session next Sat.  |
|
|
|
Post by mrsocal on Feb 2, 2014 8:26:11 GMT -8
On my bench is this undec. Atlas PS-1 that I am throwing down this 1956 scheme on. After starting the decal work it hit me that the sills on the proto are solid and not notched so I am correcting that and headed on to the paint shop (i.e. the garage)   |
|
|
|
Post by fr8kar on Feb 2, 2014 8:26:15 GMT -8
Athearn did a pretty good job on the latest run of Mopac SD40-2s... 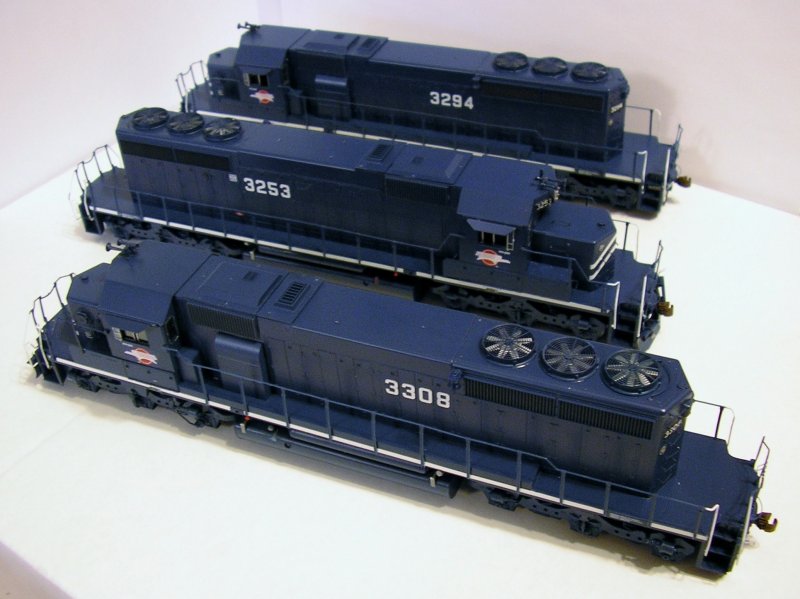 ...but they got a few things wrong that I had to fix:  First of all, the bell is in the correct location for the ratchet handbrake SD40-2s, but it needed to be moved near the radiators for the numbers Athearn chose. Also, all Mopac SD40-2s had fuel fillers at each end of the fuel tank, so that means the reservoirs must be moved forward a bit. On 3253, the location of the forward fuel filler and sight glass was fine, but not so for 3294 and 3308: 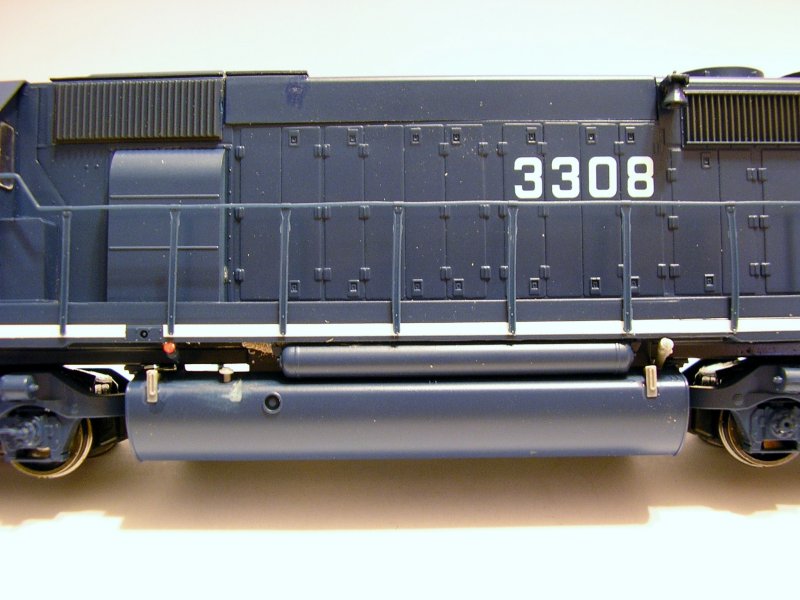 For these two later production units, the dial gauge is also used, so it was installed as well. If you look underneath the walkway at the frame, you can see where the frame had to be ground away to accommodate the new reservoir location. This was only required on the fireman's side. Eventually, I'll have MP 3316 completed to go along with these three. It's one of the last units Mopac received, so it has the Q fans and exhaust silencer. This one started off as a blue box model: 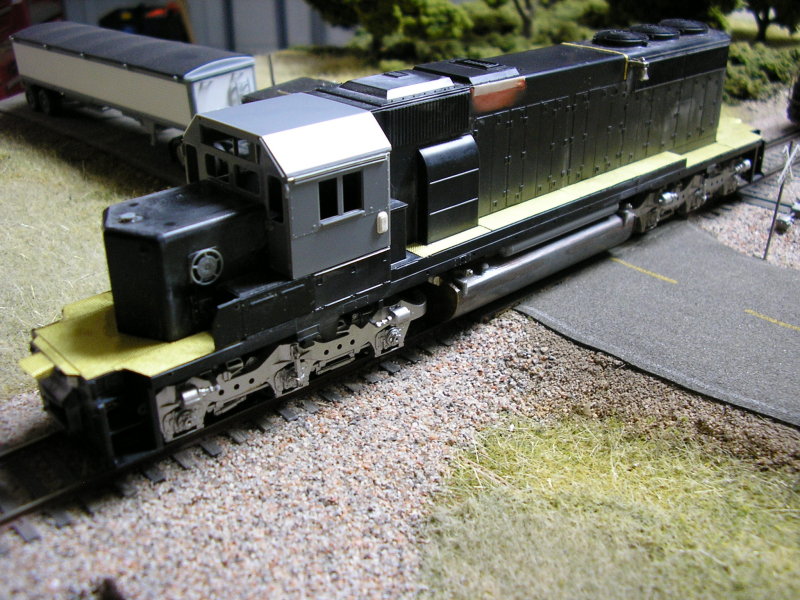 |
|
|
|
Post by mlehman on Feb 2, 2014 8:45:04 GMT -8
Nice work, guys.  rch, What's the white object attached to the cab side below and behind the window in the last pic? |
|
|
|
Post by TBird1958 on Feb 2, 2014 9:07:26 GMT -8
Those MoPac Dash 2's are cool, and as always, great stuff here! Go Seahawks! This is a stock P2K Rock Island gon  A slightly worn DT&I car, for my '70s timeline it's still a pretty new car and hasn't taken on the dramatic fading and rust that would characterize it later in life. I was fortunate enough to see this car on the Rio Grande's Fast Ford, it was just ahead of the caboose and a GP40-2 helper running long hood first going west, up Soldier Summit.  IIRC this is an old Eastern Car Works hopper, D&RGW rebuilt quite a few of it's early cement cars this way, however only this one was a complete repaint, the rest were patch jobs in gray paint.  |
|
|
|
Post by tankcarsrule on Feb 2, 2014 9:25:39 GMT -8
This car was originally insulated with an outer skin.  |
|
|
|
Post by TBird1958 on Feb 2, 2014 9:39:07 GMT -8
Bobby,
That is truly inspired work - incredible craftsmanship. Thank you for sharing!
Best Regards,
Mark
|
|
|
|
Post by fr8kar on Feb 2, 2014 9:42:16 GMT -8
Nice work, guys. rch, What's the white object attached to the cab side below and behind the window in the last pic? It is a Details West cab vent. |
|
|
|
Post by fr8kar on Feb 2, 2014 9:42:57 GMT -8
Another great addition to your incredible fleet of tank cars! |
|
|
|
Post by fr8kar on Feb 2, 2014 9:44:59 GMT -8
Thanks, Tbird. I love the gondola and the magenta auto parts car.
|
|
|
|
Post by mlehman on Feb 2, 2014 11:01:55 GMT -8
Finally got ImageShack working again, so here's a photogenic pic of the results of the lighting work. This is a pic of one of my locals. There is a BLI CZ dome in the consist, but the other lighting is by me. I still want to lower the intensity of the light in the observation some more. 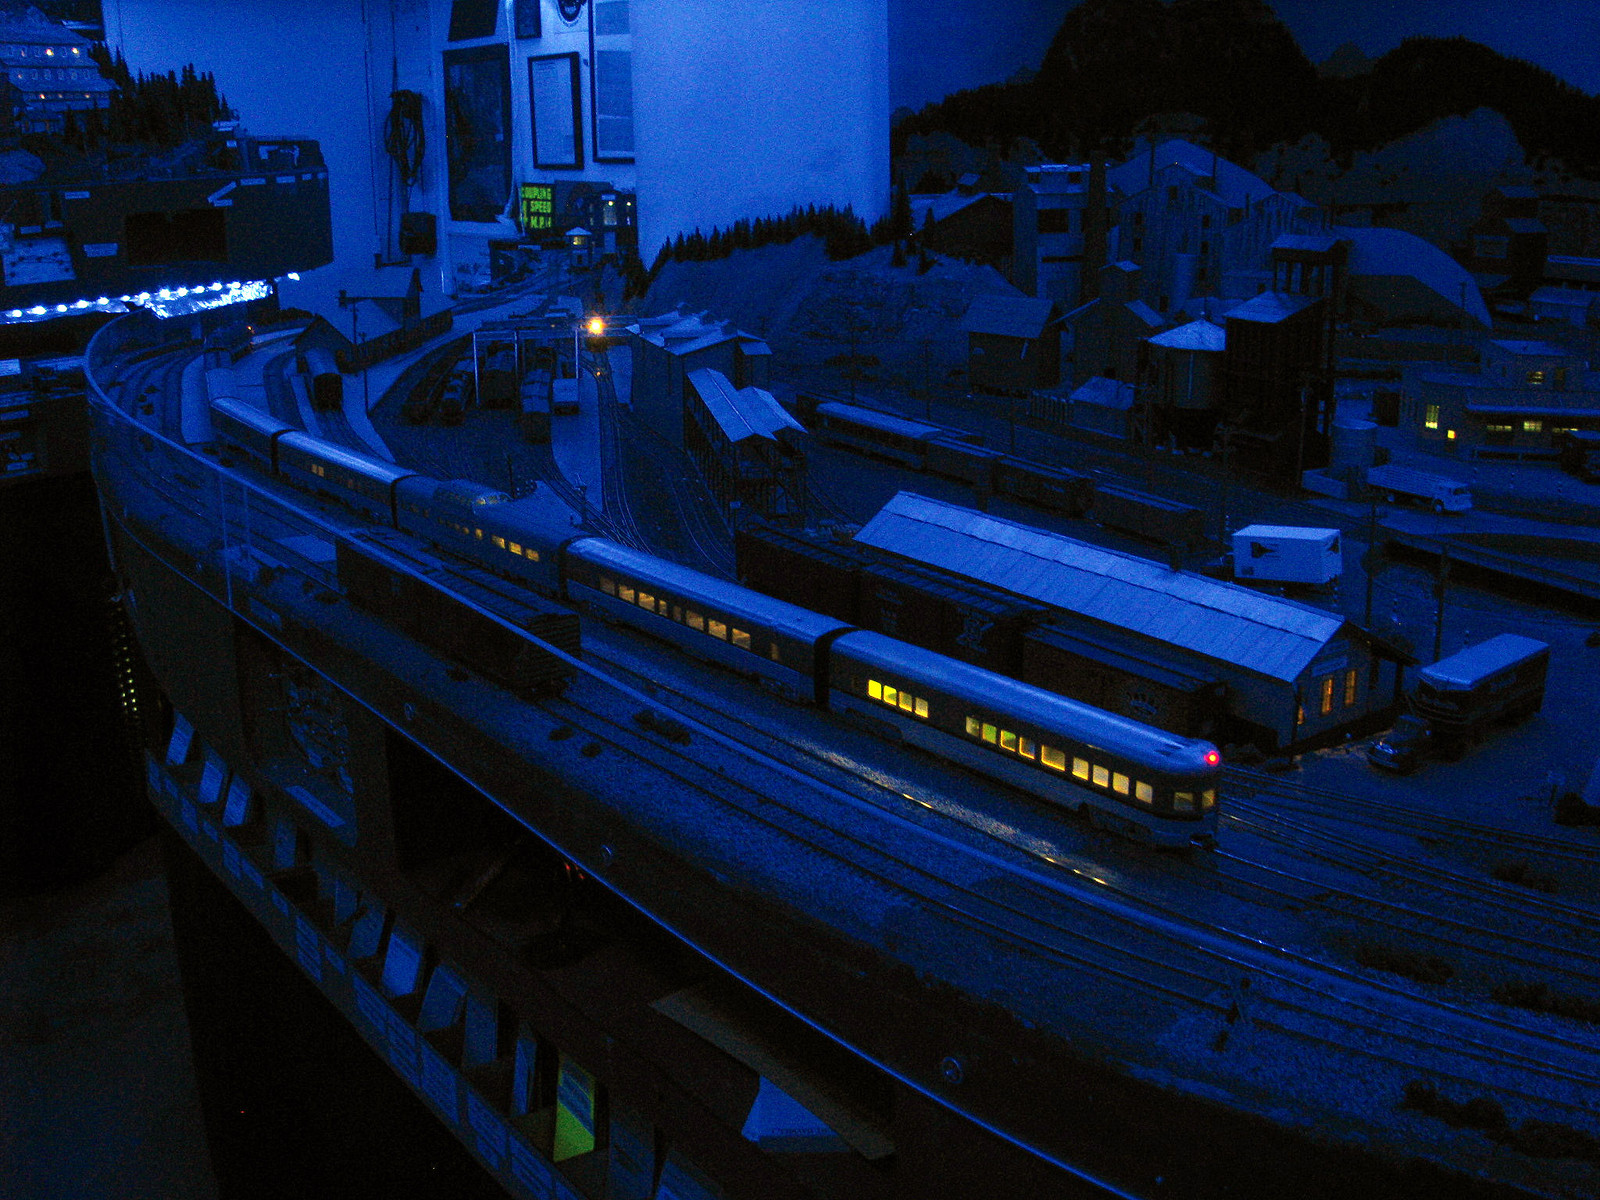 Tbird, Love that RI gon. |
|
|
|
Post by dti406 on Feb 2, 2014 11:29:14 GMT -8
T-Bird, just a note the DT&I car is a fantasy scheme as the Magenta painted cars were either Greenville or Despatch Shops cars and not the PS cars that Walther's did. The PS cars were painted Green.
Rick J
|
|
|
|
Post by TBird1958 on Feb 2, 2014 11:41:18 GMT -8
Thanks Rick, I didn't know that. It was either Walthers or Athearn BB, had to have a Big Pinkie one way or another....... |
|
|
|
Post by dti406 on Feb 2, 2014 11:42:02 GMT -8
I have started on a project a while ago and don't know if I posted the start of it here or not. I am going to build a proper P&LE Bread Box Coil Gon using the old AHM Gon Body and Covers and an underframe from a Walther's Coil Car as the underframe in the AHM car is pure fantasy.    These are the two cars before I did any work on them, sorry for the slightly out of focus pictures but the underframe and interior of the AHM car is just wrong!  Here I have removed the interior of the gon and taken apart the Walthers kit before doing any more detailing on the car.  This is the gon body with everything removed including the end platform which looked funky, also thickened the end of the gon on the inside so the coil cradle and its frame would fit tightly in the body.   This is the coil cradle and its frame and the car underframe all assembled. I have removed the intermediate frame piece from the cradle and filled in some of the frame with Evergreen plastic and removed the cast coupler pockets and installed Detail Associates Cast Coupler Pockets.  The coil cradle and underframe have been installed in the gon body, have to make the platforms at each end along with the brake wheel, and cover mechanism along with installing wire grabs and sill steps. Next up is the Cover Details including an operating locking mechanism for the cover and all the brake details under the car. Rick J |
|
|
|
Post by tankcarsrule on Feb 2, 2014 12:20:18 GMT -8
Thanks guys, I'm glad you like my efforts. I've done twenty tank cars.
Regards, Bobby
|
|
|
|
Post by surlyknuckle on Feb 2, 2014 12:37:02 GMT -8
One of the PD-3000s I picked up at Timonium. I've already painted and weathered the wheels/trucks, and added some Sergent couplers.  |
|
|
|
Post by peoriaman on Feb 2, 2014 13:42:17 GMT -8
We got some snow. Note the headlight on the DPU going away on the center track.  |
|
|
|
Post by rockisland652 on Feb 2, 2014 13:45:36 GMT -8
Apologies to those tired of Rock Island stuff on this forum.  This weekend, I continued the work on the AT&SF and ICG crossing at Joliet. I used Peco flex track for all the connecting roads. Probably should have used it on the RI tracks as well, as it would have made installation smoother. Also, I discovered that I could put a spike anywhere I wanted to in the Peco ties, no need for drilling, just spike away. Impressive. Most impressive. Ok...ok...so I connected the 'other' roads' track back up...no sense in risking an ICC complaint, right? Here is a RI freight rolling west over the crossing. The bottle of CA was uninvited... 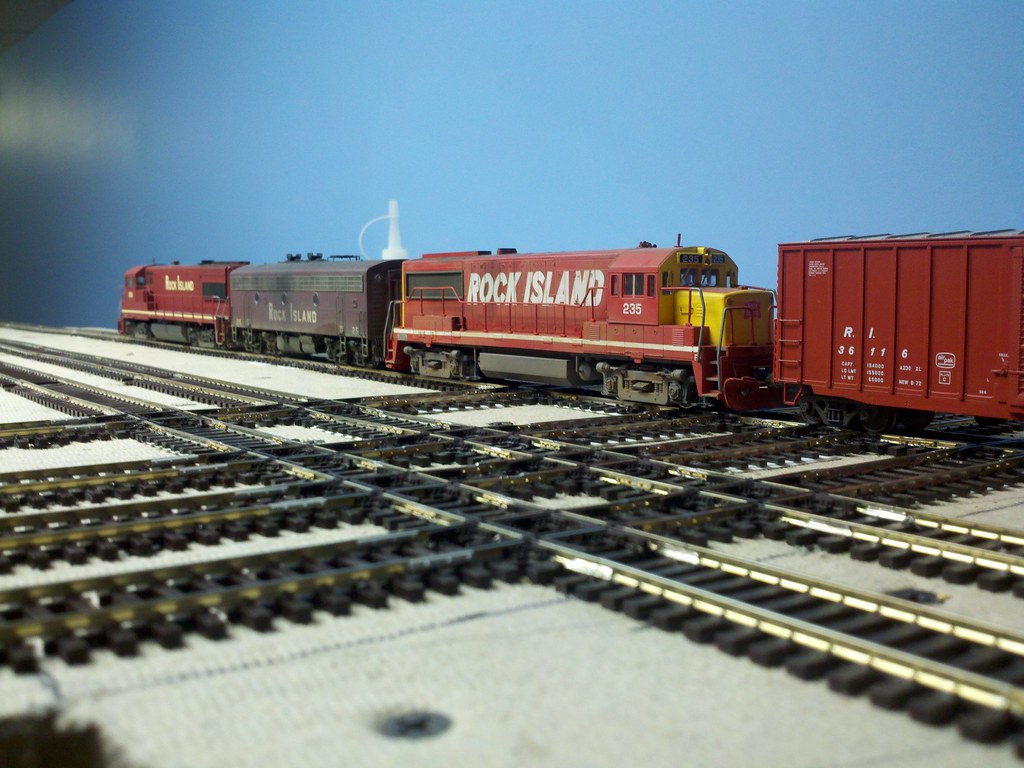 Not to forget the vast number of commuter trains that visited JUS every weekday. F7 #677 shoves east... 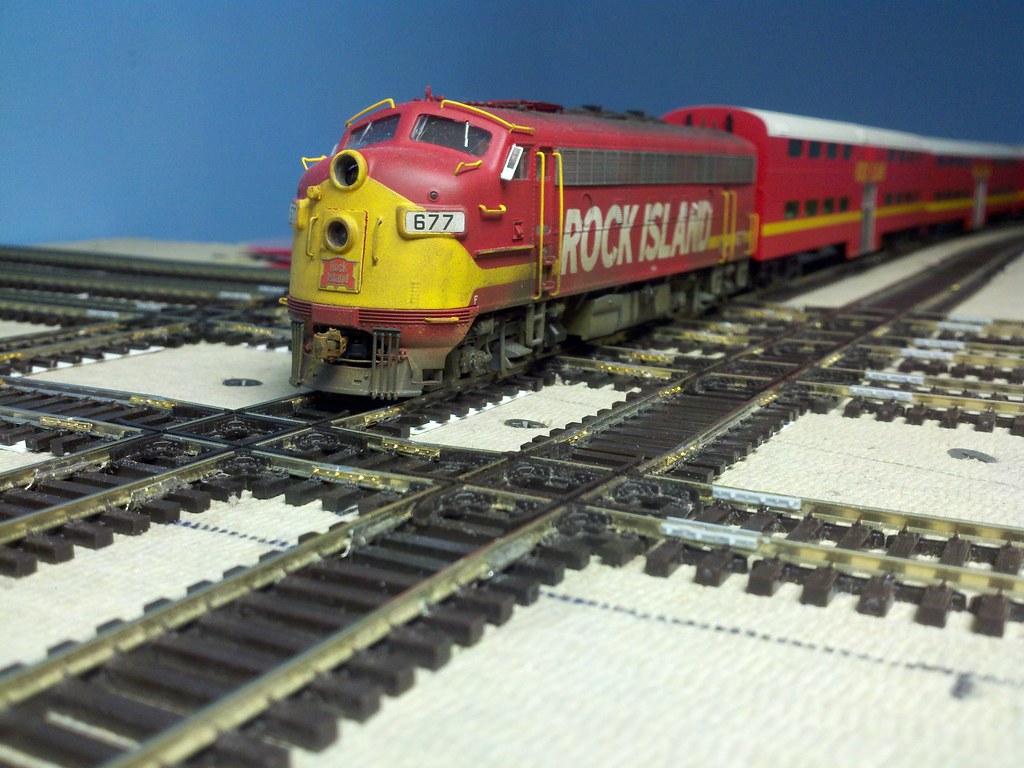 A modeling question... I'm actually working on the handrails for the large signal bridge that towered over this junction right about where the F7B's fuel tank is in the top picture. I tried gluing styrene rods to make these handrails, though I feel they are nowhere near straight enough. Anyone ever try to keep styrene rods absolutely parallel? If so, how did you do it? With a jig? Or did you toss the plastic and use soldered brass wire? Not sure how to proceed here. |
|
|
|
Post by SOMECALLMETIM on Feb 2, 2014 13:53:13 GMT -8
Tom,
I for one enjoy your Rock Island photos and progress. Who makes the RI box car in the first photo RI #36116?
|
|
|
|
Post by rockisland652 on Feb 2, 2014 14:01:16 GMT -8
Tom, I for one enjoy your Rock Island photos and progress. Who makes the RI box car in the first photo RI #36116? I'd have to go look, but I think it's an Atlas car. |
|
|
|
Post by onequiknova on Feb 2, 2014 14:05:26 GMT -8
I recently had my first etch done. The etcher omitted one of the links in the safety chains, but will be shipping me corrected etches next week. In the mean time, I couldn't wait to try them out. 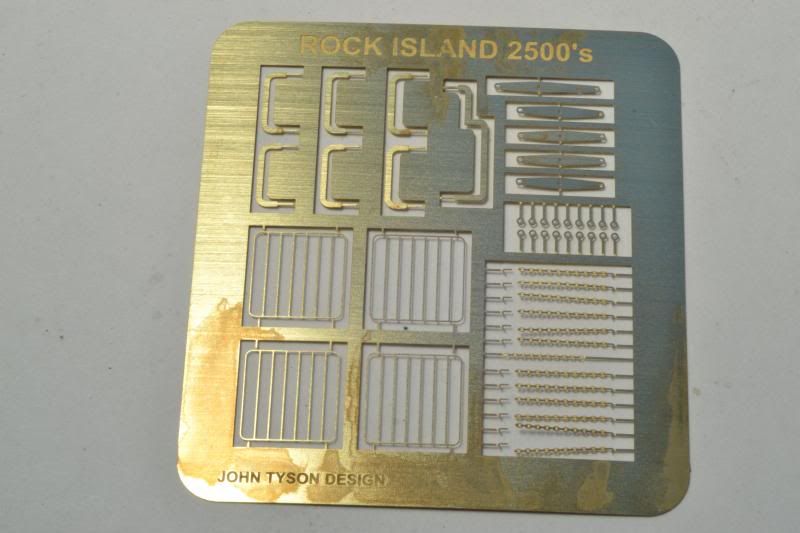 The vestibule gates in the open position.  Still lots of wire bending to do here, but the etch saves me a bunch of time scratch building. 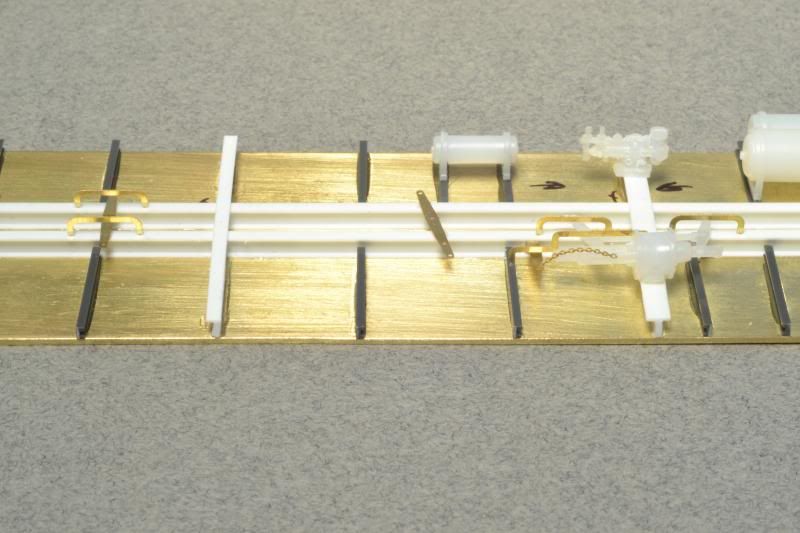 Compared to my first underframe with all scratchbuilt brake parts. 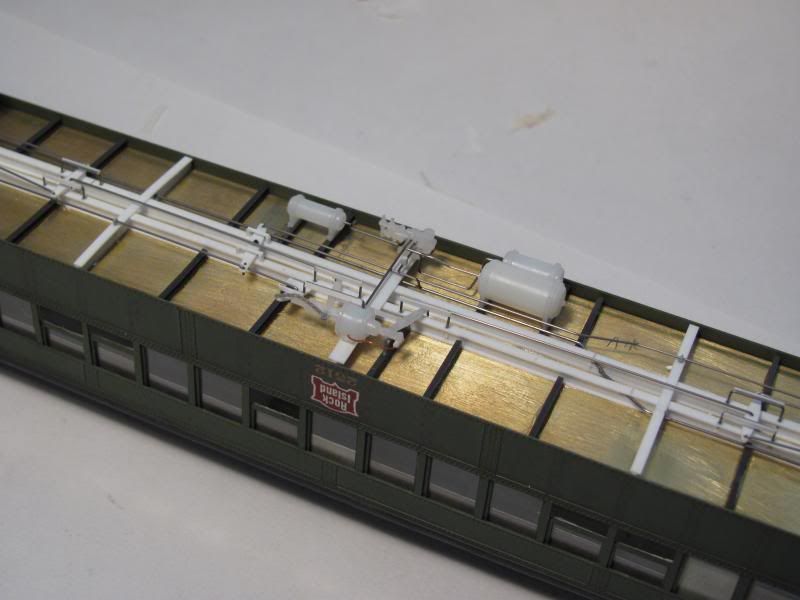 |
|
|
|
Post by onequiknova on Feb 2, 2014 14:10:57 GMT -8
A modeling question... I'm actually working on the handrails for the large signal bridge that towered over this junction right about where the F7B's fuel tank is in the top picture. I tried gluing styrene rods to make these handrails, though I feel they are nowhere near straight enough. Anyone ever try to keep styrene rods absolutely parallel? If so, how did you do it? With a jig? Or did you toss the plastic and use soldered brass wire? Not sure how to proceed here. I'd definitely go with brass wire soldered together. Much stronger is case of an errant sleeve. |
|
|
|
Post by buffalobill on Feb 2, 2014 14:18:16 GMT -8
John, incredible job on the commuter coach. That train is going to have a lot of time invested in it.
Ryan nice job on the MoPac SD-40-2's; Bobby, as usual another amazing span bolster creation.
Bill
|
|
|
|
Post by dtinut on Feb 2, 2014 19:54:38 GMT -8
Tom,
I think you'd be a lot better off soldering the railing together. In the end, if it's not straight, you can always heat a joint to straighten it, and building a jig is easy with wood, and nails. It will also stand up to more bumps and such on the layout without falling apart.
It's not hard, and paste flux is your friend!
|
|
|
|
Post by wp8thsub on Feb 2, 2014 20:04:45 GMT -8
Tom, I for one enjoy your Rock Island photos and progress. Who makes the RI box car in the first photo RI #36116? I'd have to go look, but I think it's an Atlas car. I have the same model, it's an Atlas ACF "Precision Design" car. |
|
|
|
Post by stevef45 on Feb 2, 2014 20:31:04 GMT -8
I recently had my first etch done. The etcher omitted one of the links in the safety chains, but will be shipping me corrected etches next week. In the mean time, I couldn't wait to try them out. The vestibule gates in the open position. Still lots of wire bending to do here, but the etch saves me a bunch of time scratch building. Compared to my first underframe with all scratchbuilt brake parts. thats so awesome!! Do you have to do the artwork yourself? |
|
|
|
Post by onequiknova on Feb 2, 2014 20:50:26 GMT -8
thats so awesome!! Do you have to do the artwork yourself? I did my own artwork using a free vector based drawing program called Inkscape. I learned how to use the program on youtube. The etcher can do the artwork for you if you can supply a drawing of what you want, but I don't know how much that would cost you. |
|
|
|
Post by stevef45 on Feb 3, 2014 1:28:23 GMT -8
is that inkscape free?
|
|
|
|
Post by rockfan on Feb 3, 2014 2:51:16 GMT -8
Keep posting RI pics RI652!
|
|
|
|
Post by marknycfan on Feb 3, 2014 7:00:52 GMT -8
More inspiring work as always gentlemen, Mike the DRGW Obs is a 10+
|
|


 This weekend, I continued the work on the AT&SF and ICG crossing at Joliet. I used Peco flex track for all the connecting roads. Probably should have used it on the RI tracks as well, as it would have made installation smoother. Also, I discovered that I could put a spike anywhere I wanted to in the Peco ties, no need for drilling, just spike away. Impressive. Most impressive.


