|
|
Post by nebrzephyr on Mar 1, 2014 8:57:42 GMT -8
John...WOW!!!! I could not see the seam and would have never guessed the way you did it. A magician with styrene!!!!  Bob |
|
|
|
Post by rockisland652 on Mar 1, 2014 9:33:02 GMT -8
That is amazing. This is a radical change to the windshields.
Amazing. Incredible.
|
|
|
|
Post by rockisland652 on Mar 1, 2014 10:14:13 GMT -8
John...WOW!!!! I could not see the seam and would have never guessed the way you did it. A magician with styrene!!!!  Bob Nope. He's a plastic surgeon.  |
|
|
|
Post by buffalobill on Mar 3, 2014 9:42:13 GMT -8
John: Incredible job of grafting that Highliner nose on. This one should be the basis for another upcoming build.
Bill
|
|
|
|
Post by markfj on Mar 3, 2014 15:16:49 GMT -8
That is some fine model work!
Did you think of making a mold of the Highliner nose so castings can be made for future projects?
That way, you don’t have to worry about sourcing more shells just for the nose and can tweak the castings to suit your project needs. It’s just a thought, I’m not experienced in molds & casting parts, so I don’t know how much work would be involved.
|
|
|
|
Post by onequiknova on Mar 3, 2014 17:40:19 GMT -8
Thanks guys. As far as resin casting, if I were going to do a bunch of these nose swaps, I might consider it, but for the few times I may do it, it's just not worth the time and materials to set up a nice mold. Also, with resin casting there will be a slight amount of shrinkage in your casting, so things may not line up as well. Besides, you can readily find bare Highliner shells for around $20. I decided to go ahead and put a Highliner nose on this project as well. Yes the BLI nose is pretty well done, but what sold me is the amount of time it will save me later making better fitting windshield glass and numberboard glass for the BLI nose. That step took me longer than I'd like to admit on the RI E8 I built last year, and they still didn't fit as well as the Highliner's glass will fit. Mounting the Highliner pilot will be a no brainer and stronger as well. 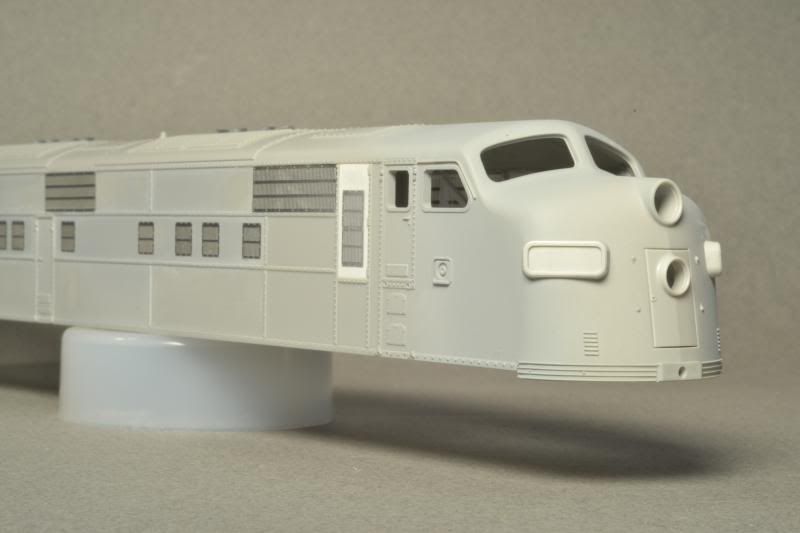 Also, after finding better prototype pictures showing the tank mounts, I decided to redo them. I also redid the washout plugs. 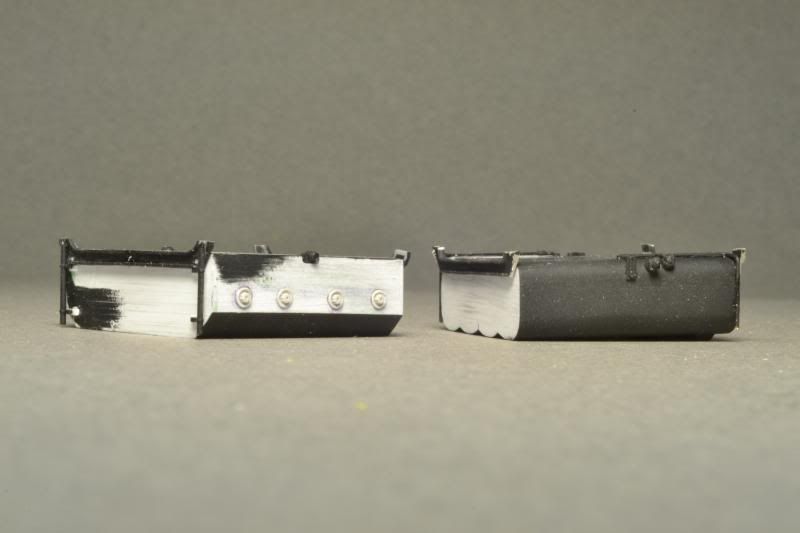 |
|
|
|
Post by onequiknova on Mar 3, 2014 17:55:34 GMT -8
Now if the rest of my etches would show up, I could get this build back into gear.
|
|
|
|
Post by buffalobill on Mar 3, 2014 19:15:49 GMT -8
John: Just one word describes this build, awesome! Nice nose job.
Bill
|
|
|
|
Post by Christian on Mar 4, 2014 3:17:07 GMT -8
I still need to figure out how to model the incadecent bulb over the door. Grant line includes bulbs with their warehouse shades. |
|
|
|
Post by onequiknova on Mar 21, 2014 11:38:15 GMT -8
After a long delay at the etcher, then getting lost in the mail for over a week, I finally received my etches. I had some trouble getting good pics of the stainless, but they get the point across. First is the radiators. 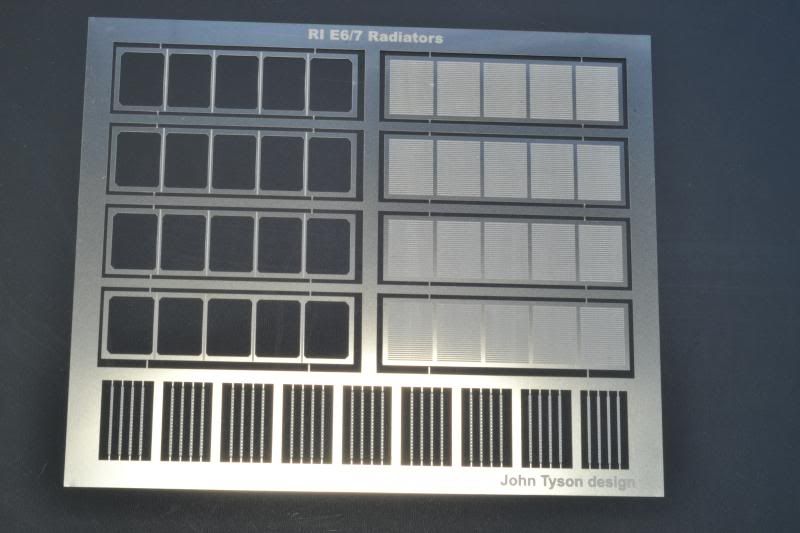 E8 style, round corner doors. 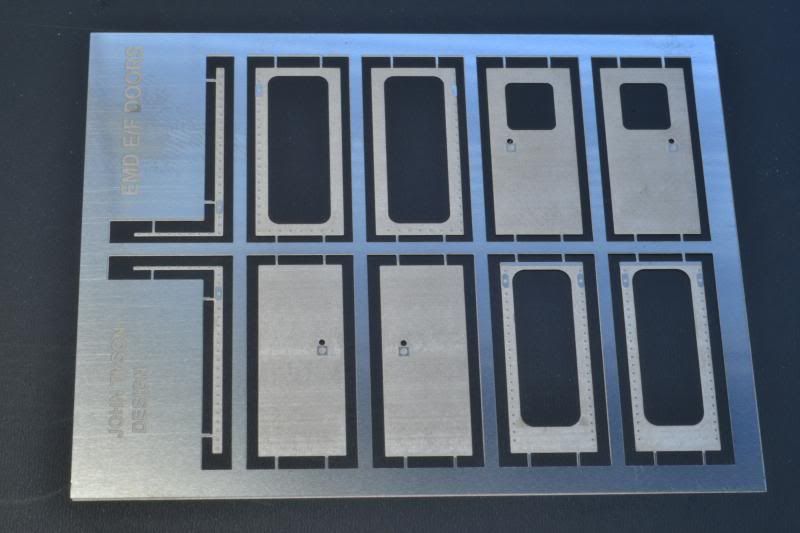 General details. The little squares are unions for the roof top piping. (2 per union) The dog bone shaped parts are the pipe brackets for the roof. They will be folded in half like Plano's lift rings to form a 3D part. Other parts are kick plates, extra battens added by the RI, frames for the open sand filler hatches, door handles and marker light gaskets. 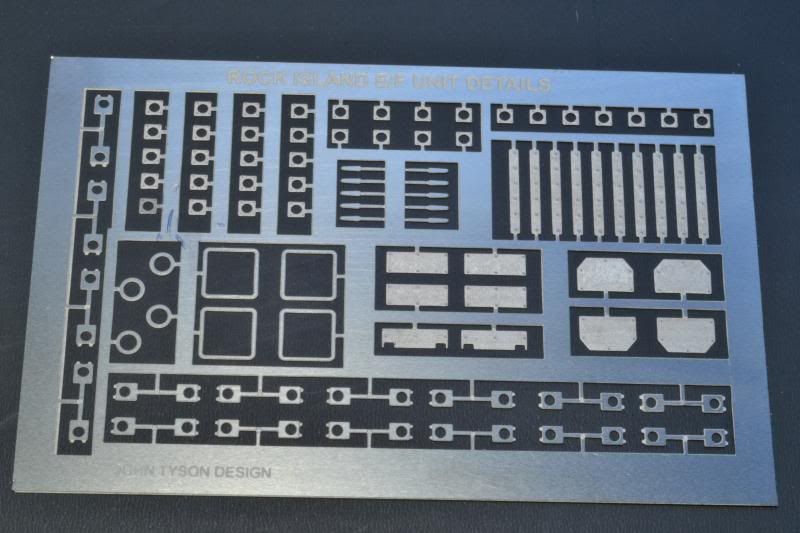 A couple of the assembled radiators. When looking at prototype photo's, I've found the fine fins of the radiator kind of disappear, but the tubes within the radiator are visible, so that's how I designed the etch. The RI added an extra core to their radiators, so these are longer than your typical E7 radiator, although cutting one of the cores off the etch would make it a standard sized radiator, which some RI power kept. 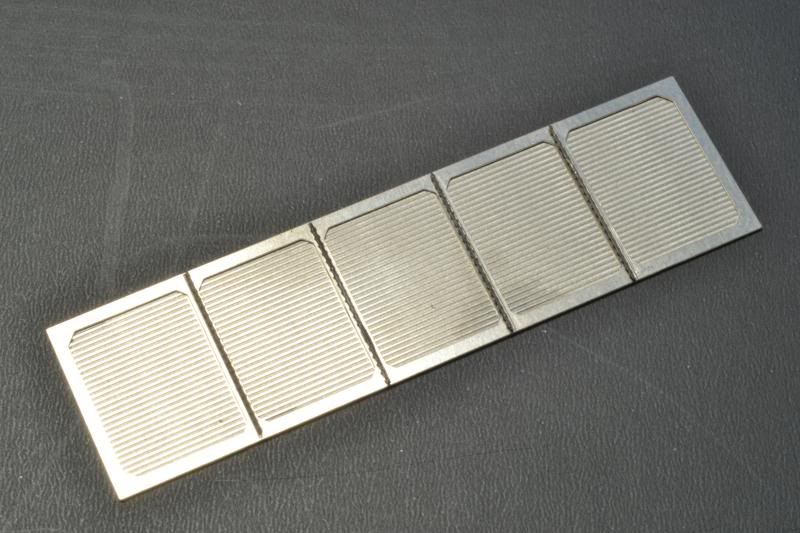 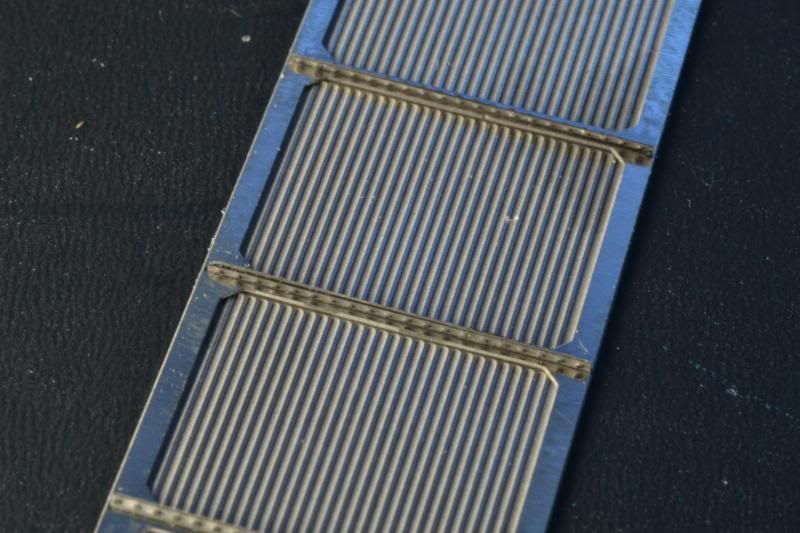 The doors assembled. I wish I would have made the door handle holes smaller. The waviness is from my finger prints. The etches are nice and smooth. 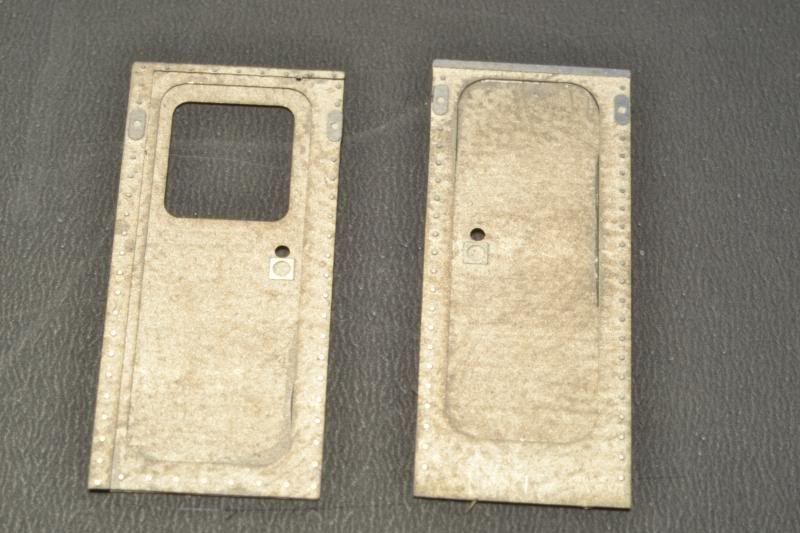 |
|
|
|
Post by buffalobill on Mar 21, 2014 11:48:21 GMT -8
John, those etchings are beautiful, you should market them to the Rock Island guys like Tom, who would appreciate them.
Bill
|
|
|
|
Post by onequiknova on Mar 21, 2014 11:52:32 GMT -8
Thanks Bill. I plan to have a handful made to try to recoup some of my costs.
|
|
|
|
Post by bdhicks on Mar 22, 2014 10:23:18 GMT -8
Excellent work, as always. Those radiators especially will look great.
|
|
Deleted
Deleted Member
Posts: 0
|
Post by Deleted on Mar 22, 2014 22:10:02 GMT -8
Your E7A looks a lot better than my E7A. If you must cover your eyes.   |
|
|
|
Post by onequiknova on Mar 23, 2014 6:22:13 GMT -8
Looks like a Creamsicle. What's the story?
|
|
|
|
Post by rockisland652 on Mar 23, 2014 7:09:37 GMT -8
Gotta be GN. No?
|
|
Deleted
Deleted Member
Posts: 0
|
Post by Deleted on Mar 23, 2014 8:35:03 GMT -8
Looks like a Creamsicle. What's the story? It is a late 1980's brass model imported by Oriental Limited and built by Samhongsa. This is the period where the brass importers started to super detail their models to a specific prototype. In the case of this model it is detailed for the Great Northern circa mid to late 1960's. Before most brass diesels were "generic". It is also the period where brass diesels were being engineered, at least by Samhongsa, to run well. this model has a can motor, dual flywheels and actual sprung trucks. This E7A is heavier than the Broadway Limited and Proto 2000 E-units. Originally it was "factory painted" in the Great Northern's E7 Empire Builder scheme. The E7's were originally not painted like the F-units. A couple of E7's did get the F-unit style of the Empire Builder scheme. Still later, some the simplified Empire Builder scheme which they wore into their very brief career's on the Burlington Northern. The "factory painted" for OL and "custom painted by OMI" for Overland Models was the work of one man, named Roy Schnoor. He owned a small hobby shop in southern Indiana and specialized in selling brass. He and his wife Sally spent nearly every weekend traversing the country going from train show to train show. During the week he pounded out custom painted models for the importers until the paint work was taken over by the builders in Korea. He also did the repair work for importers like Challenger Imports. Roy passed away about three years ago. This model had been stripped of its "factory paint" by an unknown custom painter, who also lost all the screws that hold Humpty Dumpty together.  Someone at one time also installed a constant lighting unit, complete with on/off switch on the bottom of the chassis. The on/off switch for the lighting was very popular in the late 1980's. The E7 together with a complete brass five car Great Northern Red River passenger train by Palace Car Company/Samhongsa came to me over ten years ago. The five car Red River was also disassembled by the same unknown painter, who lost all the screws that hold the floors to the bodies of the cars.....   When Challenger Imports was active, they would send Mr. Schnoor, their repair person, boxes of spare parts to fix any model which might be damaged. When Challenger closed, they left the parts with Roy. After Roy passed away, the family sold all the repair parts to a friend of mine. One of the things that came in the boxes of parts were bags full of screws. Hopefully since Samhongsa was the builder for Challenger, OL and PCC, there will be screws to put the E7 and the Red River back together. Then I can decide what path to follow with what amounts to a complete brass train set. |
|
|
|
Post by rockfan on Mar 23, 2014 9:32:02 GMT -8
southern Indiana that's all you need to know folks.
|
|
|
|
Post by onequiknova on Mar 23, 2014 13:51:29 GMT -8
I started fitting the new radiators. My cut lines scribed. Notice how much longer the new radiators are. That's because The RI added and extra core to each radiator, going from four to five. 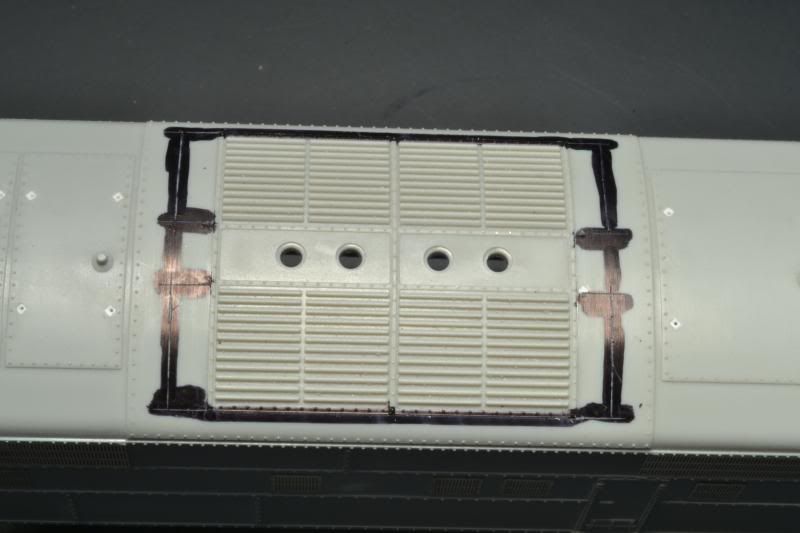 Once the holes were cleaned up, I framed them with .010x.080" styrene and sanded it flush to the roof. 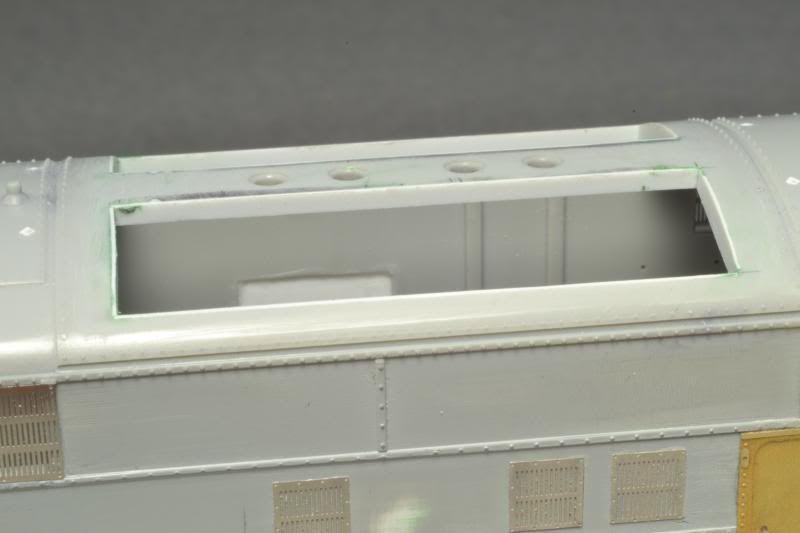 This is just mocked up. I won't permanently attach the radiator until after paint and weathering. 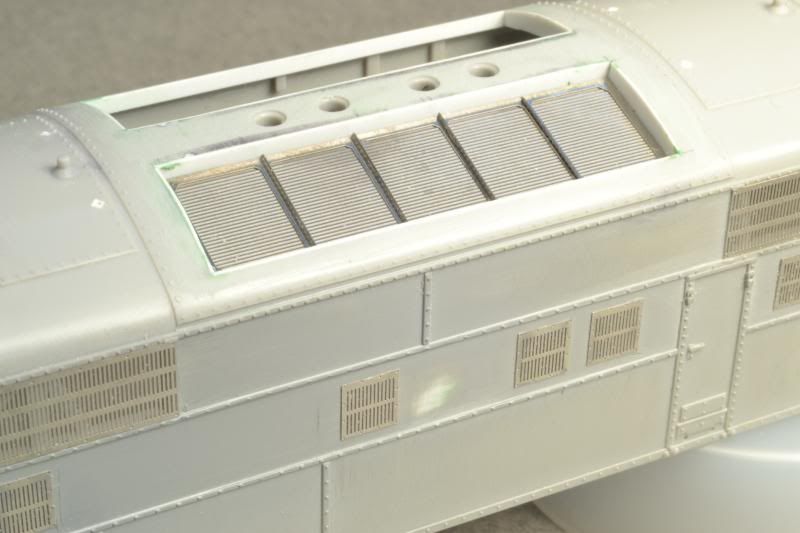 The Rock Island retrofitted the newer style rounded corner doors to their E6/7's, so that is what the new door etch is for. First I shave off the original door frames and kick plates. 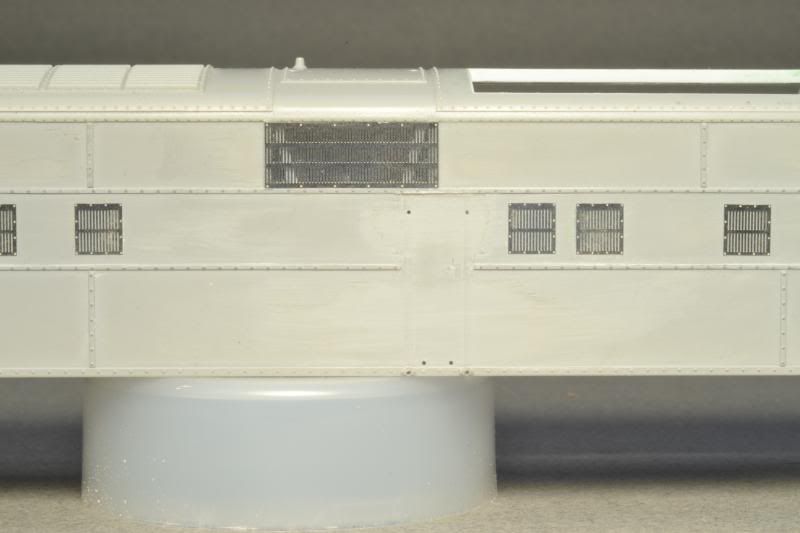 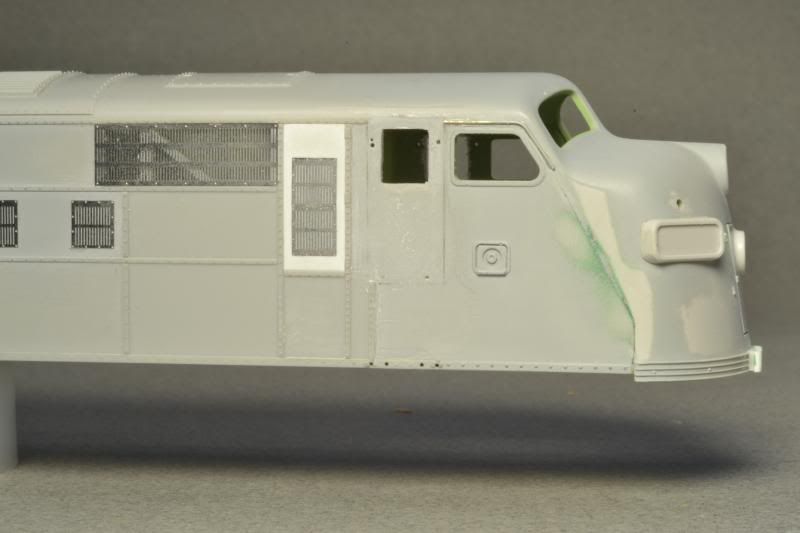 Then it's just a matter of gluing the assembled doors to the shell. Luckily the etcher sent me brass copies of my design, because the original stainless steel doors proved impossible to drill for grab irons. 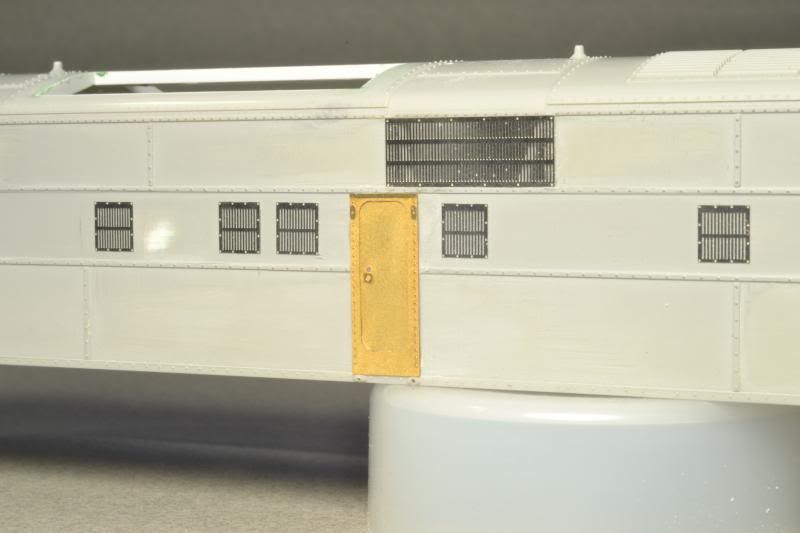 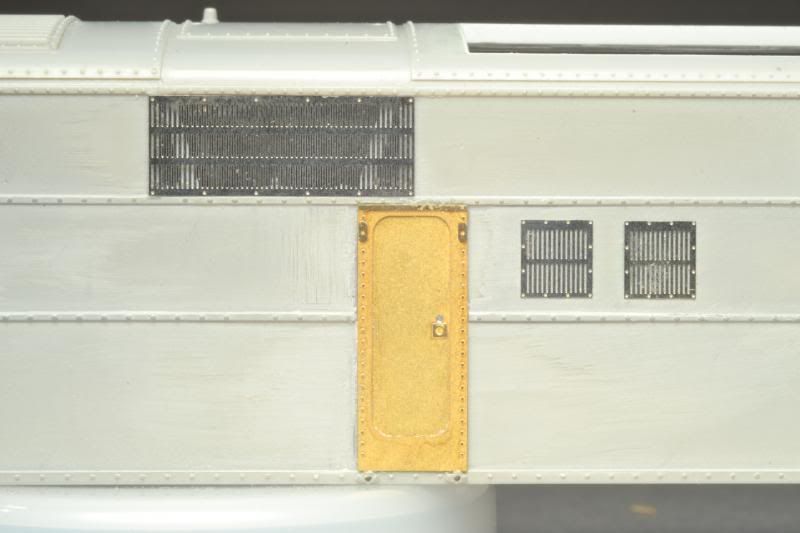 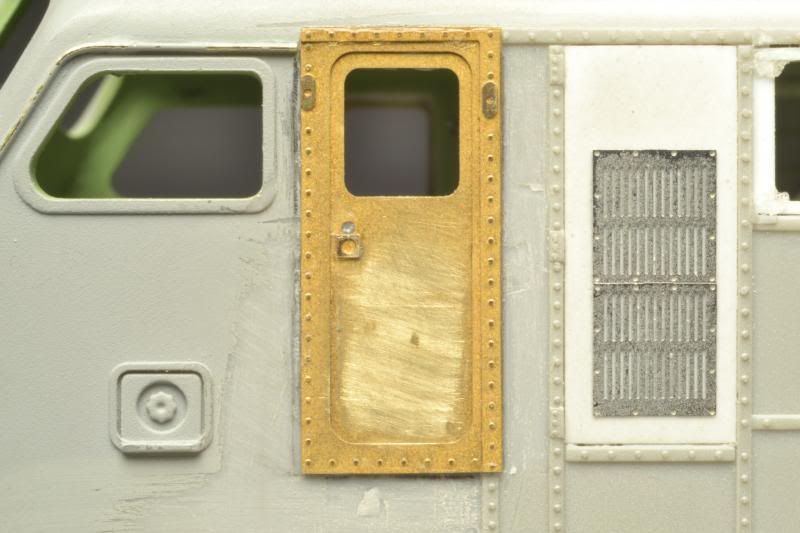 |
|
Deleted
Deleted Member
Posts: 0
|
Post by Deleted on Mar 23, 2014 15:27:42 GMT -8
Damn that model is pretty!
Love the radiators on the roof.
|
|
|
|
Post by onequiknova on Mar 23, 2014 15:47:01 GMT -8
Thanks Jim.
The radiators came out about as well as I hoped they would. They're not quite done however. I still need to figure out how to model the three cross braces per radiator. In the past I just used flat strips of styrene, but the prototype braces appear to be T shapped.
|
|
|
|
Post by onequiknova on Mar 28, 2014 12:27:37 GMT -8
|
|
|
|
Post by onequiknova on Mar 28, 2014 13:30:17 GMT -8
I've been working on the roof top oil coolers. I started with Twin Star Car's oil cooler castings, but changed out the coolers with new styrene pieces of the appropriate size. I cut the "fins" in the styrene coolers with my NWSL chopper. I set up a stop for the cutting arm so it wouldn't cut all the way through, then just moved the styrene about .010 and cut a fin, then moved it another .010 and cut another fin, etc. etc. I did a long length of styrene, then cut the individual coolers later. The roof top piping was bent from .033 brass wire. The unions and pipe clamps are from my etchings. The unions are made up of two etches that are spaced apart by a ring of magnet wire. Very nice work! What do you use for vision magnification? Thank you. I don't use any magnification. I bought an Optivisor, but I find it more of a hindrance than anything. |
|
Deleted
Deleted Member
Posts: 0
|
Post by Deleted on Mar 28, 2014 14:04:20 GMT -8
Very nice. As far as not having to use any "fake eyeballs".....I remember those days....just 10 years ago, I was old eagle eye. Today, I need the Optivisor to read my Sunday Milwaukee Journal-Sentinel.  |
|
|
|
Post by stevef45 on Mar 28, 2014 17:55:12 GMT -8
That is some incredible detail work. I've come to the realization that i might just have to get an optivisor. I was working on drilling out details west air filters for brass wife and can't see anything up close. That was the one thing i was proud to have, i was able to see very very upclose, eye doctors were impressed. But now its gone and regular vision sucks more  |
|
|
|
Post by onequiknova on Mar 31, 2014 20:53:01 GMT -8
|
|
|
|
Post by Donnell Wells on Mar 31, 2014 21:54:36 GMT -8
WOW!!!
You have taken E-unit modeling to an all new high!!!
Donnell!!!
|
|
|
|
Post by GP40P-2 on Mar 31, 2014 22:29:39 GMT -8
Keep it up, and I am going to start liking E-units. That is GREAT modeling!!
I never knew that Railflyer had an NBW etch. Do you have a close up photo? It sounds useful for where old molded-on ones have been removed with the molded grab iron??
Jim
|
|
|
|
Post by nebrzephyr on Apr 1, 2014 5:48:57 GMT -8
Looks like some boys form "Walking Dead" have taken over the crew!!!   Great modeling by the way. Bob |
|
|
|
Post by onequiknova on Apr 1, 2014 6:26:30 GMT -8
Keep it up, and I am going to start liking E-units. That is GREAT modeling!! I never knew that Railflyer had an NBW etch. Do you have a close up photo? It sounds useful for where old molded-on ones have been removed with the molded grab iron?? Jim If you look at my picture looking through the side window you can kind of make one out. It's not really a NBW etch persay, it represents the mounting lug of a grab iron. It's basicly a tear drob shaped etch with a little bolt head. The only way to get them was to buy a package of Rail flyer grab irons. I'll try to get a better picture later. |
|