|
|
Post by packer on Jul 21, 2019 16:54:01 GMT -8
Well guess I get to start this a bit late: I'm trying my hand at one of these. I recall it being an SP car, but can't recall the class: It's my first time trying to carve off molded on stuff with a #17 blade. need some practice, but starting off on something cheap. And I have 2 if I screw it up.
Now lets hope 2 (or even 1) manufactures don't announce it until AFTER I am finished, unlike that time I started a U25C build and got 2 manufacturers to announce one as soon as I start.
|
|
|
|
Post by riogrande on Jul 21, 2019 18:14:06 GMT -8
|
|
|
|
Post by fr8kar on Jul 21, 2019 18:17:45 GMT -8
One thing that really helps me is to use the chisel blade out of the handle, only using finger pressure to move it around. It makes it more difficult to gouge the model when you're using less force. Additionally, you can hold the blade vertical against the model and use a scraping motion to slowly but effectively wear down the raised areas. It takes some of the risk of damaging the model out of the equation. The other thing is to modify the blade by rounding the corners so that you don't get a gouge if the blade isn't perfectly flat on the model. I must have half a dozen chisel blades of various widths that I've modified with my bench grinder then finished on progressively finer nail files until the shape is the way I want and there are no burrs on any of the edges. I polish the blades until they are as sharp as I can make them. I make them different widths to fit in some hard to reach areas, such as on boxcar ends when I need to carve off grabs. So keep doing what you're doing, packer. Go slow and don't try to get it all in one pass. I got the decals on my UP Transco 4750. The decal edges didn't show up at all until I used some dull lacquer. I weathered the model with some Bragdon powders. 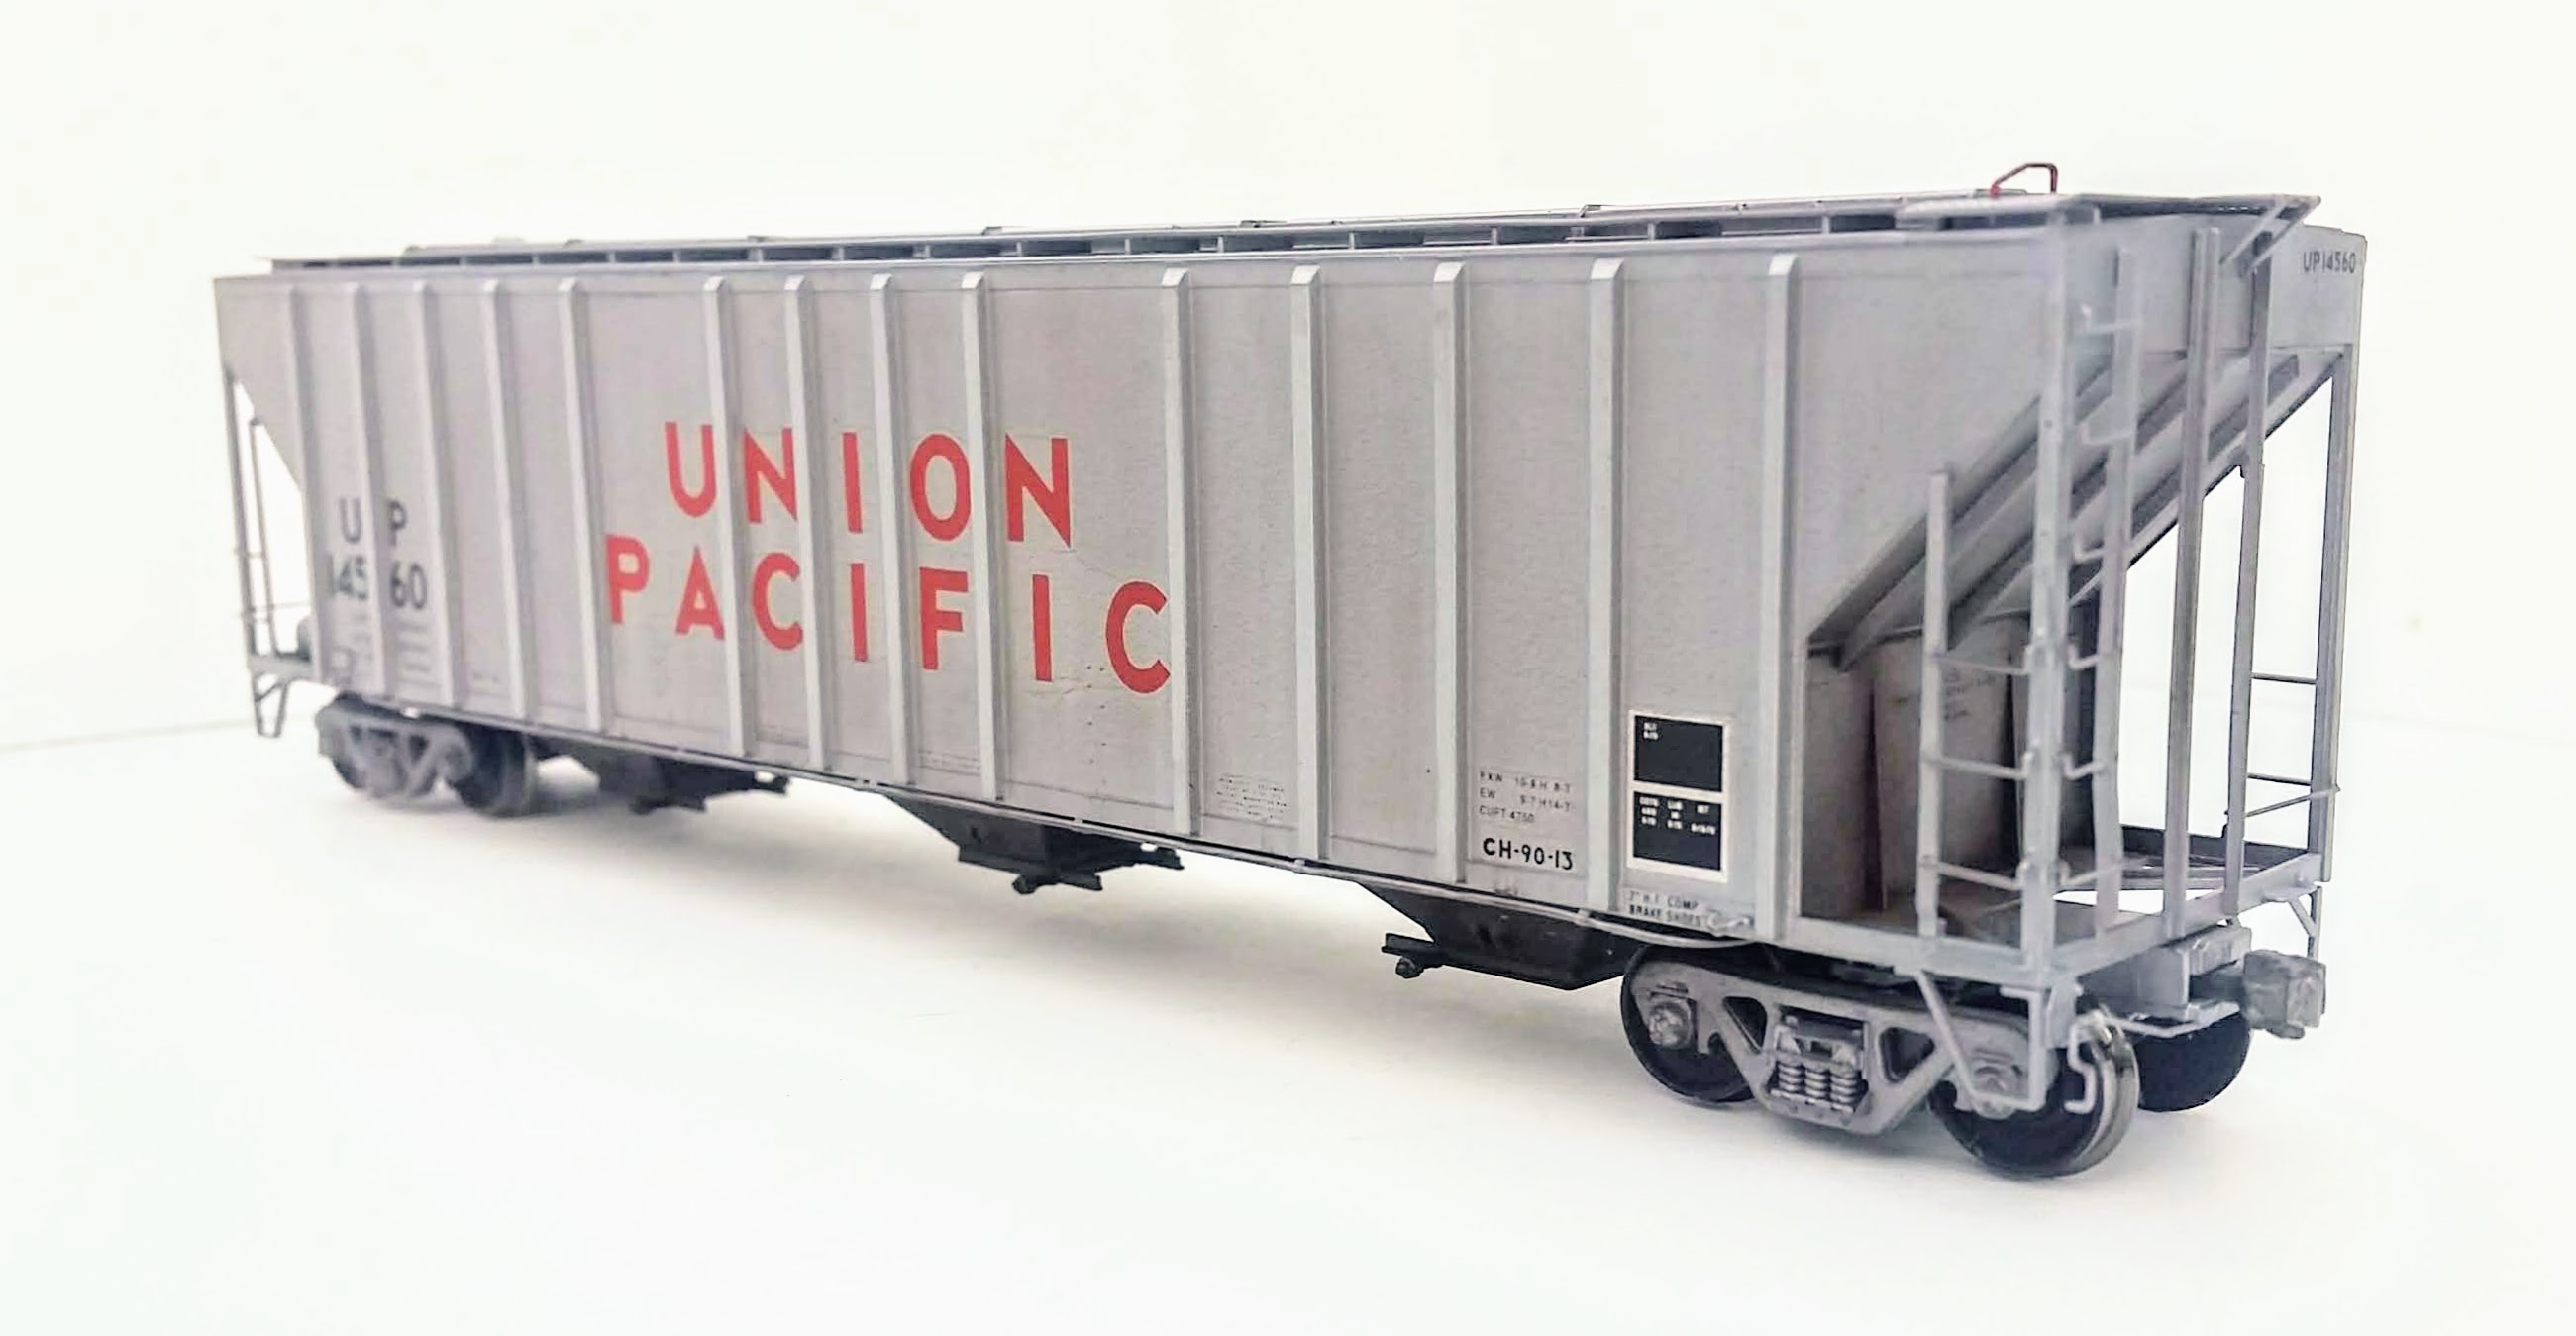 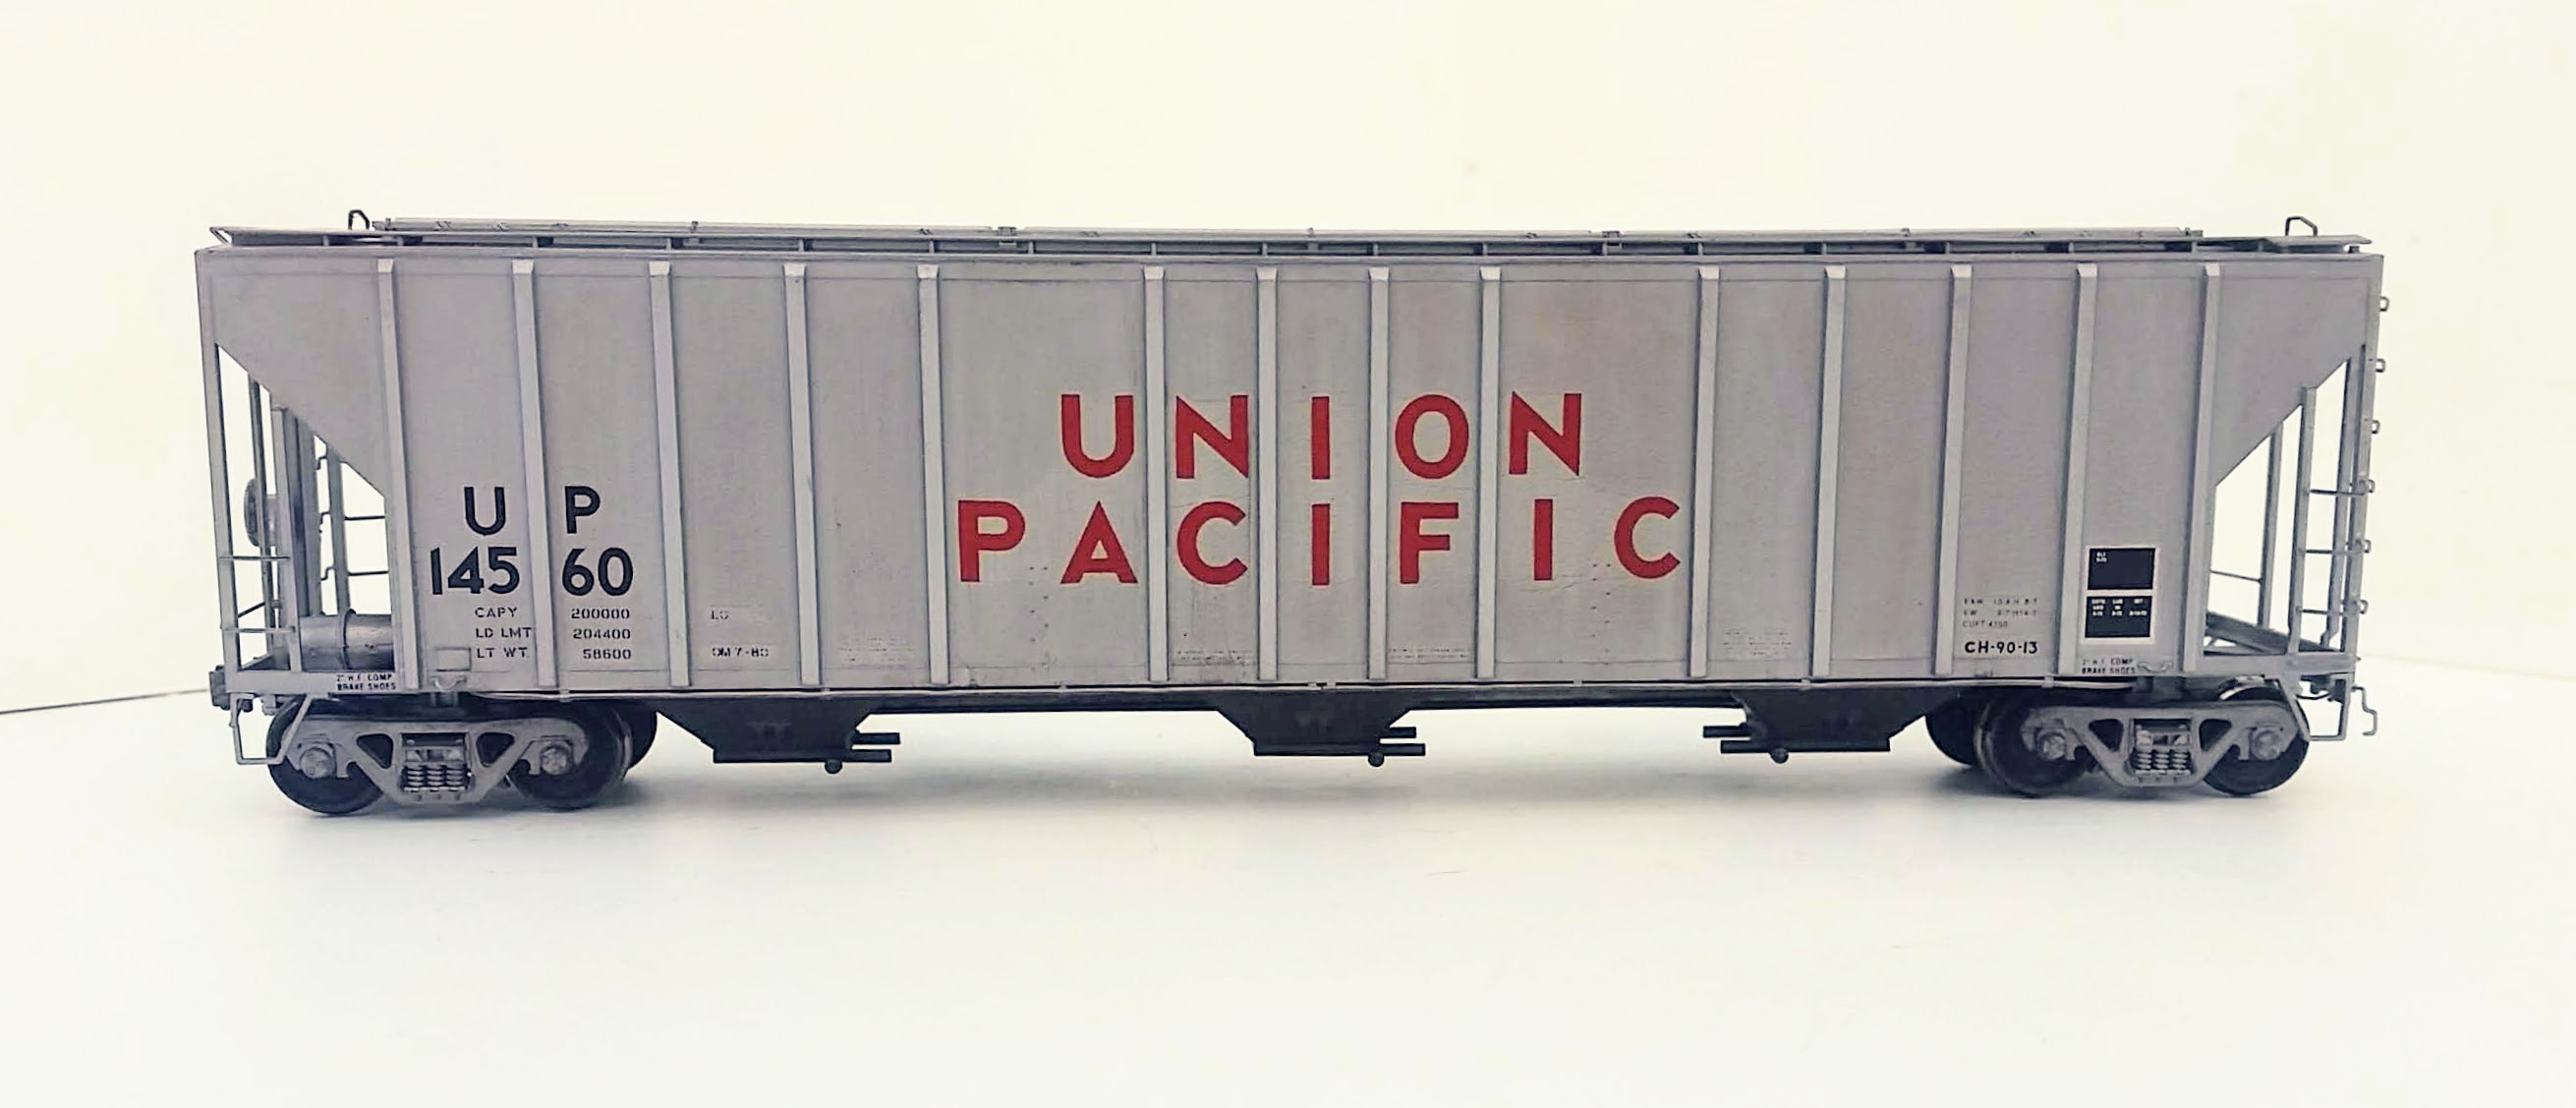  I installed the etched details on the Pink Lady Kenworths and added some air lines: 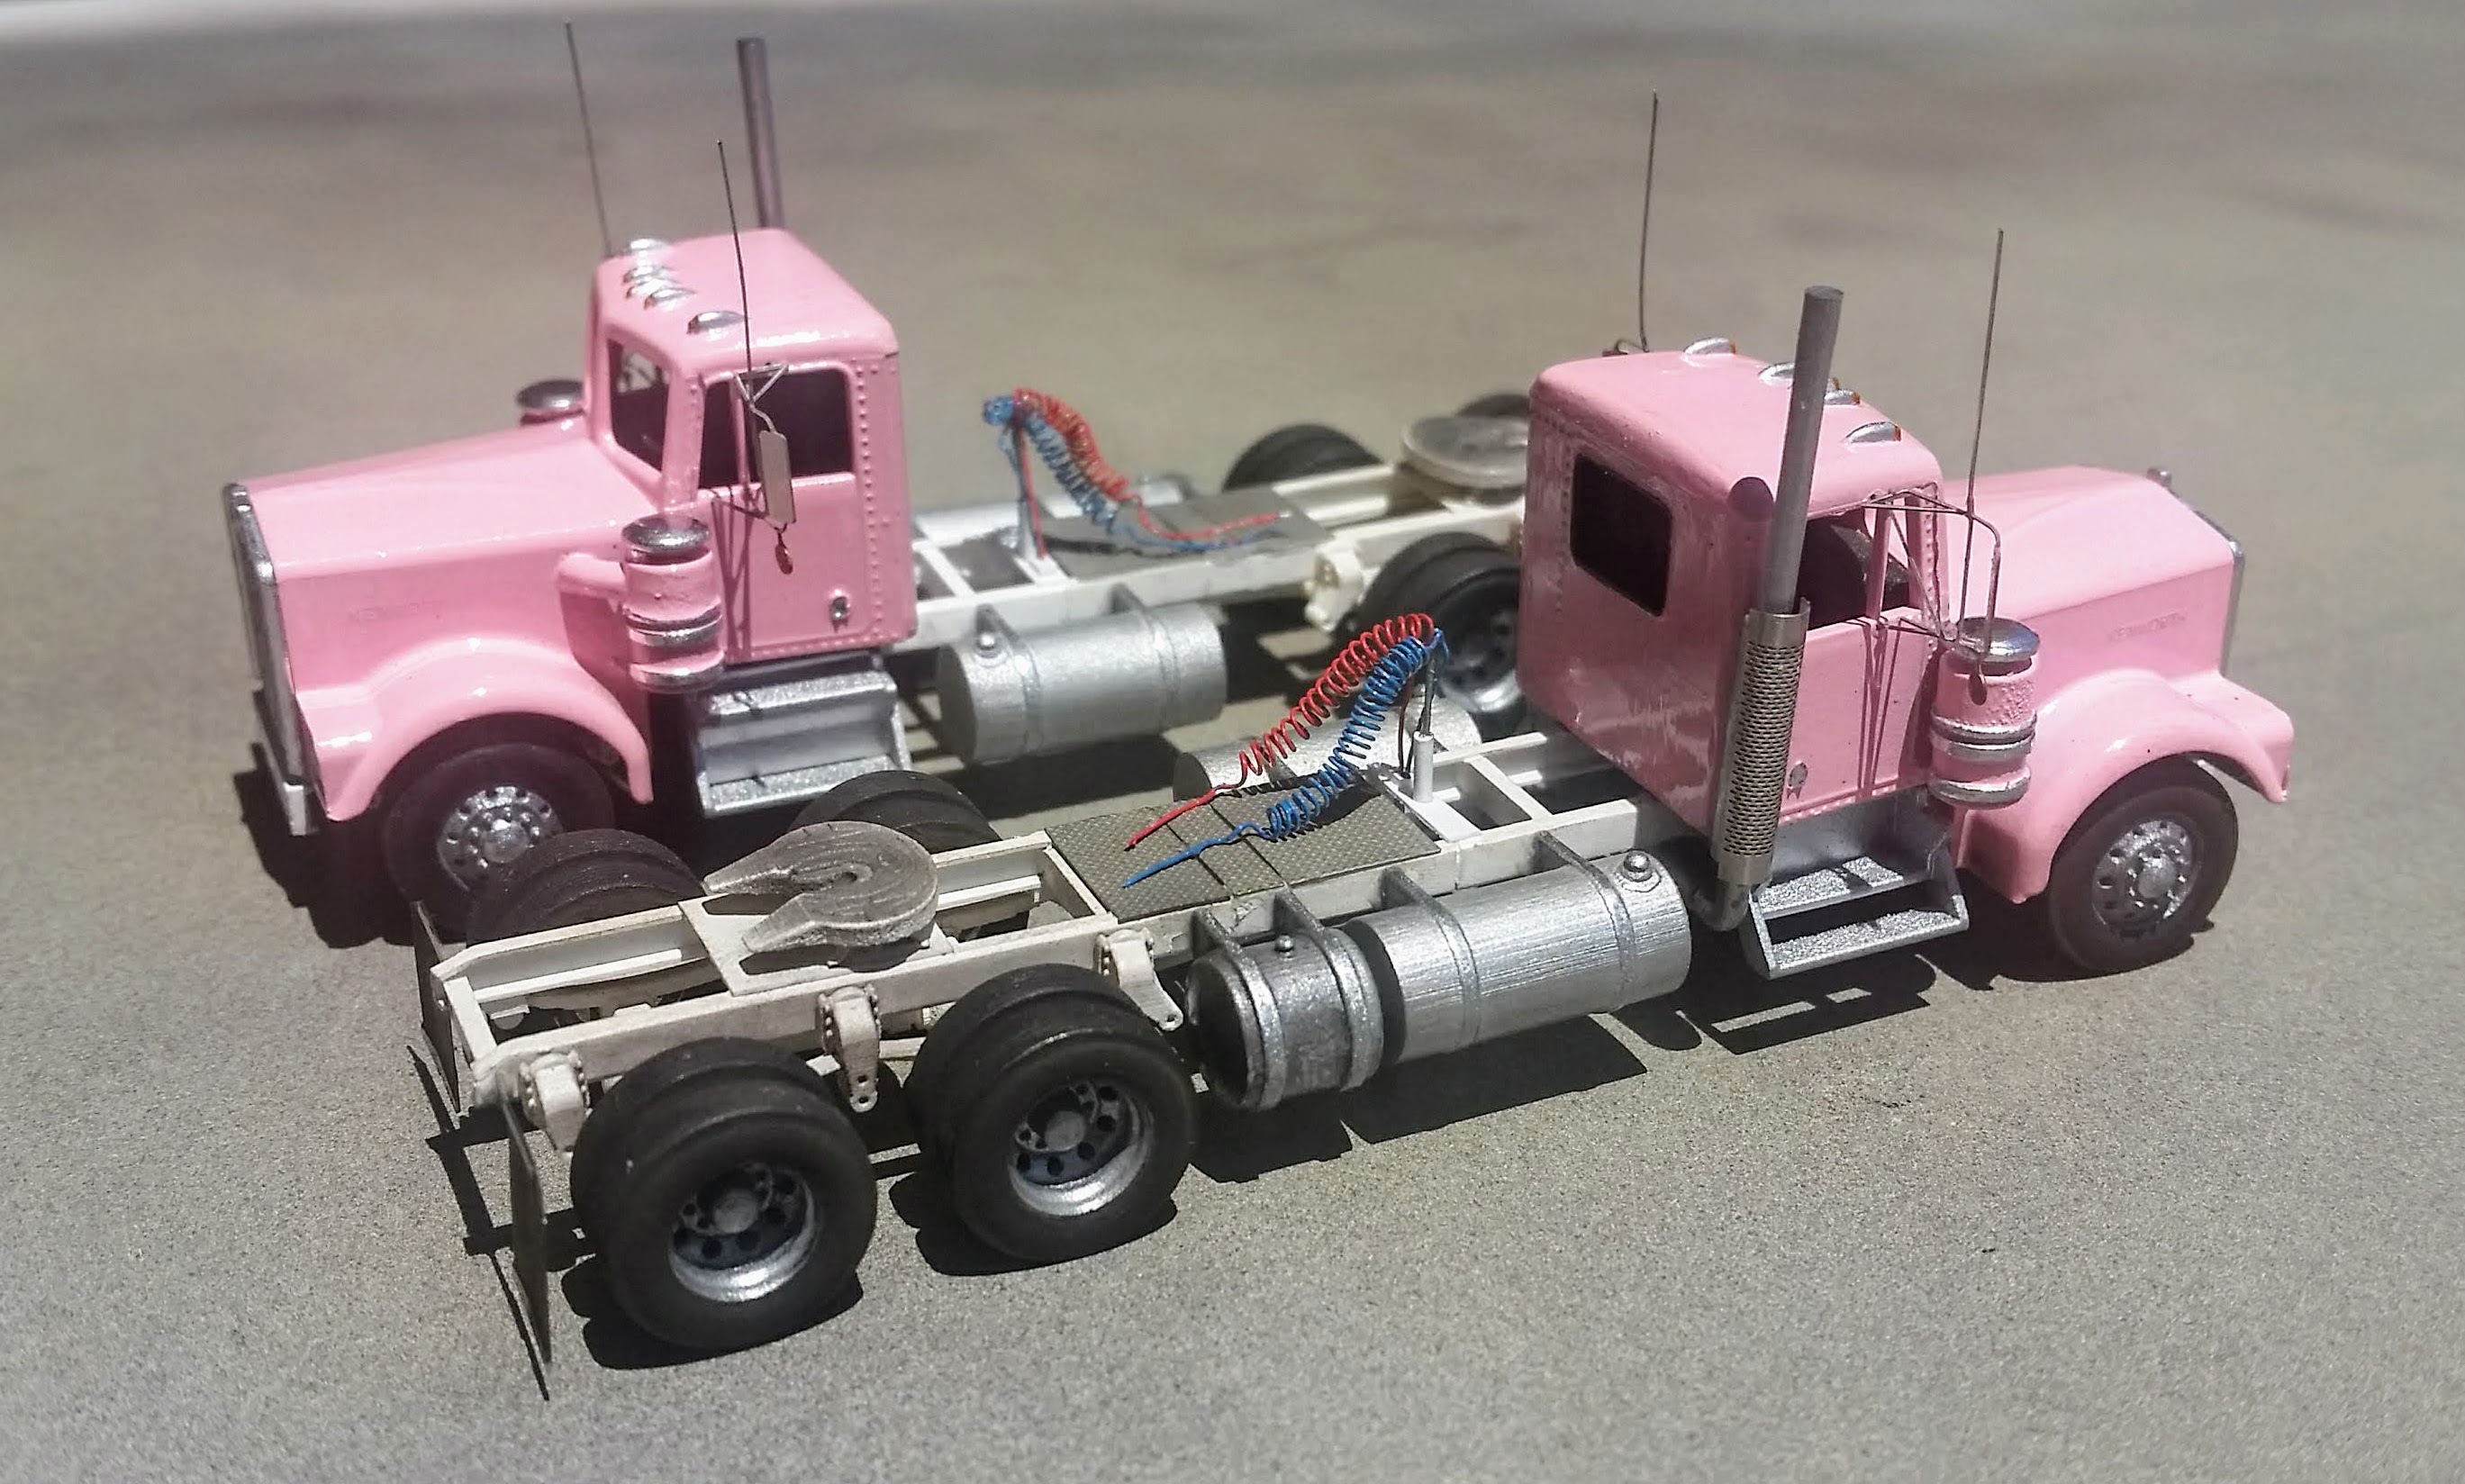 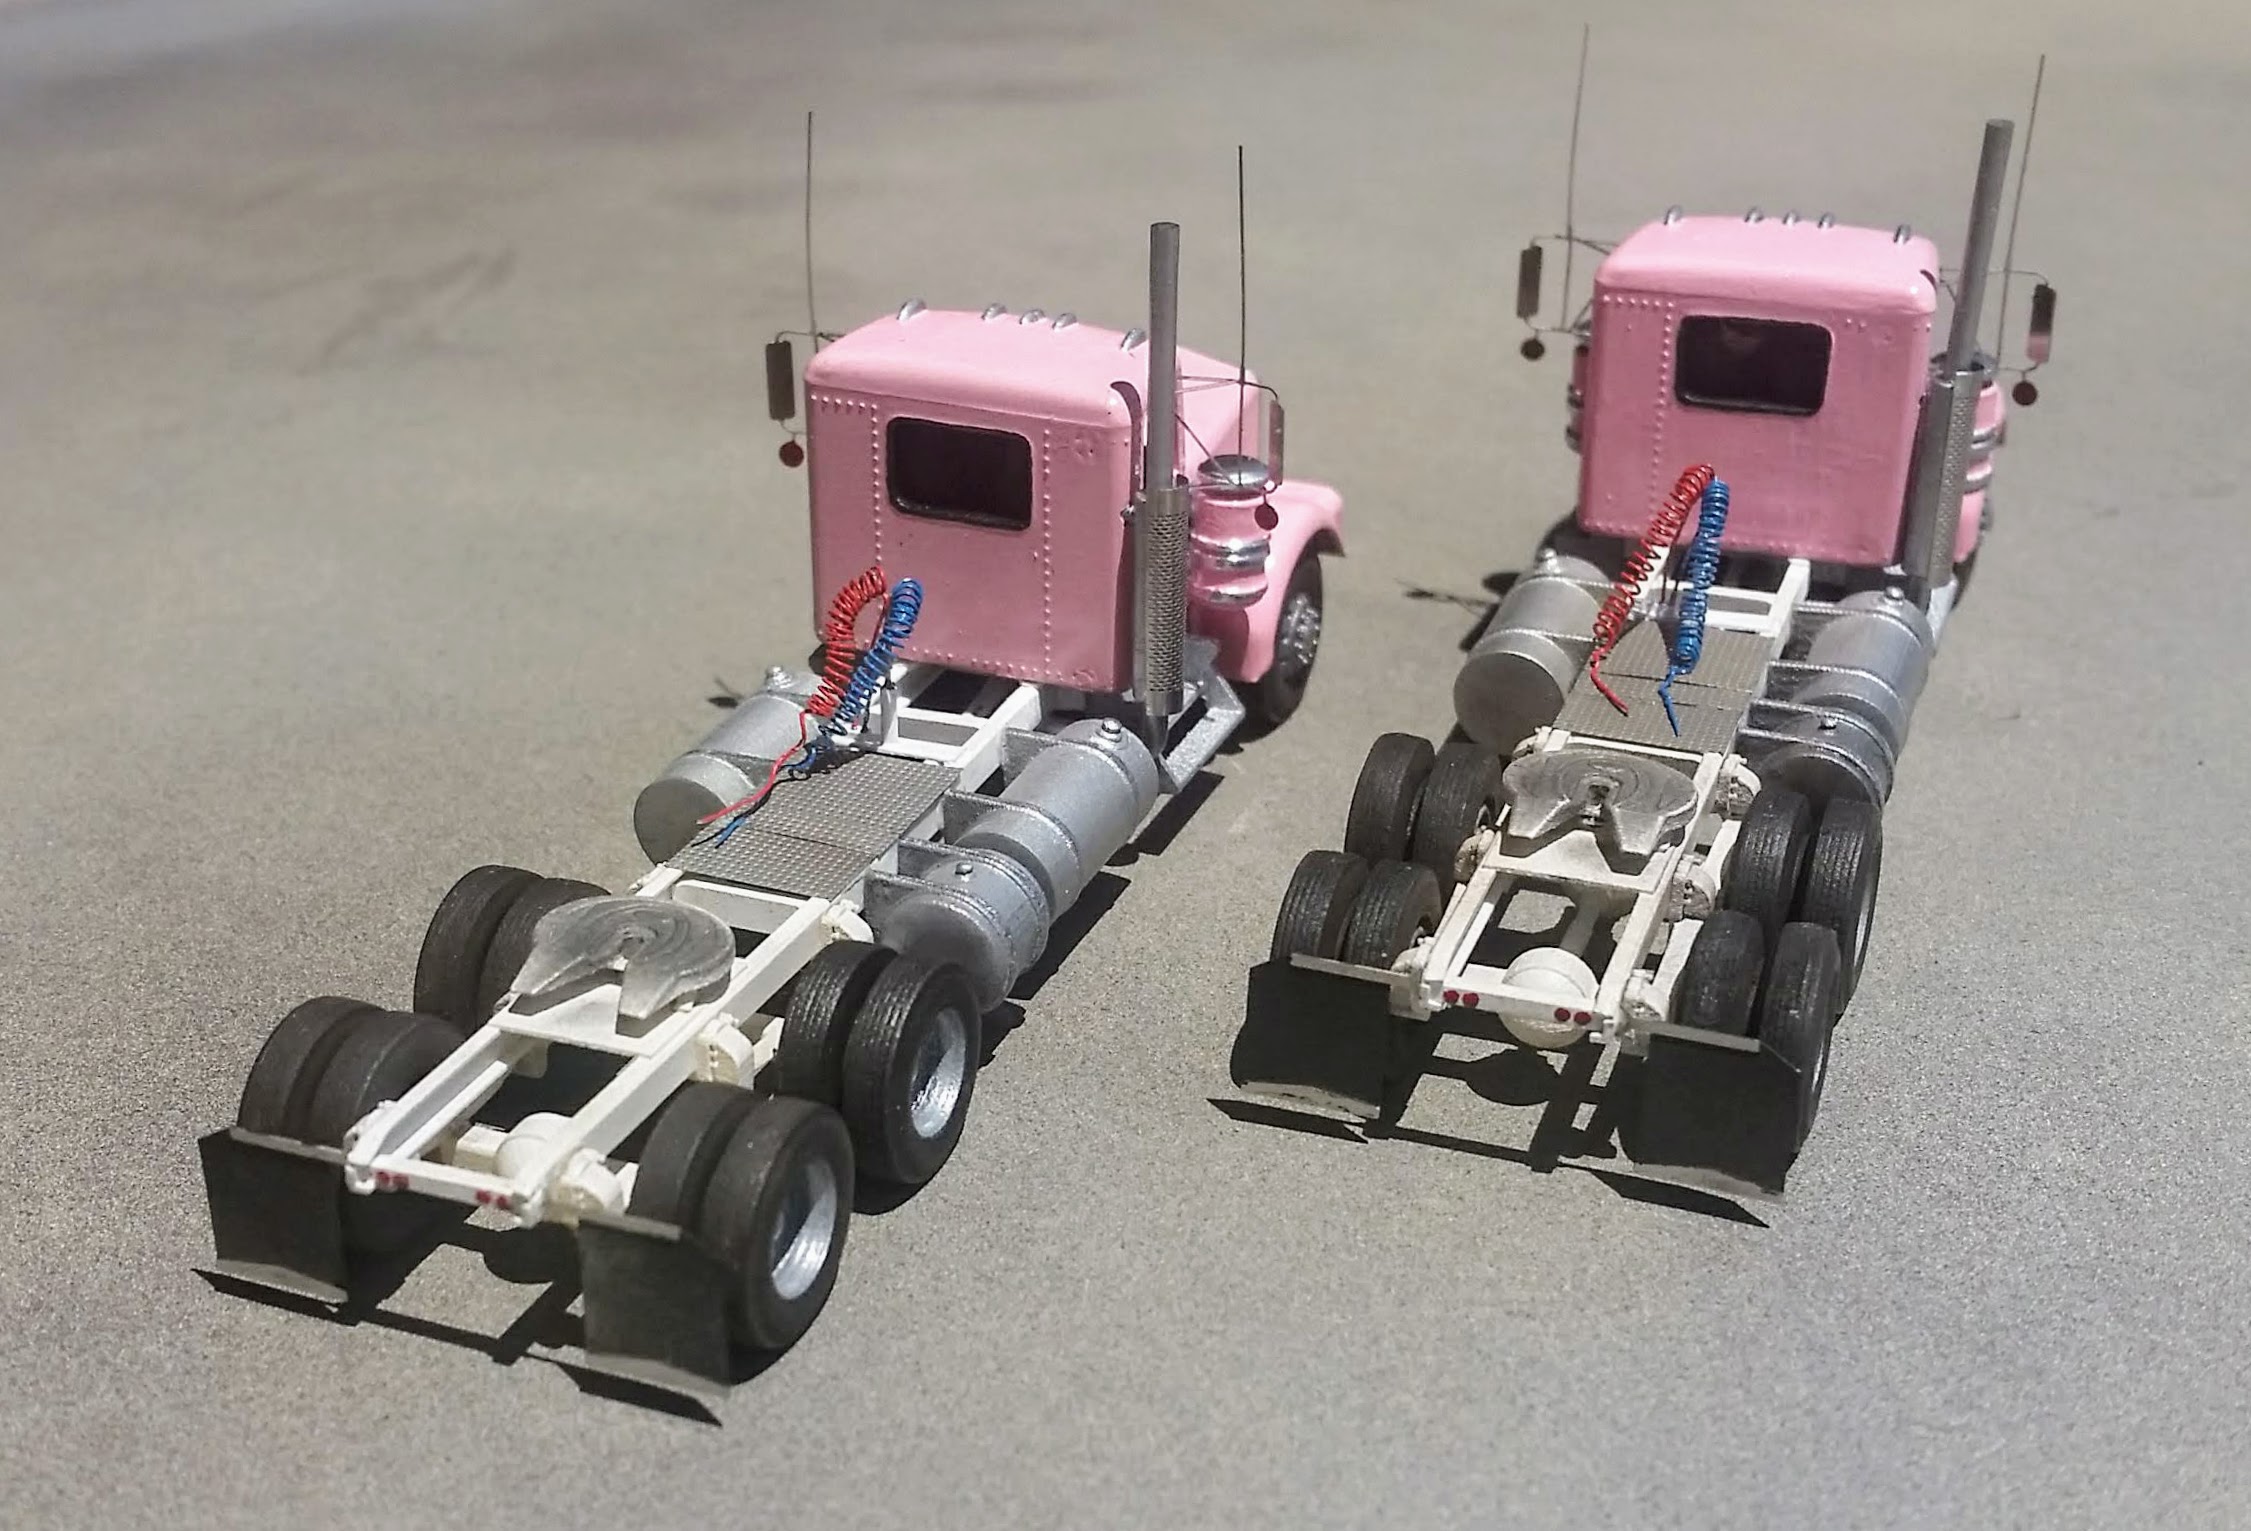  |
|
|
|
Post by fr8kar on Jul 21, 2019 18:22:20 GMT -8
Thanks for the info, Jim! |
|
|
|
Post by stottman on Jul 21, 2019 21:48:10 GMT -8
Well guess I get to start this a bit late: I'm trying my hand at one of these. I recall it being an SP car, but can't recall the class: It's my first time trying to carve off molded on stuff with a #17 blade. need some practice, but starting off on something cheap. And I have 2 if I screw it up.
Now lets hope 2 (or even 1) manufactures don't announce it until AFTER I am finished, unlike that time I started a U25C build and got 2 manufacturers to announce one as soon as I start.
Micromark sells a detail chisel that might work better for you. Its essentially a sharpened wedge, vs a sharpened blade |
|
|
|
Post by csx3305 on Jul 22, 2019 2:48:45 GMT -8
Those Micro Mark chisels are the best thing since sliced bread. Good heft, doesn’t flex, and a serrated handle for good grip. I haven’t bought any X-acto chisel blades in years.
|
|
|
|
Post by riogrande on Jul 22, 2019 3:04:45 GMT -8
I've never seen an Athearn RTR version of the 40' ugly duckling hi-cube, which makes me wonder if the tooling is worn out or lost. As teen, I'm pretty sure I had one of these as it was one of the few box cars I could get in SP Hydracushion paint scheme that I saw frequently on SP freight trains.
|
|
|
|
Post by onequiknova on Jul 22, 2019 3:53:42 GMT -8
The last package of #17 Xacto chisel blades I bought a few years ago were sharpened on both sides like a regular knife blade. That made them pretty useless as a chisel. The old ones were sharpened on only one side. Have they fixed that problem yet?
|
|
|
|
Post by milgentrains on Jul 22, 2019 5:06:20 GMT -8
I've never seen an Athearn RTR version of the 40' ugly duckling hi-cube, which makes me wonder if the tooling is worn out or lost. As teen, I'm pretty sure I had one of these as it was one of the few box cars I could get in SP Hydracushion paint scheme that I saw frequently on SP freight trains. I have several RTR versions but I've never seen one in SP or SSW paint. |
|
|
|
Post by sd40dash2 on Jul 22, 2019 5:17:49 GMT -8
Those Micro Mark chisels are the best thing since sliced bread. Good heft, doesn’t flex, and a serrated handle for good grip. I haven’t bought any X-acto chisel blades in years.
Can someone post an inline image or product number of the type of chisel being recommended here? A google images search shows a couple different types of micromark chisels.
|
|
|
|
Post by riogrande on Jul 22, 2019 5:46:16 GMT -8
I've never seen an Athearn RTR version of the 40' ugly duckling hi-cube, which makes me wonder if the tooling is worn out or lost. As teen, I'm pretty sure I had one of these as it was one of the few box cars I could get in SP Hydracushion paint scheme that I saw frequently on SP freight trains. I have several RTR versions but I've never seen one in SP or SSW paint. Are your's the plug door version or Youngstown style door? |
|
|
|
Post by timvanmersbergen on Jul 22, 2019 6:25:53 GMT -8
Hot week but all I managed to finish was a lumber load for the Tangent GSC flat. It was made from scribed balsa with strip wood blocking and chart tape strapping. Here it is being shoved down Jackson Street in Dubuque, IA in 1969 for delivery to Spahn and Rose. Traffic on 7th should be moving again in a minute or two.

|
|
|
|
Post by riogrande on Jul 22, 2019 6:30:09 GMT -8
Hot week but all I managed to finish was a lumber load So... since you didn't mention it, is that a Wheels of Time lumber load or a Train Life lumber load? Nice looking load and flat car. |
|
|
|
Post by gevohogger on Jul 22, 2019 6:30:19 GMT -8
Well guess I get to start this a bit late: Nine years, but what's the rush? |
|
|
|
Post by timvanmersbergen on Jul 22, 2019 6:35:07 GMT -8
Hot week but all I managed to finish was a lumber load So... since you didn't mention it, is that a Wheels of Time lumber load or a Train Life lumber load? Nice looking load and flat car. None of the above. I have edited my post. Thanks.
|
|
|
|
Post by ncrc5315 on Jul 22, 2019 7:43:31 GMT -8
Fr8kar, how did you do the air lines on the Kenworth's? They look really good.
|
|
|
|
Post by csx3305 on Jul 22, 2019 8:37:06 GMT -8
|
|
|
|
Post by csx3305 on Jul 22, 2019 8:42:44 GMT -8
Well guess I get to start this a bit late: Nine years, but what's the rush? He managed to start this thread nearly two years before this forum even existed.....does that mean this thread is the nexus of the universe? **mind boggles** |
|
|
|
Post by TBird1958 on Jul 22, 2019 9:37:06 GMT -8
One thing that really helps me is to use the chisel blade out of the handle, only using finger pressure to move it around. It makes it more difficult to gouge the model when you're using less force. Additionally, you can hold the blade vertical against the model and use a scraping motion to slowly but effectively wear down the raised areas. It takes some of the risk of damaging the model out of the equation. The other thing is to modify the blade by rounding the corners so that you don't get a gouge if the blade isn't perfectly flat on the model. I must have half a dozen chisel blades of various widths that I've modified with my bench grinder then finished on progressively finer nail files until the shape is the way I want and there are no burrs on any of the edges. I polish the blades until they are as sharp as I can make them. I make them different widths to fit in some hard to reach areas, such as on boxcar ends when I need to carve off grabs. So keep doing what you're doing, packer. Go slow and don't try to get it all in one pass. I got the decals on my UP Transco 4750. The decal edges didn't show up at all until I used some dull lacquer. I weathered the model with some Bragdon powders. Ryan,
Can you tells us a bit more about the conversion of the Magor car to a Transco, is there an article to reference?
|
|
|
|
Post by fr8kar on Jul 22, 2019 10:50:42 GMT -8
Fr8kar, how did you do the air lines on the Kenworth's? They look really good. Thanks! It's "bead wire" from the craft store (0.008" diameter) coiled tightly around the needle from my airbrush then stretched to get the spacing between the coils and more or less formed into the shape it's in sagging from the pogo stick. It only takes a minute or two to form the wire. After it was attached to the pogo stick and deck plate I painted it red and blue (Model Master Rot RLM 23 and Chrysler Engine Blue). Edited to add: The airbrush needle is 3/64" or 0.047" diameter, so you could use wire or Evergreen 221 styrene rod to wrap the wire if you want the same results I got. |
|
|
|
Post by fr8kar on Jul 22, 2019 11:08:39 GMT -8
Ryan,
Can you tells us a bit more about the conversion of the Magor car to a Transco, is there an article to reference? I don't know of an article. I just noticed a strong resemblance between the Magor and Transco cars. Of course I don't have any dimensions other than the capacity to back that up. The major differences I could see are the location of the brake hardware and high side ladders on the Exactrail car. The huck bolt/rivet pattern below the hopper bay partitions is slightly different and the ends use L-angle instead of zees. I didn't bother changing the ends or mess with the huck bolt/rivet pattern. In fact, it looks like I forgot to complete the four ladder rungs on left side A end and right side B end or add crossover platforms. There are some good views of Soo Line Transco hoppers on the Canadian Freight Car Gallery. I'm sure there are lots of differences I missed. Soo Magor hopper: canadianfreightcargallery.ca/cgi-bin/image.pl?i=soo70381&o=sooSoo Transco hopper: canadianfreightcargallery.ca/cgi-bin/image.pl?i=soo70671&o=soo |
|
Deleted
Deleted Member
Posts: 0
|
Post by Deleted on Jul 22, 2019 11:16:12 GMT -8
Those chisels are the best...they are heavy...and allow you to get a good grip on them...and firm control of the chisel.
|
|
|
|
Post by valenciajim on Jul 22, 2019 11:52:08 GMT -8
Those chisels are the best...they are heavy...and allow you to get a good grip on them...and firm control of the chisel. Do you have any thoughts about whether the 2mm or 4 mm tool is better? |
|
|
|
Post by grahamline on Jul 22, 2019 12:22:21 GMT -8
I have also found the chisels marketed by Hasegawa, Kato, Trumpeter, and Tamiya. Look for shops and websites that sell to plastic modelers building things like cars, armor, aircraft, ships etc.
|
|
Deleted
Deleted Member
Posts: 0
|
Post by Deleted on Jul 22, 2019 12:34:04 GMT -8
I prefer the 2 mm. Have to be careful...and practice on older junker cars to get the right touch.
I have some panel scribers as well...plus the mission models chisels are pretty nice too. But they score things up a bit more...
These are going to get used on the Walthers G85 flats...when they arrive.
|
|
|
|
Post by sd40dash2 on Jul 22, 2019 12:35:03 GMT -8
Thanks for the info. The Micromark chisels sound and look great, but at $25CDN per tool plus shipping, I will have to pass. What happens when the chisel gets dull??
Will continue to use my exacto chisel, available for like $1 per blade.
|
|
Deleted
Deleted Member
Posts: 0
|
Post by Deleted on Jul 22, 2019 12:44:44 GMT -8
Well...I just ordered a new set of the pbl "swiss" sprue nippers in the ultra fine. Those are now $39.95 a set; but they are the best sprue cutters you can get. They will get into those small areas that were impossible to get to.
I don't skimp on tools. You get what you pay for. The micro-mark chisels would be a good investment for you if you were upgrading several old cars; IMO.
For instance;
I can (and have) simply shaved the grabs right off an E&C Shops corrugated gondola...using these. I use the 4mm on the sides; and the 2 mm on the ends. No milling required. They shave right off...there is some cleanup of the area...but that is accomplished with some varied grades of sandpaper glued on small sticks of styrene and water.
I have had mine for over 15 years...and they are razor sharp. You could ask MicroMark...I don't think these dull. They're not a knife...they are one solid piece of metal.
|
|
|
|
Post by fr8kar on Jul 22, 2019 13:03:19 GMT -8
I would sharpen a chisel like these on a whetstone, just like one of my kitchen knives. I'd probably cut a triangular block of wood to use as a guide so the angle remains consistent.
|
|
|
|
Post by csx3305 on Jul 22, 2019 13:40:55 GMT -8
I’ve sharpened my Micro Mark chisel multiple times with ordinary 400 grit auto body sandpaper.
Splurge and get one. The first time your #17 blade slips and digs into the side of an expensive model, or worse yet, buries up in your non-dominant hand, you won’t be thinking of the $24 CDN you saved.
|
|
|
|
Post by ncrc5315 on Jul 22, 2019 13:52:26 GMT -8
Fr8kar, how did you do the air lines on the Kenworth's? They look really good. Thanks! It's "bead wire" from the craft store (0.008" diameter) coiled tightly around the needle from my airbrush then stretched to get the spacing between the coils and more or less formed into the shape it's in sagging from the pogo stick. It only takes a minute or two to form the wire. After it was attached to the pogo stick and deck plate I painted it red and blue (Model Master Rot RLM 23 and Chrysler Engine Blue). Edited to add: The airbrush needle is 3/64" or 0.047" diameter, so you could use wire or Evergreen 221 styrene rod to wrap the wire if you want the same results I got. Thanks for the reply, have to file this one away. |
|


