|
|
Post by ChessieFan1978 on Nov 2, 2019 19:22:25 GMT -8
|
|
|
|
Post by valenciajim on Nov 2, 2019 19:56:11 GMT -8
Great picture of great models, but it is still Saturday!
|
|
|
|
Post by ChessieFan1978 on Nov 2, 2019 21:23:55 GMT -8
Great picture of great models, but it is still Saturday! Well Sunday has been almost over lately before anyone posts so I got an early start. |
|
|
|
Post by TBird1958 on Nov 3, 2019 8:53:53 GMT -8
It's September of 1976 and we find D&RGW SD40T2 #5356 laboring westbound in the company of SD45 5317 and GP30 3002 headed uphill in between Helper, and Soldier Summit UT. Delivered in fall of '75 the Tunnel Motor has spent most of it's time in the Moffat Coal Pool in an effort to meet the huge increase in that traffic. Management is well pleased with the high utilization from these units and will eventually purchase a total of 72 units in 5 separate groups and likely would have procured more if EMD hadn't stopped production in favor of the SD50. The model is Scaletrains weathered with Abteilung 502 oils and matte effect thinner, Tamiya grey panel wash and several passes of dullcote in an attempt make it look like it's' been out earning it's keep for a year. Happy Sunday Gentlemen, Mark Hills   |
|
|
|
Post by theengineshed on Nov 3, 2019 9:37:54 GMT -8
|
|
|
|
Post by riogrande on Nov 3, 2019 9:46:34 GMT -8
Lovely job on the ST tunnel motor Mark!
Total purchased was 73. From memory plans were to buy 20 more but EMD claimed 17 SD50s would do the same work as 20 SD40T-2s, so the order was changed.
Yesterday wife and I finished laying the faux wood plank vinyl flooring in the basement. Have four items to correct to pass inspection. Caulk sink, caulk bottom of toilet, change out lighter gauge suspended ceiling wire for 12 guage. That 12 guage wire is major thick but I got that done this weekend. Last thing is the flat panel lights need suspension wires attached to ceiling per code. We also still need baseboards in now that the floor is installed.
|
|
|
|
Post by nsfantodd on Nov 3, 2019 10:01:26 GMT -8
Love the SD45s Matt!
Mark, your weathering looks excellent! Your panel line treatment looks great! I usually dull coat, weather with acrylics, and dull coat again. But wasn't sure if that would work with the panel line. I was thinking the panel line might spread like a Sharpie does when hit with dull coat. I have not bought any of the panel line, but I'm going to order some and see how it works.
Todd
|
|
|
|
Post by timvanmersbergen on Nov 3, 2019 11:15:53 GMT -8
It's September 1969 in Dubuque, IA. A recently rebuilt GP10 shoves and equally recently repainted Illinois Central bulkhead flat with a load of Mississippi pine down Jackson Street for delivery to Spahn and Rose Lumber Company. Traffic on 7th should be moving again shortly. The GP10 is an Intermountain with modified details. The GSC bulkhead is an Exactrail. The CGW version had the right wheelbase for this series of IC cars that got steel faced bulkheads. I added styrene in place of the wood bulkhead facing, stripped, repainted, and used Kohlberg decals. The load is scribed balsa and chart tape.  |
|
|
|
Post by TBird1958 on Nov 3, 2019 11:26:02 GMT -8
Todd, that was my first time using it, I followed with oil washes in Ochre, Buff, Light Sand, Dark Brown and Warmed Black, from Abteilung 502, thinned with Matte Effect thinner, it dries fast and you can come back over it and "work it" later on, fun to work with, I'm liking them better than Acrylics for this kind of effects.
|
|
|
|
Post by dti406 on Nov 3, 2019 13:04:36 GMT -8
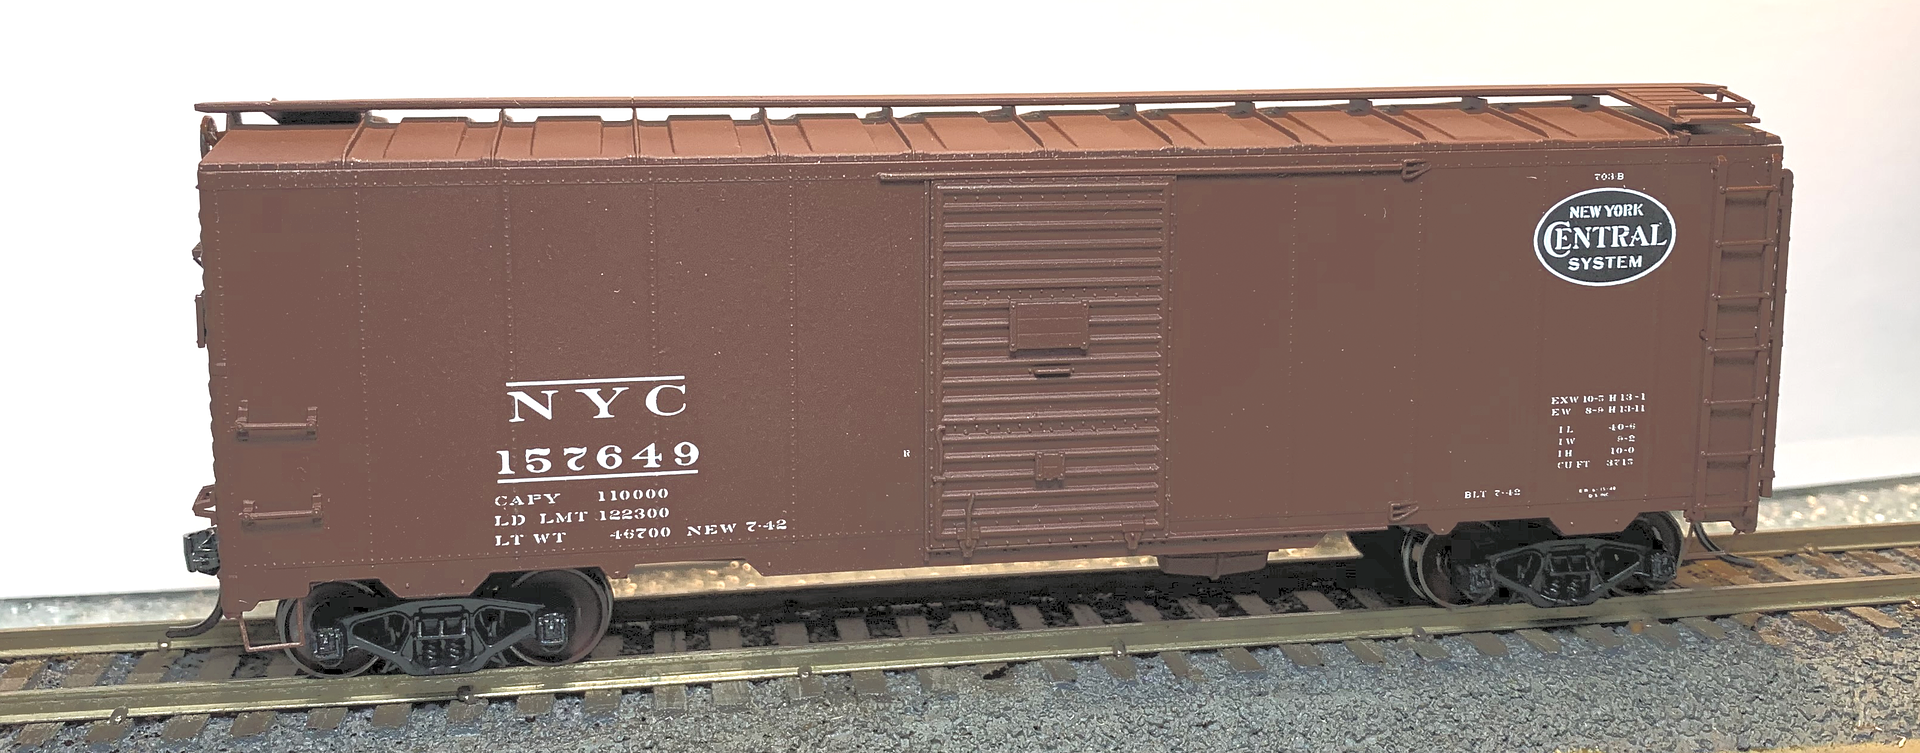 IMWX 1937 AAR Boxcar Kit, with Yarmouth Model sill steps in place of the plastic ones that came with the kit. Car was painted with Scalecoat II Boxcar Red Paint and lettered with Speedwitch Media Decals. Car was built in 1942 for general service. 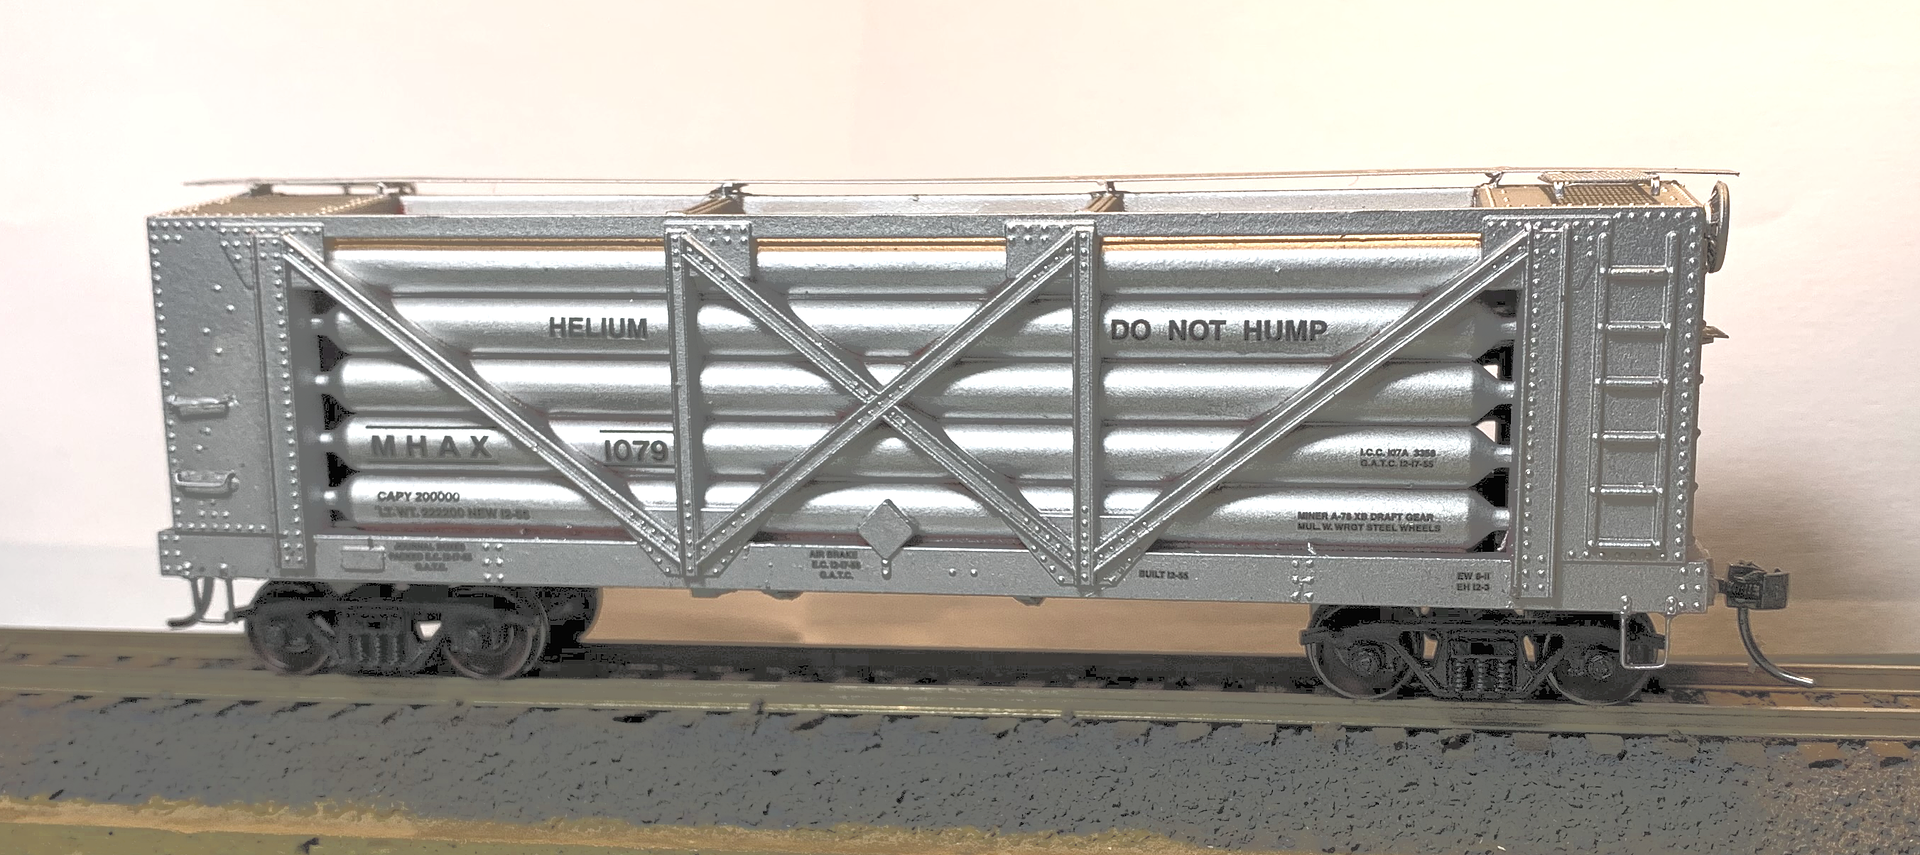 Next I updated another old AHM Helium Tank Car with metal sill steps, removed cast on grabs and replaced with wire ones and added some where appropriate. Also replaced the cast on roofwalk with a Plano Replacement. Car was painted and built as they were rebuilt in the early sixties removing the wood roofwalk and other upgrades. Substituted the trucks with some I stole from a Roundhouse Ore Car as Athearn no longer has these in stock. They have extensions to hold the added brake shoes as these cars were very heavy and needed the double brake shoes on each wheel. Car was painted with Scalecoat II Silver Paint and lettered with Tichy decals. These cars were the ex US Navy cars that were all transferred to the US Bureau of Mines after the plimp were retired. Most of them supplied helium to various NASA applications. Thanks for looking! Rick Jesionowski |
|
|
|
Post by GP40P-2 on Nov 3, 2019 15:03:18 GMT -8
Lovely job on the ST tunnel motor Mark! Total purchased was 73. From memory plans were to buy 20 more but EMD claimed 17 SD50s would do the same work as 20 SD40T-2s, so the order was changed. Yesterday wife and I finished laying the faux wood plank vinyl flooring in the basement. Have four items to correct to pass inspection. Caulk sink, caulk bottom of toilet, change out lighter gauge suspended ceiling wire for 12 guage. That 12 guage wire is major thick but I got that done this weekend. Last thing is the flat panel lights need suspension wires attached to ceiling per code. We also still need baseboards in now that the floor is installed. Do show us some pictures of the room just before layout work begins. You have done a lot of work on that, so make sure to show it, it is a major part of building a layout. |
|
|
|
Post by cemr5396 on Nov 3, 2019 18:33:07 GMT -8
Walthers well cars before and after Plano-ization  |
|
|
|
Post by riogrande on Nov 4, 2019 5:20:41 GMT -8
Lovely job on the ST tunnel motor Mark! Total purchased was 73. From memory plans were to buy 20 more but EMD claimed 17 SD50s would do the same work as 20 SD40T-2s, so the order was changed. Yesterday wife and I finished laying the faux wood plank vinyl flooring in the basement. Have four items to correct to pass inspection. Caulk sink, caulk bottom of toilet, change out lighter gauge suspended ceiling wire for 12 guage. That 12 guage wire is major thick but I got that done this weekend. Last thing is the flat panel lights need suspension wires attached to ceiling per code. We also still need baseboards in now that the floor is installed. Do show us some pictures of the room just before layout work begins. You have done a lot of work on that, so make sure to show it, it is a major part of building a layout. It has been lots of work - almost all weekends and days off since last December. Here a photo showing all the floor in. About all that is left is the baseboard around the walls and add/replace some ceiling grid tiles.  |
|
|
|
Post by GP40P-2 on Nov 4, 2019 8:47:02 GMT -8
Do show us some pictures of the room just before layout work begins. You have done a lot of work on that, so make sure to show it, it is a major part of building a layout. It has been lots of work - almost all weekends and days off since last December. Here a photo showing all the floor in. About all that is left is the baseboard around the walls and add/replace some ceiling grid tiles. Wow, that was a lot of work and looks really nice. You posted some of your early photos of the unfinished basement. Having a nice room to begin with will pay dividends once you start building and operating a layout. Congrats on almost being ready for a layout! |
|
|
|
Post by riogrande on Nov 4, 2019 10:24:40 GMT -8
More than I imaged. We searched to find a home with a finished basement but in our price range most were "too" finished, with the basement area divided into separate rooms and one big room was needed. There was one other home in the area with a larger unfinished rectangular basement with stairs down in the middle, but the support beams were bowed and it looked like engineers would have to fix that at possibly some expense. It also had an outdoor pool that would have needed a lot of money and a maintenence headache. This basement/home was the next best and it had all the framing in the basement done around the walls including the rough-in bathroom area. Finishing was a team effort with my wife. We both hung the drywall (50 4x8 sheets worth) , I did most of the taping, mudding and sanding. We both painted. I installed the suspended ceiling. She helped with the tiles. I installed the bathroom drywall and cement board and taped, mudded. She did all the shower tile and floor tile. We did get a contractor for the outlet wiring, ceiling LED light wiring and plumbing. Guessing contractor costs were around $2k and materials under $3k so roughly $5k cost to finish already framed in basement. Rather than post any more photo's here, most of the progress photo's are here on pate 3 and page 4 if anyone is interested: atlasrescueforum.proboards.com/thread/3737/jims-layout-basement-finishing-progress?page=3Here is what we started with - photo take from the opposite end:  Even this room is not real big. The blue area (train room area) is almost 34 feet long and the width is 15 near the far end and 16 closer over - estimated about 510 or so sq ft. I custom designed the track plan to take best advantage of the space with hopefully some decent runs. I thought about using the last room but due to the access and walkways, a lift out bridge would be necessary and it wouldn't add that much more. My wife is going to make it her loung room with a little fridge, coffee/tea bar, sofa, TV and maybe a tanning bed.  |
|
|
|
Post by unittrain on Nov 10, 2019 8:02:31 GMT -8
This is my first post here as I switched from N to HO this last spring, I'm currently working on my first HO module I'm modeling some early PC and a little early Conrail, My first project is a bridge scratchbuild using Central valley girders,its a large Camelback pratt truss bridge that is the central theme of this module. The module is 4' by 6', I plan on building several modules that will connect to a staging area. I'll have photos here and there as work progresses. The bridge will be a single track 231' span with a 100' deck plate girder span, its abandoned. It crosses the Pennsylvania railroad double track mainline (Cleveland Pittsburgh line) I've been lurking on the forum as I know little about what to buy and not buy in HO as far as locomotives and rolling stock so I've been learning as I purchase HO stuff. I have hundreds of N scale rolling stock that I've been selling off. It's all the best stuff in N so if any N scalers are looking for 60s and 70s era rolling stock drop me a message I just may have what your looking for.
|
|
|
|
Post by nsfantodd on Nov 10, 2019 9:42:17 GMT -8
Todd, that was my first time using it, I followed with oil washes in Ochre, Buff, Light Sand, Dark Brown and Warmed Black, from Abteilung 502, thinned with Matte Effect thinner, it dries fast and you can come back over it and "work it" later on, fun to work with, I'm liking them better than Acrylics for this kind of effects. Mark, Thanks for your description about the oils you used and the process. I've never tried weathering with oils, but I'm going to give it a shot. Your results were great! |
|
|
|
Post by el3672 on Nov 12, 2019 15:58:39 GMT -8
Jim, now that's a really sharp looking train room,coming along great!!
I like the plank flooring and the selection you chose. Overall nice setting for your layout.
|
|
|
|
Post by riogrande on Nov 12, 2019 17:33:37 GMT -8
Jim, now that's a really sharp looking train room,coming along great!! I like the plank flooring and the selection you chose. Overall nice setting for your layout. We settled on the vinyl plank flooring as it seem economical, hopefully easier to clean (layout building) and decent looking. We spent all last weekend replacing some of the rattier ceiling tiles with some new ones and it's looking pretty good now. There is only 3 1/2 inches to the joists do it's tight getting them in or out. Now mainly the baseboard to go in. |
|
|
|
Post by el3672 on Nov 12, 2019 19:35:53 GMT -8
Awesome guys, keep up the great work and looking forward to your empire dream layout updates.
|
|


