|
|
Post by sd40dash2 on Aug 2, 2020 16:55:50 GMT -8
Sides and ends finally installed to chassis, everything is squared up. Ignore the apparently-misaligned horizontal styrene strip along the far well. It only appears that way because the lead weight was not cut perfectly square. 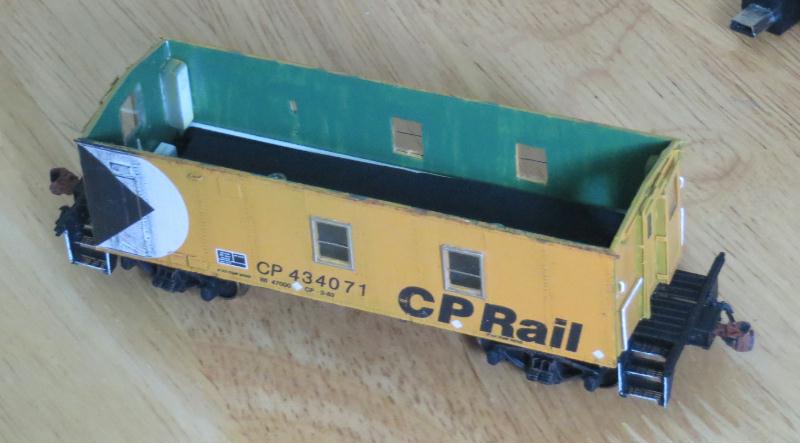 |
|
|
|
Post by sd40dash2 on Aug 3, 2020 8:10:55 GMT -8
The roof has now been detailed, painted, aligned, installed and initially weathered. The two roof sections were installed in conjunction with the cupola side wall braces in order to achieve prototype dimensions. Bit of a balancing act to achieve what you see here. Now have to set this aside and let it all dry. 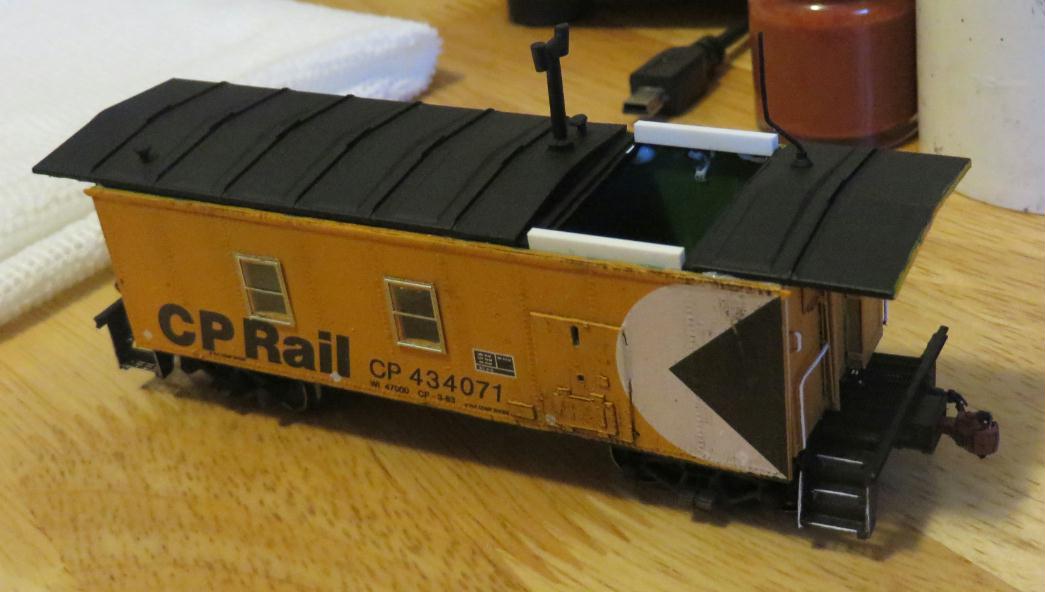 |
|
|
|
Post by brammy on Aug 3, 2020 14:01:46 GMT -8
This is just really fantastic work. Thank you for sharing all of this.
|
|
|
|
Post by sd40dash2 on Aug 3, 2020 14:08:50 GMT -8
This is just really fantastic work. Thank you for sharing all of this. Much too kind -- I am really happy you are enjoying the thread. Thank you for commenting. |
|
|
|
Post by sd40dash2 on Aug 3, 2020 16:25:41 GMT -8
Side braces painted, outer edge on the closer one is sloppily painted but that's where the glue goes. While the main body green is already painted and I decided to leave it, all cupola interior pieces will be painted mint green as discussed on page 4 of this thread. The next series of images will be a little less exciting than previous ones. Since edgecrusher stated upthread that he could not visualize my cupola assembly, my goal will be to show you the stages of how I constructed it through more frequent posts. If you guys get bored with the next several micro-steps please speak up and I'll skip ahead a bit.  |
|
|
|
Post by sgoti on Aug 3, 2020 21:46:34 GMT -8
Side braces painted, outer edge on the closer one is sloppily painted but that's where the glue goes. While the main body green is already painted and I decided to leave it, all cupola interior pieces will be painted mint green as discussed on page 4 of this thread. The next series of images will be a little less exciting than previous ones. Since edgecrusher stated upthread that he could not visualize my cupola assembly, my goal will be to show you the stages of how I constructed it through more frequent posts. If you guys get bored with the next several micro-steps please speak up and I'll skip ahead a bit. Details make the model, and details make the thread! I know I don't mind a few visual several thousand words on how you are doing this. |
|
|
|
Post by brammy on Aug 4, 2020 4:16:53 GMT -8
You better not skip ahead.
|
|
|
|
Post by sd40dash2 on Aug 4, 2020 4:36:14 GMT -8
Here are just some of the cupola parts prepped and ready to install. This section of the car will need many pieces of strip and shim to make it all fit together. So far I've counted 57 pieces! Thanks NSWL Chopper II! 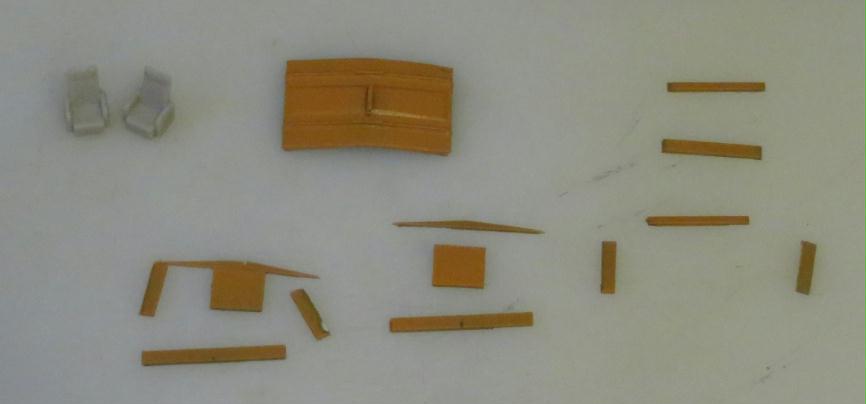 |
|
|
|
Post by sd40dash2 on Aug 4, 2020 13:06:09 GMT -8
Cupola corners installed, their insides will be painted mint green next. This is one of the more challenging aspects to this build, not only the engineering but also the alignment, glue then painting and waiting for it all to dry before proceeding. Most remaining work is tedious like this and has slowed me down slightly. But I'll keep posting here with the same frequency due to the interest in this thread. 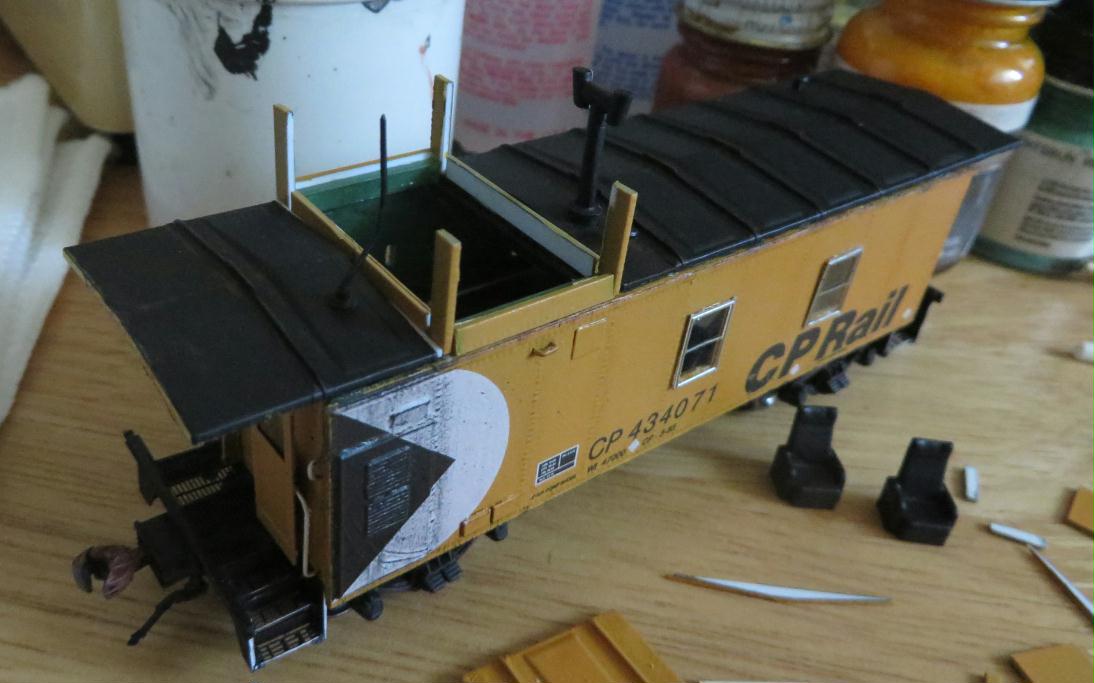 |
|
|
|
Post by sd40dash2 on Aug 5, 2020 3:12:58 GMT -8
Insides hand painted mint green after each set of strips is installed and dry. Note the careful avoidance to add unnecessary paint to where the window frames will be. 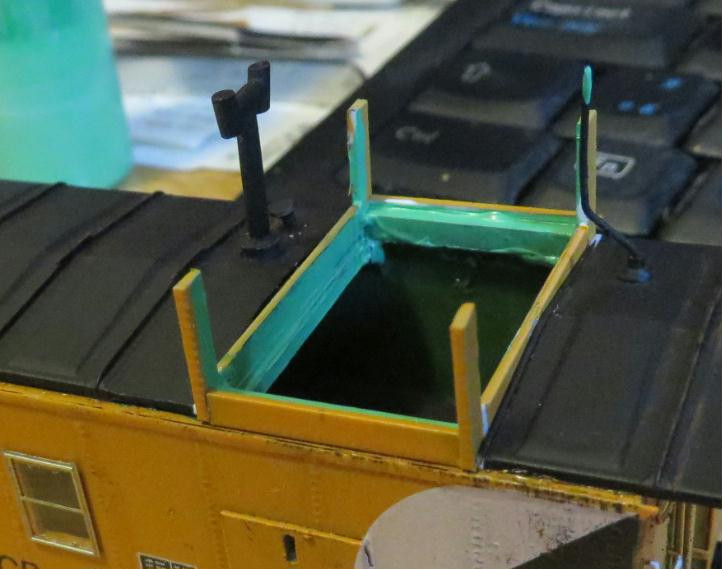 |
|
|
|
Post by sd40dash2 on Aug 5, 2020 11:08:59 GMT -8
Horizontal top pieces added, aligned, glued, wait to dry, paint, wait to dry. 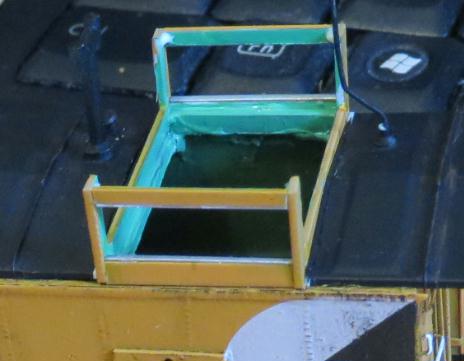 |
|
|
|
Post by Christian on Aug 5, 2020 11:31:49 GMT -8
Horizontal top pieces added, aligned, glued, wait to dry, paint, wait to dry. What are you using for glue in those corners? |
|
|
|
Post by sd40dash2 on Aug 5, 2020 11:35:27 GMT -8
^ Weldbond in the corners so as to avoid ACC fumes and offer more working time to get the parts properly aligned. In fact most of this caboose is held together with that glue.
|
|
|
|
Post by fishbelly on Aug 5, 2020 17:12:27 GMT -8
Curious as to what you all think about caboose interiors. Are they worth the effort?
I have a few of the Walthers and older P2K cabooses with interiors that are rather nice. When put together, I cannot see anything inside there. They have smaller windows though. The larger cabooses like the Atlas extended vision and the other one that is not extended have larger windows. you can see into them more.
I have two cabooses to build. I have one of the GSB caboose interior kits. I thought I had two, but I cannot find the other one. A search for any on ebay shows up nothing. A friend of mine says I should build one with the interior and one prepped for an interior in case I ever find a GSB kit again.
|
|
|
|
Post by fr8kar on Aug 5, 2020 19:07:31 GMT -8
Curious as to what you all think about caboose interiors. Are they worth the effort? I have a few of the Walthers and older P2K cabooses with interiors that are rather nice. When put together, I cannot see anything inside there. They have smaller windows though. The larger cabooses like the Atlas extended vision and the other one that is not extended have larger windows. you can see into them more. I have two cabooses to build. I have one of the GSB caboose interior kits. I thought I had two, but I cannot find the other one. A search for any on ebay shows up nothing. A friend of mine says I should build one with the interior and one prepped for an interior in case I ever find a GSB kit again. I'm not sure they're worth the trouble unless you plan on making the roof removable so you can see inside or you light the interior. Of course, having something in the more visible areas of the caboose, like the bay windows or cupola, is never a bad idea. But full interior? Not unless you just enjoy building. Having said that, I printed out some Vapor Caban caboose stoves and they came out pretty good. Too bad you can't see them in the caboose! |
|
|
|
Post by sd40dash2 on Aug 6, 2020 3:08:10 GMT -8
Make sure sides are square to each other. I see the digital camera is revealing modelling imperfections not apparent under normal viewing conditions. I'm fixing what I can as I go along so keep the torches and pitchforks at bay for the moment, please. LOL  |
|
|
|
Post by sd40dash2 on Aug 6, 2020 13:43:47 GMT -8
Side window frames cut from many pieces of .010x.030 strip which will also be used for the square end windows. Can't remember what size strip was used for side window center posts, likely whatever I had that appeared closest to the prototype. Exact measurements are not always available or practical to scale down for some smaller things like this. 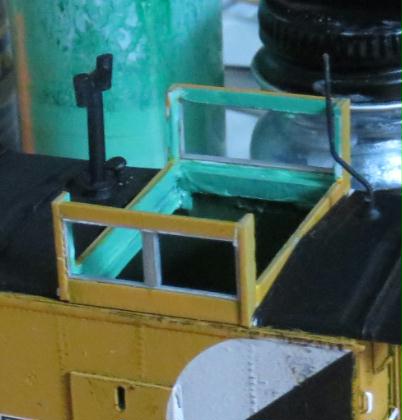 |
|
|
|
Post by Christian on Aug 7, 2020 3:13:34 GMT -8
^ Weldbond in the corners so as to avoid ACC fumes and offer more working time to get the parts properly aligned. In fact most of this caboose is held together with that glue. I love Weldbond. Too bad it isn't used by more railroad modelers because it has some interesting properties. Back in the old days the bottle listed those "odd" uses, but not so much anymore! |
|
|
|
Post by Christian on Aug 7, 2020 3:16:12 GMT -8
I'm not sure they're worth the trouble unless you plan on making the roof removable so you can see inside or you light the interior. The Tangent B&O caboose has a completely detailed interior specific to that caboose. Too bad it's invisible even with the lights on! For some arcane reason I feel better because I know it's there. |
|
|
|
Post by sd40dash2 on Aug 7, 2020 4:46:45 GMT -8
Rather than to glue them to the corners, I felt the cupola seats needed something to rest on. So I applied strips of .040 x .250 styrene and allowed them to dry with the caboose upside down. After that I painted them and allowed the mint green paint to dry. As you can see, there are a lot of short bursts of work followed by waiting for things to dry with this cupola build.  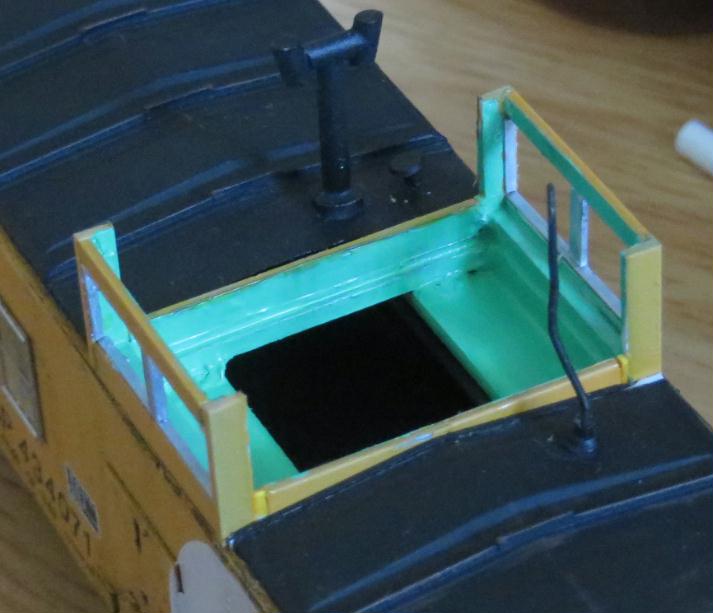 |
|
|
|
Post by riogrande on Aug 7, 2020 4:49:24 GMT -8
It's looking nice and square.
|
|
|
|
Post by fishbelly on Aug 7, 2020 4:50:11 GMT -8
I'm not sure they're worth the trouble unless you plan on making the roof removable so you can see inside or you light the interior. The Tangent B&O caboose has a completely detailed interior specific to that caboose. Too bad it's invisible even with the lights on! For some arcane reason I feel better because I know it's there. Knowing it is there is the thing that makes it OK. It is there! I do not know why. |
|
|
|
Post by sd40dash2 on Aug 7, 2020 4:53:21 GMT -8
It's looking nice and square. Thanks. I credit the scale ruler and NWSL chopper for that. |
|
|
|
Post by sd40dash2 on Aug 7, 2020 11:57:06 GMT -8
Opposing view cupola seats installed along with side windows cut from .005 acetate and everything installed with Weldbond glue.  |
|
|
|
Post by sd40dash2 on Aug 7, 2020 12:59:21 GMT -8
EDITORIAL: Just a note about the next few images as this project nears completion. You guys may be spotting various little modelling flaws and mistakes in these digital images and I think more of these will arise as the final details are applied and photographed. This model looks really good to my eyes in person but the high digital resolution is revealing small modelling flaws that are not obvious when viewing the model in person. This creates a dilemma between wanting to share my work and having my many little flaws exposed. I know there are way better modellers out there than me and there will always be. Frankly, digital photography creates a lot of added pressure to get these models looking absolutely perfect but this exceeds my skill level. I will be correcting many of the flaws as I finish the model but many of them will remain as it just gets too hard to fix some of these things without making things worse in some cases. I know some will say this is an impetus to improve but again, we're butting up against my own limitations here and I need you guys to understand that. I model to satisfy the final result in person on my bench (through a magnifying viewer) and in my display case and not to the extremely critical eye of the digital camera. Your thoughts are always welcome but just wanted to give you guys a heads up to not expect perfect modelling.
|
|
|
|
Post by thunderhawk on Aug 7, 2020 14:17:25 GMT -8
Few if any models will stand up to the seemingly microscopic zoom abilities of today's cameras. No need to worry.
|
|
|
|
Post by sd40dash2 on Aug 8, 2020 4:24:55 GMT -8
Cupola face center sections installed using a strip backer, align, affix, allow glue to dry, paint inside and allow paint to dry, always watch alignment before things dry. Lots of tedious stop-start work here. Good project for times stuck inside at extreme times of year.  |
|
|
|
Post by sd40dash2 on Aug 8, 2020 12:04:26 GMT -8
Let's take a bit of a break from the tedious cupola build to show what started this whole project. For the price of this consignment bin kit, I figured at the time I could easily adapt it to the prototype. Wrong! Every dimension and every component was incorrect when compared to the prototype. My book has been a very handy reference throughout this process. Anyway, back onto the shelf this retro kit goes and back to the cupola build. I hope this was a pleasant diversion.   |
|
|
|
Post by Christian on Aug 9, 2020 1:08:22 GMT -8
This model looks really good to my eyes in person but the high digital resolution is revealing small modeling flaws that are not obvious when viewing the model in person. This creates a dilemma between wanting to share my work and having many little flaws exposed. Your thoughts are common to so many of us. Doing a project like this caboose puts it all out there and takes guts to make the commitment. Way back last century when the West Coasties put together the philosophy that became the Prototype Modelers movement the idea was to make models that were as close to a prototype as possible within the model builder's skills. Some folks have insane model building abilities. Most of us don't. But we work to the best of our abilities. I don't ever intend to make a glue blob or a gap, or leave off something that is beyond my research or ability. But it happens and sometimes I do get very discouraged and it takes weeks or months to get past those "flaws." Note my occasional posts about The Econo-Stack From HellTM. Digital photography has changed everything. This construction article you are presenting will by nature show off every wort and "mistake." That's why I'm impressed by your guts in putting it out there. I'm not sure I have the courage to do a step by step. What I do post is photographed carefully and doesn't show a lot of the flaws that sometimes paralyze me. Yeah, we all want to be great and that's a good thing. But we all need to have a reality check for our model building work. Now, as for your caboose. You've said it all. It looks good. When it's finished pull back the camera and find a great angle. Sure, your eye will still go to the flaws. My eyes won't. My eyes are going to see a great model of a yellow caboose. Christian |
|
|
|
Post by fr8kar on Aug 9, 2020 6:45:19 GMT -8
Wow, Christian. You really summed up how a lot of us feel. I agree wholeheartedly!
I appreciate your willingness to post such clear progress photos, Manny. The model may not be perfect but it looks damn good. I've certainly been inspired.
|
|


