|
|
Post by fr8kar on Aug 16, 2020 7:55:52 GMT -8
Happy Sunday everyone. Today should be the last day of our mini heat wave. It got up to 104° yesterday and 106° the day before that. It's supposed to get down to the 90s next week. I can't wait. During the last week or so I worked on this Atlas kaolin tank car. The blob that is the control valve was the first thing to go (after the paint), along with the reservoir. I replaced both with printed parts and cut out the coupler pocket replacing it with Moloco parts. Then I repainted it and pieced together decals from a few sets to get hopefully close to the prototype, a 1971 built phosphoric acid tank. These 70s built tanks have SF couplers, which is handy for me since I grabbed a few from Sergent before the investment cast couplers became unavailable. Weathering this should be fun since these things were positively filthy. 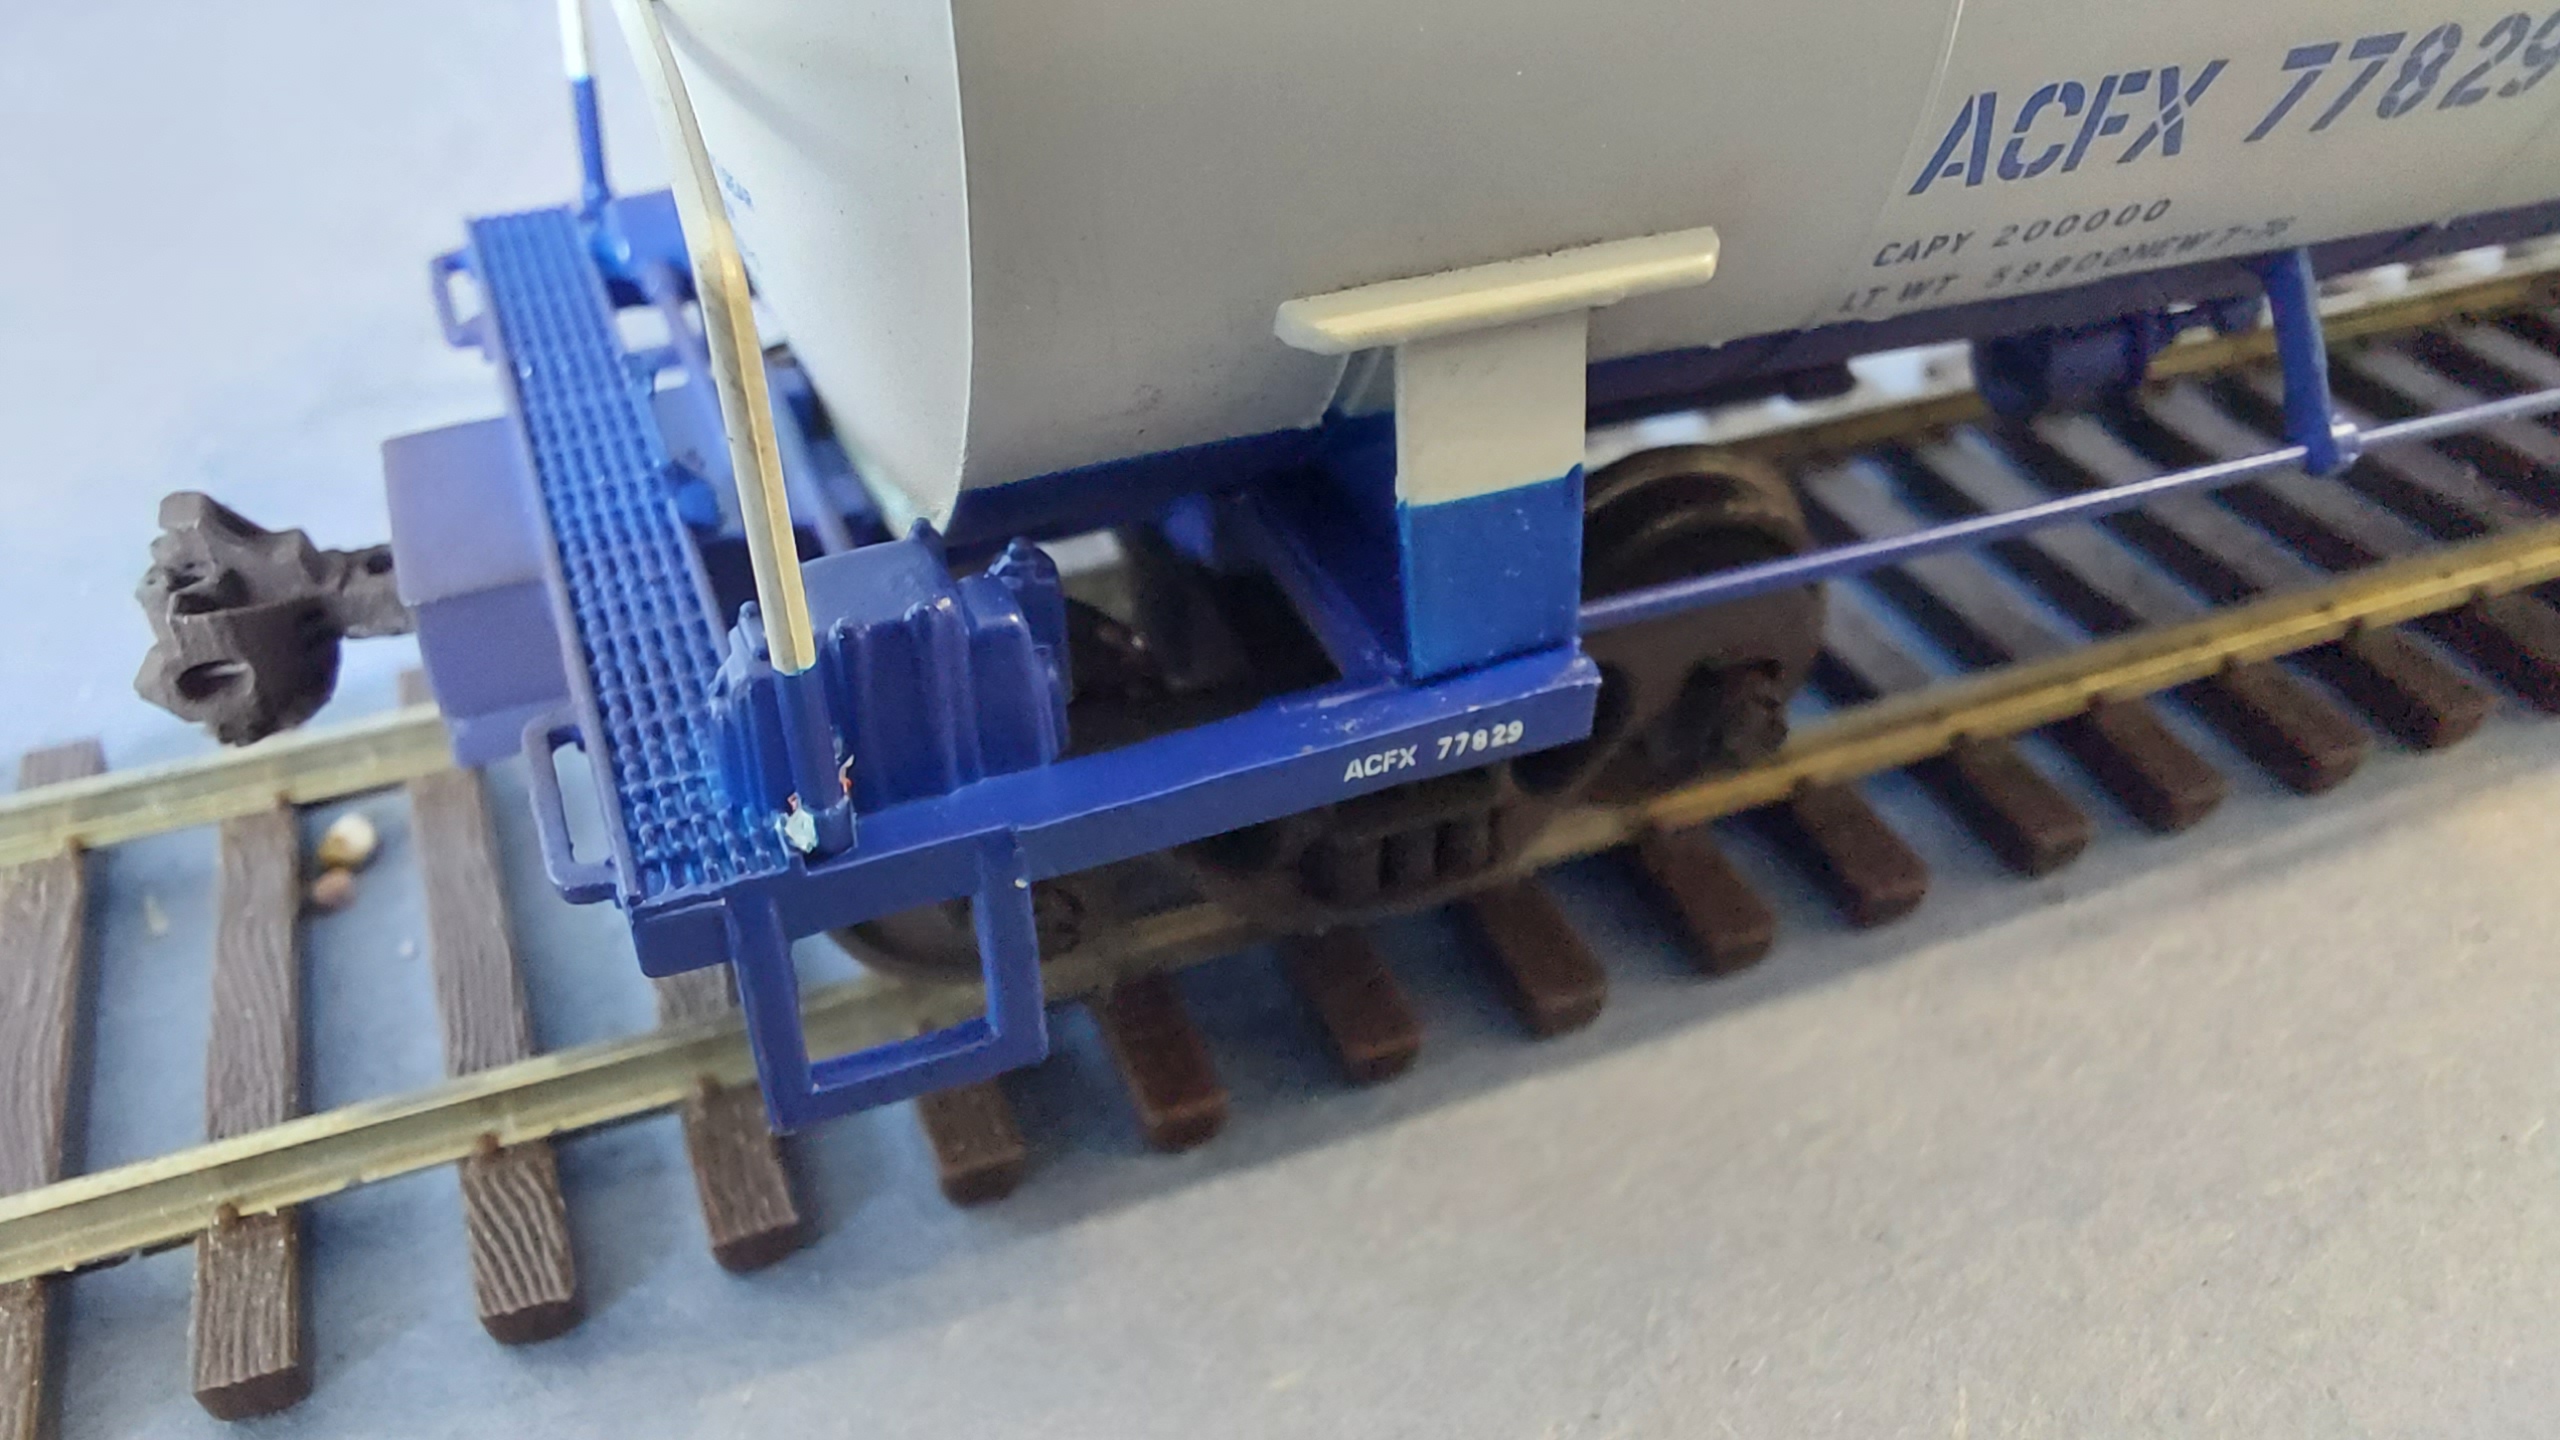 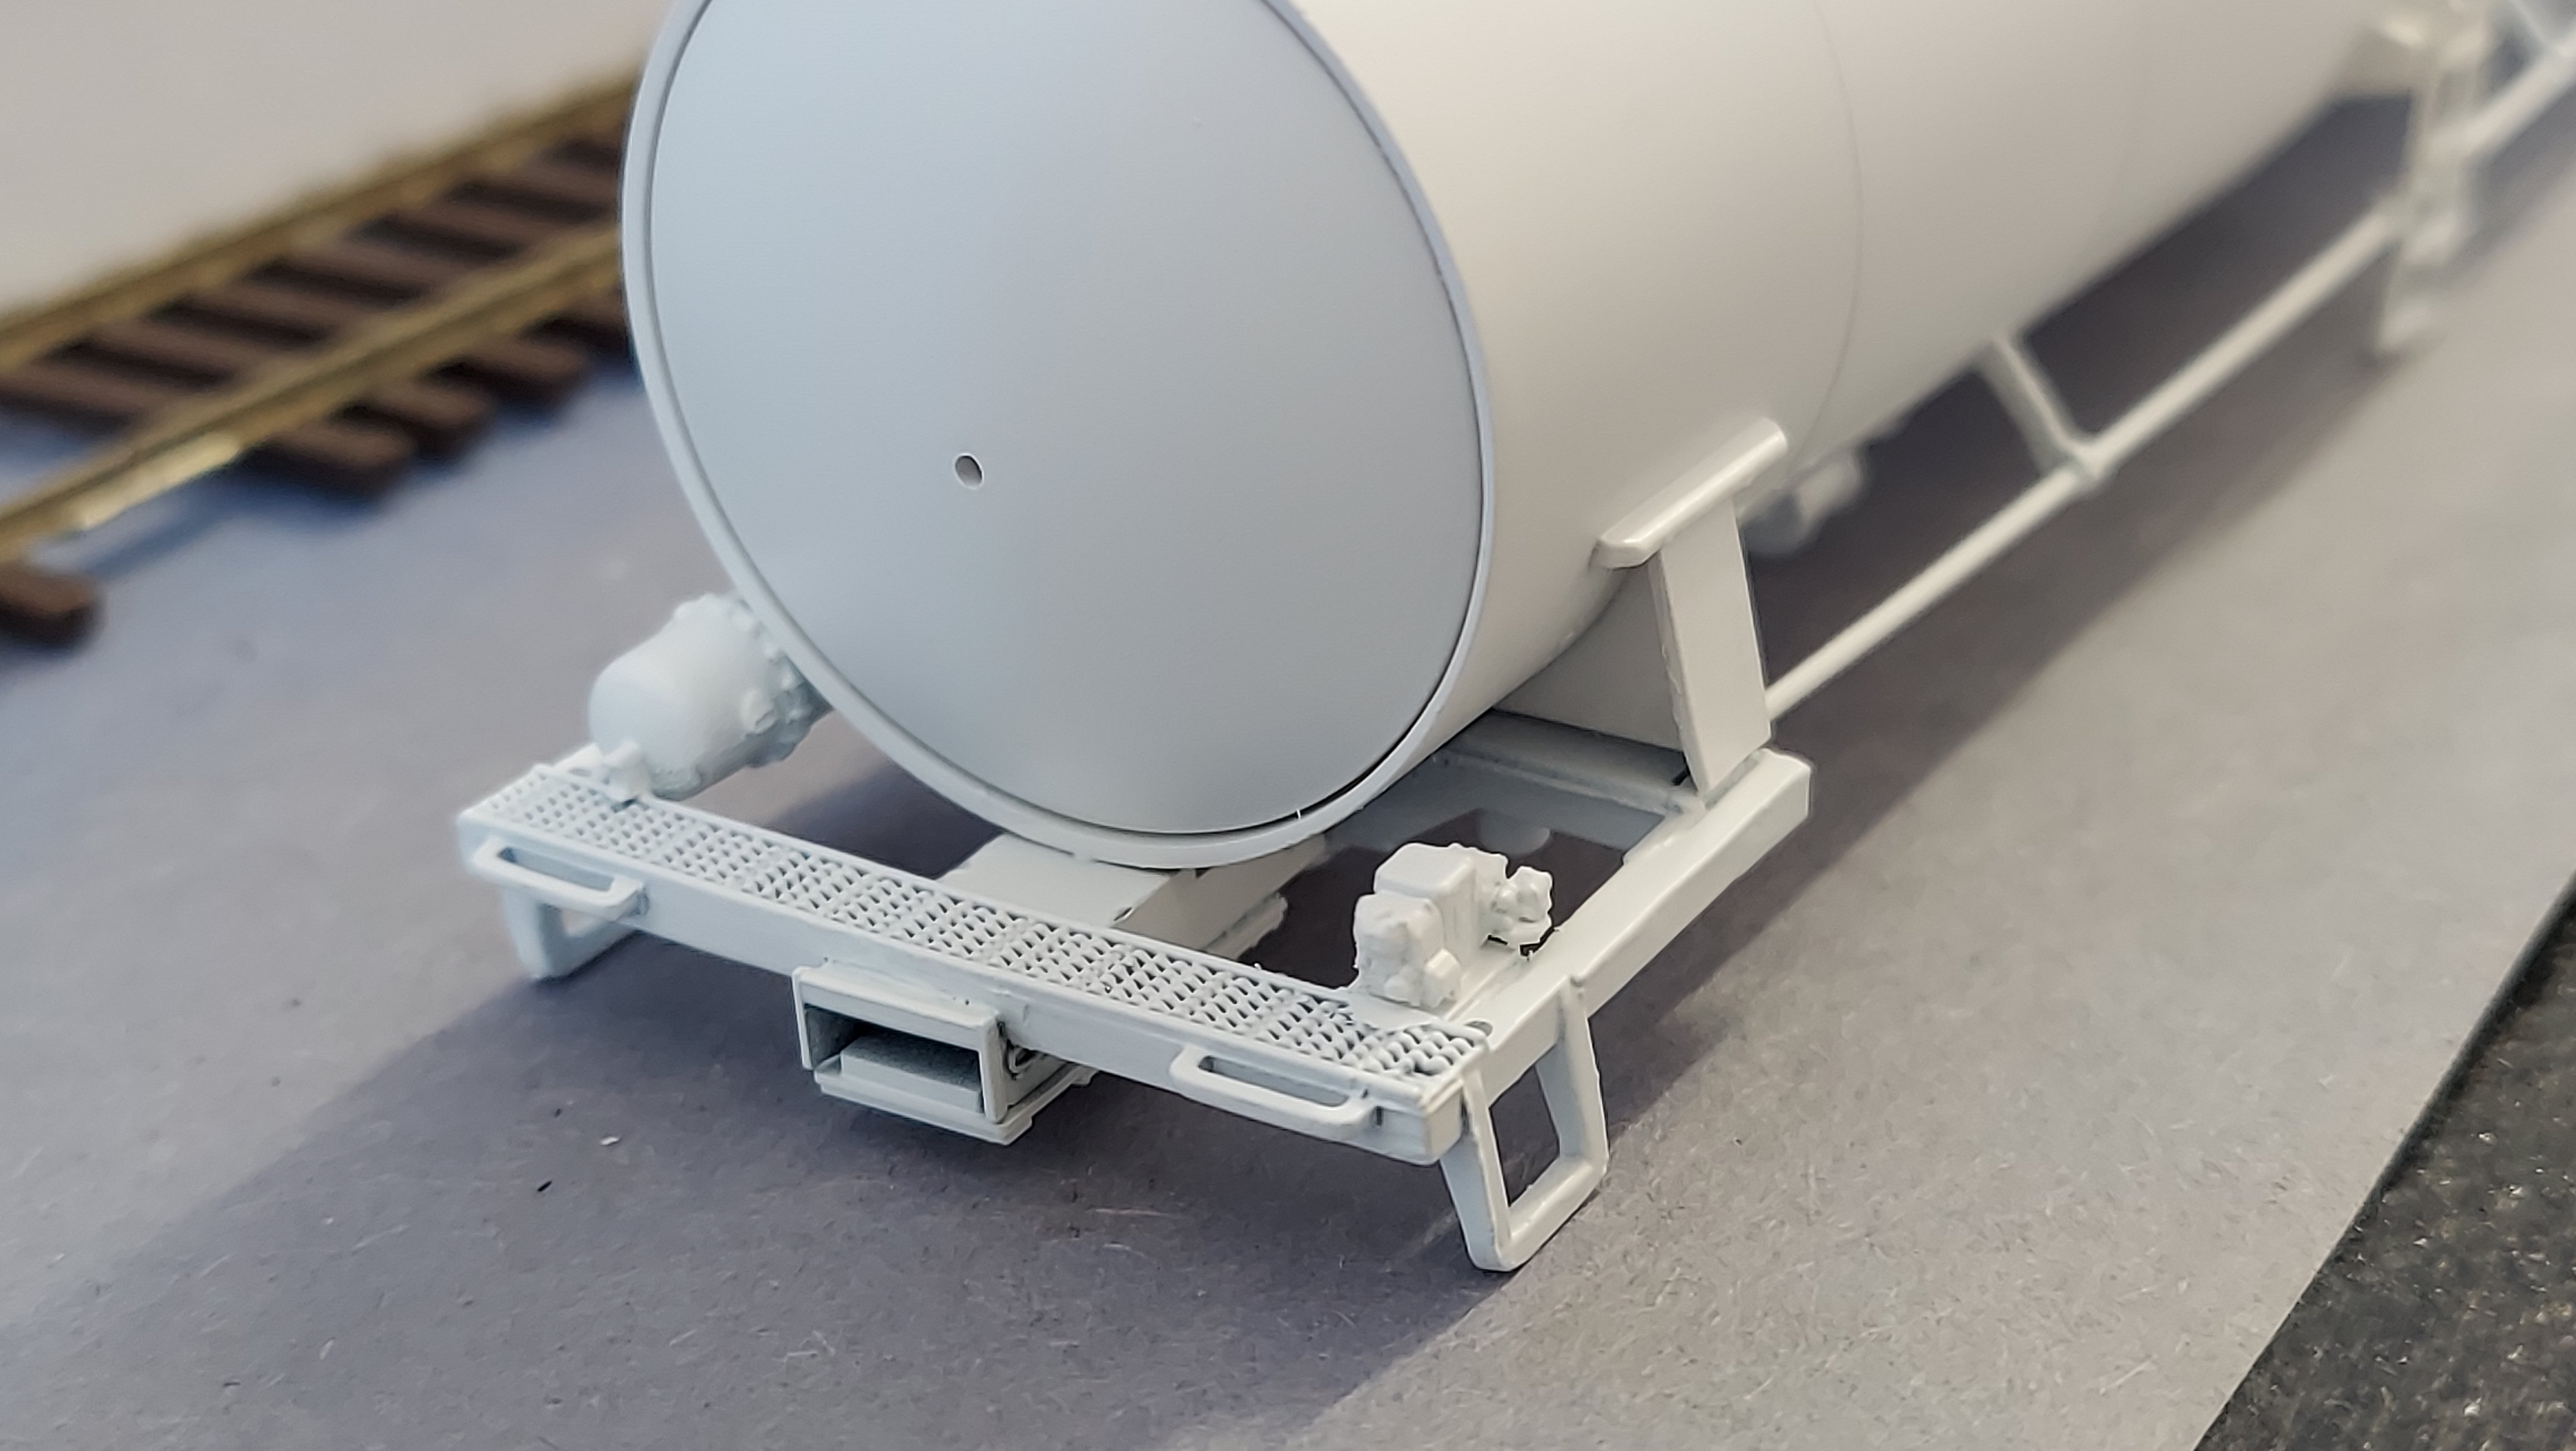 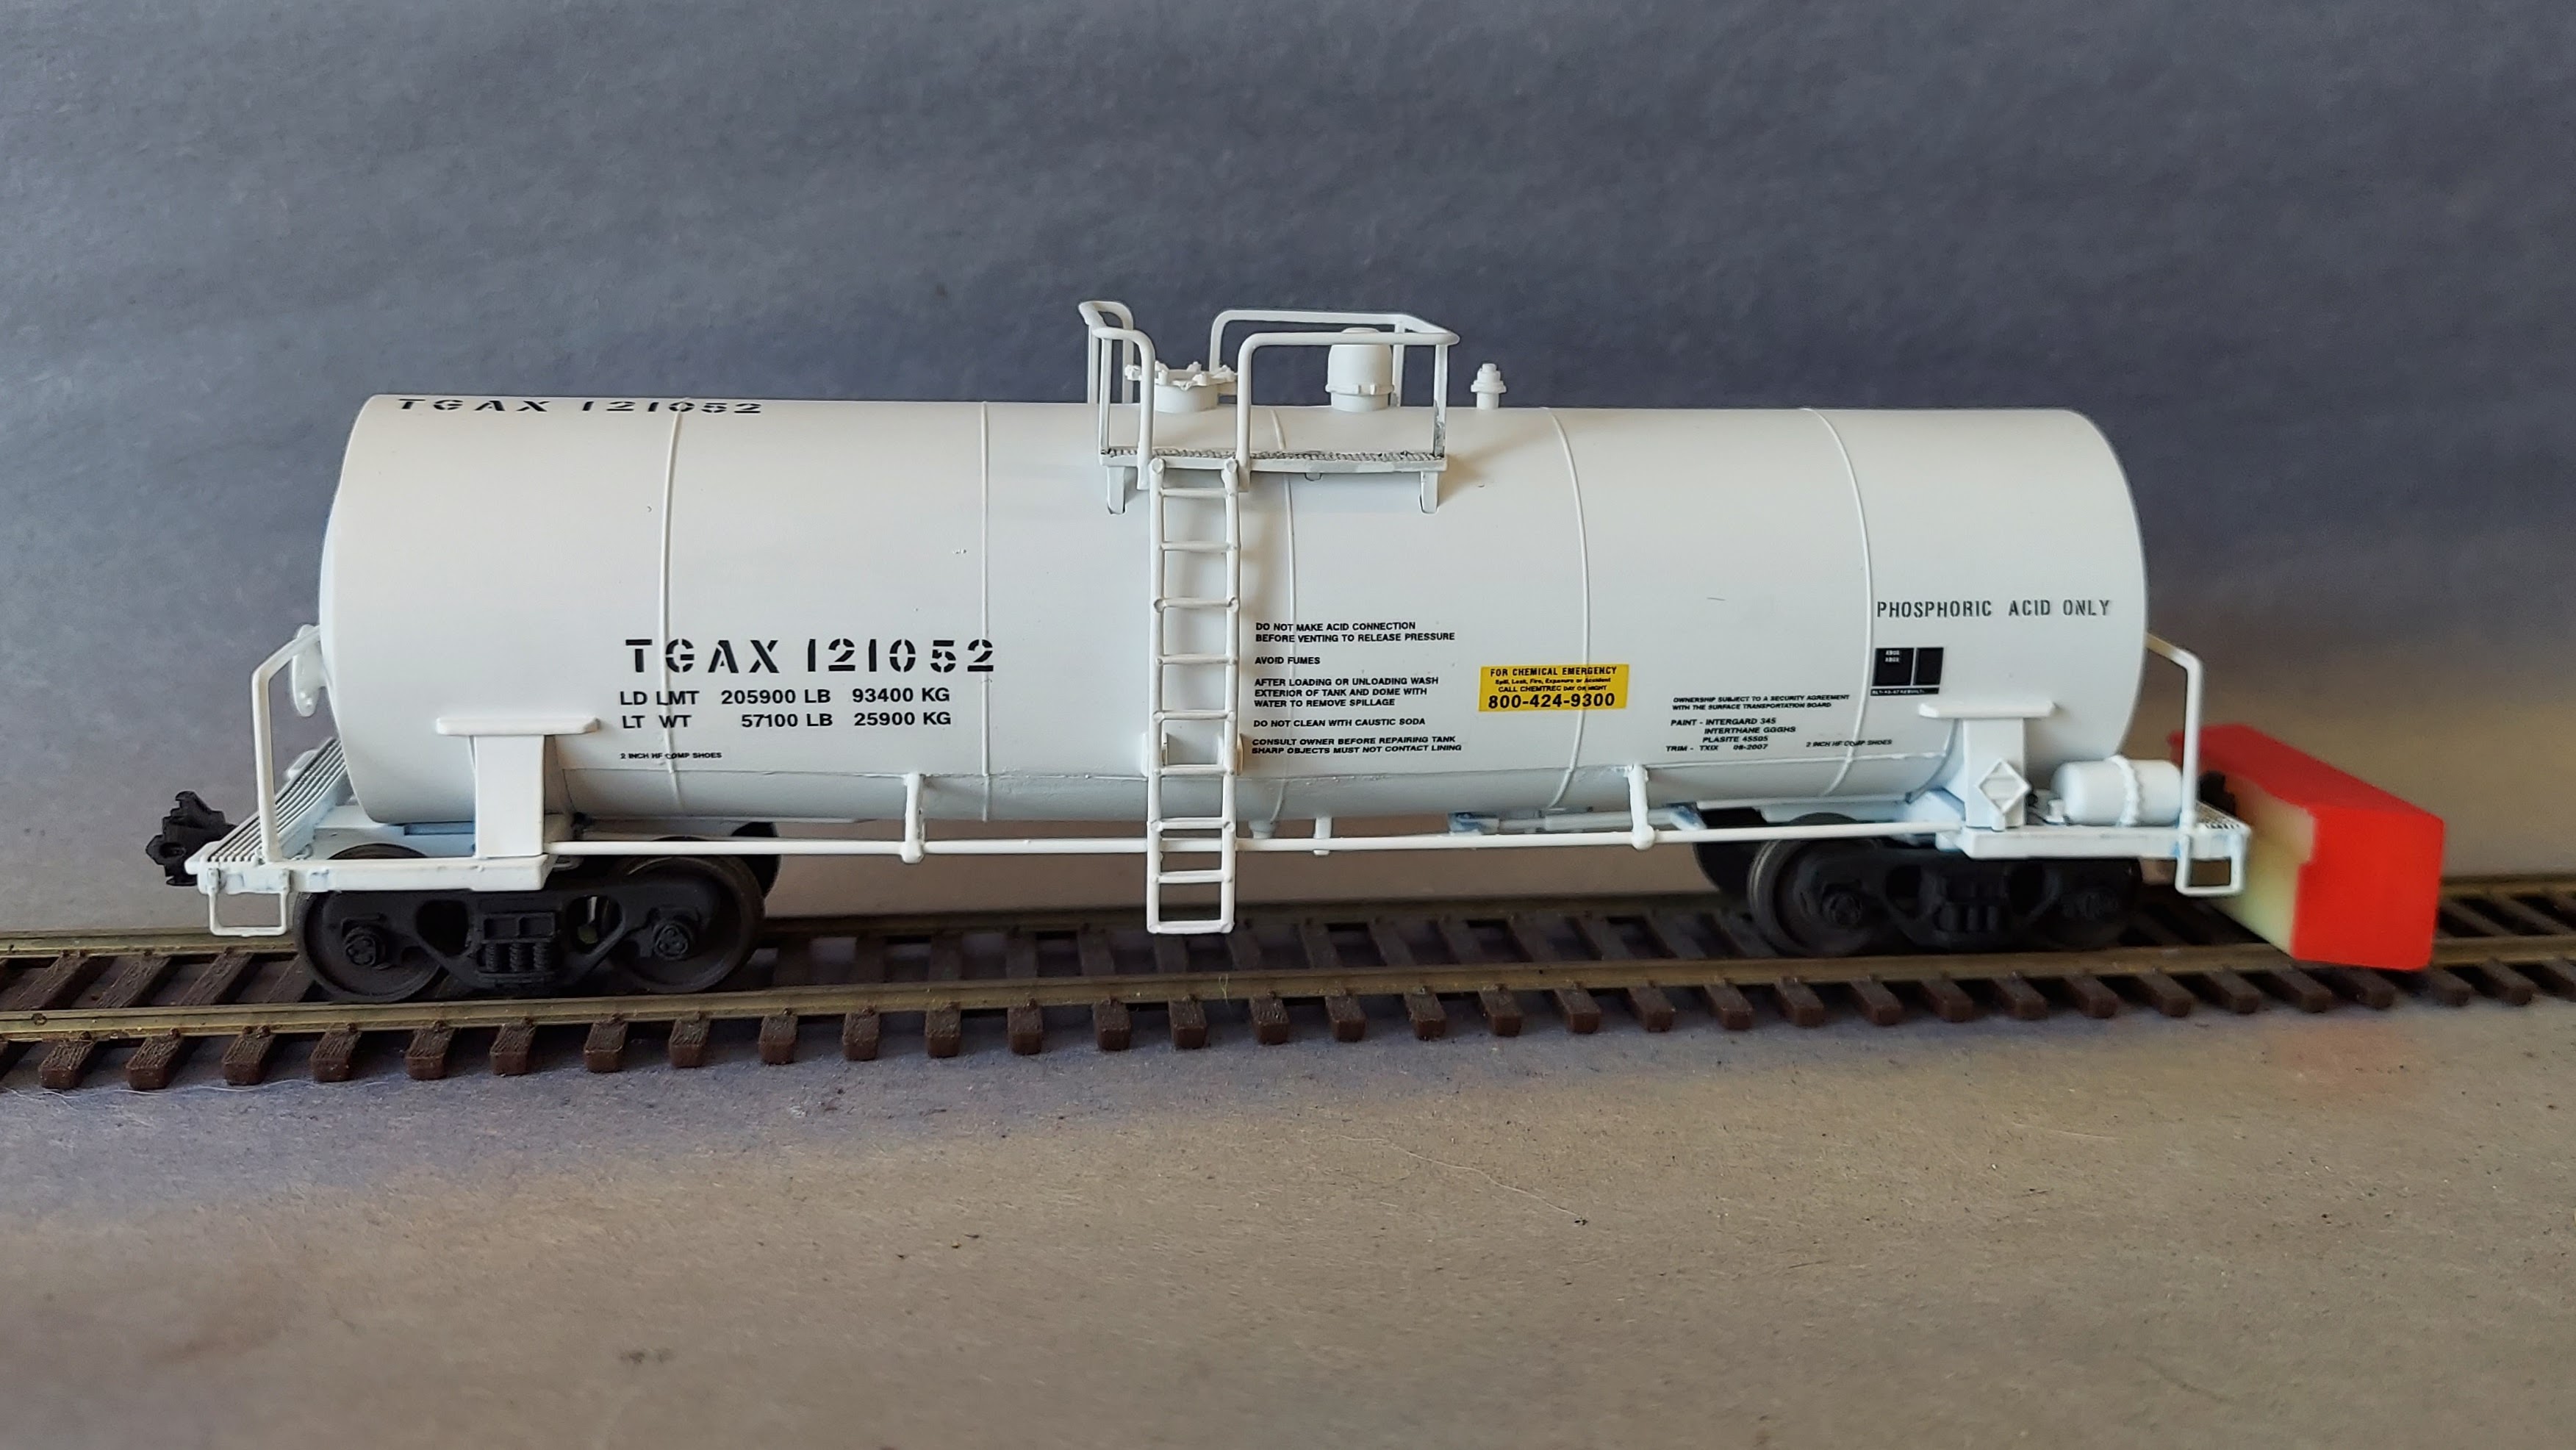 I didn't spring for any of the Tangent boxcars - not that I wasn't tempted, but because GM used the quad door version for the Arlington Assembly plant. As soon as I saw that announcement I told my friends I'm in trouble if Tangent does the quad door later on. Looks like it's only a matter of time. What I did do was buy a pair of Walthers boxcars in Milwaukee paint then removed the lettering but kept the paint. I was able to save the aluminum doors but I had to repaint the body. I used some Oddballs decals to turn these into Mopac boxcars. The plastic couplers are gone now since an order of Sergent couplers arrived after I took the photos. 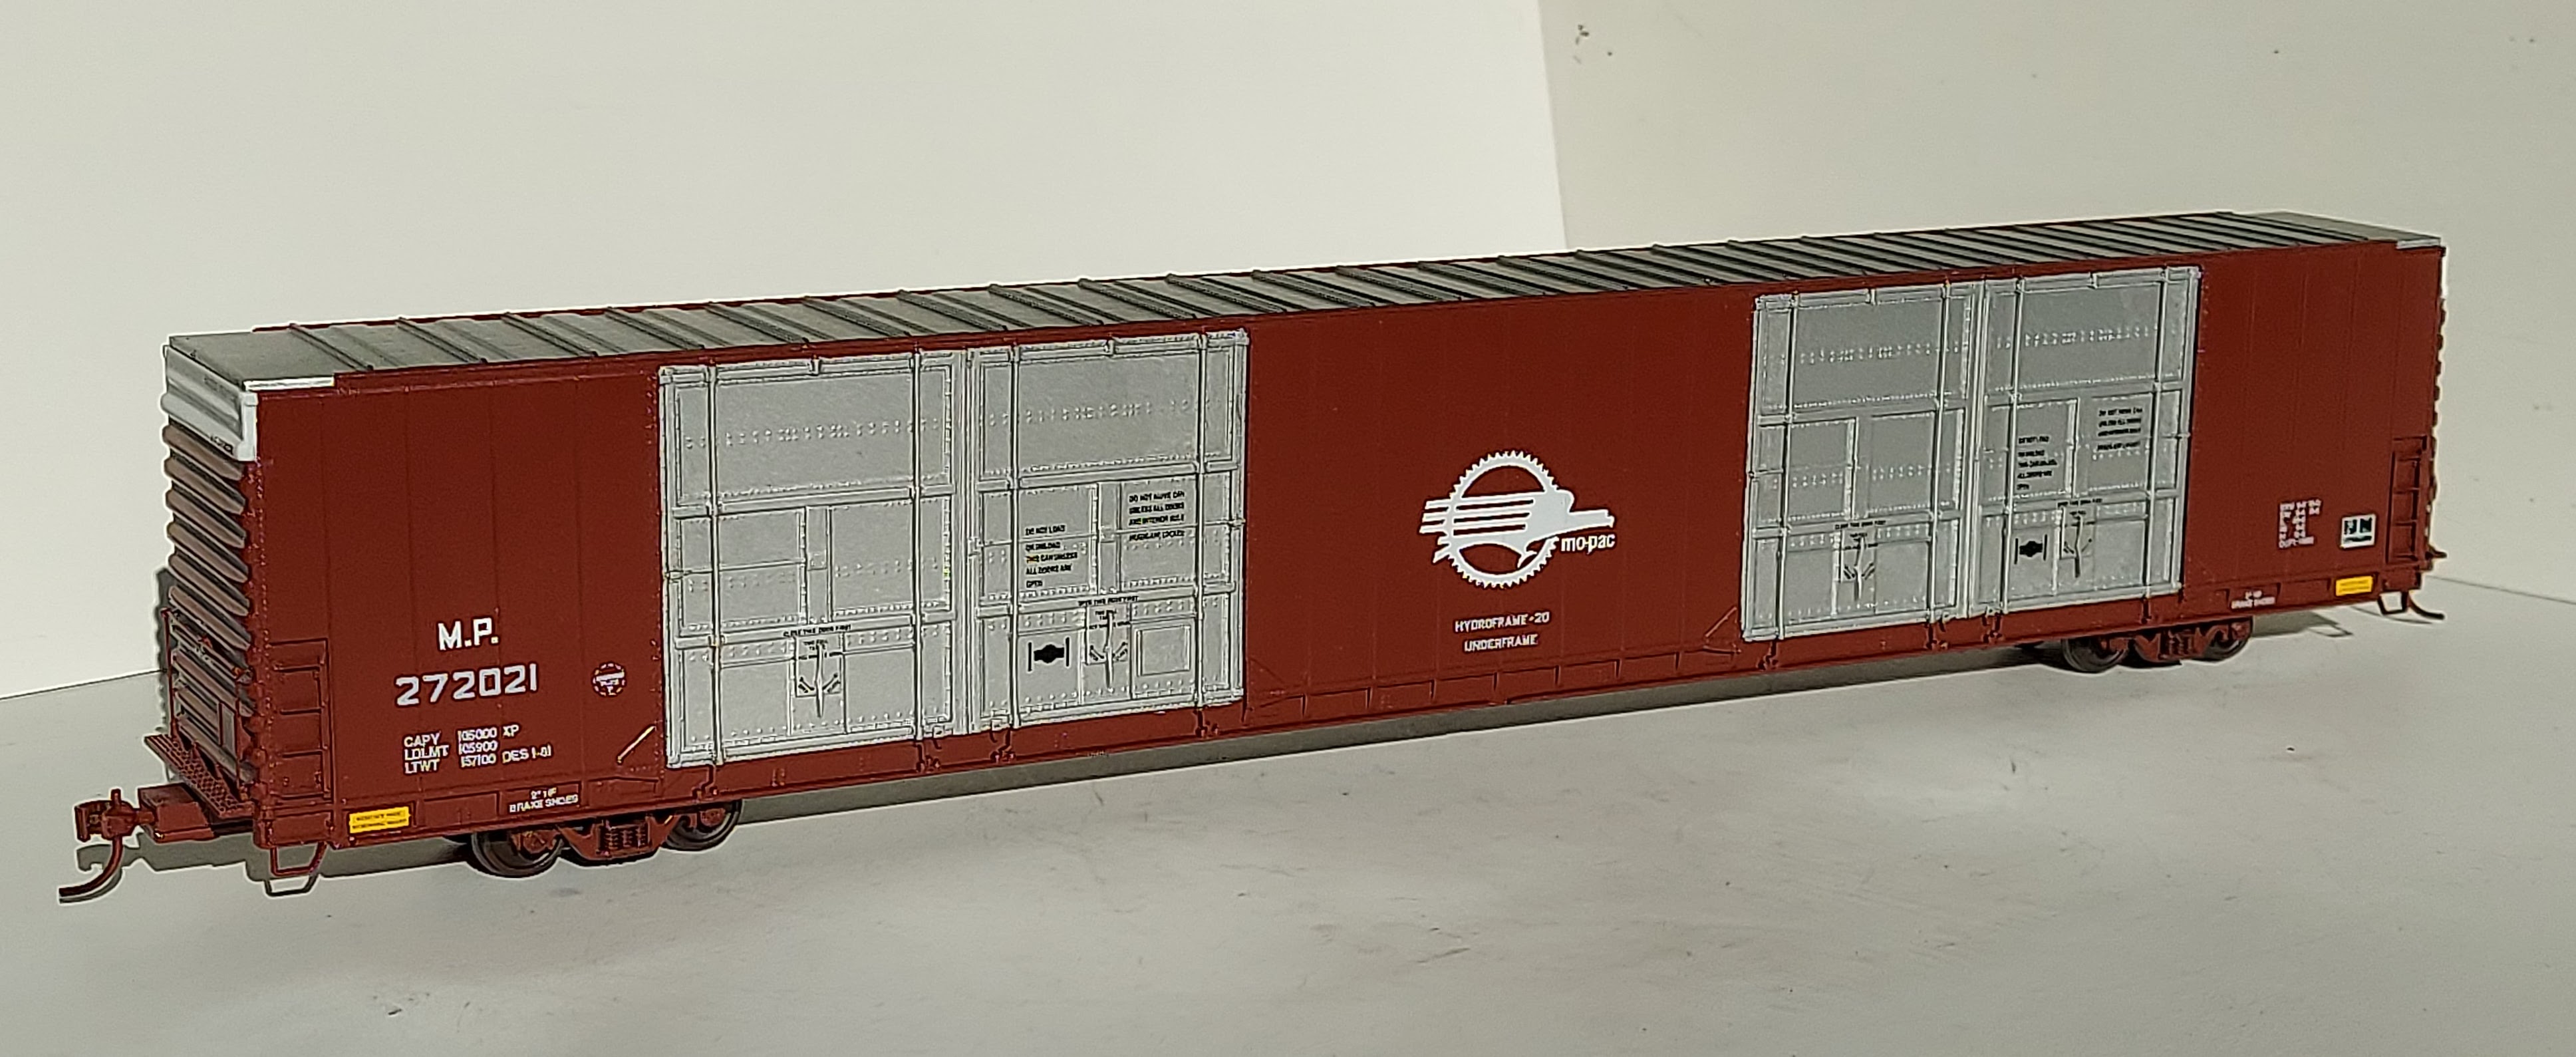 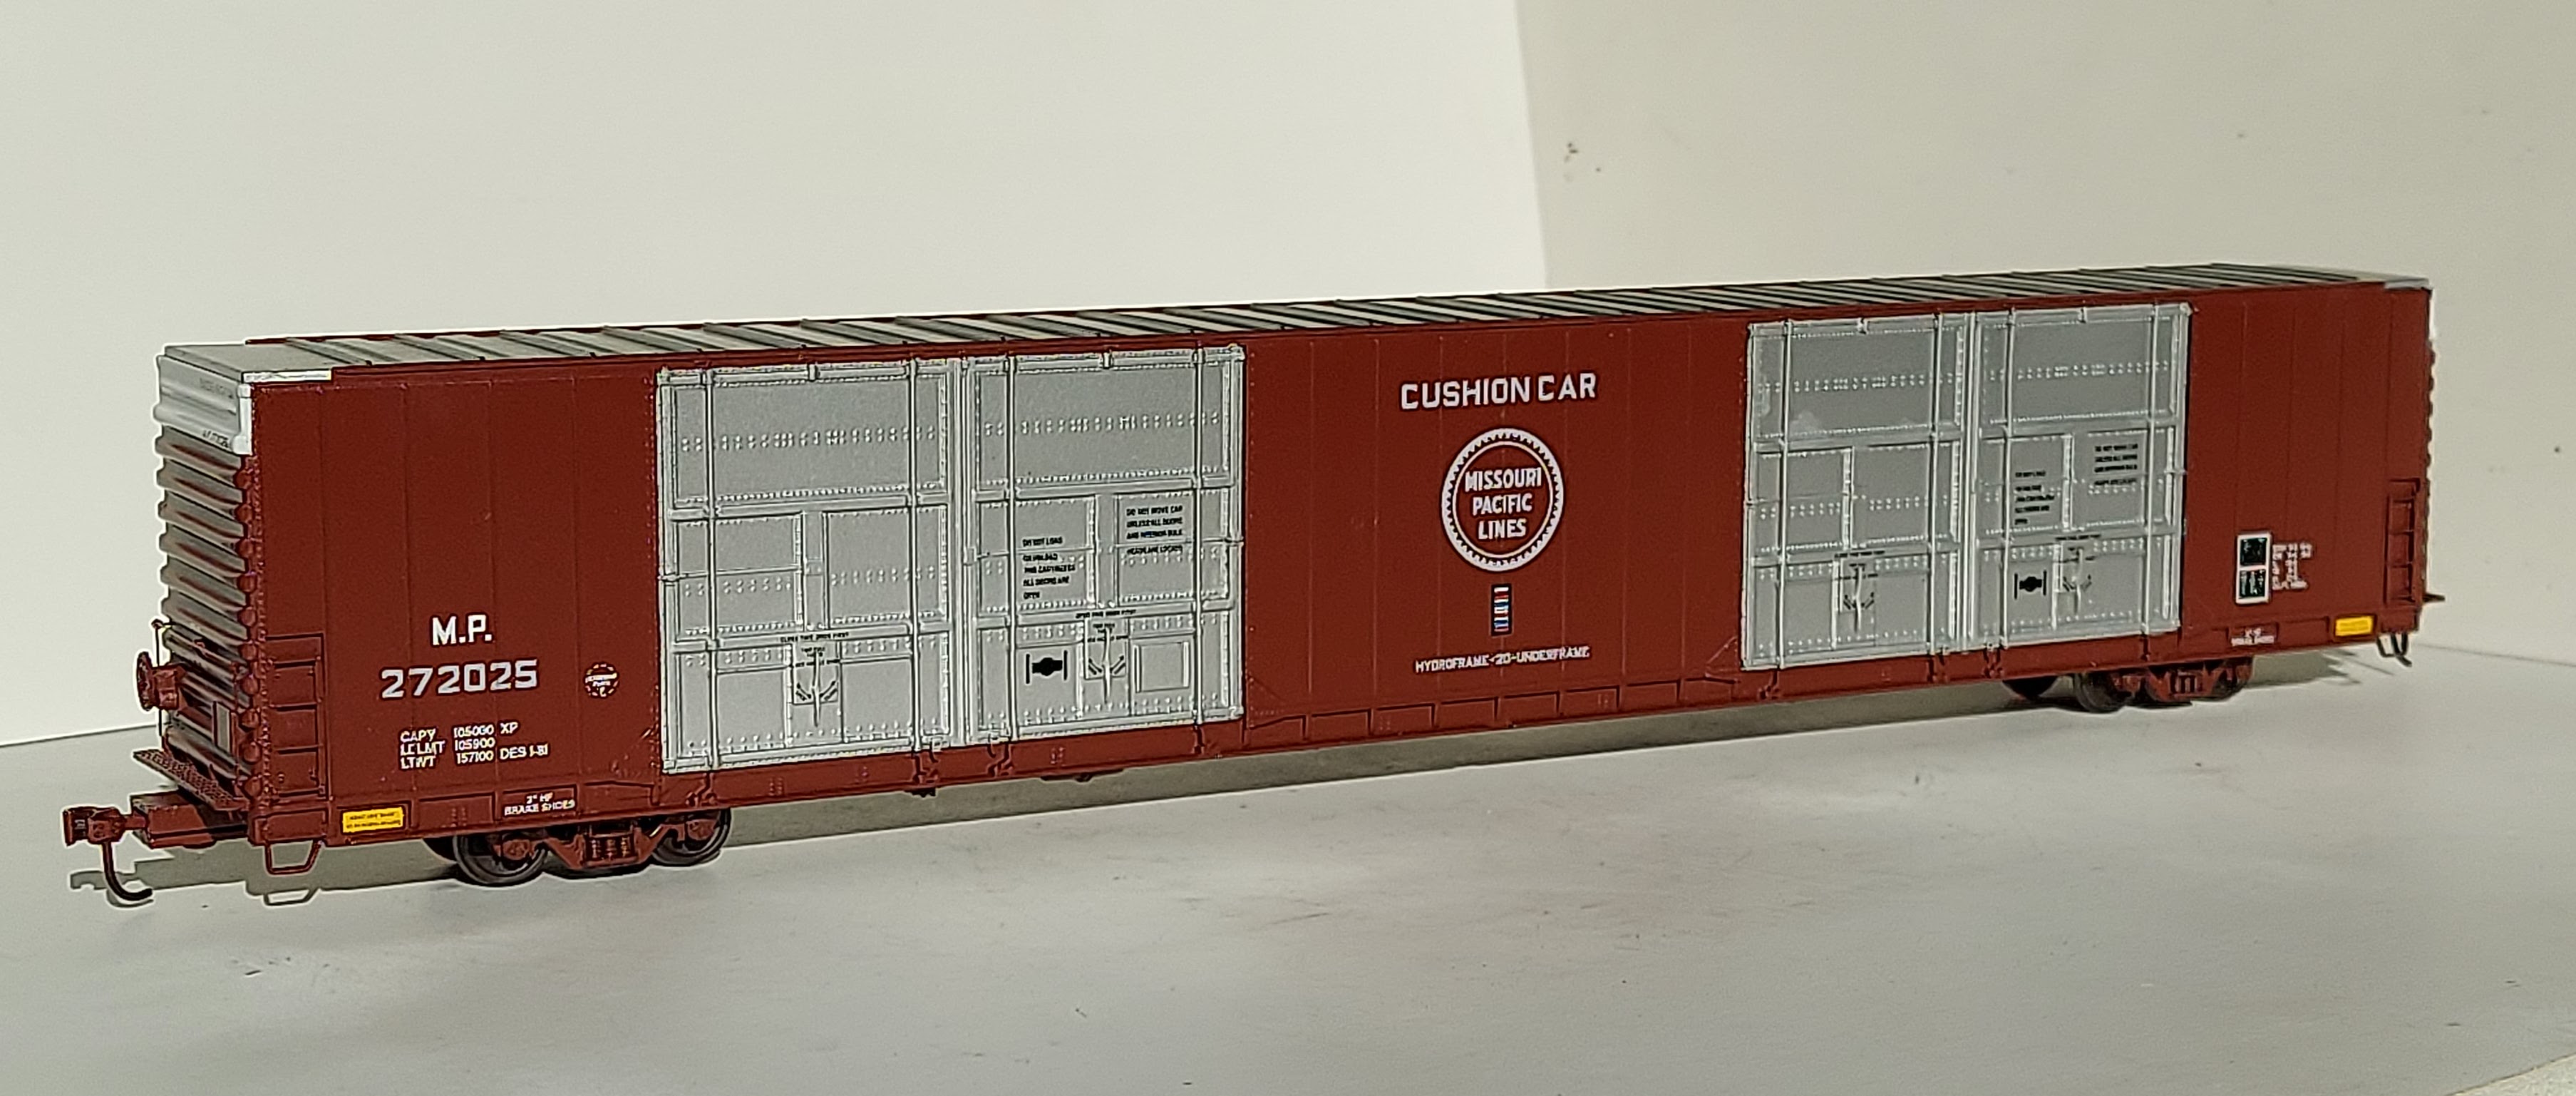 |
|
|
|
Post by csxt8400 on Aug 16, 2020 9:35:07 GMT -8
 Nice cars, Ryan. I was just looking at your parts cars last night. I'll need a few non-Greenvilles someday to break up the monotony so those Walthers cars intrigue me. Just not for the price that people are asking on Ebay.. Here's my Seaboard patch at about 90% finished. I need a little more detail to the ends and a few other small things here and there. You'll note in the second shot that the lettering and logo has some bubbling, luckily under indoor light that is much less prominent. Going a little lighter than a lot of these cars would look like during my 99-01 era, but that approach takes a lot less time and stress on recreating all the subtle effects of real world weathering. I think I'll be able to strike a happy medium.   |
|
|
|
Post by sd40dash2 on Aug 16, 2020 9:55:37 GMT -8
^ Outstanding modelling this week!
Ryan, I appreciate the excellent quality closeup photos. Your work highlights once again that draft gear parts are an area that could use some improvement and innovation in this hobby. Perhaps working cushions would be the next big innovation? If not working, at least bring RTR cars up to the detailing standards of the Moloco parts that have been around for quite some time. You totally sold me on those parts a few years back and they continue to make a huge difference to all sorts of models. Thanks for sharing.
As for the CSX hopper, I love the base weathering plus the patched area that clearly has less weathering. This suggests to the viewer that the car was a few years old when it received this patch. The weathering on the trucks and underframe are also excellent. Job well done here!
|
|
|
|
Post by fr8kar on Aug 16, 2020 10:41:41 GMT -8
That hopper looks real. Anyone looking should definitely click those to enlarge them.
You could do the bubbled lettering as a paint failure by chipping away the raised part of the decals. That might leave some crackle patterns behind. The new outlet gates make a big difference, but again with your hoppers the trucks sort of steal the show!
|
|
|
|
Post by TBird1958 on Aug 16, 2020 10:57:47 GMT -8
My only Atlas kaolin car, they're a bit new but within my time line so I just have this one on the roster. I rebuilt the ends and platform but didn't do anything with the draft gear, it was a difficult car to mask for paint.  This is the first tank car I kitbashed, it's an old MDC car, again rebuilt ends and platform.  |
|
|
|
Post by riogrande on Aug 16, 2020 13:21:50 GMT -8
I think there are Atlas Thiele with 2 panel stencils too.
|
|
|
|
Post by tom on Aug 17, 2020 4:04:03 GMT -8
Local freight dropped off a couple of interesting freight cars in my yard so I took a couple of photos: Here is a Northhampton & Bath boxcar made from a modified Intermountain 10' high boxcar and Mask Island decals:  And here is a P&LE/NYC boxcar modified from a Branchline boxcar kit and lettered with K4 and Microscale decals:  My yard has been "upgraded" recently by adding dirt/cinders to it (which I used fa inely sifted combination of dirt and degraded mulch). |
|
|
|
Post by ChessieFan1978 on Aug 17, 2020 4:11:38 GMT -8
|
|
|
|
Post by markfj on Aug 17, 2020 6:00:47 GMT -8
Nothing complete to share this week, but I am making progress on my Rail Yard Models X58 kit. Yeah, I know the Tangent model is available and can be bought for cheap these days (I got one for as low as $38.65 at the last show I attending in 2019). But this kit has been sitting in my closet for way too long so I finally decided to finish it. The only deviations I made from the instructions so far was to make the draft gear more serviceable by drilling and tapping a mounting hole. That extra styrene block is good insurance against accidentally stripping the threads in the resin body down the road.   Also I found the lower walkways to be a bit fiddly. There are mounting pins molded on the car end, but for the life of me I could not get the walkway tabs to fit over the pins. So remove the pins and drilled #80 holes to accept some .015” phosphor bronze wire. That worked exceptionally well as the walkways are very secure now.   One other modification was to add some brass strip stock to some of the roof walk supports. I checked a bunch of photos and apparently six of the supports are wider than the others.  That’s it for me. Thanks, Mark |
|
|
|
Post by thunderhawk on Aug 18, 2020 4:21:30 GMT -8
Decalling billboard lettering on cars with ribs is not fun. Not the best job here but I wanted to get my newest release in paint to make sure the decal set fits it correctly and note any errors or omissions. (I have to add the draft gear keys. First oversight noted already)  The beauty of these is the limited number of parts. The grab irons are part of the body on these like on the Lines West Thrall cabooses. Not separately applied yet free standing. Other than the stirrups, which are separately applied to avoid shipping damage, this kit has three parts; The body and the bolster/draft gear assemblies which include the brake appliances. The only reason the bolsters are not part of the body is to allow painting. Note the trainline running outside the hopper bays. All 3d printed. These will only be offered decorated if I can find a shop to pad print them. |
|
|
|
Post by fishbelly on Aug 18, 2020 5:12:03 GMT -8
Decalling billboard lettering on cars with ribs is not fun. Not the best job here but I wanted to get my newest release in paint to make sure the decal set fits it correctly and note any errors or omissions. (I have to add the draft gear keys. First oversight noted already) The beauty of these is the limited number of parts. The grab irons are part of the body on these like on the Lines West Thrall cabooses. Not separately applied yet free standing. Other than the stirrups, which are separately applied to avoid shipping damage, this kit has three parts; The body and the bolster/draft gear assemblies which include the brake appliances. The only reason the bolsters are not part of the body is to allow painting. Note the trainline running outside the hopper bays. All 3d printed. These will only be offered decorated if I can find a shop to pad print them. Give Accurail a call and see if they will pad print them for you. Unless of course they only work on their own product. Worth a call though. Very nice looking car. Where did Milwaukee use these cars? |
|
|
|
Post by markfj on Aug 18, 2020 5:15:20 GMT -8
Thunderhawk: Can we get a couple close-ups of the details. Looks really good so far!
Thanks, Mark
|
|
|
|
Post by gevohogger on Aug 18, 2020 5:19:28 GMT -8
Will that Milwaukee car be offered as a kit? Please say yes!
I remember the article in Model Railroader back in the day...
|
|
|
|
Post by thunderhawk on Aug 18, 2020 5:48:43 GMT -8
I was thinking I should start a separate thread for this but didn't since it's not the finished product. Perhaps Donnell can set it up. To answer some questions; They were used systemwide. Originally they were rebuilt for hauling coal in Indiana using 50 ton offset side hoppers built between 1938 and 1948. Capacity was only increased 5 tons but the appearance obviously changed a lot. Eventually the hauled coal, stone, sand, iron ore (unit trains), bentonite and broken glass from Milwaukee breweries. There were quite a number of variations of them and I am offering four of them for now. I'll get some more pics later as it is at the shop and I'm going to bed. I get more done working nights. Apparently a holdover from my engine service days when I rarely needed sunglasses. It is not a Tangent/Exactrail/Arrowhead quality car as the tech isn't quite there yet. However it is very presentable and allows me to produce cars that will never be mass produced. There are some tweeks I'm going to try that should clean it up even better. This car has several areas with shallow angles which are difficult with 3d printing. I'm pretty sure I can clean them up with some orientation changes however. Saying that, once painted and clearcoated the slight striations are not obvious unless one looks for them. Yes, they are offered as kits. I won't be offering them ready to run unless I can farm out the pad printing as mentioned above. Everything but couplers are included. Trucks are Kadee HGC 50ton Bettendorf's. Lines West Freight Cars
I remember the Stan Mailer article as well and referenced it a bit designing this. Surprising thing about that article is it never showed the car complete and painted. |
|
|
|
Post by Donnell Wells on Aug 18, 2020 7:11:18 GMT -8
I was thinking I should start a separate thread for this but didn't since it's not the finished product. Perhaps Donnell can set it up. To answer some questions; They were used systemwide. Originally they were rebuilt for hauling coal in Indiana using 50 ton offset side hoppers built between 1938 and 1948. Capacity was only increased 5 tons but the appearance obviously changed a lot. Eventually the hauled coal, stone, sand, iron ore (unit trains), bentonite and broken glass from Milwaukee breweries. There were quite a number of variations of them and I am offering four of them for now. I'll get some more pics later as it is at the shop and I'm going to bed. I get more done working nights. Apparently a holdover from my engine service days when I rarely needed sunglasses. It is not a Tangent/Exactrail/Arrowhead quality car as the tech isn't quite there yet. However it is very presentable and allows me to produce cars that will never be mass produced. There are some tweeks I'm going to try that should clean it up even better. This car has several areas with shallow angles which are difficult with 3d printing. I'm pretty sure I can clean them up with some orientation changes however. Saying that, once painted and clearcoated the slight striations are not obvious unless one looks for them. Yes, they are offered as kits. I won't be offering them ready to run unless I can farm out the pad printing as mentioned above. Everything but couplers are included. Trucks are Kadee HGC 50ton Bettendorf's. Lines West Freight Cars
I remember the Stan Mailer article as well and referenced it a bit designing this. Surprising thing about that article is it never showed the car complete and painted.
Donnell |
|
|
|
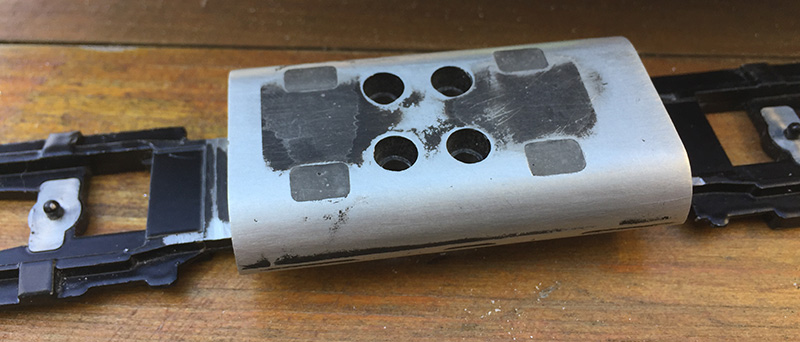
Post by tillamook on Aug 18, 2020 11:16:13 GMT -8
I'm currently building Portland & Western GP40 3002 based on an Athearn Blue Box GP40-2. At the moment I'm working on the frame. I filled the huge holes for the clips of the shell with epoxy and sanded the whole tank smooth:
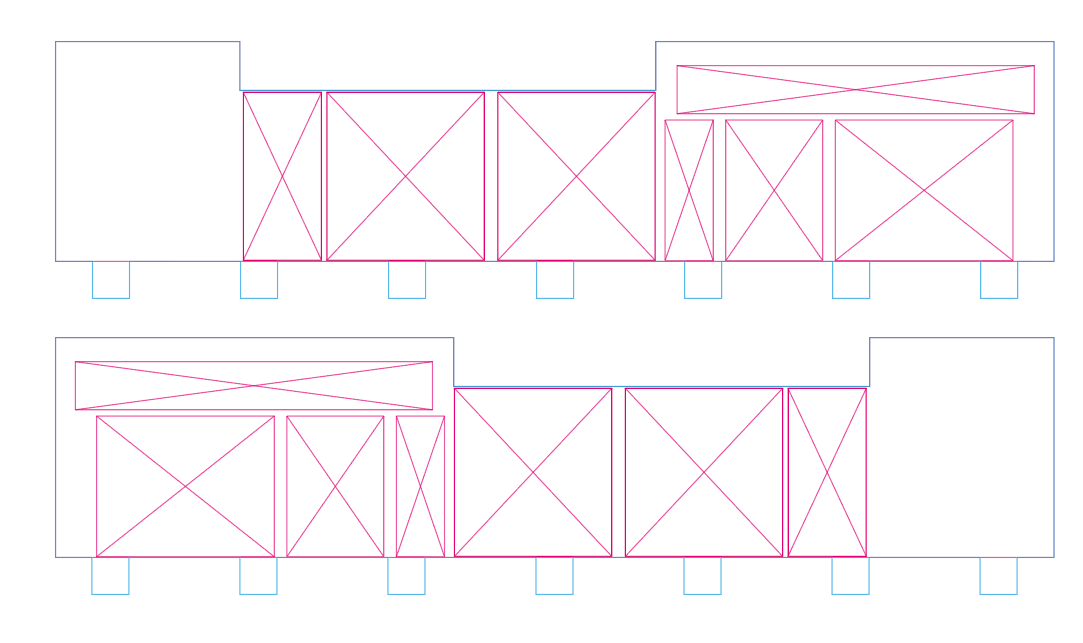
Backdating the -2 to a GP40 means modifying the doors below the radiator fan and replacing them with Cannon parts. I'm about to rebuild the whole shell above the walkways because the difference in depth and latch detail between the cannon parts and the Athearn BB doors would surely be obvious. And to be honest, when you plan on changing the turbo hatch, dust bin, inertial filters and radiator screens as well as the hood end, where's the point in the hassle to keep the shell intact?
I'm going to laminate the sides from two 0.5 mm styrene sheets cut with a plotter, the upper part already featuring the cut-outs for the doors, screens and blower housing. The base sheet has 5 mm wide tabs on the bottom to tooth into recesses filed in the walkway.
|
|
|
|
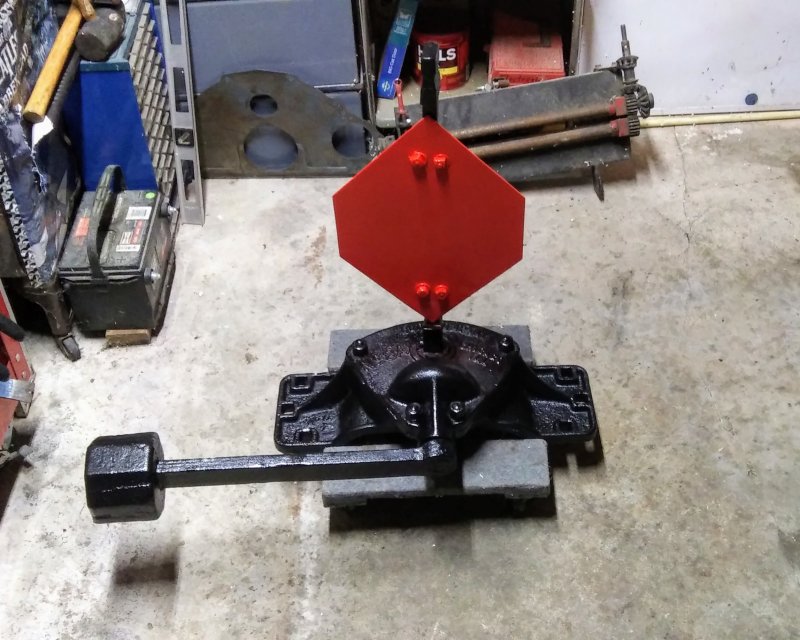
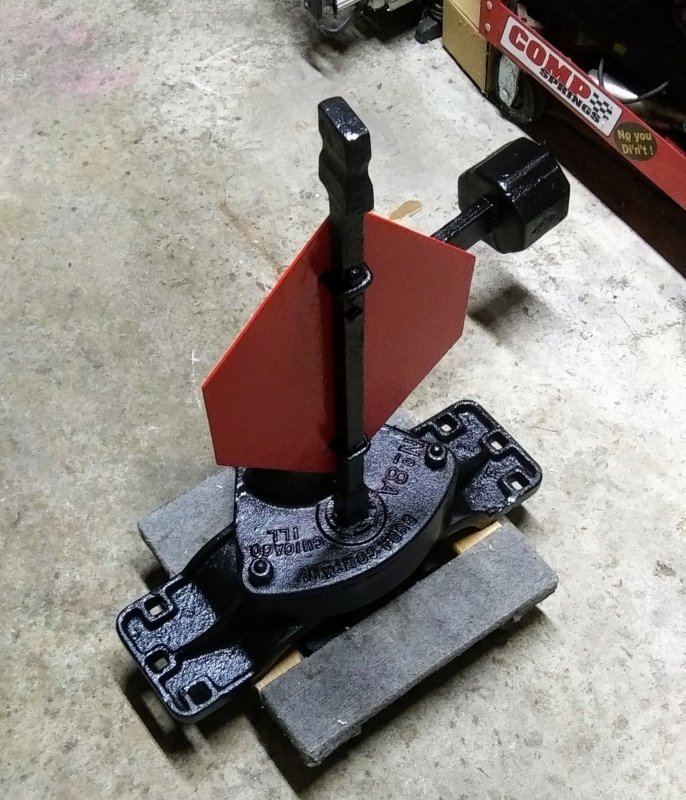
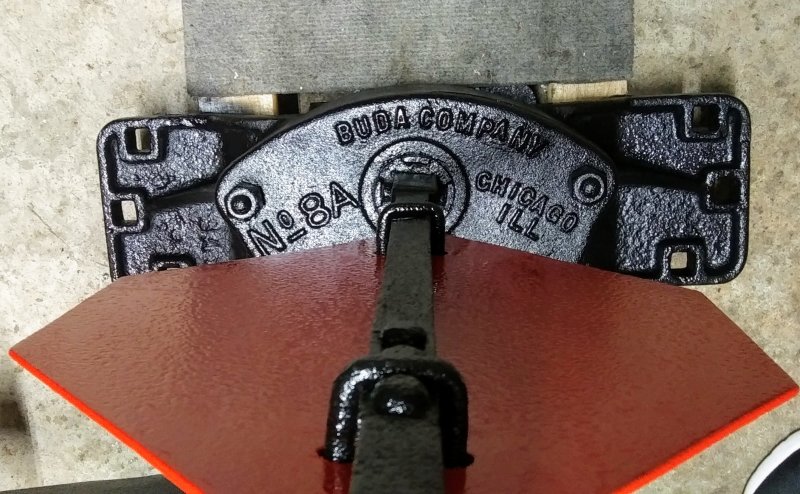
Post by edgecrusher on Aug 18, 2020 11:39:41 GMT -8
This is probably of a bit larger scale than we're used to around here.... but its a finished project none the less. Over the last few weekends I disassembled it, cleaned up everything and lightly sand blasted all the exterior castings. I re-greased all the inside "guts" and put everything back together. Paint was an industrial epoxy primer and black epoxy/enamel top coat. Now I just need to find a couple of decent looking ties to set it on.
|
|
|
|
Post by fr8kar on Aug 18, 2020 12:24:04 GMT -8
I'm currently building Portland & Western GP40 3002 based on an Athearn Blue Box GP40-2. At the moment I'm working on the frame. I filled the huge holes for the clips of the shell with epoxy and sanded the whole tank smooth: Backdating the -2 to a GP40 means modifying the doors below the radiator fan and replacing them with Cannon parts. I'm about to rebuild the whole shell above the walkways because the difference in depth and latch detail between the cannon parts and the Athearn BB doors would surely be obvious. And to be honest, when you plan on changing the turbo hatch, dust bin, inertial filters and radiator screens as well as the hood end, where's the point in the hassle to keep the shell intact? I'm going to laminate the sides from two 0.5 mm styrene sheets cut with a plotter, the upper part already featuring the cut-outs for the doors, screens and blower housing. The base sheet has 5 mm wide tabs on the bottom to tooth into recesses filed in the walkway.
Please consider documenting this in a build thread like Manny did with his caboose. I would be thrilled to follow along. |
|
|
|
Post by ncrc5315 on Aug 18, 2020 16:29:36 GMT -8
I'm currently building Portland & Western GP40 3002 based on an Athearn Blue Box GP40-2. At the moment I'm working on the frame. I filled the huge holes for the clips of the shell with epoxy and sanded the whole tank smooth: Backdating the -2 to a GP40 means modifying the doors below the radiator fan and replacing them with Cannon parts. I'm about to rebuild the whole shell above the walkways because the difference in depth and latch detail between the cannon parts and the Athearn BB doors would surely be obvious. And to be honest, when you plan on changing the turbo hatch, dust bin, inertial filters and radiator screens as well as the hood end, where's the point in the hassle to keep the shell intact? I'm going to laminate the sides from two 0.5 mm styrene sheets cut with a plotter, the upper part already featuring the cut-outs for the doors, screens and blower housing. The base sheet has 5 mm wide tabs on the bottom to tooth into recesses filed in the walkway.
Please consider documenting this in a build thread like Manny did with his caboose. I would be thrilled to follow along. Yes, please document, I have considered doing something similar, and a pattern to follow would be great. |
|
|
|
Post by csxt8400 on Aug 18, 2020 20:07:51 GMT -8
I was thinking I should start a separate thread for this but didn't since it's not the finished product. Perhaps Donnell can set it up. To answer some questions; They were used systemwide. Originally they were rebuilt for hauling coal in Indiana using 50 ton offset side hoppers built between 1938 and 1948. Capacity was only increased 5 tons but the appearance obviously changed a lot. Eventually the hauled coal, stone, sand, iron ore (unit trains), bentonite and broken glass from Milwaukee breweries. There were quite a number of variations of them and I am offering four of them for now. I'll get some more pics later as it is at the shop and I'm going to bed. I get more done working nights. Apparently a holdover from my engine service days when I rarely needed sunglasses. It is not a Tangent/Exactrail/Arrowhead quality car as the tech isn't quite there yet. However it is very presentable and allows me to produce cars that will never be mass produced. There are some tweeks I'm going to try that should clean it up even better. This car has several areas with shallow angles which are difficult with 3d printing. I'm pretty sure I can clean them up with some orientation changes however. Saying that, once painted and clearcoated the slight striations are not obvious unless one looks for them. Yes, they are offered as kits. I won't be offering them ready to run unless I can farm out the pad printing as mentioned above. Everything but couplers are included. Trucks are Kadee HGC 50ton Bettendorf's. Lines West Freight Cars
I remember the Stan Mailer article as well and referenced it a bit designing this. Surprising thing about that article is it never showed the car complete and painted. Would you be interested in producing other pig flats? NS, CNW, and CP come to mind for 80's and 90's intermodal oddities. www.rrpicturearchives.net/showPicture.aspx?id=2032264 |
|
|
|
Post by thunderhawk on Aug 18, 2020 22:42:48 GMT -8
The MKT pig flat was actually supplied by an individual that paid to have the CAD done on it by an outside freelancer. He's receiving kits of the MKT car in trade for the CAD files. A nice trade for all involved. However, the freelancer either wasn't a model railroader or didn't do a lot of design for 3d printing as I have had to modify it a fair bit. I haven't advertised that sort of service as yet. This particular one came up as a request from the modeler. However, it is something I have been considering for a while as it would work very well for those that can do CAD work themselves but don't want to mess around with buying printers and resin then learning what works and what doesn't. Better than Shapeways as well as the guy supplying the CAD files gets parts for free. Cars or detail parts. Saying all of that, yes I am open to making more of that type of car. I can go up to 60' cars in HO at this time. As far as me designing one it would be a ways down the road as I don't have time for the CAD work with everything else on my plate right now. |
|
|
|
Post by oldmuley on Aug 19, 2020 17:49:06 GMT -8
What scale is this? This is probably of a bit larger scale than we're used to around here.... but its a finished project none the less. Over the last few weekends I disassembled it, cleaned up everything and lightly sand blasted all the exterior castings. I re-greased all the inside "guts" and put everything back together. Paint was an industrial epoxy primer and black epoxy/enamel top coat. Now I just need to find a couple of decent looking ties to set it on.
|
|
|
|
Post by simulatortrain on Aug 20, 2020 3:46:57 GMT -8
Bowser hoppers sure look nice with new (printed ladders): 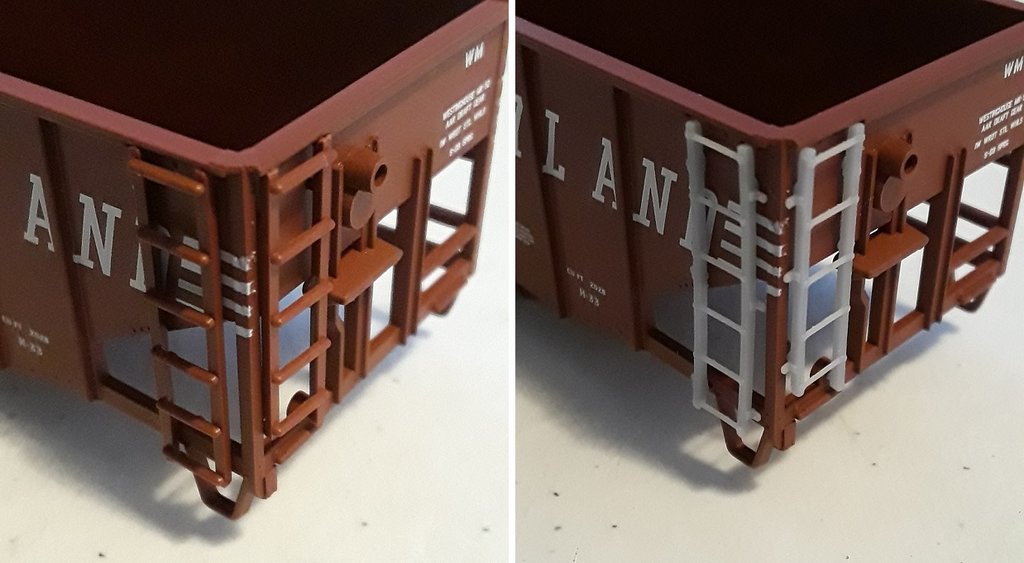 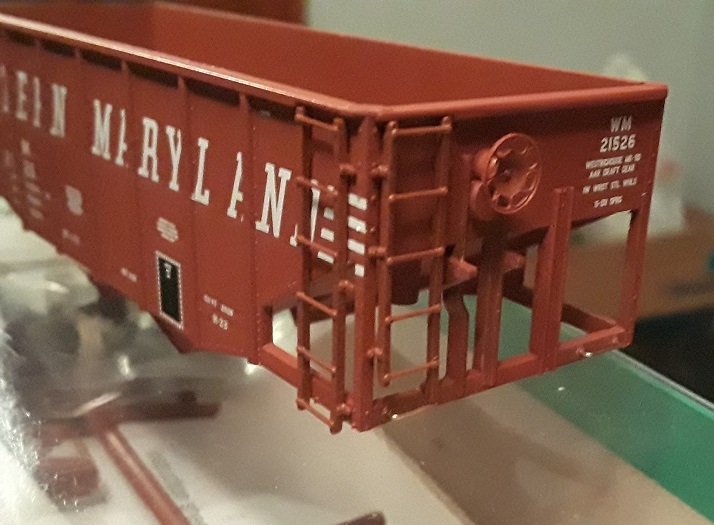 |
|
|
|
Post by riogrande on Aug 20, 2020 3:51:55 GMT -8
Those new ladders are a big improvement!
|
|
|
|
Post by edgecrusher on Aug 20, 2020 5:53:47 GMT -8
What scale is this? This is probably of a bit larger scale than we're used to around here.... but its a finished project none the less. Over the last few weekends I disassembled it, cleaned up everything and lightly sand blasted all the exterior castings. I re-greased all the inside "guts" and put everything back together. Paint was an industrial epoxy primer and black epoxy/enamel top coat. Now I just need to find a couple of decent looking ties to set it on.
Its 1:1, that was my attempt at humor. Its a legitimate, functioning (and heavy) CNW low switch stand. |
|
|
|
Post by kentuckysouthernrwy on Aug 20, 2020 9:09:23 GMT -8
Its 1:1, that was my attempt at humor. Its a legitimate, functioning (and heavy) CNW low switch stand. Careful there, young man. Humo(u)r has been all but outlawed these days. Leave it to the professionals.  |
|
|
|
Post by oldmuley on Aug 20, 2020 16:31:40 GMT -8
Its 1:1, that was my attempt at humor. Its a legitimate, functioning (and heavy) CNW low switch stand. Funny; because the switch stand looked a little "chunky", I assumed it might be a model of some type. I was going to comment on your amazing shop details like that awesome battery! |
|
|
|
Post by edgecrusher on Aug 21, 2020 6:01:54 GMT -8
Its 1:1, that was my attempt at humor. Its a legitimate, functioning (and heavy) CNW low switch stand. Funny; because the switch stand looked a little "chunky", I assumed it might be a model of some type. I was going to comment on your amazing shop details like that awesome battery! Yeah, I wish. My skills in HO scale certainly aren't to that point yet. Maybe someday. |
|