|
|
Post by ChessieFan1978 on Nov 22, 2020 8:58:49 GMT -8
|
|
|
|
Post by tom on Nov 22, 2020 9:53:27 GMT -8
A pair of Penn central F-units make a pickup at the local yard. Both locomotives are Highliner shells on Stewart chassis.  |
|
|
|
Post by TBird1958 on Nov 22, 2020 10:03:11 GMT -8
Some progress on my Cannon & Co SP B70-30 for the week. In Tamiya silver primer, masking the yellow door.  All painted and super glossy here, I used TCP Reefer Yellow and Tuscan Red, I resprayed the roof silver without masking, leaving some overspray.  Lettering/decals are pretty involved, here I have the decal sheet taped down and am cutting the lettering into small pieces to fit over the ribs of the car. I'm using a good photo reference from Morning Sun's Vol II of SP Freight cars to accurately get the lettering located correctly.  Here I' about 2/1/2 hours into one side of the car, decals are mostly Micro Scale with some HK bits as well, quite a ways to go here as there's lots of touch up to do around the ribs and the large white Southern Pacific lettering has yet to be applied. Have a great Sunday, Mark Hills  |
|
|
|
Post by packer on Nov 22, 2020 13:10:24 GMT -8
|
|
|
|
Post by TBird1958 on Nov 22, 2020 13:43:51 GMT -8
I did a few small things: Added some Moloco goodies to an Athearn RTR car. I’m probably gonna try out oils on this car. Gonna try to go for a similar look to the proto photo    I picked up some of those Moloco cut bars recently too, can't wait to use them on something! |
|
|
|
Post by kpack on Nov 22, 2020 13:54:04 GMT -8
Since no manufacturers seem to want to make dough off of these models, I'll continue to "roll my own". Car is a Walther's model, highly modified A-end, all molded on details removed everywhere and replaced with appropriate parts. All paint (besides primer) is cheap craft acrylics. Decals are Microscale. Car is only about 50% done. More detailing and weathering needs to be done.  -Kevin |
|
|
|
Post by csxt8400 on Nov 22, 2020 14:00:15 GMT -8
Since no manufacturers seem to want to make dough off of these models, I'll continue to "roll my own". Car is a Walther's model, highly modified A-end, all molded on details removed everywhere and replaced with appropriate parts. All paint (besides primer) is cheap craft acrylics. Decals are Microscale. Car is only about 50% done. More detailing and weathering needs to be done. -Kevin Another stunner. Can I ask how you get around with using the normal paints and regular water? I seem to get too much surface tension, or if I back off from the water it goes on too thick. Guess that's why I stick to oils. |
|
|
|
Post by nsc39d8 on Nov 22, 2020 15:03:21 GMT -8
So I finally got some work finished. A couple of Atlas Trainman hoppers I stripped and repainted to match two prototypes. 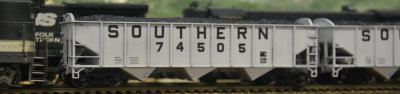 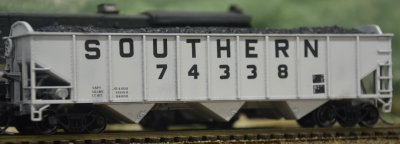 The pair together.  These were made to match two photos sent to the Southern Modeling group on Groups.IO. Painted with Scalecoat II UP hopper car gray and used various Microscale decals I had left over. Next is a long time project of a N&W RS36. Atlas Trainman model with a RS11 cab and short hood. This unit lasted till around the merger time in the 80's. 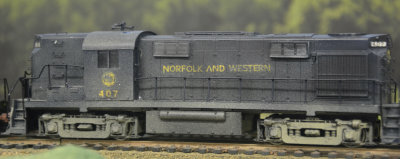 Next is a mate for the RS36, a N&W GP9 that lasted into the 80's as well. It got better treatment and got repainted while the RS36 never lost it's factory blue. Still needs some weathering. 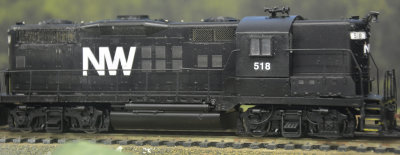 The locomotive pair. 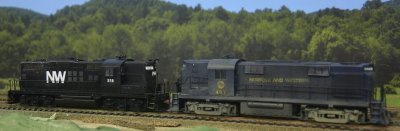 |
|
|
|
Post by ChessieFan1978 on Nov 22, 2020 15:38:35 GMT -8
Since no manufacturers seem to want to make dough off of these models, I'll continue to "roll my own". Car is a Walther's model, highly modified A-end, all molded on details removed everywhere and replaced with appropriate parts. All paint (besides primer) is cheap craft acrylics. Decals are Microscale. Car is only about 50% done. More detailing and weathering needs to be done. -Kevin Another stunner. Can I ask how you get around with using the normal paints and regular water? I seem to get too much surface tension, or if I back off from the water it goes on too thick. Guess that's why I stick to oils. Those poor cars are unfortunately a graffiti artists favorite, I've only seen one untouched in my 23 years of railroading. Sad to they are neat cars. |
|
|
|
Post by myoungwisc on Nov 22, 2020 16:00:16 GMT -8
Currently on the workbench, an HO scale representation of Wisconsin Central #6652. This is a collaboration project of sorts, having purchased the factory painted model from a friend of mine with the express purpose of updating this unit for use leading a 1995 era taconite train. As purchased, it already had a good weathering job and full accoutrements of DCC capabilities. Well, 18 months later with Circus City custom decals in hand, I've been able to get it to about 90%. Further weathering of the trucks, updating the handrail paint colors and installing ditch lights are left on the to do list...hopefully it won't be another 18 months to wrap this beast! For those interested in modeling their own 6652, I do have a couple decal sets left over.
|
|
|
|
Post by slowfreight on Nov 22, 2020 16:14:08 GMT -8
Currently on the workbench, an HO scale representation of Wisconsin Central #6652. This is a collaboration project of sorts, having purchased the factory painted model from a friend of mine with the express purpose of updating this unit for use leading a 1995 era taconite train. As purchased, it already had a good weathering job and full accoutrements of DCC capabilities. Well, 18 months later with Circus City custom decals in hand, I've been able to get it to about 90%. Further weathering of the trucks, updating the handrail paint colors and installing ditch lights are left on the to do list...hopefully it won't be another 18 months to wrap this beast! For those interested in modeling their own 6652, I do have a couple decal sets left over. This is fantastic. Looks the part and takes me back to watching the WC hammer diamonds in front of Deval tower at 40 per. |
|
|
|
Post by danpik on Nov 22, 2020 17:26:21 GMT -8
Here is one of the Cryotrans cars I did several years ago. 50'Athearn reefer as a stand-in  |
|
|
|
Post by kpack on Nov 22, 2020 18:19:16 GMT -8
Since no manufacturers seem to want to make dough off of these models, I'll continue to "roll my own". Car is a Walther's model, highly modified A-end, all molded on details removed everywhere and replaced with appropriate parts. All paint (besides primer) is cheap craft acrylics. Decals are Microscale. Car is only about 50% done. More detailing and weathering needs to be done. -Kevin Another stunner. Can I ask how you get around with using the normal paints and regular water? I seem to get too much surface tension, or if I back off from the water it goes on too thick. Guess that's why I stick to oils. I painted the white by mixing warm white and antique white, thinned with straight Windex. Thinned to consistency of skim milk, shot through the airbrush at 30 PSI. Multiple layers to build up the color. Sealed with Future floor finish, then masked and painted the orange using various shades of acrylics. I use straight tap water when I weather with acrylics. The trick is to build up in very thin layers. If I'm trying to build up color (as in the orange) I mix the paint with water until it's the consistency of milk, dab off most of it then apply a layer. Dry with a hair dryer and immediately hit it again. Several layers will get you the color you want. If I'm weathering something like the grime you see above, I typically get the area damp with water first (not much), then add very small amounts of very thinned color to it and allow the water to draw out the pigment and spread it without hard water lines. -Kevin |
|
|
|
Post by packer on Nov 22, 2020 18:32:06 GMT -8
Another stunner. Can I ask how you get around with using the normal paints and regular water? I seem to get too much surface tension, or if I back off from the water it goes on too thick. Guess that's why I stick to oils. I painted the white by mixing warm white and antique white, thinned with straight Windex. Thinned to consistency of skim milk, shot through the airbrush at 30 PSI. Multiple layers to build up the color. Sealed with Future floor finish, then masked and painted the orange using various shades of acrylics. I use straight tap water when I weather with acrylics. The trick is to build up in very thin layers. If I'm trying to build up color (as in the orange) I mix the paint with water until it's the consistency of milk, dab off most of it then apply a layer. Dry with a hair dryer and immediately hit it again. Several layers will get you the color you want. If I'm weathering something like the grime you see above, I typically get the area damp with water first (not much), then add very small amounts of very thinned color to it and allow the water to draw out the pigment and spread it without hard water lines. -Kevin I’m trying to do a weathering technique similar to that, but when I try it the paint tends to pool up into puddles |
|
|
|
Post by simulatortrain on Nov 22, 2020 18:38:26 GMT -8
Today I went on a decaling spree. The first victim was this RDG flat that I built at the beach a little while back (I'm not much for sitting outside all day.) I can't remember if I've ever shown it here, but it's pretty much a Proto gon floor, styrene, and rivet decals. If I did it again, I'd use the Tangent car, but I think this build predates it. My mind is having a rough time with it, seeing it like it's one of those Lionel flats that's clearly based on gon tooling. I'll be thankful for the rare opportunity to weather a flat that isn't black, brown, or oxide.  The other car is a Proto flat done as a WM F-20. Walthers did these, which baffles me: instead of doing the F-8/9 cars that actually match the car, they chose the one that's supposed to have the side handbrake. Anyway, I have a good stash of Proto flats and decided to roll my own. Its three F-8/9 cousins were decaled months ago. 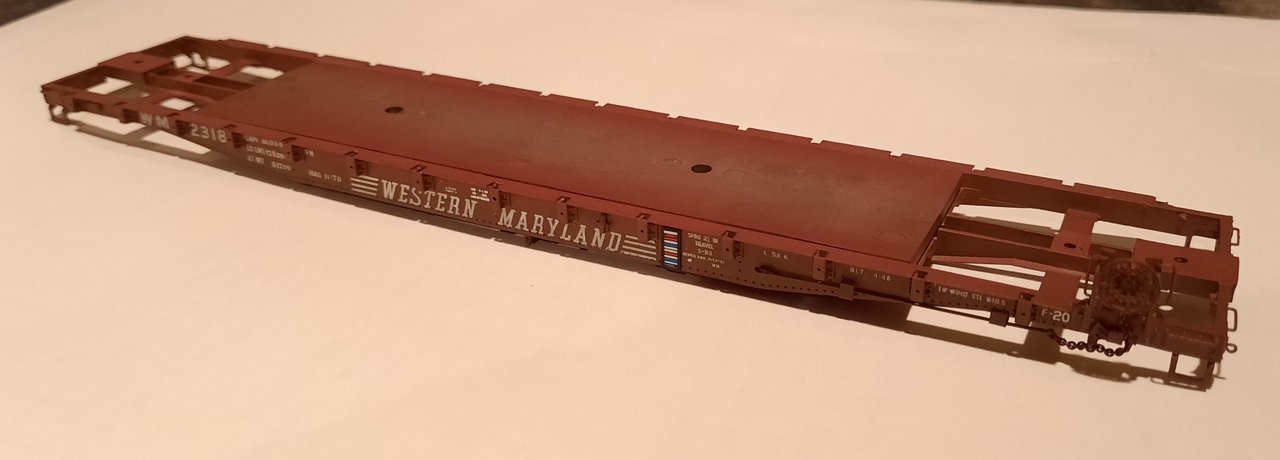 |
|
|
|
Post by dtinut on Nov 23, 2020 8:15:32 GMT -8
Adam, what decals did you use for the 2 flat cars - both look awesome!
|
|
|
|
Post by simulatortrain on Nov 23, 2020 10:12:28 GMT -8
Adam, what decals did you use for the 2 flat cars - both look awesome! Thanks!! For the RDG car I used some from the Reading Modeler (www.readingmodeler.info) and for the WM car I used some made by Jeff Adams of the WMRHS. They were meant for a different class of car, but with a little work they were good for this one too. I'm extremely thankful to have both, as you might have an easier time finding the holy grail than certain flatcar decals! |
|
|
|
Post by markfj on Nov 23, 2020 10:21:42 GMT -8
|
|
|
|
Post by kpack on Nov 23, 2020 10:36:16 GMT -8
I painted the white by mixing warm white and antique white, thinned with straight Windex. Thinned to consistency of skim milk, shot through the airbrush at 30 PSI. Multiple layers to build up the color. Sealed with Future floor finish, then masked and painted the orange using various shades of acrylics. I use straight tap water when I weather with acrylics. The trick is to build up in very thin layers. If I'm trying to build up color (as in the orange) I mix the paint with water until it's the consistency of milk, dab off most of it then apply a layer. Dry with a hair dryer and immediately hit it again. Several layers will get you the color you want. If I'm weathering something like the grime you see above, I typically get the area damp with water first (not much), then add very small amounts of very thinned color to it and allow the water to draw out the pigment and spread it without hard water lines. -Kevin I’m trying to do a weathering technique similar to that, but when I try it the paint tends to pool up into puddles Watch this. Might help you to visualize how much water/paint I'm using and the technique. -Kevin |
|
|
|
Post by oldmuley on Nov 24, 2020 17:21:54 GMT -8
Currently on the workbench, an HO scale representation of Wisconsin Central #6652. This is a collaboration project of sorts, having purchased the factory painted model from a friend of mine with the express purpose of updating this unit for use leading a 1995 era taconite train. As purchased, it already had a good weathering job and full accoutrements of DCC capabilities. Well, 18 months later with Circus City custom decals in hand, I've been able to get it to about 90%. Further weathering of the trucks, updating the handrail paint colors and installing ditch lights are left on the to do list...hopefully it won't be another 18 months to wrap this beast! For those interested in modeling their own 6652, I do have a couple decal sets left over.
PM Sent.... |
|
|
|
Post by fr8kar on Nov 24, 2020 18:25:58 GMT -8
I’m trying to do a weathering technique similar to that, but when I try it the paint tends to pool up into puddles Watch this. Might help you to visualize how much water/paint I'm using and the technique. -Kevin This is the most helpful video I've seen for using acrylics. And your results speak for themselves. Great job and thanks for sharing. |
|
|
|
Post by csxt8400 on Nov 24, 2020 18:56:18 GMT -8
Currently on the workbench, an HO scale representation of Wisconsin Central #6652. This is a collaboration project of sorts, having purchased the factory painted model from a friend of mine with the express purpose of updating this unit for use leading a 1995 era taconite train. As purchased, it already had a good weathering job and full accoutrements of DCC capabilities. Well, 18 months later with Circus City custom decals in hand, I've been able to get it to about 90%. Further weathering of the trucks, updating the handrail paint colors and installing ditch lights are left on the to do list...hopefully it won't be another 18 months to wrap this beast! For those interested in modeling their own 6652, I do have a couple decal sets left over.
Forgot to comment, but awesome job! Numberboards look great, too. I am working on two ore trains at the moment for my turn of the century focus, the Middletown train and the Fairfield, AL train. When Tangent does the KCPL Pullman-Standard 4000 cuft hoppers I plan on getting a handful to patch as SSAM. I have some decals in the works that you may be interested in as well. |
|
|
|
Post by myoungwisc on Nov 24, 2020 19:37:57 GMT -8
Forgot to comment, but awesome job! Numberboards look great, too. I am working on two ore trains at the moment for my turn of the century focus, the Middletown train and the Fairfield, AL train. When Tangent does the KCPL Pullman-Standard 4000 cuft hoppers I plan on getting a handful to patch as SSAM. I have some decals in the works that you may be interested in as well.
Thank you very much - Matt Welke with Circus City is a great graphic artist. Regarding the decals you have under development, I'm all ears! -Martin |
|


