|
|
Post by TBird1958 on Feb 14, 2021 11:57:00 GMT -8
I built this Rail Yard Models X79 a few years back, it's spent a fair bit of time on my buddy's layout, often in the "grocery pool", the prototype was assigned to Kellogg's in Battle Creek, MI. I recently brought the car home and added some of Nick Molo's new Stanray cut bars and rubber air hoses. I also added a little weathering to it in the form some oil washes, which warmed it up and gave it a bit more depth.   I also started a quick upgrade of an Atlas Evans Blue Island 52' RBL, while the overall model may not be "perfect" I'd say it's doubtful we'll ever get a model that is so I went ahead with this as an easy project. Our forum member Packer recently shared some pics of an Eel River RBL that he'd used bolsters from a Details West from to upgrade, that's the first part of my project, the second was to add some Moloco Evans cushioned draft gear , better walk over platforms from Plano, some additional brake gear, Moloco cur bars and some new steps. Here's the Atlas frame showing a notch I cut into the weight so truck mounting screws can pass.  Details West bolsters, cut from their frame, glued to the Atlas .  The original model, a bit clunky by today's standards.  The underside, with most of the new parts in place, the steps were made from Plano stainless steel fret scrap.  Here I've masked and painted the ends with some TCP B&M Blue, still have to mount the trucks and weather it very lightly as it'll be a very new car on my railroad.  Finally, a rare snow shot as Seattle doesn't usually get much, here I'm in my garage shooting past what will be Soldier Summit on my layout... Happy Valentine's Day! Mark Hills  |
|
|
|
Post by cr9617 on Feb 14, 2021 12:22:33 GMT -8
I picked this McKean kit up for $4.90 at a shop in Connecticut. When the guy was ringing me up, he asked if I had ever built one of these, to which I replied, "No, not in a long time." He laughed and said "there is a reason it's $5." While not as bad as it's reputation, the kit did require a lot of work. Most of it was cleaning up the pieces and squaring everything as the molding was pretty bad. I got rid of all the cast on details and built new ends from styrene and Tichy ladder rungs, and added wire grabs where necessary. I added moloco draft gear and scratch built the brake rigging from some spare parts I had and brass rod. It was painted with Tru Color CP action green cause that's what I happened to have that on hand and lettered with microscale decals. I re stenciled the car as the in the prototype photos complete with the uneven lettering. I built the load from scale 2x8s with a core of 3/8 x 1/4 basswood strip to save time and material. It was a fun build, but next time I'd probably just go with the Exactrail car.  IMG_4686[1] IMG_4686[1] by cr9617, on Flickr  IMG_4685[1] IMG_4685[1] by cr9617, on Flickr  20210126_110047[1] 20210126_110047[1] by cr9617, on Flickr  20210213_221935[1] 20210213_221935[1] by cr9617, on Flickr |
|
|
|
Post by TBird1958 on Feb 14, 2021 12:27:46 GMT -8
Without doubt, that is THE Best one of those Front Range cars has ever looked!
|
|
|
|
Post by Donnell Wells on Feb 14, 2021 13:02:41 GMT -8
I agree with Tbird! That flat car with lumber load looks great! I have several like it, and everytime I see someone enhance one of these older kits, it only deepens my admiration for the hobby! Thanks for sharing. BTW, Tbird, I see those staples man! I meant stirrups... Great minds think alike!
Donnell
|
|
|
|
Post by slowfreight on Feb 14, 2021 15:21:49 GMT -8
Without doubt, that is THE Best one of those Front Range cars has ever looked! I agree. I got really far on one, then got scared off by the end cages and replaced it with a cut-down Walthers. Lumber load looks fantastic. I see very few credible models of unwrapped lumber. |
|
|
|
Post by cr9617 on Feb 14, 2021 15:38:27 GMT -8
Thank you everyone!
|
|
|
|
Post by fr8kar on Feb 14, 2021 15:43:50 GMT -8
Without doubt, that is THE Best one of those Front Range cars has ever looked! I agree. I got really far on one, then got scared off by the end cages and replaced it with a cut-down Walthers. Lumber load looks fantastic. I see very few credible models of unwrapped lumber. Same here. As I was building mine and comparing it to a Walthers car I noticed the height was off. Maybe it was just the trucks I was using, I don't know. I just cut the Walthers car down, too. Mine never looked as good as the one here. Excellent work! After buying some Genesis ACF 4600 hoppers a few years ago I decided I'd never again need to bother with upgrading Accurail hoppers. After all, it costs about as much to upgrade the Accurail car with better trucks, wheels, running board, paint and decals. But these cars kept staring at back at me, and a bird in the hand.... So I grabbed a new Excel blade and started carving. Here's one car done alongside the next victim. I just finished the second one a little while ago. New running boards and decals are enroute.   |
|
|
|
Post by nebrzephyr on Feb 14, 2021 15:48:28 GMT -8
I picked this McKean kit up for $4.90 at a shop in Connecticut. When the guy was ringing me up, he asked if I had ever built one of these, to which I replied, "No, not in a long time." He laughed and said "there is a reason it's $5. Really nice. Curious what you used for the “banding”. Bob |
|
|
|
Post by cr9617 on Feb 14, 2021 16:05:21 GMT -8
I picked this McKean kit up for $4.90 at a shop in Connecticut. When the guy was ringing me up, he asked if I had ever built one of these, to which I replied, "No, not in a long time." He laughed and said "there is a reason it's $5. Really nice. Curious what you used for the “banding”. Bob 1/64 chart tape, I got it on Amazon.  20210214_185342[1] 20210214_185342[1] by cr9617, on Flickr I agree. I got really far on one, then got scared off by the end cages and replaced it with a cut-down Walthers. Lumber load looks fantastic. I see very few credible models of unwrapped lumber. Same here. As I was building mine and comparing it to a Walthers car I noticed the height was off. Maybe it was just the trucks I was using, I don't know. I just cut the Walthers car down, too. Mine never looked as good as the one here. Excellent work! The car is definately high, I used Kadee 100 ton trucks and had to ditch the the 158s for a pair of overset 142s which unfortunately dont have the scale head. |
|
|
|
Post by csxt8400 on Feb 14, 2021 16:11:46 GMT -8
Great car projects this week, all. 9617, we have gone a few weeks now without boxcars from you. Everything okay??  |
|
|
|
Post by cr9617 on Feb 14, 2021 16:27:15 GMT -8
Great car projects this week, all. 9617, we have gone a few weeks now without boxcars from you. Everything okay?? haha I'll be back to the regularly scheduled programming after I wrap up that wright trak N6a caboose that its the background of the last pic. |
|
|
|
Post by myoungwisc on Feb 14, 2021 16:29:44 GMT -8
Besides a number of Cannon boxcar kits, most of my recent purchases have been commercially available fully decorated and detailed models. Recently, I decided to embark on an effort to bring a number of "vintage" models up to current standards essential and some road-specific details and prototypical paint. Starting with a few models purchased in my teens, I've slowly been churning through the lot. A few under construction: Delaware & Hudson Bethlehem 52' gondola. Roundhouse kit with styrene representing sheet steel installed over the ends, Detail Associates brake system, Plano brake platform, Athearn ladders, Moloco draft gear and Tangent grab irons. Decals by Highball Graphics:  Illinois Central 50' boxcar. Branchline kit with A-Line stirrups and Kohlberg decals. I made an attempt at pre-weathering the decals to give them a faded appearance, however I'm not really happy with how they turned out, now seeing them under the scrutiny of a photograph:  Conrail Greenville 60' boxcar. Con Cor kit with all factory details removed. Holes plugged with styrene and third party ladders installed. Plano platforms, Details West draft gear and coupler cut bar equipment, Athearn brake wheel, styrene bits to represent stiffeners installed over the trucks. I've applied Microsol to the decals a half dozen times but the larger than life rivets are being difficult. Lessons learned, probably should have replaced them with Archer rivets!:  BN FMC 50' boxcar (Ex- ESLJ) Atlas RTR with two shades of yellow decals. Draft gear replaced with Moloco parts, decals by Microscale:  |
|
|
|
Post by sd40dash2 on Feb 14, 2021 16:47:18 GMT -8
^ I would sure love to see photos of that orange caboose (incl the underframe) in the background.  |
|
|
|
Post by canrailfan on Feb 14, 2021 18:05:38 GMT -8
The car is definately high, I used Kadee 100 ton trucks and had to ditch the the 158s for a pair of overset 142s which unfortunately dont have the scale head. Those 100 ton trucks look like they have 36" wheels. Would changing to 33" wheels make the car look better? Just a suggestion since many older HO freight cars came with 33" wheels no matter what was on the prototype. |
|
|
|
Post by Colin 't Hart on Feb 15, 2021 1:02:39 GMT -8
The car is definately high, I used Kadee 100 ton trucks and had to ditch the the 158s for a pair of overset 142s which unfortunately dont have the scale head. Those 100 ton trucks look like they have 36" wheels. Would changing to 33" wheels make the car look better? Just a suggestion since many older HO freight cars came with 33" wheels no matter what was on the prototype. These cars had 36" wheels, as shown on this end view of an ExactRail model of the same prototype: 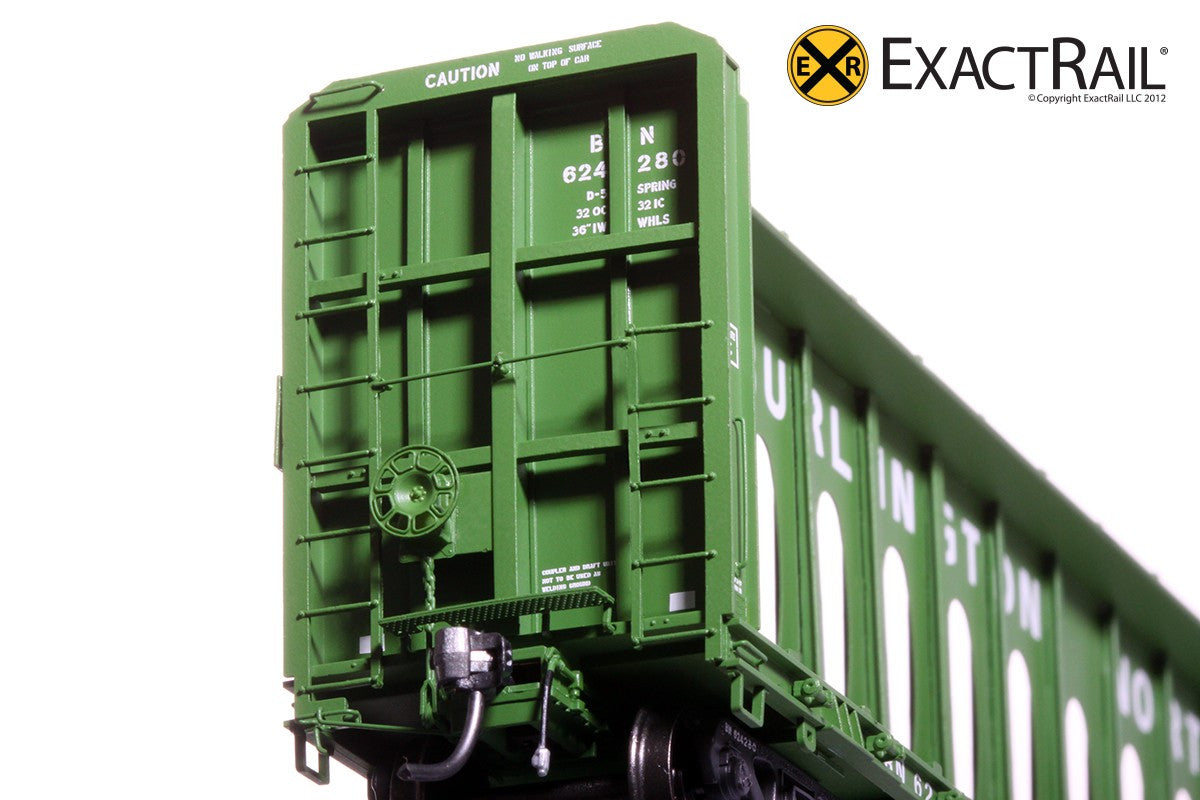 |
|
|
|
Post by Colin 't Hart on Feb 15, 2021 1:06:24 GMT -8
Fantastic! One question: how do you get those ladder rungs so straight and even? Is there a trick to it? |
|
|
|
Post by markfj on Feb 15, 2021 3:39:13 GMT -8
CR9617, great job on that McKean kit!
I made the mistake of getting a couple McKean kits at a show back in 2012. They cost about five or six bucks a piece so I thought it would be some cheap fun. Wrong! The center beam kit (same as yours, but different road name) was a mess of warped and deformed parts. Nothing useful in detail parts either. I did give it the old college try, but it and the 4 bay ACF (equally as bad) were eventually sent to the dump.
Thanks, Mark J.
|
|
|
|
Post by Donnell Wells on Feb 15, 2021 6:00:07 GMT -8
CR9617, great job on that McKean kit! I made the mistake of getting a couple McKean kits at a show back in 2012. They cost about five or six bucks a piece so I thought it would be some cheap fun. Wrong! The center beam kit (same as yours, but different road name) was a mess of warped and deformed parts. Nothing useful in detail parts either. I did give it the old college try, but it and the 4 bay ACF (equally as bad) were eventually sent to the dump. Thanks, Mark J. The painted kits were hard to put together due to the extra thickness that the paint added to the slots and tabs. I ended up scraping the paint down to bare plastic, and things worked out a bit better. Donnell |
|
|
|
Post by cr9617 on Feb 15, 2021 6:24:27 GMT -8
Fantastic! One question: how do you get those ladder rungs so straight and even? Is there a trick to it? Not really. The holes were there already for the plastic grabs that come with the kit so I just covered those holes with one end of the tichy rung and eyed up the rest. |
|
|
|
Post by gevohogger on Feb 15, 2021 6:29:37 GMT -8
My "favorite" feature of the old McKean / Front Range kits were the way the instructions sometimes bore no resemblance to the actual plastic parts in the kit. It was as if they wrote up the instructions months later, not remembering how the parts went together or how they were attached!
I never built a center beam, but I built a lot of boxcars and covered hoppers. Some were certainly better than others.
|
|
|
|
Post by simulatortrain on Feb 15, 2021 6:39:55 GMT -8
Just about finished up my WM F7B: 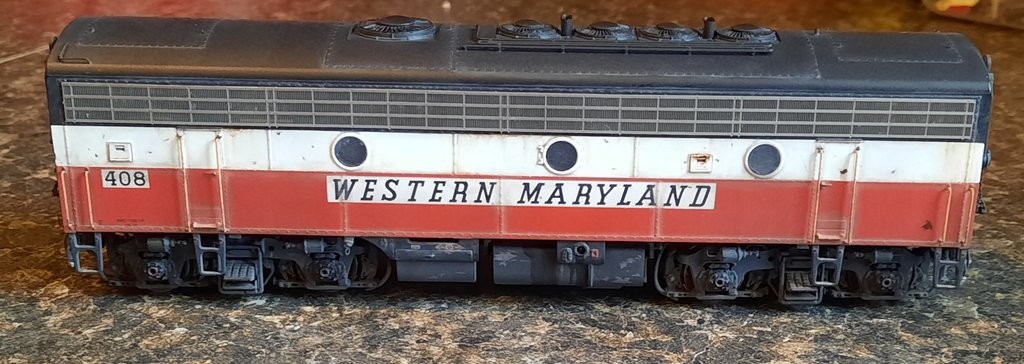 I also made some good progress on this interior: 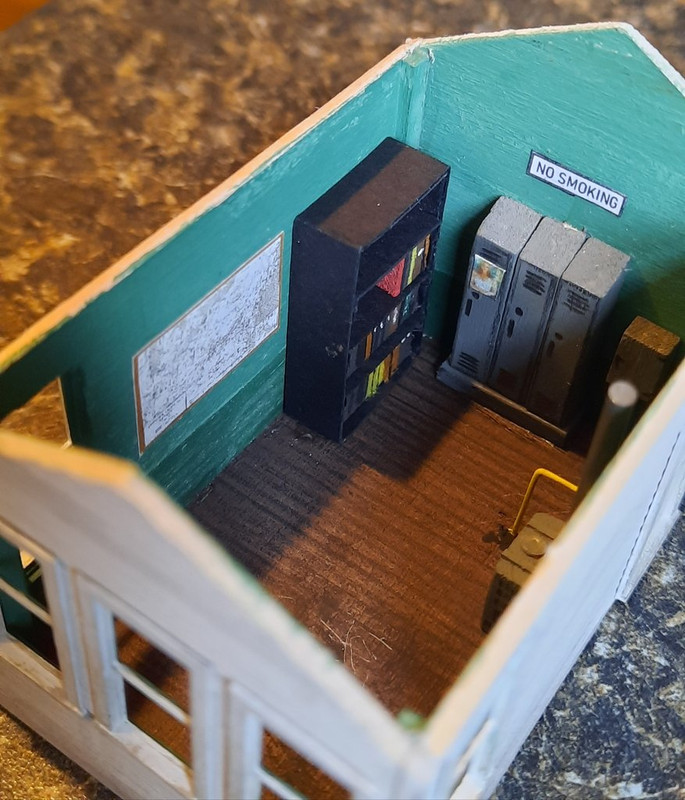 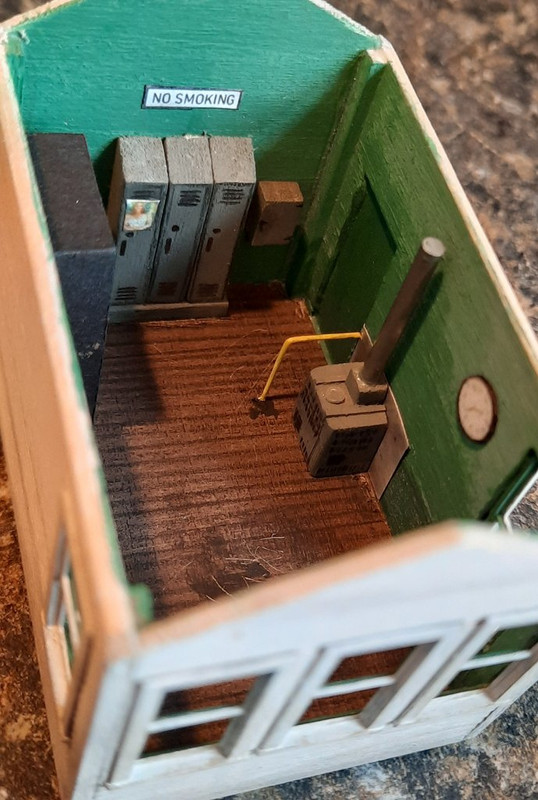 |
|
|
|
Post by canrailfan on Feb 15, 2021 12:56:49 GMT -8
Those 100 ton trucks look like they have 36" wheels. Would changing to 33" wheels make the car look better? Just a suggestion since many older HO freight cars came with 33" wheels no matter what was on the prototype. These cars had 36" wheels, as shown on this end view of an ExactRail model of the same prototype: Yes, I know the prototype cars had 36" wheels (most 100 ton cars do). But there was a time when many model manufacturers made all their models with 33" wheels; wheel diameter wasn't considered an important detail. I was curious to know if 33" wheels would resolve the couple height issue. That would indicate that the original kit wheels were undersized. |
|
|
|
Post by csxt8400 on Feb 15, 2021 15:36:35 GMT -8
Well, although it's not finished, I am getting itchy having all these "almosts" sitting around waiting to post. And now with a more compelling display than raw wood or black table tops. Now I just need to take off the window screen... 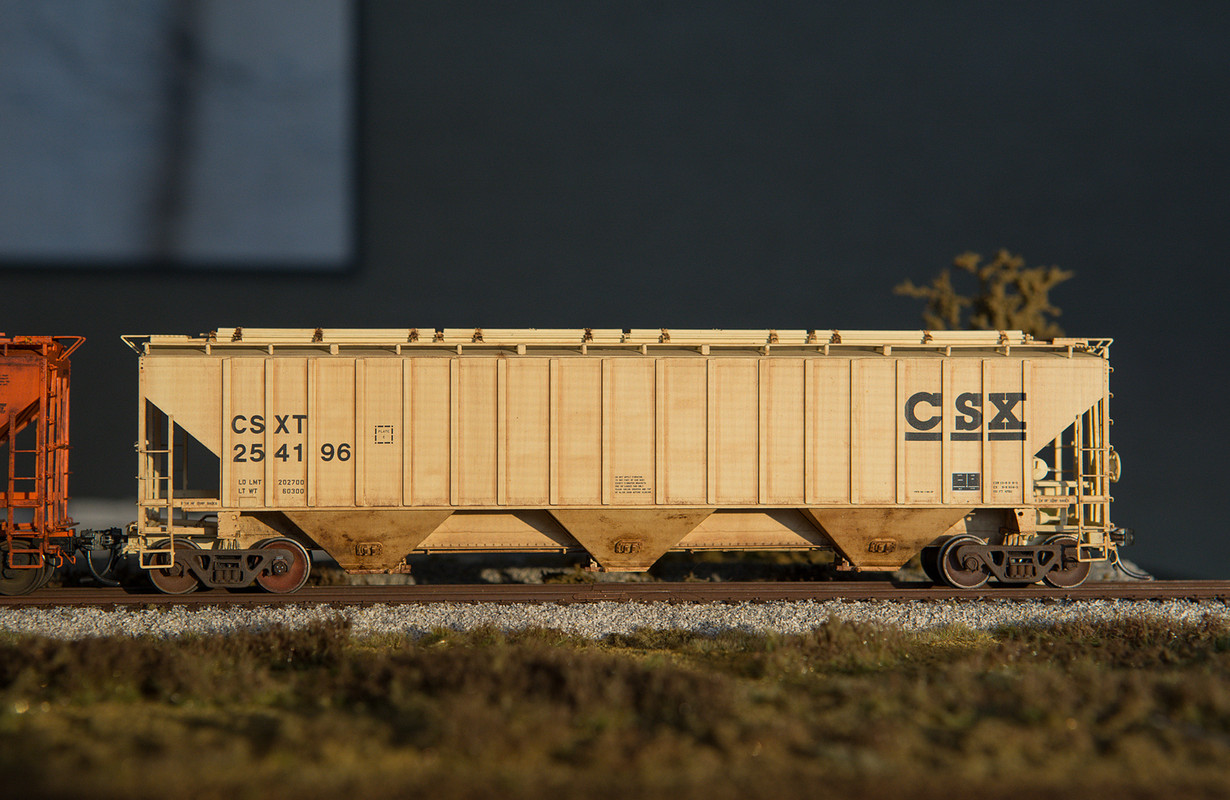 And then a little photoshop to increase my diorama sizing for a less-than-stellar focus job. 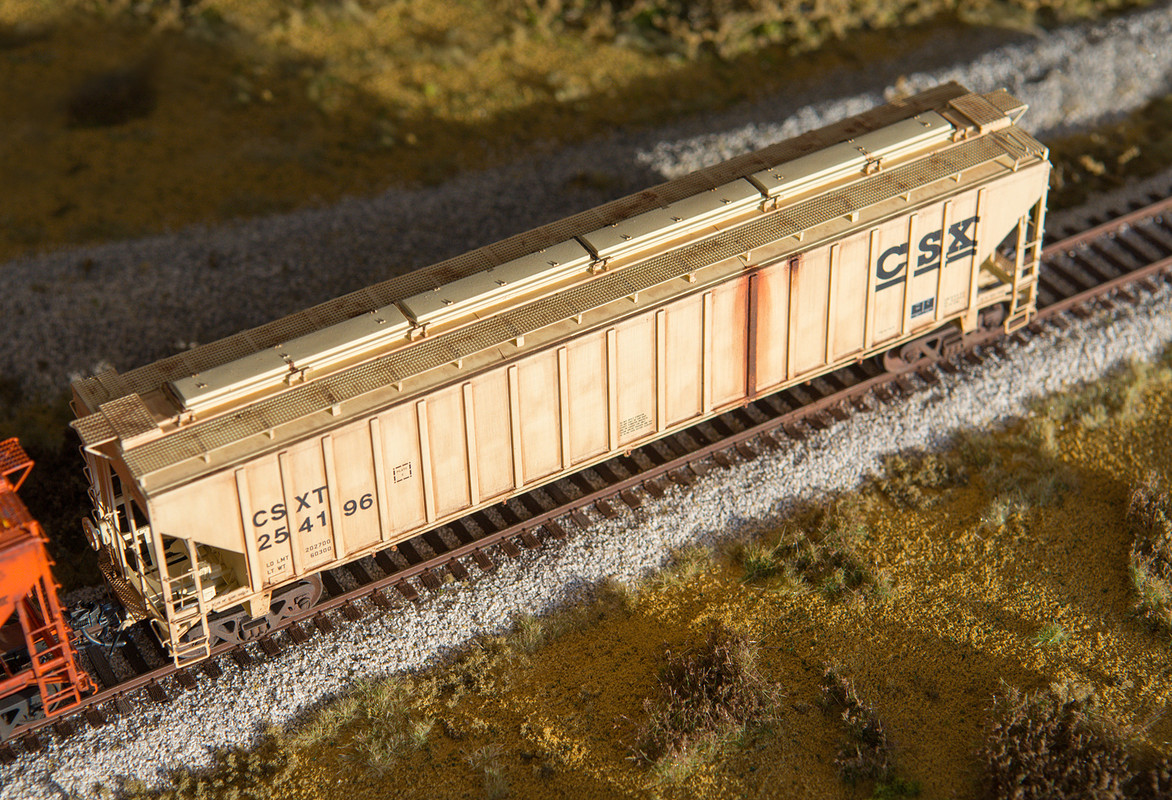 As is usual, I still need to weather the ends to tone down the freshness, along with address the couplers and their magnetic abilities. Great stuff this week, all. |
|
|
|
Post by nsfantodd on Feb 15, 2021 17:50:21 GMT -8
Just about finished up my WM F7B: I also made some good progress on this interior: Your B unit weathering is great, looks like in service unit that is not overdone. Great job! Your interior is nicely done also. |
|
jako
Junior Member

Posts: 73
|
Post by jako on Feb 16, 2021 0:51:41 GMT -8
Hello people Pictures of my finished fracking tank
Greetings Sven
|
|