|
|
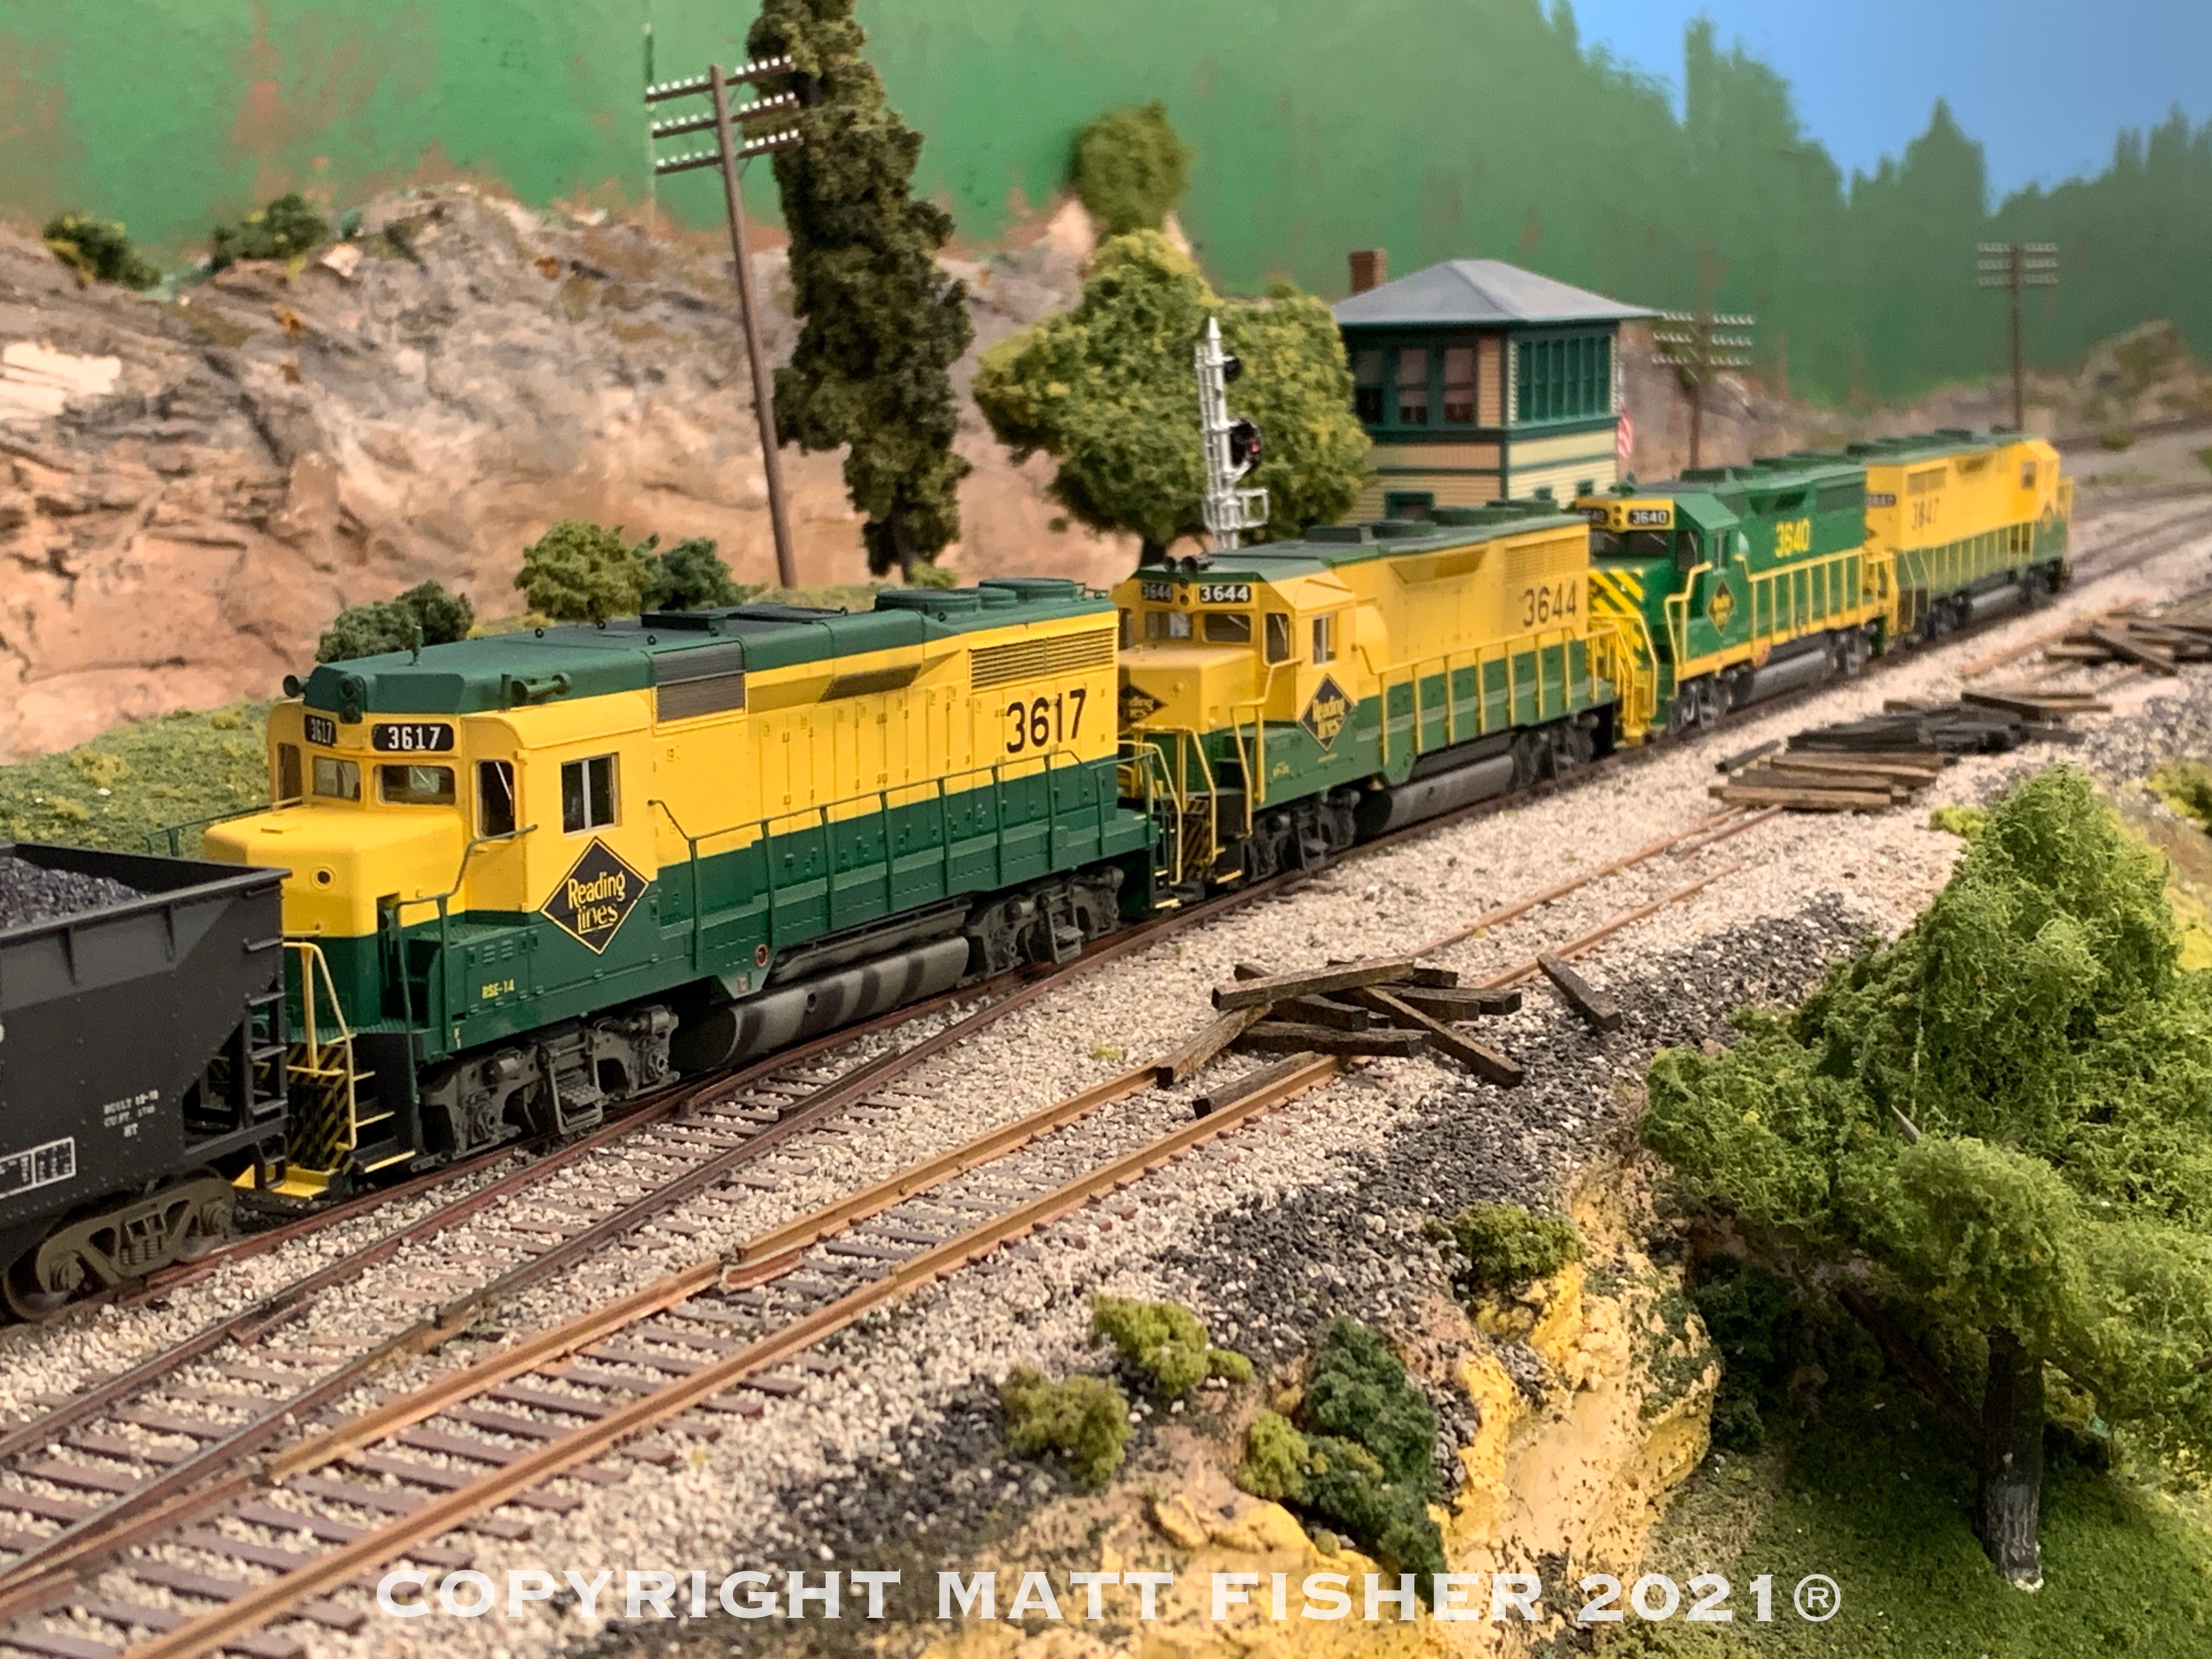
Post by tankcarsrule on Sept 12, 2021 3:34:57 GMT -8
|
|
|
|
Post by jbilbrey on Sept 12, 2021 6:29:58 GMT -8
I'm still dealing with the aftermath of my move, so I haven't had much of a chance to do much model railroading. However, I did take some out to build and paint a Woodland Scenics gazebo. I am hoping to use it be side a laser-cut church that I previously built.
Yesterday while out antique shopping with my family (my daughter was looking for a new desk for her home), I stumbled across a hobbyshop 3 miles from my new house that had all sorts of new HO locomotives, rolling stock, scenery details, track and vehicles that didn't otherwise appear on Google searches for the area. Another store had box of two steam locomotives in it with a $30 price tag for the pair. One was a Mantua 0-6-0 turned 2-6-0 with an unfamiliar (to me) Vanderbilt tender, but the other apparently was a Southern Pacific Decapod by Sunset Models.
|
|
|
|
Post by simulatortrain on Sept 12, 2021 7:09:37 GMT -8
Ready to weather the shell on this guy:  |
|
|
|
Post by fr8kar on Sept 12, 2021 7:57:38 GMT -8
Here's a couple shots in the morning light of some Trucks N Stuff pneumatic bulk tankers. The model is a good starting point for a foreground model, but out of the box it's a bit toy-like. I removed the model's oversized ladders, cleaned up the parting lines and mold gate burrs and replaced the landing gear with parts from Athearn 20' container chassis before painting the trailer. After the paint was dry I installed the wheels and tires from the Athearn container chassis. The prototype for this model appears to be a mid-2000s Trail King, which doesn't work for my era, but given the total lack of any other prototype pneumatic bulk tanker in HO scale, I'll just squint and pretend it's a Heil or Fruehauf. 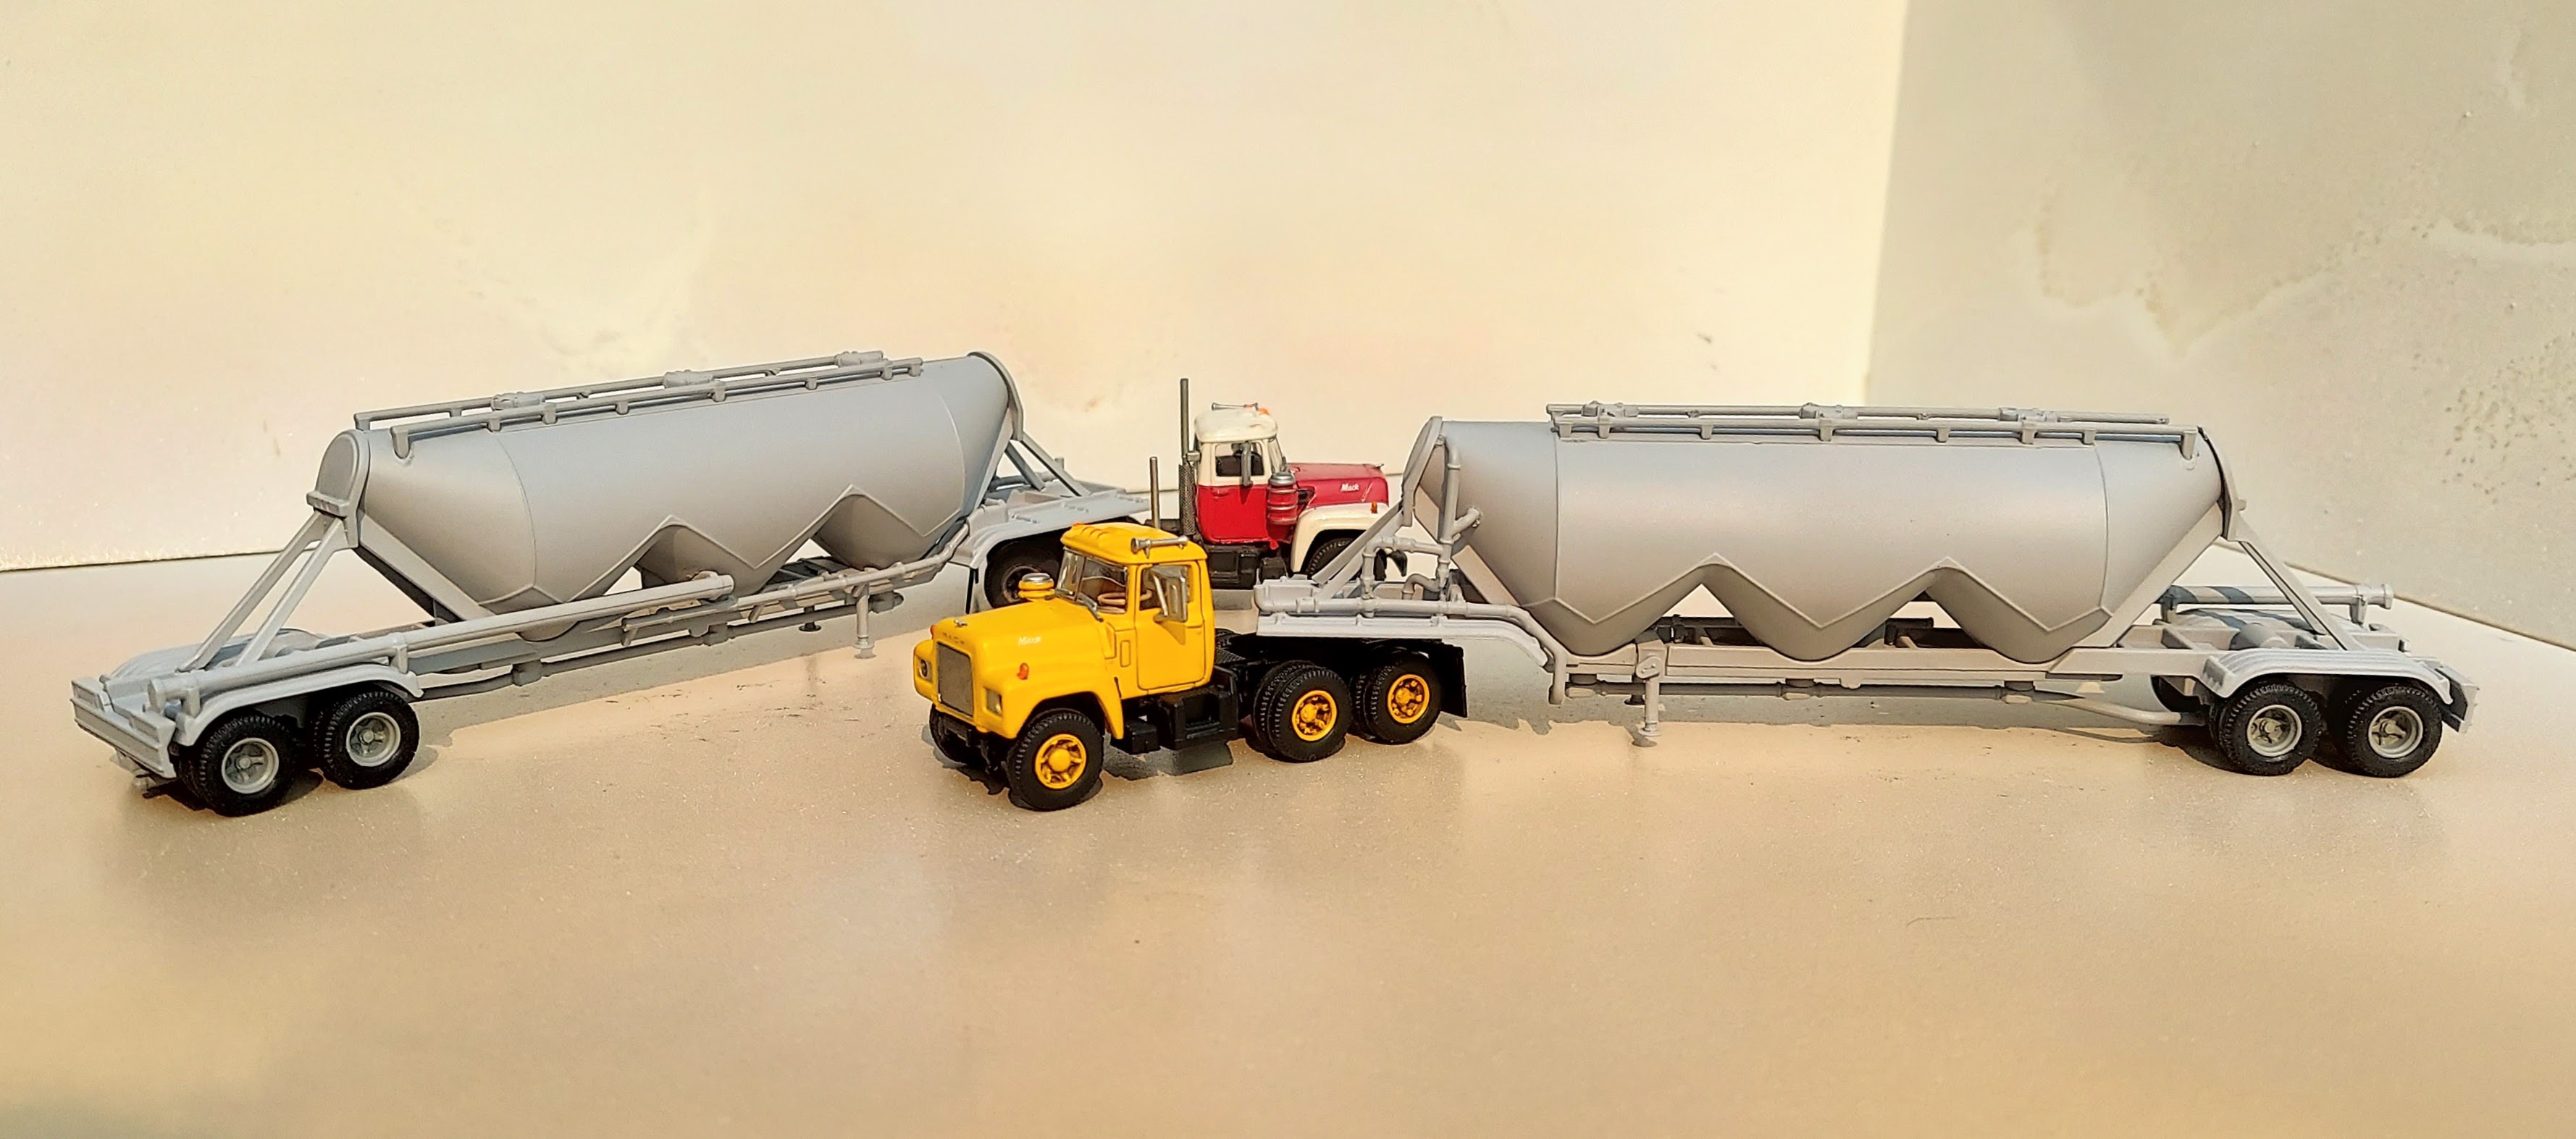 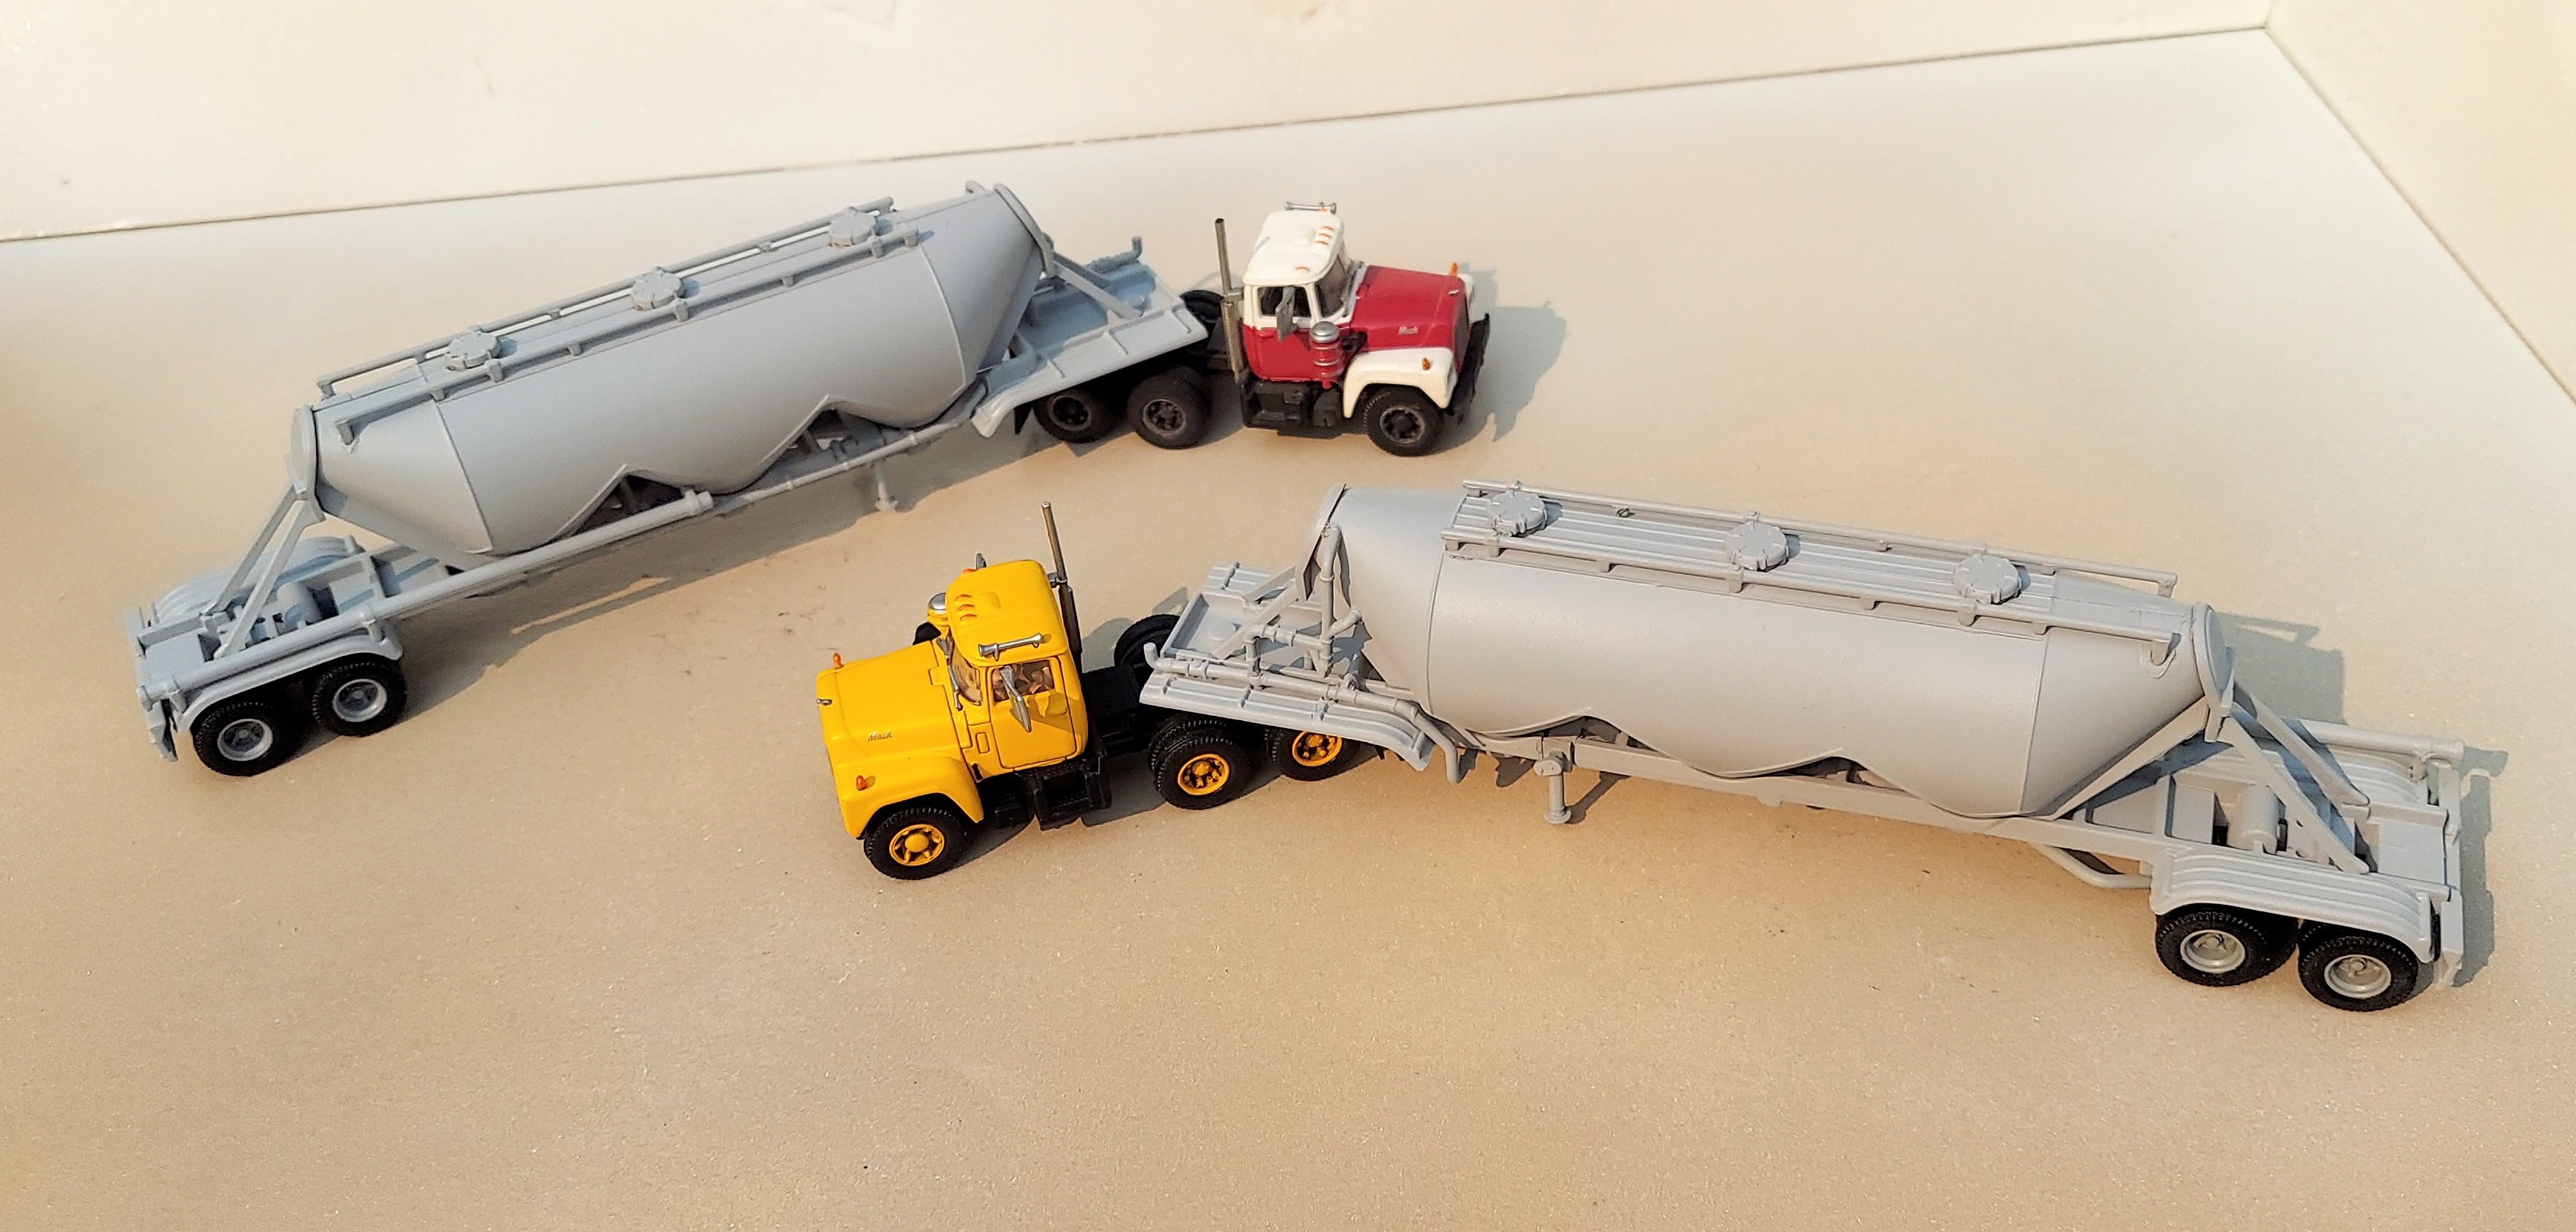 |
|
|
|
Post by TBird1958 on Sept 12, 2021 8:47:52 GMT -8
Ryan, I really like the trucks/trailers, I've been meaning to try what you did there for some time now, the Macks look sharp too, aren't they going for serious $$$ now? A quick upgrade on this Rapido ACF, I've removed the original draft gear an replaced it with a shorted set of non-cushioned Moloco parts. Start to finish including paint the new draft gear less than an hour. Happy Sunday, Mark Hills With the Rapido box removed.  new parts installed   |
|
|
|
Post by TBird1958 on Sept 12, 2021 8:56:37 GMT -8
meant to post these as well, I was out for a walk in one of Seattle's parks last Monday and came across this interesting (to me) trackage leading to an old car float operation. Obviously hasn't been used in some time yet the track and all that surrounds it is of fairly recent construction - the points of the turnout were what caught my eye.   |
|
|
|
Post by valenciajim on Sept 12, 2021 10:10:21 GMT -8
Here are some layout photos: The first photo is of a water pumping station that I scratchbuilt from an article in the September 2018 issue of Model Railroader. Because the sides of the first story were angled, the model was challenging to build. Also, I was able to find on line photos of the sides of the structure that were not pictured in the MR article. This model was a lot of fun to build. The structure is located between an orange grove and the icing station on a siding that serves a Sunkist packing house in the town of Santa Paula on my layout.  The next picture is of the icing facility. A few years ago, I went nuts decalling cars for the Gorre & Daphetid RR and one of those cars is on the right side. I printed the decals myself using an inkjet printer. The car on the left is a specially painted car, that was commissioned by a local Sunkist Packing House and the Oxnard Harbor District. The Prototype for that car is parked in the freight yard of the Fillmore & Western Railroad which is located in Fillmore, CA. It is a neat one of a kind car that I was able to model using various sets of Microscale decals.  " width="2048" height="1063" alt="IMG-4011"></a><script async src="//embedr.flickr.com/assets/client-code.js" charset="utf-8"></script> Staying on the reefer theme, here is a FGE boxcar that I decalled and weathered to match a prototype photo.  The final picture is of a UP steam locomotive pulling a number of Gorre & Daphetid Box cars. As I said in the earlier photo, sevral years ago, I obtained a number of Gorre & Daphetic decals (that are now out of production) and I decorated about 20 cars in memory of John Allen. <a data-flickr-embed="true" href="https://www.flickr.com/photos/193572006@N04/51457999860/in/dateposted-public/" title="IMG-4014"><img src="  |
|
|
|
Post by tankcarsrule on Sept 12, 2021 10:50:21 GMT -8
Nice looking layout and builds Jim!
Regards, Bobby
|
|
|
|
Post by fr8kar on Sept 12, 2021 12:47:55 GMT -8
Ryan, I really like the trucks/trailers, I've been meaning to try what you did there for some time now, the Macks look sharp too, aren't they going for serious $$$ now? Yes sir they sure are. I wish I'd bought more of them when I could. Right now it looks like the best way forward for modeling a Mack R600 is using the Ralph Ratcliffe cab and chassis parts. Those are solid cabs but boy they sure are gorgeous. |
|
|
|
Post by surlyknuckle on Sept 12, 2021 13:08:13 GMT -8
Adam, the 180 is rockin'. Love all your work. Signed, a fellow =WM= fan.
|
|
|
|
Post by cr9617 on Sept 12, 2021 13:26:08 GMT -8
hey everyone, excellent modeling as always. I haven't posted here in a while so please excuse the photo dump, but here is what I was able to finish over the summer. A foobie Conrail F41 flatcar built from an old school Walthers kit.  IMG_4933 IMG_4933 by cr9617, on Flickr A former PC flat now in MOW service for Conrail. Car is a stock Intermountain car, the steel deck is made from sheet styrene with Archer weld bead decals. I guess this also is a foobie, it's not really based on one car but a combination of cars.  IMG_5054 IMG_5054 by cr9617, on Flickr  IMG_5058 IMG_5058 by cr9617, on Flickr Delaware & Hudson Athearn Genesis GP39-2. I made the fuel tank dent by cutting the side out the plastic tank and overlaying a sheet of aluminum foil which I then dented. I filled the back of the tank with epoxy so the foil would hold its shape and withstand handling. The dent came out slightly larger than what the prototype had but I think it came out pretty good for a first try.  IMG_5064 IMG_5064 by cr9617, on Flickr A couple of Athearn RTR SW1500s. 9504 is the factory paint job, 9608 was completely stripped an repainted to rework the radiator grill, grabs and side sill to match photos. I mistakenly put ditch lights on 9504 because I was working off photos when it was a lease unit and incorrectly assumed it had them when she was still on Conrail. Oh well.  IMG_4944 IMG_4944 by cr9617, on Flickr  IMG_5036 IMG_5036 by cr9617, on Flickr And finally an Amtrak Athearn genesis p42.  IMG_4917 IMG_4917 by cr9617, on Flickr  IMG_4922 IMG_4922 by cr9617, on Flickr |
|
|
|
Post by TBird1958 on Sept 12, 2021 13:43:22 GMT -8
What are you using to wash your hood unit doors and panel lines with? Looks great!
|
|
|
|
Post by Christian on Sept 12, 2021 14:49:21 GMT -8
Delaware Hudson Athearn Genesis GP39-2. I made the fuel tank dent by cutting the side out of the plastic tank and overlaying a sheet of aluminum foil which I then dented. I filled the back of the tank with epoxy so the foil would hold its shape and withstand handling. The dent came out slightly larger than what the prototype had but I think it came out pretty good for a first try. |
|
|
|
Post by sd40dash2 on Sept 12, 2021 15:28:47 GMT -8
Outstanding material this week again by those above. Thanks for posting.
Another very nice Accurail kit (#3523) of the common 10' 6" inside height 40' boxcar. This one is painted in the attractive but unfortunately short-lived Spans the World paint scheme of 1948-50. The kit was upgraded by detailing and painting the entire underframe assembly, adding semi-scale wheelsets, semi-scale couplers with trip pin removed, air hoses, uncoupling levers, retainer valve and line, new stirrups and an etched running board and corner grabs. No, this does not fit "my era" but who cares? It's a nice kit and offered some simple modelling fun and helps keep the detail parts suppliers in business as well. Thanks to them and to Accurail for continuing to make kits like this at a reasonable price. Appreciation also goes out to everyone along the supply chain for bringing this model to me.
Obligatory underframe shot which reveals that I forgot to hand-paint the insides and bottoms of the shell walls black to match the underframe. Next time.
|
|
|
|
Post by cr9617 on Sept 13, 2021 0:47:25 GMT -8
What are you using to wash your hood unit doors and panel lines with? Looks great! It's ak interactive NATO camo vehicle wash. |
|
|
|
Post by Gino Damen on Sept 13, 2021 2:05:49 GMT -8
Finished the upgrade of two Atlas Trainman hoppers with Plano roofwalks.
Next step, more experiment is to see how much work it is the replace the cast laddersteps with wires.
Gino
|
|
|
|
Post by markfj on Sept 13, 2021 5:16:47 GMT -8
Wow, the Photo Fun thread is really kickin butt this week!
Thanks all for sharing.
Mark
|
|
|
|
Post by Colin 't Hart on Sept 13, 2021 6:20:39 GMT -8
Next step, more experiment is to see how much work it is the replace the cast laddersteps with wires. Gino, look for some of Ryan Harris's ( fr8kar ) covered hoppers where he has thinned the cast ladder rungs by carving away from the back. |
|
|
|
Post by drsvelte on Sept 13, 2021 7:31:22 GMT -8
KV Models has some photo-etch stirrups that might work.  |
|
|
|
Post by ChessieFan1978 on Sept 13, 2021 17:10:34 GMT -8
|
|
|
|
Post by Gino Damen on Sept 14, 2021 5:56:36 GMT -8
KV Models has some photo-etch stirrups that might work. Thanks for the heads up. I already found those and given that the stirrups from ExactRail are very fragile I already thought about buying a couple of these in case the factory ones get lost during an running session.
Gino
Edit: 7 pieces are on their way to the Netherlands :-) |
|
|
|
Post by Gino Damen on Sept 14, 2021 5:58:58 GMT -8
Next step, more experiment is to see how much work it is the replace the cast laddersteps with wires. Gino, look for some of Ryan Harris's ( fr8kar ) covered hoppers where he has thinned the cast ladder rungs by carving away from the back.
That is indeed amazing. Just need to decide which car can be sacrificed to practice this...
Edit: Just plowed through Ryan's blog and noticed that he also removes them fully and glues plastruct MR-10 (0.01 / 0,3 mm) rod in the cages. That looks a lot less messy although I wonder how sturdy those rods are. 0,3 mm is really tiny for stryreen rods.
Gino
|
|
|
|
Post by loco8107 on Sept 18, 2021 18:41:22 GMT -8
What are you using to wash your hood unit doors and panel lines with? Looks great! It's ak interactive NATO camo vehicle wash. What did you use for the radiator cover for the SW1500? Really looks neat! |
|
|
|
Post by Christian on Sept 19, 2021 0:32:15 GMT -8
Edit: Just plowed through Ryan's blog and noticed that he also removes them fully and glues plastruct MR-10 (0.01 / 0,3 mm) rod in the cages. That looks a lot less messy although I wonder how sturdy those rods are. 0,3 mm is really tiny for stryreen rods. I have a couple of hoppers done that way that are over thirty years old. I am gentle with my cars so YMMV. The C&NW on the left is a new cage - circa 1988 style prototype modeling. Pre Plano if you can believe it! The one on the right is from 2004 with Plano parts, but with the stock plastic cage.  |
|