


Post by csxt8400 on Apr 5, 2023 14:57:43 GMT -8
Although I see a few things I'd like to alter a bit, mainly the truck's final conditioning, the ex CR-now-NYC 601816 is finished. It is paired up with my other NYC'd G43, and I thought I'd post them together to showcase the good and the not-so-good.

The excellent models from Tangent are a great base to start weathering right away. The time difference between these projects showcases the technique differences, and the areas of attention that I have dedicated more time to.
I have said that I am a small detail/artwork nut that doesn't think I can accurately replicate the prototype in all areas. We all must figure out our strengths and accept where we may not excel. I like to think I try to hit an 80-85% threshold as it relates to weathering. I want to knock down the sheen, liven up the areas of concern, and definitely get the trucks/wheels/couplers to a prototypical place. I think at that juncture, on most simple cars, you have a convincing car to place in-train, even if it may not blow your socks off.
With that goal accepted, I have omitted physical changes to these. As much as I love a good gondola (although these aren't scrap service anyway) I haven't dipped my toes into that water yet. So that leaves me with the surface weathering, and on the 601816 I have used my usual mix of oils, acrylics, and some very small accents via powders. I have also come to a nice agreement with gauche, and it is what I used for the interior weathering. It dries without adding sheen which I greatly appreciate, as my non-airbrush equipped work space doesn't enjoy aerosols much either. So anything that doesn't gloss up my work is a plus. The wheels were done with MIG oil brusher "grime" applied to my color pallet and worked in with a small brush.

After the the wheels were off, I added dullcoat to the body and then got to work with some MIG washes (tracks wash, black wash) and more of my favorite MIG oil brushes (rust and grime again) to accent the corrugations on the panels. After this was done, more dull coat. At this point the model languished for a few months, and when I picked it back up I grabbed some acrylic for heavier effect. At this stage I went and added more depth to the rib/rivet/end details, with a dry brush technique. After I did enough accenting for my tastes, I turned to the interior and grabbed some gauche black and rust, and went with a custom mix to get a dark shade with brown accents. I ripped a small piece of foam and got it blotted down, then went to town as best I could just pressing it against the interior surfaces. I was pretty heavy with this application, and any spots that seemed too heavy I just grabbed the foam again, and spread it out evenly. I did this about two or three times, varying the colors just slightly to give some variation. I also made sure to get the top chord, and it created a nice but subtle chipping effect on the outside corners. For a scrap gon I would have gone even heavier on that effect.
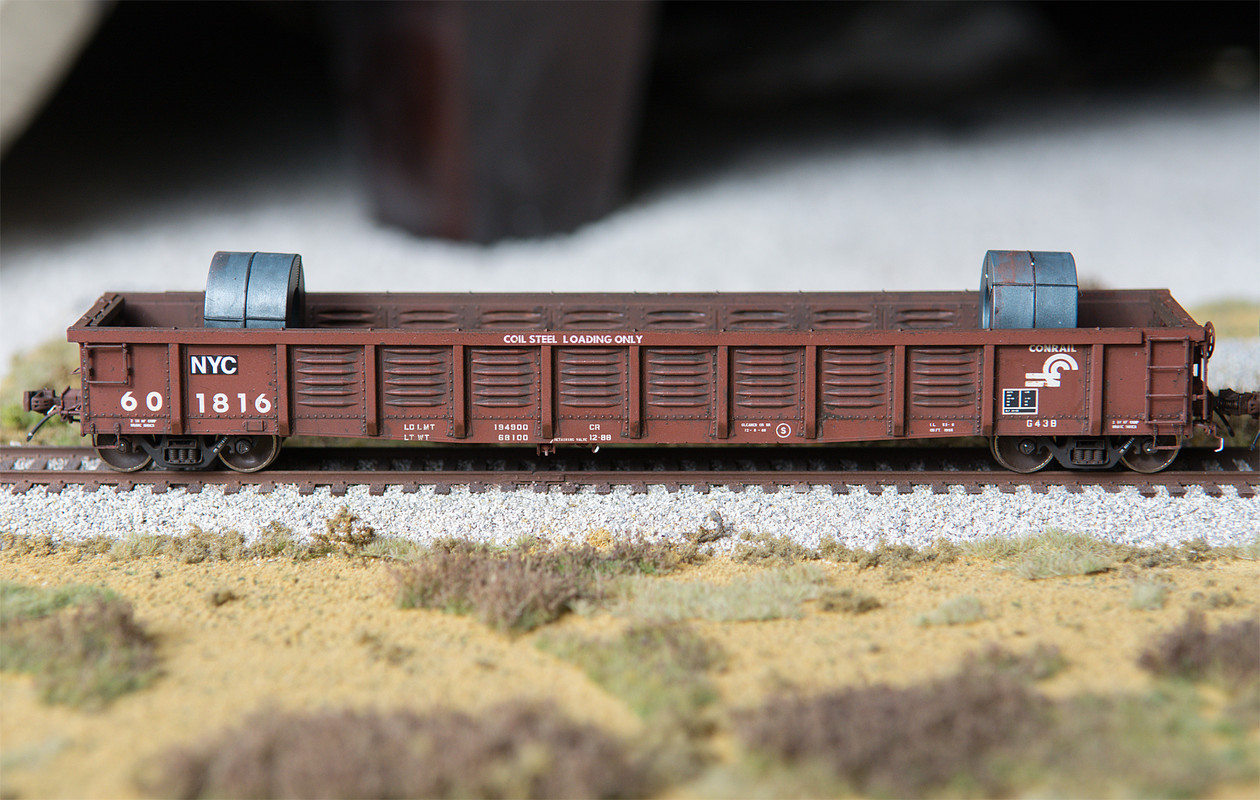
The other area of interest was making the coil cradle more used and abused than my prior effort. It isn't totally different than the sides, but the tone is there, plus I made sure to hit the interior bulkheads with the heavy gauche, which gives it a nice delineation to the end of the car itself.

After that, I added my usual small details like painting white on the bleed rods, pin lifters, angle cocks, one side of the cars roller bearing bolts, and dabbing the "released" spray paint indicator on the handbrake chain. I also added a dab of gray to simulate the angle cock "collar" and not silver tipped hose ends, a detail that many add that is usually counter to the strive for realism. Finally, NYC decals of my own creation to bring it up to 1999 specs.
With a few things learned between both projects, I look forward to doing another one of these. I will most likely go back and add some of gauche interior to the older model, as that is certainly a weak point between the two. More time spent covering the pristine plastic bits as well, especially the grabs and end details, is a must-do. On the 607032 I was less meticulous and it certainly shows.

Thanks for looking!
The excellent models from Tangent are a great base to start weathering right away. The time difference between these projects showcases the technique differences, and the areas of attention that I have dedicated more time to.
I have said that I am a small detail/artwork nut that doesn't think I can accurately replicate the prototype in all areas. We all must figure out our strengths and accept where we may not excel. I like to think I try to hit an 80-85% threshold as it relates to weathering. I want to knock down the sheen, liven up the areas of concern, and definitely get the trucks/wheels/couplers to a prototypical place. I think at that juncture, on most simple cars, you have a convincing car to place in-train, even if it may not blow your socks off.
With that goal accepted, I have omitted physical changes to these. As much as I love a good gondola (although these aren't scrap service anyway) I haven't dipped my toes into that water yet. So that leaves me with the surface weathering, and on the 601816 I have used my usual mix of oils, acrylics, and some very small accents via powders. I have also come to a nice agreement with gauche, and it is what I used for the interior weathering. It dries without adding sheen which I greatly appreciate, as my non-airbrush equipped work space doesn't enjoy aerosols much either. So anything that doesn't gloss up my work is a plus. The wheels were done with MIG oil brusher "grime" applied to my color pallet and worked in with a small brush.
After the the wheels were off, I added dullcoat to the body and then got to work with some MIG washes (tracks wash, black wash) and more of my favorite MIG oil brushes (rust and grime again) to accent the corrugations on the panels. After this was done, more dull coat. At this point the model languished for a few months, and when I picked it back up I grabbed some acrylic for heavier effect. At this stage I went and added more depth to the rib/rivet/end details, with a dry brush technique. After I did enough accenting for my tastes, I turned to the interior and grabbed some gauche black and rust, and went with a custom mix to get a dark shade with brown accents. I ripped a small piece of foam and got it blotted down, then went to town as best I could just pressing it against the interior surfaces. I was pretty heavy with this application, and any spots that seemed too heavy I just grabbed the foam again, and spread it out evenly. I did this about two or three times, varying the colors just slightly to give some variation. I also made sure to get the top chord, and it created a nice but subtle chipping effect on the outside corners. For a scrap gon I would have gone even heavier on that effect.
The other area of interest was making the coil cradle more used and abused than my prior effort. It isn't totally different than the sides, but the tone is there, plus I made sure to hit the interior bulkheads with the heavy gauche, which gives it a nice delineation to the end of the car itself.
After that, I added my usual small details like painting white on the bleed rods, pin lifters, angle cocks, one side of the cars roller bearing bolts, and dabbing the "released" spray paint indicator on the handbrake chain. I also added a dab of gray to simulate the angle cock "collar" and not silver tipped hose ends, a detail that many add that is usually counter to the strive for realism. Finally, NYC decals of my own creation to bring it up to 1999 specs.
With a few things learned between both projects, I look forward to doing another one of these. I will most likely go back and add some of gauche interior to the older model, as that is certainly a weak point between the two. More time spent covering the pristine plastic bits as well, especially the grabs and end details, is a must-do. On the 607032 I was less meticulous and it certainly shows.
Thanks for looking!
