|
|
Post by onequiknova on May 20, 2013 9:26:21 GMT -8
I wanted to start a thread about my recent adventures into resin casting. I tried it once years ago with varying degrees of success, but my castings were hit and miss with air bubbles. I set out to build a handful of Rock Island "Capone" commuter coaches, and felt this new project would be a perfect opportunity to try my hand at resin casting again. This time using a new approach. After doing some research, I found pressure casting is where it's at if you're wanting to create bubble free castings time and time again. I found a lot of guys were buying a Harbor Freight paint pot and converting it to a pressure chamber. So I headed off to Harbor Freight with a 20% off coupon in hand to buy one. With my wallet 80 dollars lighter, here it is. 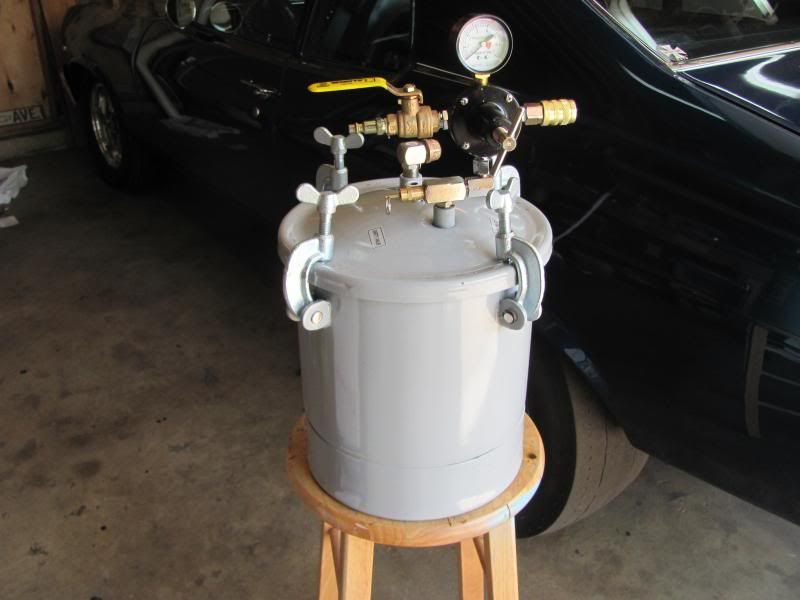 It has a max pressure of 80 PSI, and a working pressure of 30-60 PSI. I'll be casting at around 30 PSI. Obviously, use at your own risk. Things can go wrong quickly with a pressure chamber if you don't know what you're doing. The part I want to cast will be the ends of the coach. My master started out as the end from a MDC Harriman coach, and was modified with styrene and rivet decals to match the prototype.  Since this is a two sided piece with details on both sides, a two piece mold will be used. To start, you'll need some non drying clay. I use Klean Klay from Micro Mark. Next you want to roll out a piece of the clay with a small rolling pin like object and roll a piece out flat larger than the master you plan to cast. Trim the edges with a straight edge ad knife.  Here I have imbedded the master into the clay about half way in. This line where the master meets the clay will later become the parting line of your mold, so you want to spend some time with a single edge razor blade, chisels blade, or similar tool to smooth the clay along the master to achieve a nice parting line. You want to make sure the clay is tight up against the master, no gaps. Make sure there are no small bits of clay or other junk stuck to the exposed master. They will show up later in your mold. Every two part mold will need a pour hole and air vents. The black wire embedded in the clay will be the pour hole, and the tooth picks up top are air vents. There's no need to glue these parts to the master. Any mold material that seeps between them can be cut out with an Xacto knife after the mold cures. The divets in the clay are made with the blunt end of a drill bit, and will act as locating pins to hold the two part mold into alignment. Now it's time to make your mold box. I used foam core, but a lot of guys use Legos, which I will probably use for future molds. They're reusable, fast, and air tight.  As you can see, you want to leave somewhere around a 1/2 inch between your master and the wall of the mold box. The foam core is glued together with a hot glue gun. You also need to glue the foam core to your base to prevent your mold material from seeping out of the cracks. More to come. |
|
|
|
Post by calzephyr on May 20, 2013 9:52:48 GMT -8
Thanks for the post. It is very interesting and I hope to see good results!!
Larry
|
|
|
|
Post by onequiknova on May 20, 2013 10:03:48 GMT -8
Now it's time to make your first pour. first thing to do is coat the inside of the mold box with mold release. I'll be using Micro Mark 1 to 1, fast curing RTV for my mold. It's a two part rubber mixed to a 1 to 1 ratio, with a curing time of around 4 hours. After thoroughly mixing the RTV, slowly pour it into a corner of the mold box in a thin stream and let the RTV fill up around the master to avoid air bubbles. After tapping the bottom of the box for a few minutes to relaese any trapped air bubbles, I put the box in my pressure chamber at 30 PSI for 4 hours.  I didn't explain it in my first post, but what the pressure chamber does is compress any existing bubbles so small, they can't be detected. Once the RTV cures, it's time to strip away the mold box and carefully peel the clay from the RTV mold, being sure to leave the master in the RTV. After trimming away some small flash, this is what I ended up with.  [/URL [/URL |
|
|
|
Post by onequiknova on May 20, 2013 10:15:30 GMT -8
Now that we have one side of our two part mold, it's time to make the second half. Just like before with the clay, you want to build a mold box around your new RTV mold and give it a coating of mold release. Like so.  Now mix up another batch of RTV and pour it into the mold box, same as before and place in pressure pot. I took a gamble, using the mold release I had on hand, a gamble that you will see later didn't pay off. Be sure to use a rubber to rubber mold release for this step. I have since ordered the correct mold release. Once cure, strip away the mold box and pull apart the mold. As you can see, the mold release didn't do it's job in some spots and the two halves stuck together. Luckily I was able to salvage the mold. Even though I lost most of the locating pins, the way the mold tore apart it's kind of self locating. I won't be making another until the new release shows up in the mail.  Now is the time to use a new Xacto blade to trim away any flash and make sure the pour and vent slots reach all the way into the mold cavity and out of the mold itself. I also carved a funnel shape at the top of the pour hole. |
|
|
|
Post by onequiknova on May 20, 2013 10:33:58 GMT -8
Now it's time to see if my hard work has paid off. I'll be using Micro Mark CR600 Resin. It has a 1 to 1 mix ratio, with a pour time of approximately two minutes. So you need to work fast. With the mold held together with rubber bands and two pieces of foam core to keep it ridged, mix up the resin and pour it in the mold. I did the mixing and pouring in the garage right next to my pressure chamber since the working time is so small.  After an hour in the pressure chamber, I stripped the mold and viola.. Success! Nearly perfect. even the #80 grab iron holes I drilled were duplicated. The tiny scratchbuilt flag holders are there too. No way I would have gotten these results without the pressure chamber.  As you can see, the gates have been cut off, but no other work has been done yet. There is very little flash to clean up. Overall, I'm very happy with the results.  I have a bunch of ideas swimming in my head now. I'll update this thread with my next casting adventure. |
|
|
|
Post by upwpfan on May 20, 2013 13:12:18 GMT -8
Onequinova;
I really liked your resin casting tutorial. The pressure casting method you describe looks like a winner! You mentioned that there might be safety concerns with using the "Harbor Freight" pressure casting device that you built. What are they? What should I watch for and what modifications did you make to the paint container?
Regards
Jere Ingram
|
|
|
|
Post by onequiknova on May 20, 2013 13:46:03 GMT -8
Basically, the concerns I've seen online have been about the hardware being a possible fail point. After all, this thing is made in China. Personally, I think most of the complaints are from user error. You only need to tighten the clamps as tight as you can with your thumb and fore finger. If it still leaks, you need to check the sealing surface for obstructions. I had a small weld slag that had to be ground off the lid to get mine to seal properly.
The only modification to the pot itself is to remove the paint pick up tube from inside the lid and plug it. I also installed the 1/4" ball valve and air fittings. the pot comes with the regulator. I also fashioned a round disc from foam core to fit inside the bottom of the pot since it's got a rounded bottom.
What I do is turn the regulator on my air compressor to 60 PSI. (20 under the max rating of the pot) that way if anything happens to fail somehow, the pot will never reach Max operation pressure. I bring the pressure chamber to 45 PSI, then shut the ball valve. I'll check it every hour to make sure the pressure hasn't risen or fallen due to temp changes or leaks. As far as leaks, mine seams
to have none after redoing a few factory joints.
Use some common sense and you shouldn't have a problem.
|
|
|
|
Post by alcoc430 on May 20, 2013 18:11:18 GMT -8
onequiknova
Great Post!, Thanks for sharing. The part came out excellant. Please keep us updated on your progress.
Jim
|
|
|
|
Post by acelaphillies on May 21, 2013 11:24:06 GMT -8
Excellent work John!
|
|
|
|
Post by onequiknova on May 21, 2013 12:29:12 GMT -8
Thanks guys.
After casting 4 ends last night and another in the pressure chamber as I type, I learned a couple things.
#1: The pressure pot will get rid of small air bubbles suspended in the casting, but wont get rid of large air bubbles stuck in corners. Be sure to tap, tilt and squeeze the mold after pouring your resin to get rid of the trapped air bubbles.
#2, Mold release isn't really necessary with an RTV mold. It may prolong the life of the mold, but it obscures details. Especially in sharp corners. The only time I'll use mold release will be when making a rubber to rubber pour.
My next attempt at casting will be some spark arrestors in a one piece mold.
|
|
|
|
Post by onequiknova on May 21, 2013 20:53:23 GMT -8
My next attempt will be to cast some spark arrestors. These are modified Detail Associates parts that have had the base narrowed to better match the arrestors used by the Rock Island. It's a pain to do, so resin casting is perfect for these. I snapped these off a couple RI F unit projects I have going. Here are the originals I'll be casting.  Unlike the last mold, this will be a one piece mold. First thing to do is cut the ends off some tooth picks and glue them to the arrestors with CA. You want to try to glue them in an inconspicuous spot. You want to make them all the same length. I went back after the photo was taken to correct this mistake.  Now you'll need a piece of that non drying clay again and form it into a long triangle and place it onto the bottom of your mold box like I have below.  Then stick the tooth picks into the clay and finish the mold box. I used the handle of a small paintbrush to seal the clay to the tooth picks.  now it's time to pour the RTV. Be sure to cover the tops of the parts by at least a 1/4". Again, pour into a corner with a small stream and let the RTV surround the parts. This is what you should have when you pull the box apart.  Remove the clay, then grab the tooth picks with some pliers and give them a twist and pull. You want to break the glue joint and only pull out the tooth picks.  Now with a brand new Xacto blade, you want to stretch the mold open and slice into it right through the middle of the part from end to end. Don't slice the entire mold, just where the part is. Use the hole left by the tooth pick to locate the middle. Stretching the mold while cutting is supposed to result in better castings than simply slicing the mold at rest. This Micro-Mark RTV is not right for this type of mold. As you can see below this RTV is too stiff and tore as I stretched it. Once I get a part # on a more flexible RTV, I'll post it up. Even though I got quite a bit of tearing, the mold still works fine.  |
|
|
|
Post by onequiknova on May 21, 2013 21:11:45 GMT -8
On to casting. Normally with this type of mold you don't need any rubber bands to hold it together, but since mine tore, I'm treating it like a two part mold with foam core supports and a rubber band holding it together. This time I used a cheap plastic syringe to fill the mold. The kind used to give medicine to babies. You want to stick the syringe down the tube left by the tooth picks and squirt the resin in the cavity, poking and prodding in and out to expel any trapped air bubbles. once the individual cavities are full of resin, fill the trough left by the clay. I had to work quickly here with this short pot life resin. You need to get it in the pressure chamber before it starts to set up. I'll probably try a slower setting resin when I run out of this stuff.  Be sure to clean the syringe with acetone before the resin completely sets up. Once cured, stretch the mold open and retrieve your parts. It's actually easier to get the parts out if they break from the sprue while in the mold. As you can see, even though the mold tore, there is very little flash.  And a close up showing the reproduction of detail.  Any other resin casters out there? feel free to share. As you can see, I'm still just learning. |
|
|
|
Post by Donnell Wells on May 22, 2013 3:08:58 GMT -8
I used Alumilite to make copies of the Hi-liners F-unit freight pilot. I just took my time reading through the directions, and pretty much followed them step by step. I used Legos for my mold box, and made a two-part mold and if actually came out fairly well. I did experience the diminished detail using mold release as you described earlier, so I neglected to use it on subsequent casts. I didn't pressure cast, and my copies came out pretty bubble free on the side that showed. There were some very small bubbles on the backside of a couple parts, but they would be hidden from view. I designed the mold so that the good side was down during the pour, that way the bubbles would float up to the top, or backside of the casting.
Incidentally, Hiliners released individual parts after my mold was made, so now I'll be buying instead of casting...
|
|
|
|
Post by skytop35 on May 22, 2013 4:51:04 GMT -8
I've been casting parts in N scale for years, have to agree with using a pressure pot, it makes a big difference. Also, you can use Vaseline petroleum jelly for a rubber to rubber mold release. It's a cheaper alternative.
You might also look into Smooth-On products for casting and molding. Cheaper than Micro-Mark and they have a wide variety of products. I use Oomo 30 for making the molds and Smooth Cast 305 for casting. There are several Smooth Cast products with different pot lifes to allow you more or less working time with the resin.
Cool thread. However, once your friends find out you do casting, beware, as they will be after you to do parts for them. LOL !!!
|
|
|
|
Post by scl1234 on May 22, 2013 5:03:55 GMT -8
Would be interesting to see results of parts cured under vacuum. A pressure of 10-11 psia (3-4 pounds vacuum) should be enough to eliminate bubbles in the part if that's ever an issue. Lower pressure inside the vessel would be safer and allow the part to cure quicker. A reducer (thinner) for the resin would also help reduce bubbles.
A Mity-Vac motor oil extractor (marine applications) or similar device could be used to pull vacuum on the vessel.
Nice work, by the way!
|
|
|
|
Post by onequiknova on May 22, 2013 7:09:55 GMT -8
I bought a 12 dollar vacuum pump at HF while I was there. It's meant for evacuating AC systems and uses a venturi effect (compressed air)to pull a vacuum. It's supposed to pull 28.3 inches of Mercury. Not sure how that converts to pounds. I'll eventually figure out how to hook it up.
Guys have been converting these HF pressure pots to vacuum chambers by replacing the lid with a thick piece of clear acrylic as a viewing window.
|
|
|
|
Post by scl1234 on May 22, 2013 7:36:27 GMT -8
28.3 in Hg converts approx. to 13.9 psi. (riogrande - check my math) Subtracting this from atmospheric (14.696 psia), we have ~0.8 psia...probably too low a pressure for the pot to handle. Test to see if the pot will hold 10 psia (~5 psi vac) first...otherwise your pot may end up looking like Marilyn Monroe.
When you connect the eductor vacuum device to a compressed air source, the side port should have a lower pressure depending on the compresed air flow rate. They usually have an arrow stamped on the side indicating compressed air flow direction.
|
|
|
|
Post by John Sheridan on May 23, 2013 11:20:59 GMT -8
Here's a good tip for small part casting:
Instead of building the box out of foamcore, styrene, etc. use Legos. when you build the box out of legos, simply press them tight together so the RTV doesn't ooze out too much. When cured, simply break-apart the legos, clen off any RTV, and they are ready for re-use!
|
|
|
|
Post by tankcarsrule on May 23, 2013 16:41:38 GMT -8
Here's the trucks I did several years ago. One other thing I had to do living on the coast Was buy a dehumidifier. With our high humidity I had a foamed up mess with out it. Bobby Attachments:
|
|
|
|
Post by tankcarsrule on May 23, 2013 16:49:54 GMT -8
Here's the painted truck. Bobby Attachments:
|
|
|
|
Post by onequiknova on May 23, 2013 17:38:33 GMT -8
Nice truck! Did you build the master?
|
|
|
|
Post by tankcarsrule on May 24, 2013 10:57:59 GMT -8
Thanks John. Yes I did build the master, as a matter of fact it took four masters for the
Trucks.
Bobby
|
|
|
|
Post by Donnell Wells on May 26, 2013 17:49:16 GMT -8
Does anyone have a lead on gray colored resin similar to what was used in the production of Rail Yard Model kits? I don't really like the white colored rein because it doesn't show detail well. I know it's there (the detail) but seeing it clearly is what I'm after.
Donnell
|
|
|
|
Post by islandmodelworks on May 27, 2013 18:50:44 GMT -8
Most resins come in white though they can be tinted. We add black pigment to our resins to make them gray.
|
|
|
|
Post by onequiknova on May 29, 2013 16:32:13 GMT -8
I learned a valuable lesson today. I went to make a mold of the roof for my Rock Island commuter coach project. Problem is I didn't consider what will happen to a hollow cavity under pressure. I ended up wasting a good amount of rubber to figure it out.
What I did was I laid the roof onto a clay base and sealed the edges, leaving the underside of the roof open, which created a large, sealed cavity. Under pressure the roof deformed and ruined the mold. Luckily the master is still intact with only a handful of Archer rivets needing replaced.
When casting a hollow object you either need to fill the cavity with clay or vent the cavity to atmosphere to avoid this issue. Funny thing is, I read about this while researching casting, but I forgot about it. Won't do that again.
|
|
|
|
Post by trebor on May 30, 2013 7:22:57 GMT -8
Tank, nice trucks.
I did some castings some years ago with RTV and auto body resins. Vaccum de-gassing was used, an old fish tank hooked up to a vaccum cleaner.
I thought vaccum de-airing would be better in theory than pressure, to suck out bubbles. Is the pressure to make bubbles smaller, or is the casting medium forced into mold? I take it the casting medium is not injected into the mold.
|
|
|
|
Post by onequiknova on May 30, 2013 8:39:14 GMT -8
Tank, nice trucks. I did some castings some years ago with RTV and auto body resins. Vaccum de-gassing was used, an old fish tank hooked up to a vaccum cleaner. I thought vaccum de-airing would be better in theory than pressure, to suck out bubbles. Is the pressure to make bubbles smaller, or is the casting medium forced into mold? I take it the casting medium is not injected into the mold. The best way would be to degas, then cast under pressure, since it's possible to introduce air while pouring. The pressure is to squeeze any suspended air bubbles smaller. Nothing is injected under pressure per se, but I do inject my molds with a syringe because I feel it better fills the molds. For instance, take this mold of commuter coach seats. the fill and air vents are very small, which would make it nearly impossible to just pour resin into the mold.   The tip of the syringe is pushed into one hole and the resin is forced into the mold while the air escapes out the other.  Another thing I started to notice. When the resin is put under pressure and the air bubbles compressed, there needs to be an extra supply of resin to fill that void where the air once was. It's hard to tell, but the air vents on the part below are now hollow. They were full before putting it under pressure. This tells me there needs to be a bigger supply of extra resin to offset any air being compressed in the mold. Follow? Kind of hard to explain.  What I did last night was cut a trough in the top of my mold to hold some extra resin to be forced into the mold. We'll see how it works.  |
|
|
|
Post by scl1234 on May 30, 2013 8:59:11 GMT -8
John's observations on the effects of compressibility of gases (air) means he needs to minimize the entrained air (even when filling the syringe with resin) so that when the mold is pressurized, the "shrinkage" in the mold from air bubbles being compressed is minimal...lessening the need for additional resin.
If absolutely no air is entrained in the resin, there shouldn't be any volume loss when the mold is pressurized as liquids are incompressible.
|
|
|
|
Post by onequiknova on May 30, 2013 9:10:27 GMT -8
You're right. Fill the mold correctly, and you shouldn't need much extra resin. The above example was an extreme case, but it shows that even a bad pour can be "fixed" with pressure. That part above would be junk if cured without pressure.
|
|
|
|
Post by calzephyr on May 30, 2013 10:34:45 GMT -8
Thanks John. Yes I did build the master, as a matter of fact it took four masters for the Trucks. Bobby That is a nice job of creating a great looking project. Larry |
|


 [/URL
[/URL