|
|
Post by mlehman on Jun 28, 2014 13:10:02 GMT -8
I've been creating loads for a variety of different equipment recently, so thought I'd share some of them. Ideas and creations by others are welcome, too, so if you've got something to show, please do. A little philosophy...I usually make my loads removable. This permits reusing both the car and the load -- and the same car and load don't show up every time. This also saves a lot of hassle with tiedowns, although I often incorporate the illusion of tiedowns when that's feasible. Stuff doesn't fall off, although I do sometimes use little tricks to help loads stay on. I make many of my loads with a styrofoam base. This keeps the load light. If you cut a couple of angled reliefs at each end on the underside, then a finger push on one end pops the other end up for easy removal. You can see that in this pic of some cut stone loads I made. I glued wooden shapes to represent the cut stone on top of the styrofoam (plastic could be used for slick marble, for instance), then painted the whole thing flat white. I used some canopy glue, in part because the narrow tipped dispenser could slide in between the "stones" and apply some tacky glue. I then dusted and rolled the item in sawdust to represent the excelsior and hay used to cushion these loads. 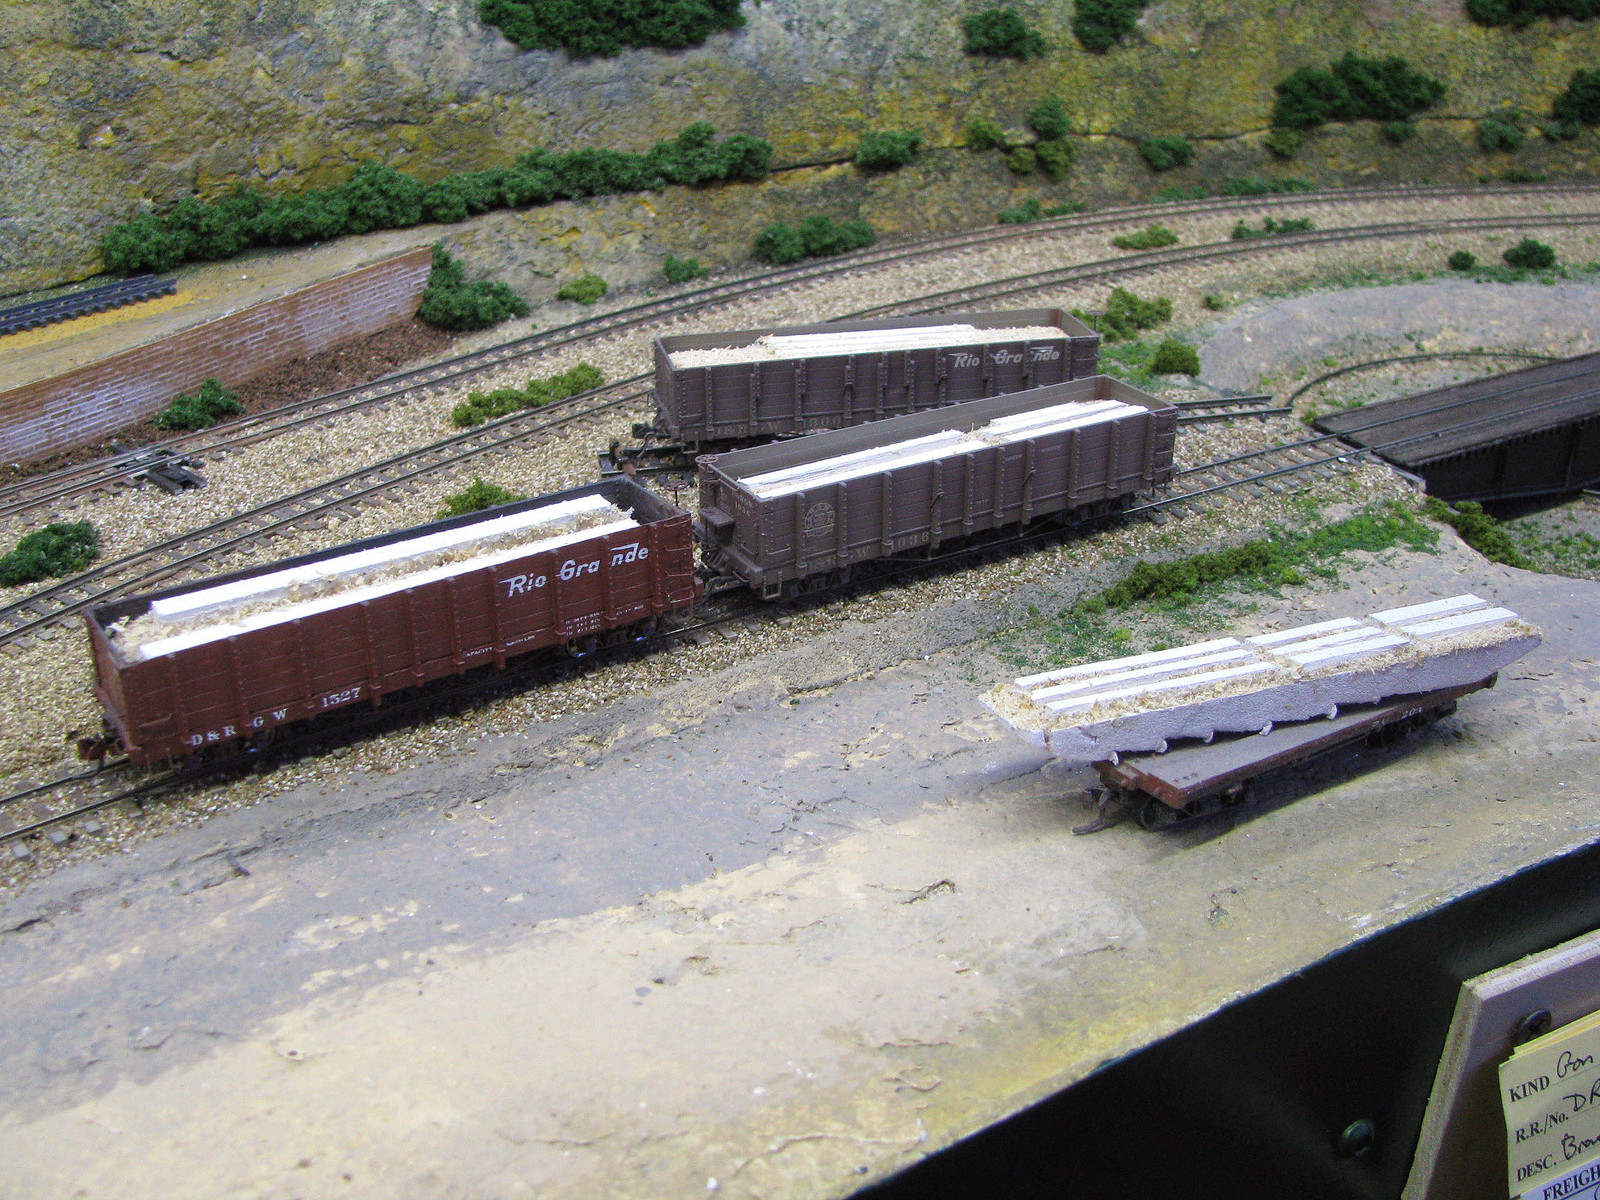 The raw quarried stone is represented by balsa wood cut to shape and painted white. 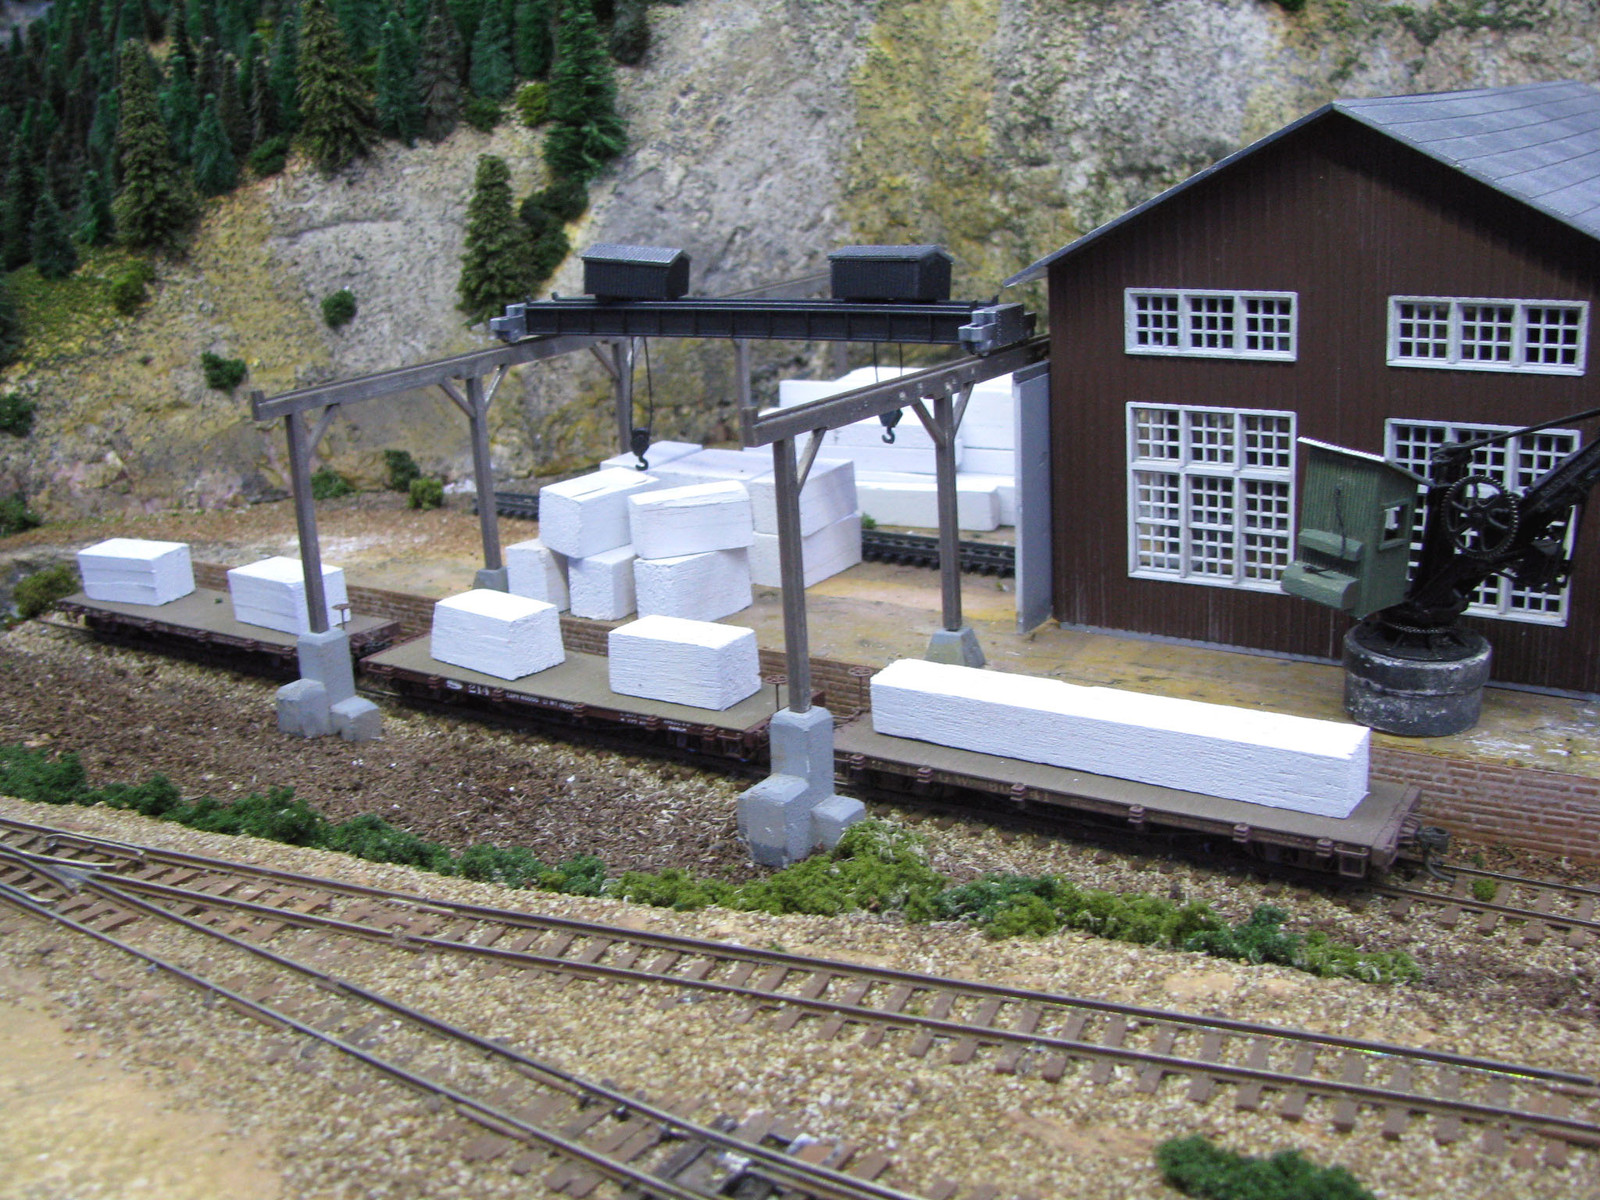 Another easy load to make based on a styrofoam block is a load of fresh or treated ties. The fellows down at the mill have really been cranking the ties out... 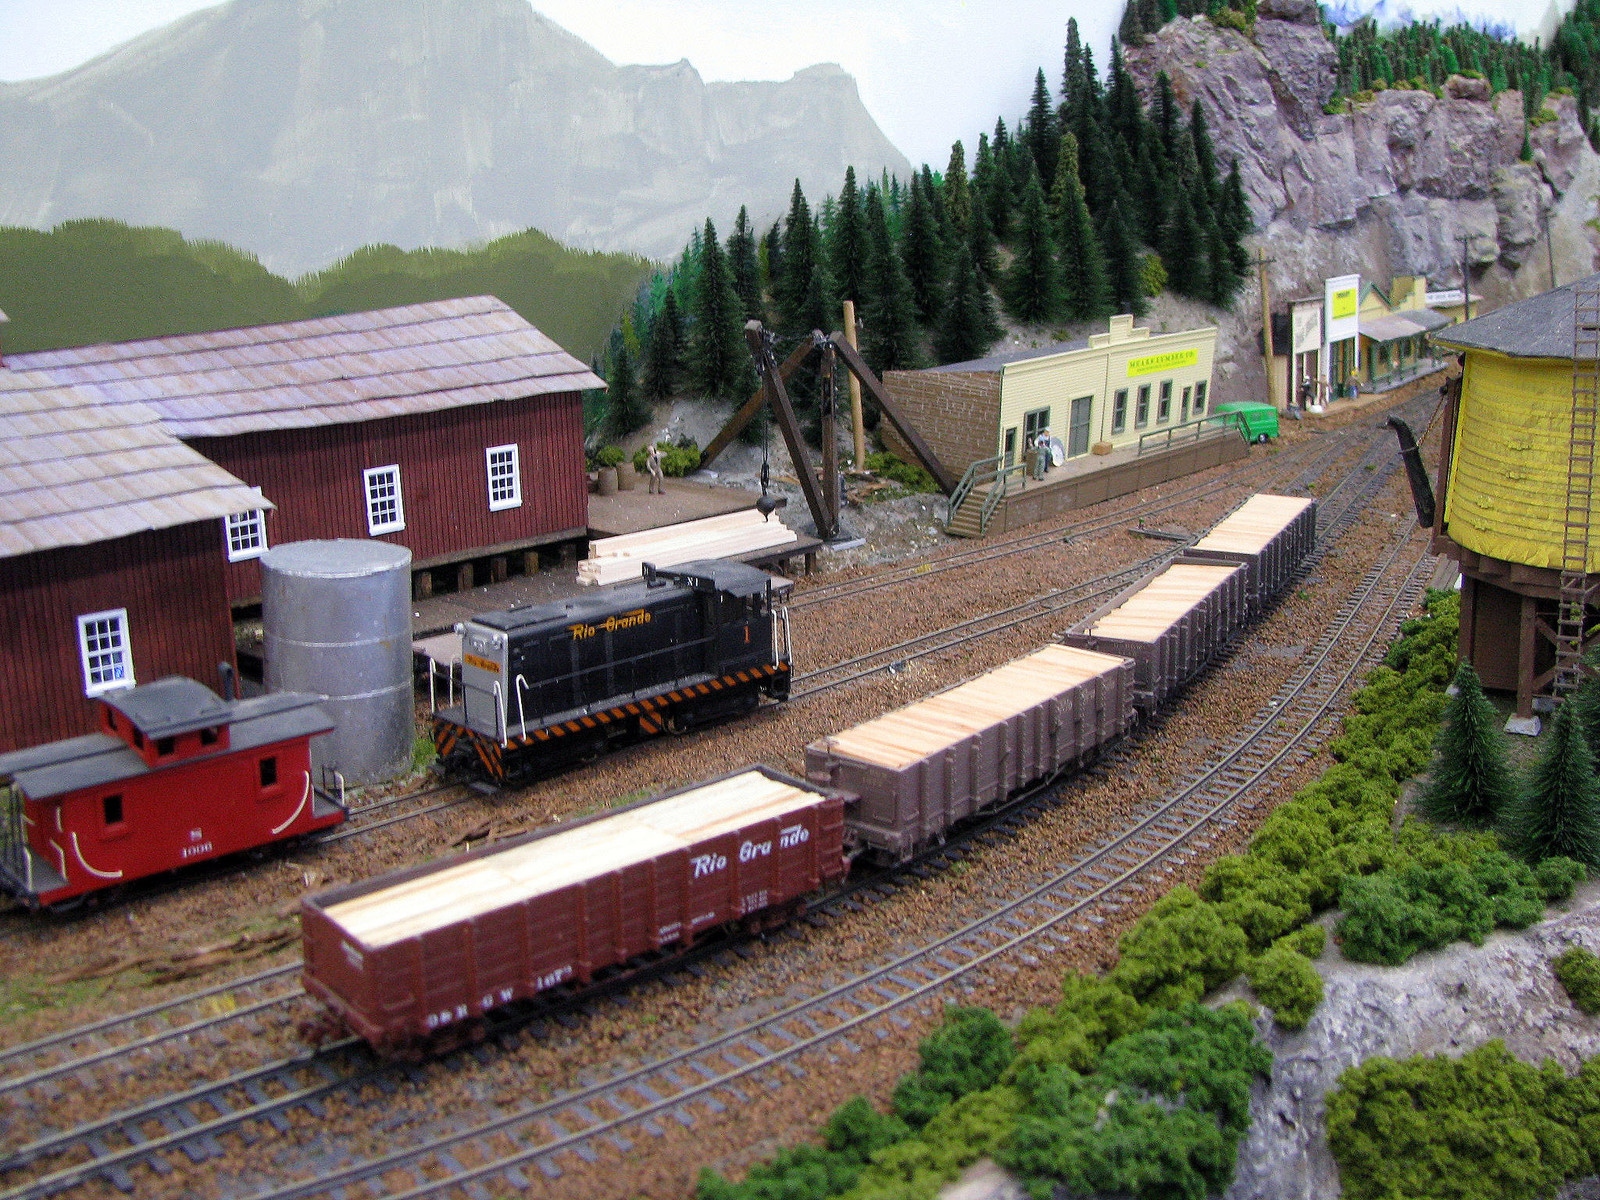 Anytime you have a vehicle or piece of machinery, it can be a load. This is a 2-drum steam donkey. 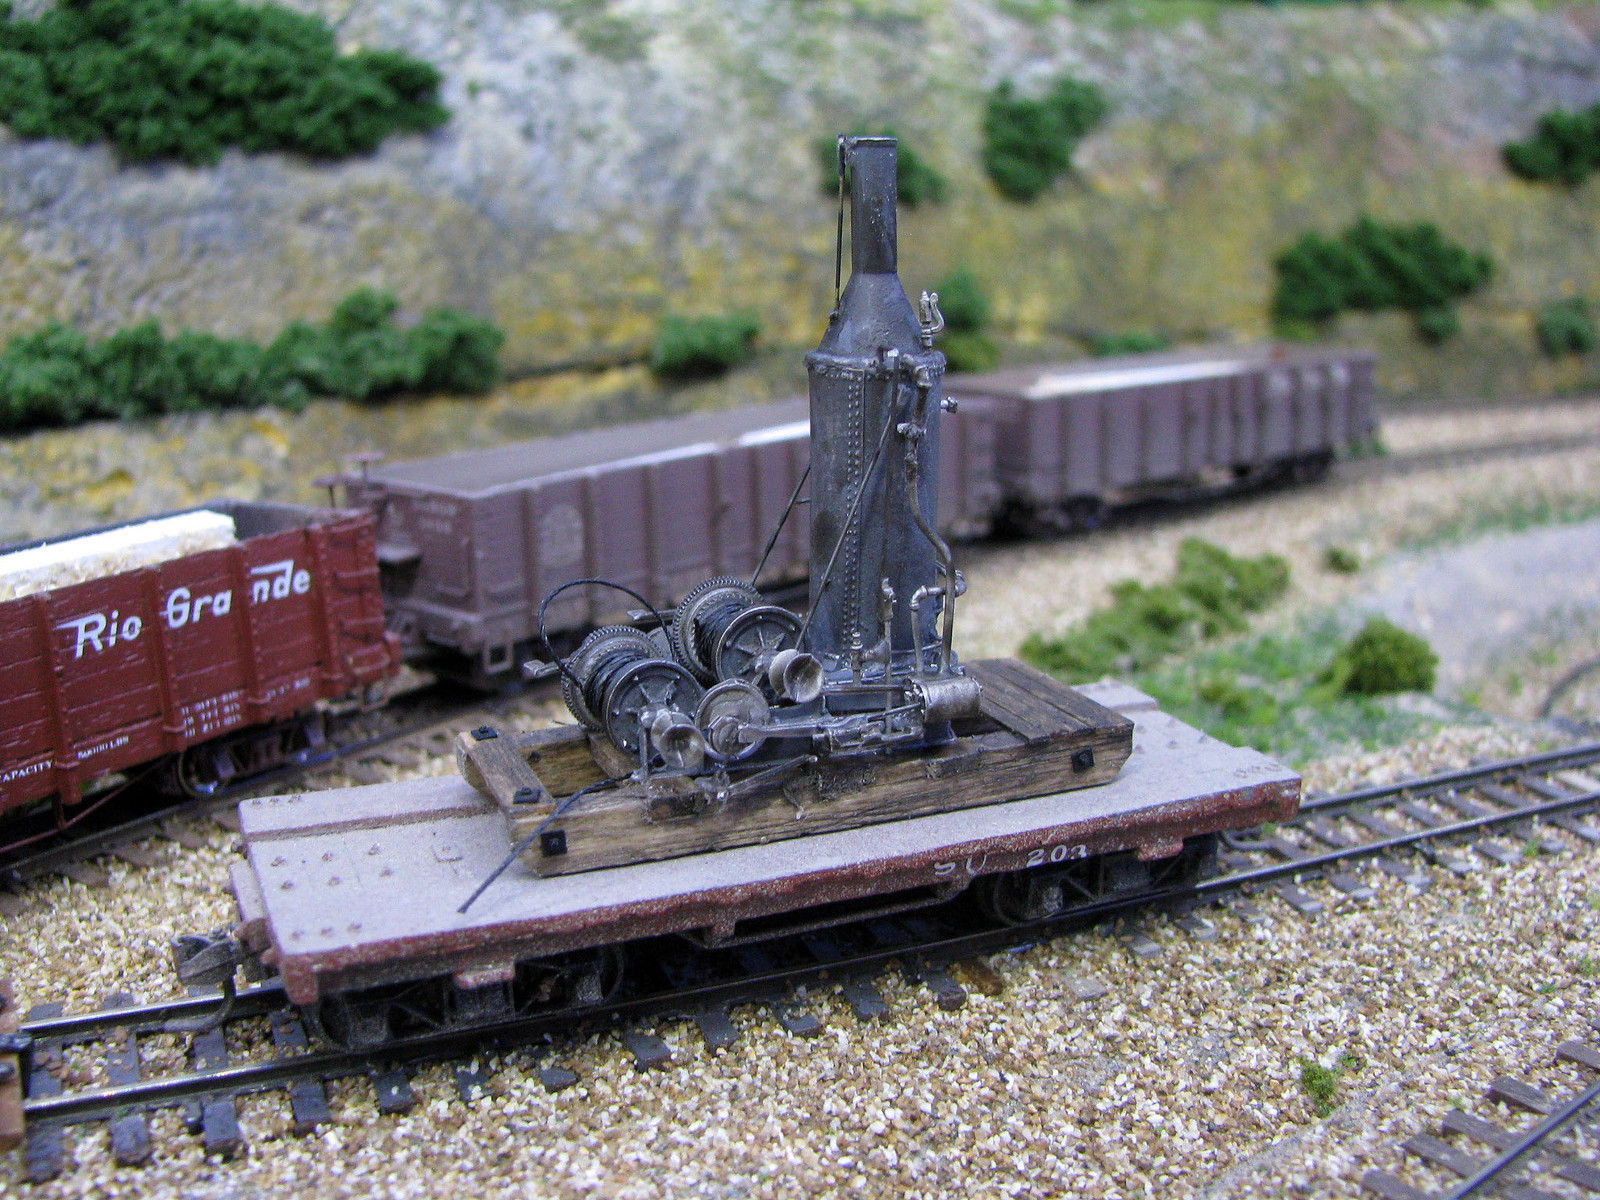 |
|
|
|
Post by mlehman on Jun 29, 2014 5:32:36 GMT -8
Making hay in this installment. Fuel facilities for steam and diesel are often modeled, but we often forget the infrastructure that supported another transportation mode -- beasts of burden. Critters gotta eat, even when they're not at work. Hay and various grains provide that fuel and the RR carried it, too. Straw was a related commodity, useful for bedding and various other things. I'd been thinking about making some hay and straw to use around the several elevators and their down-line customers. Then I had a brain storm, or maybe brain fart, as this is probably not a new idea... I'm still working on a way to make the individual bales and layers of bales to stick out, but this was the first version and it came out pretty well. I cut a block of styrofoam to represent a load of stacked hay bales, along with some scale 4x4 for staking the load. 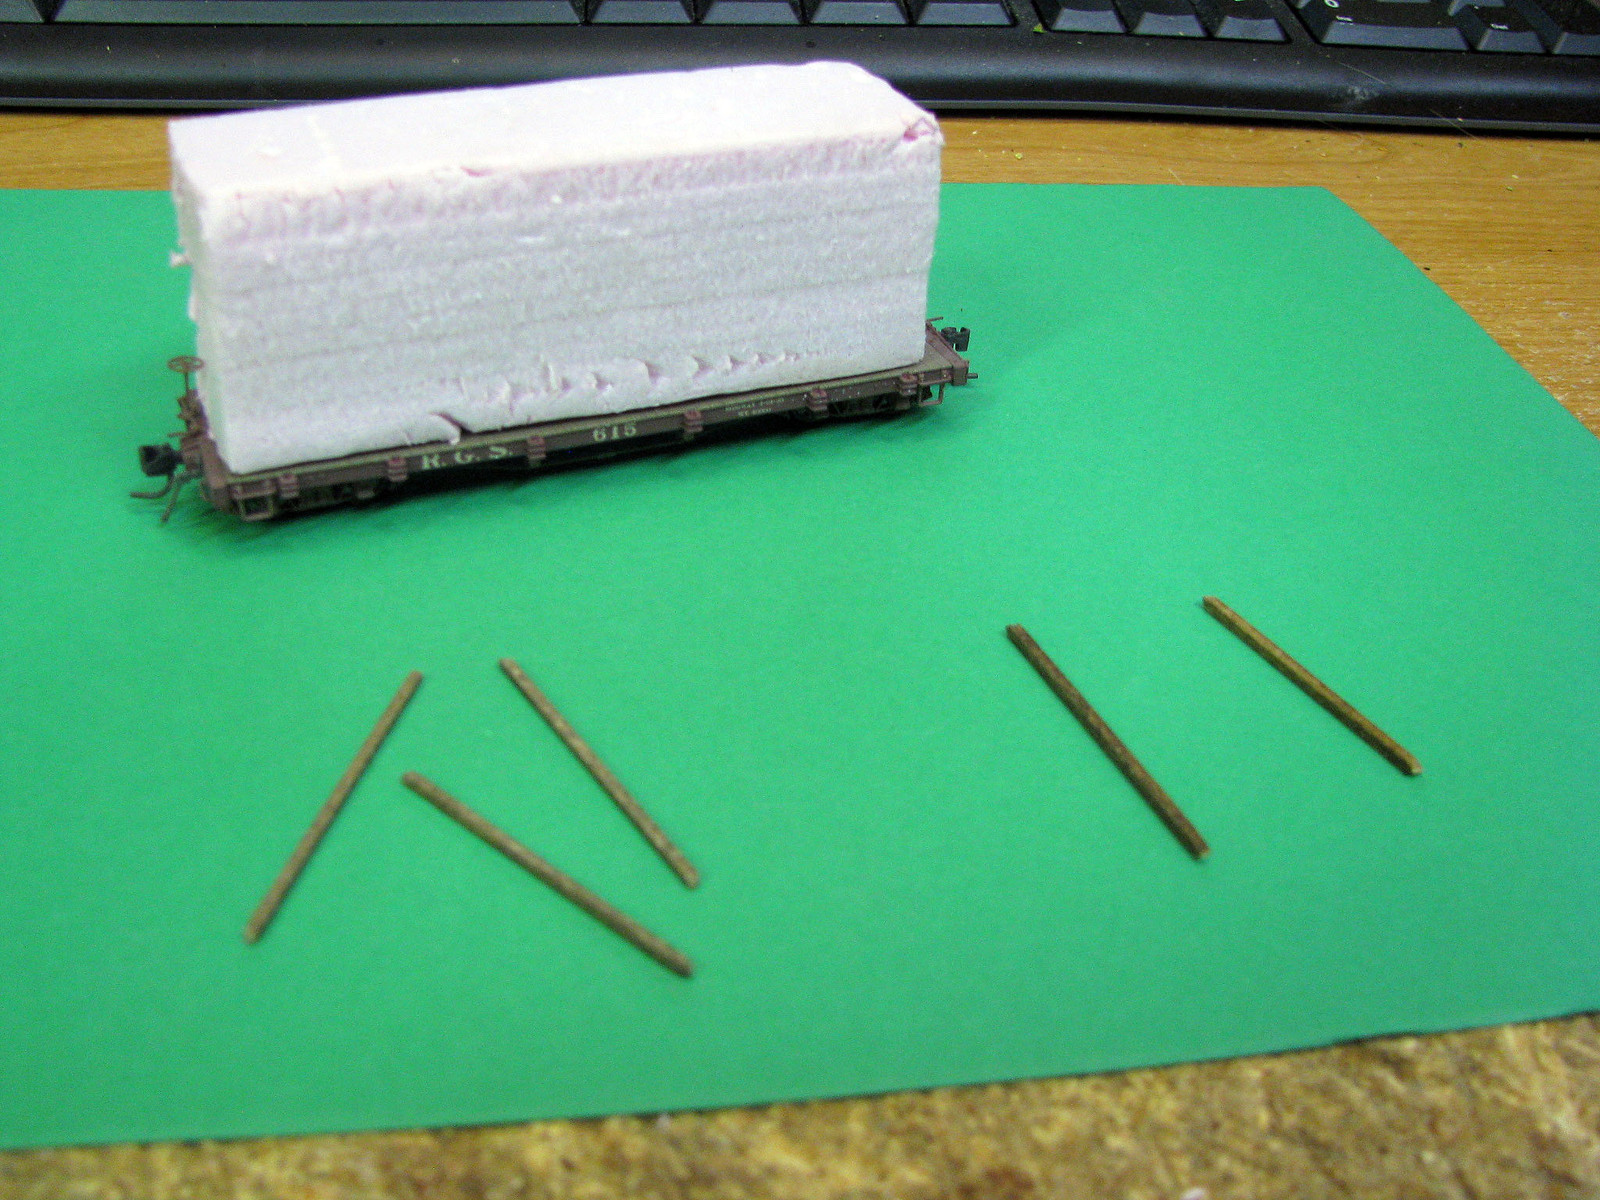 I built the load to fit the Blackstone Rio Grande short flat cars. As with many cars with stake pockets, the pockets won't accept a 4x4 without considerable work to open them up. This is not really needed though. I taper the bottom of the stake a little, then make sure it's seated as much as it can be when the glue is drying. Even though they're not really seated in the stake pockets, it looks like they are and the combined efforts of all the stakes are plenty to hold the load in place, yet remains easy to remove from the car. 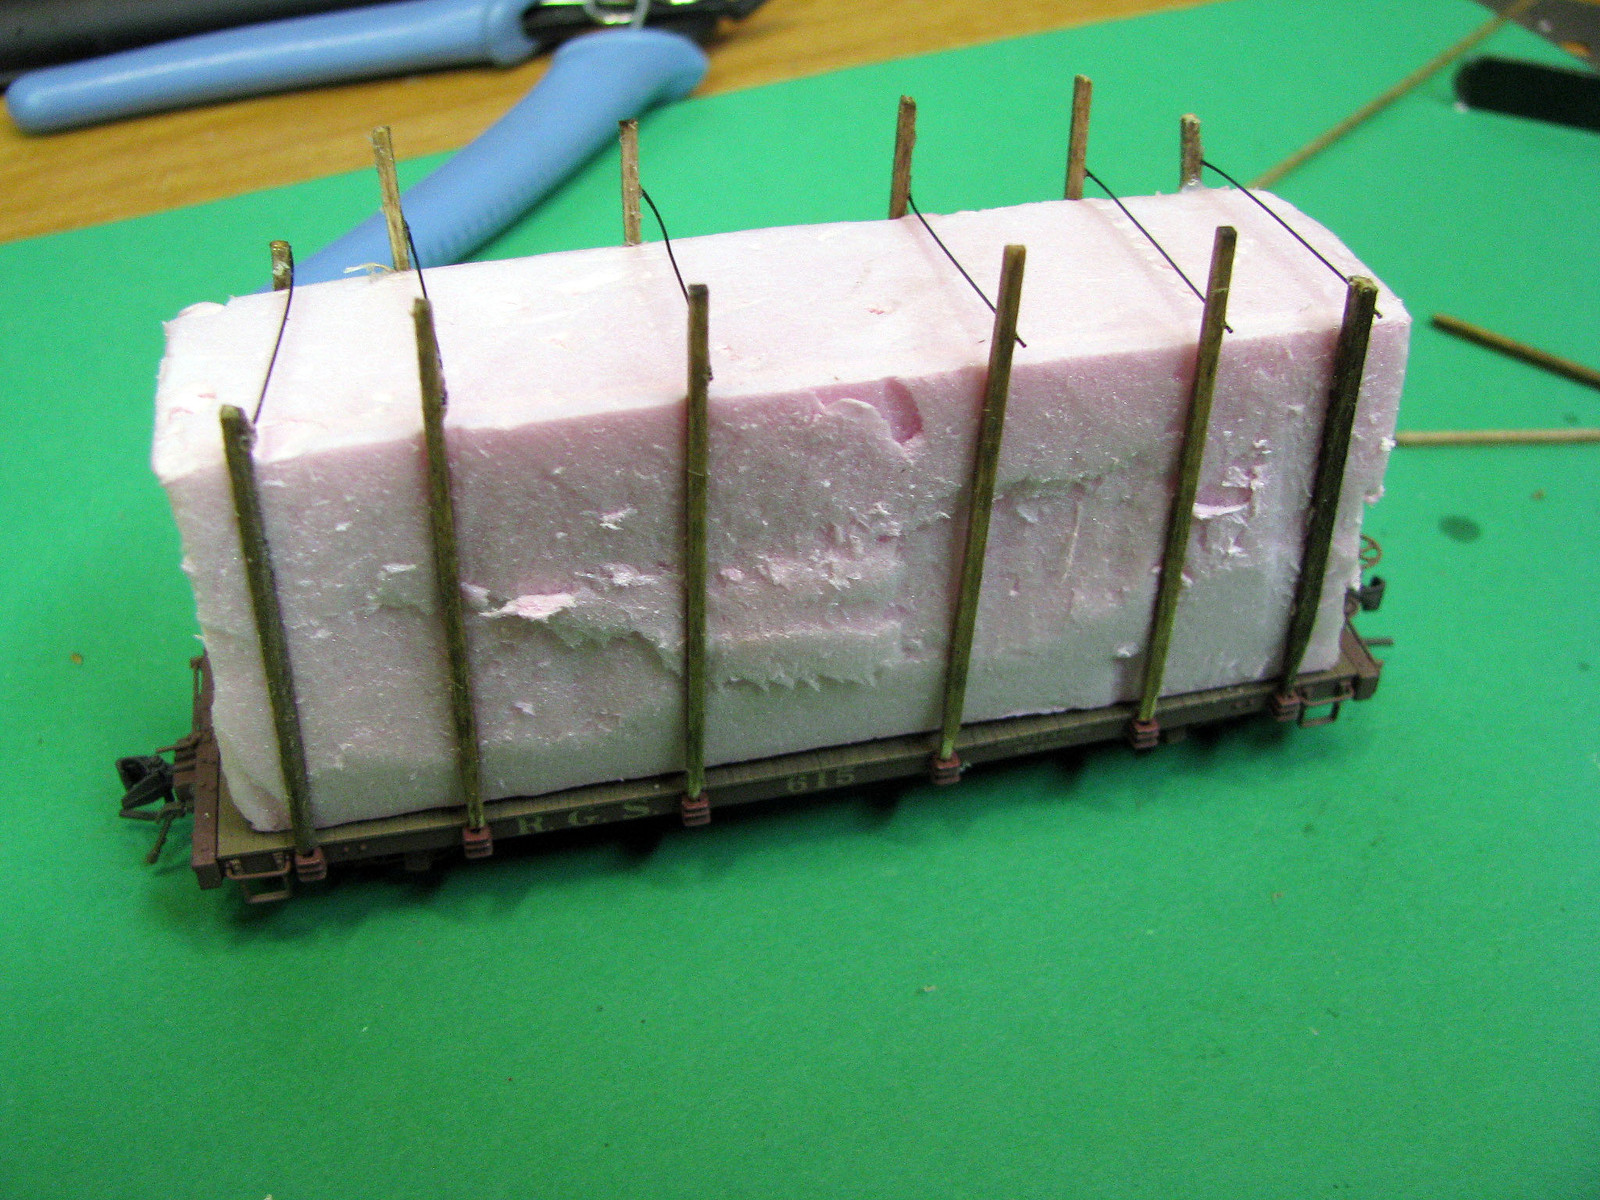 The stakes are tied together at the top. I used some black nylon line used for beading ACCed to the top of each stake. Note how in the pic above how I left clearance for the "hay" to be applied underneath. 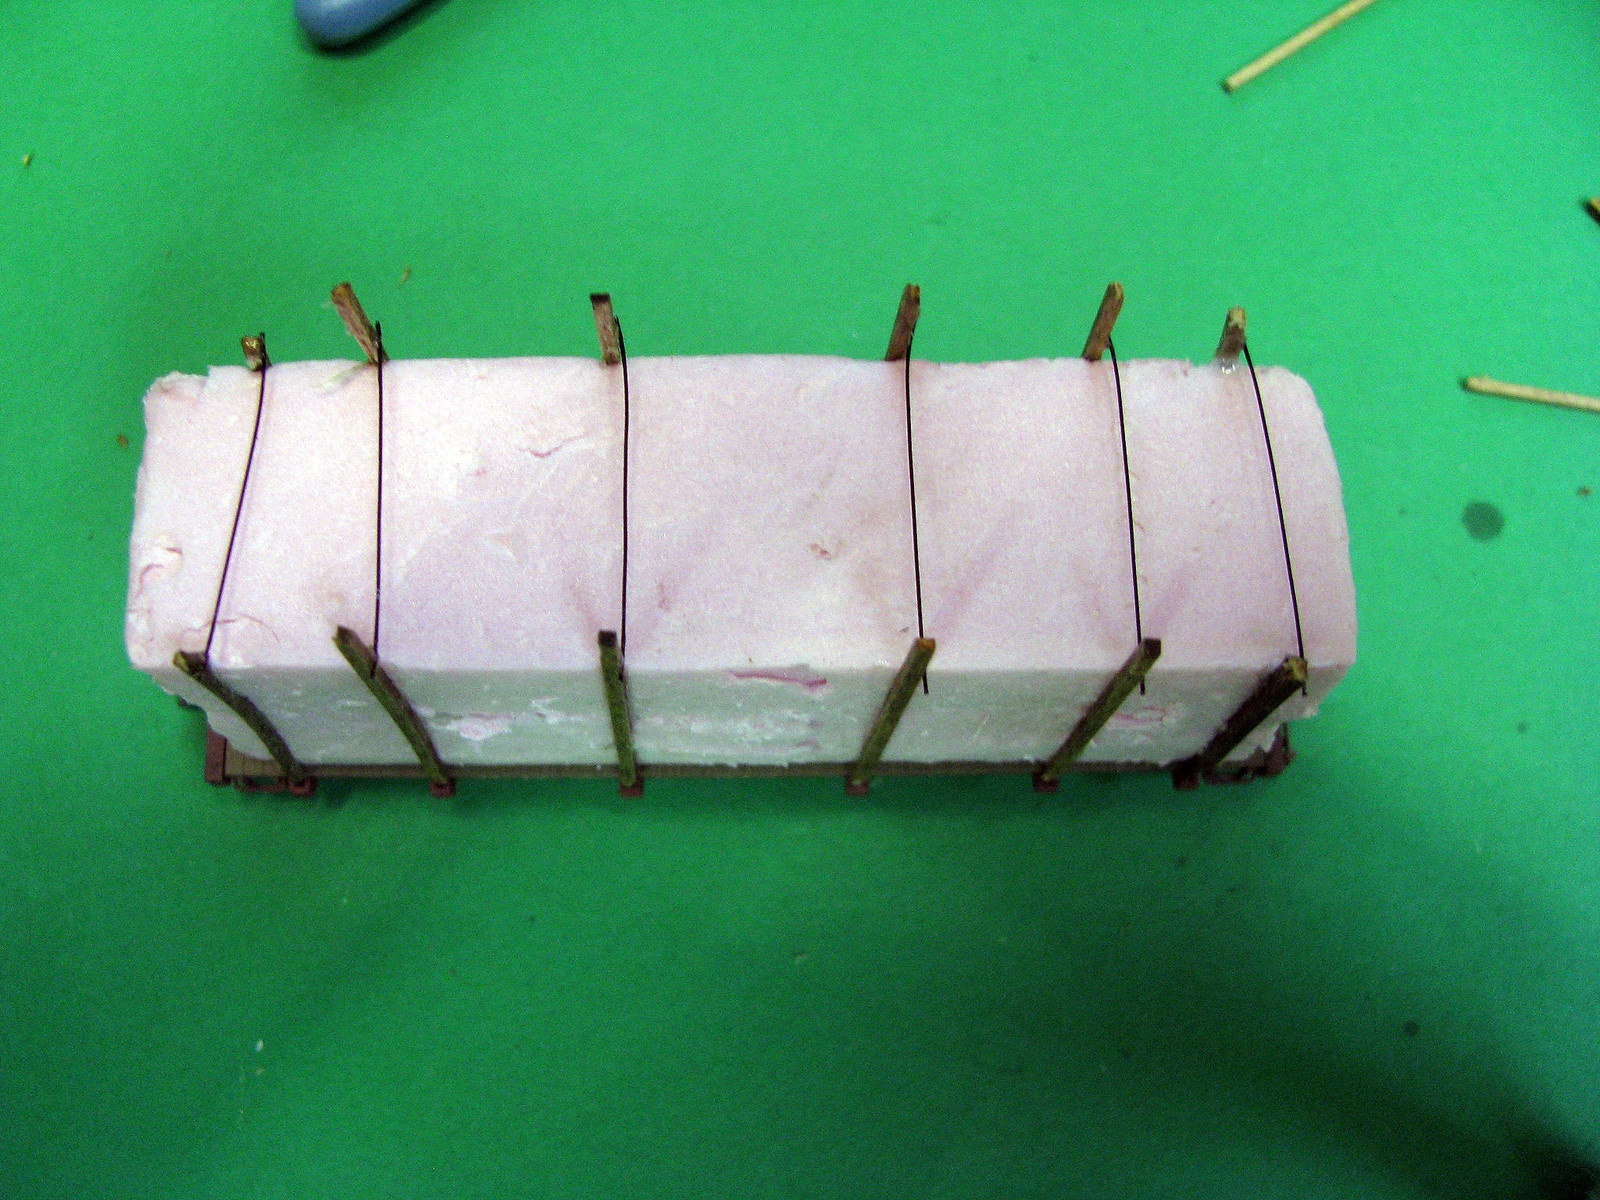 Now comes the potentially messy part. I used Aleene's for gluing both the stakes and the "hay" to the hay stack, BTW. I carefully spread the glue across a few section of the styrofoam at a time, trying to keep it off the stakes as much as possible, then dumped the sawdust that represents the hay or straw on the glue. I gently patted the glue into contact with the sawdust, then shook off the excess. 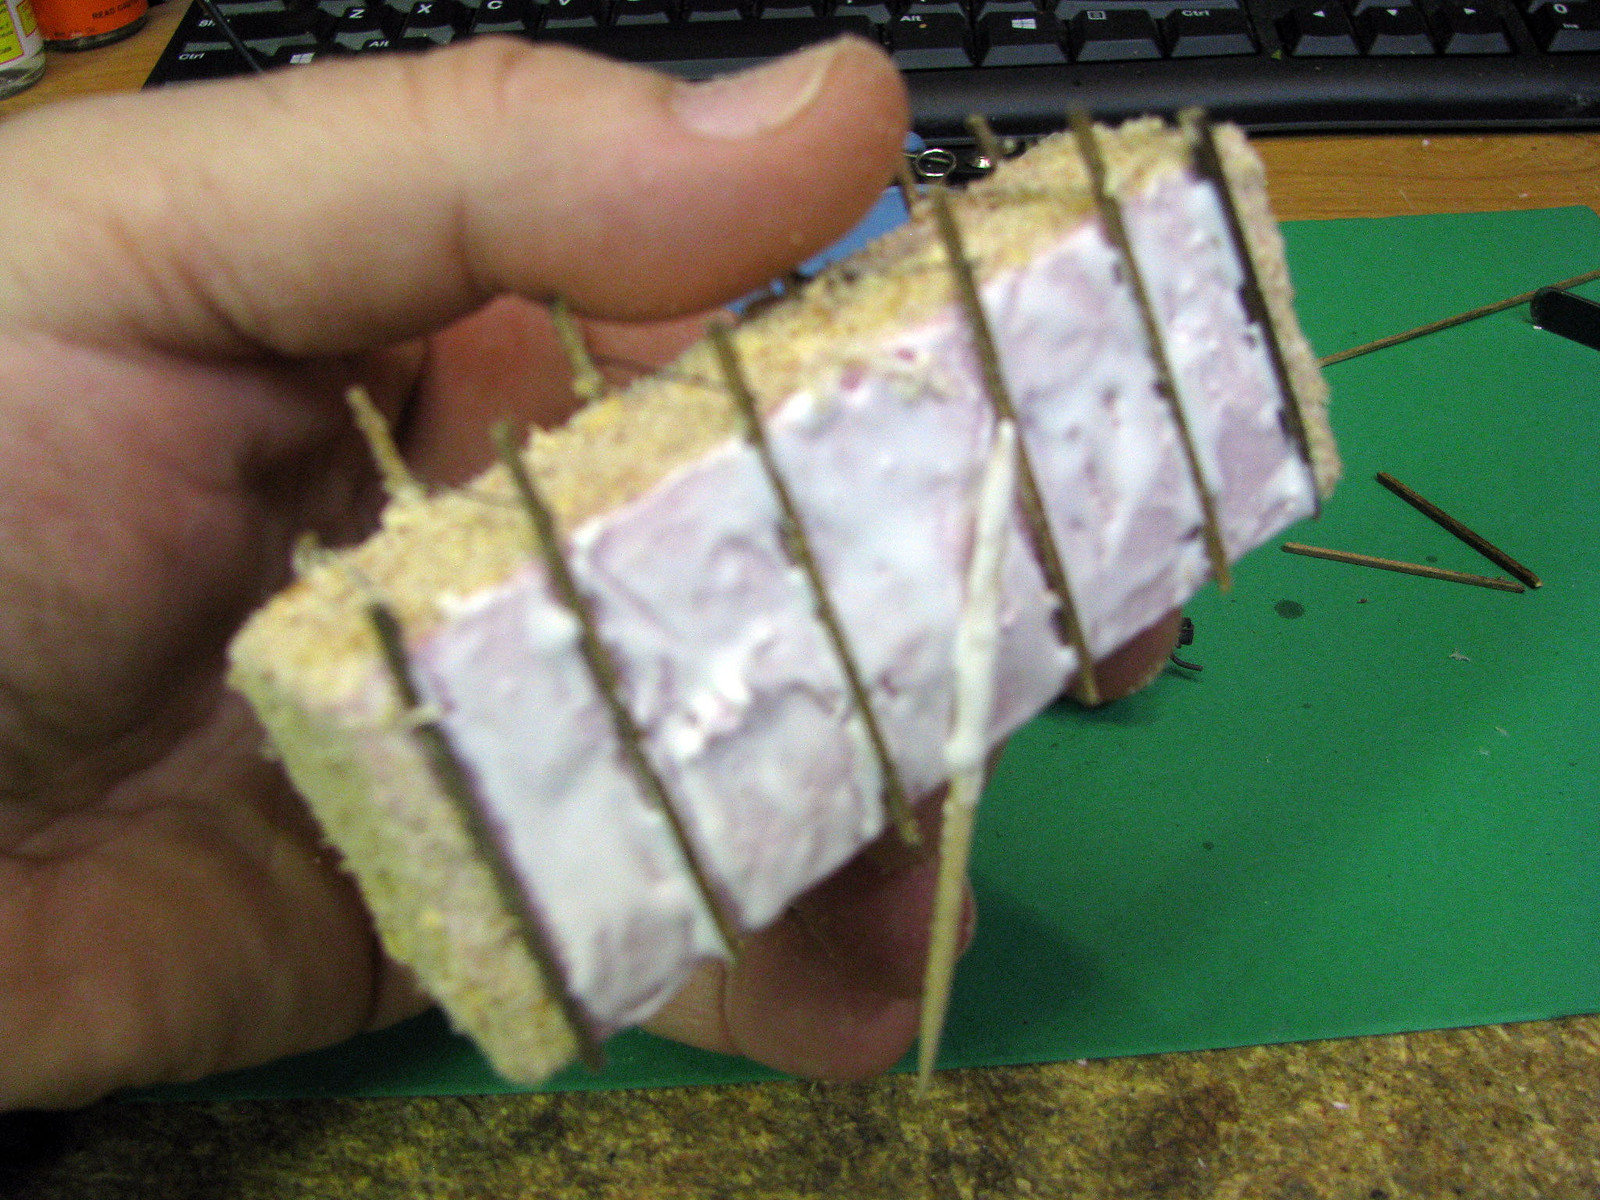 And here's the finished product. Yes, it's a high load, but hay was bulky and light, so stack 'em as tall as will fit your clearance gauge. 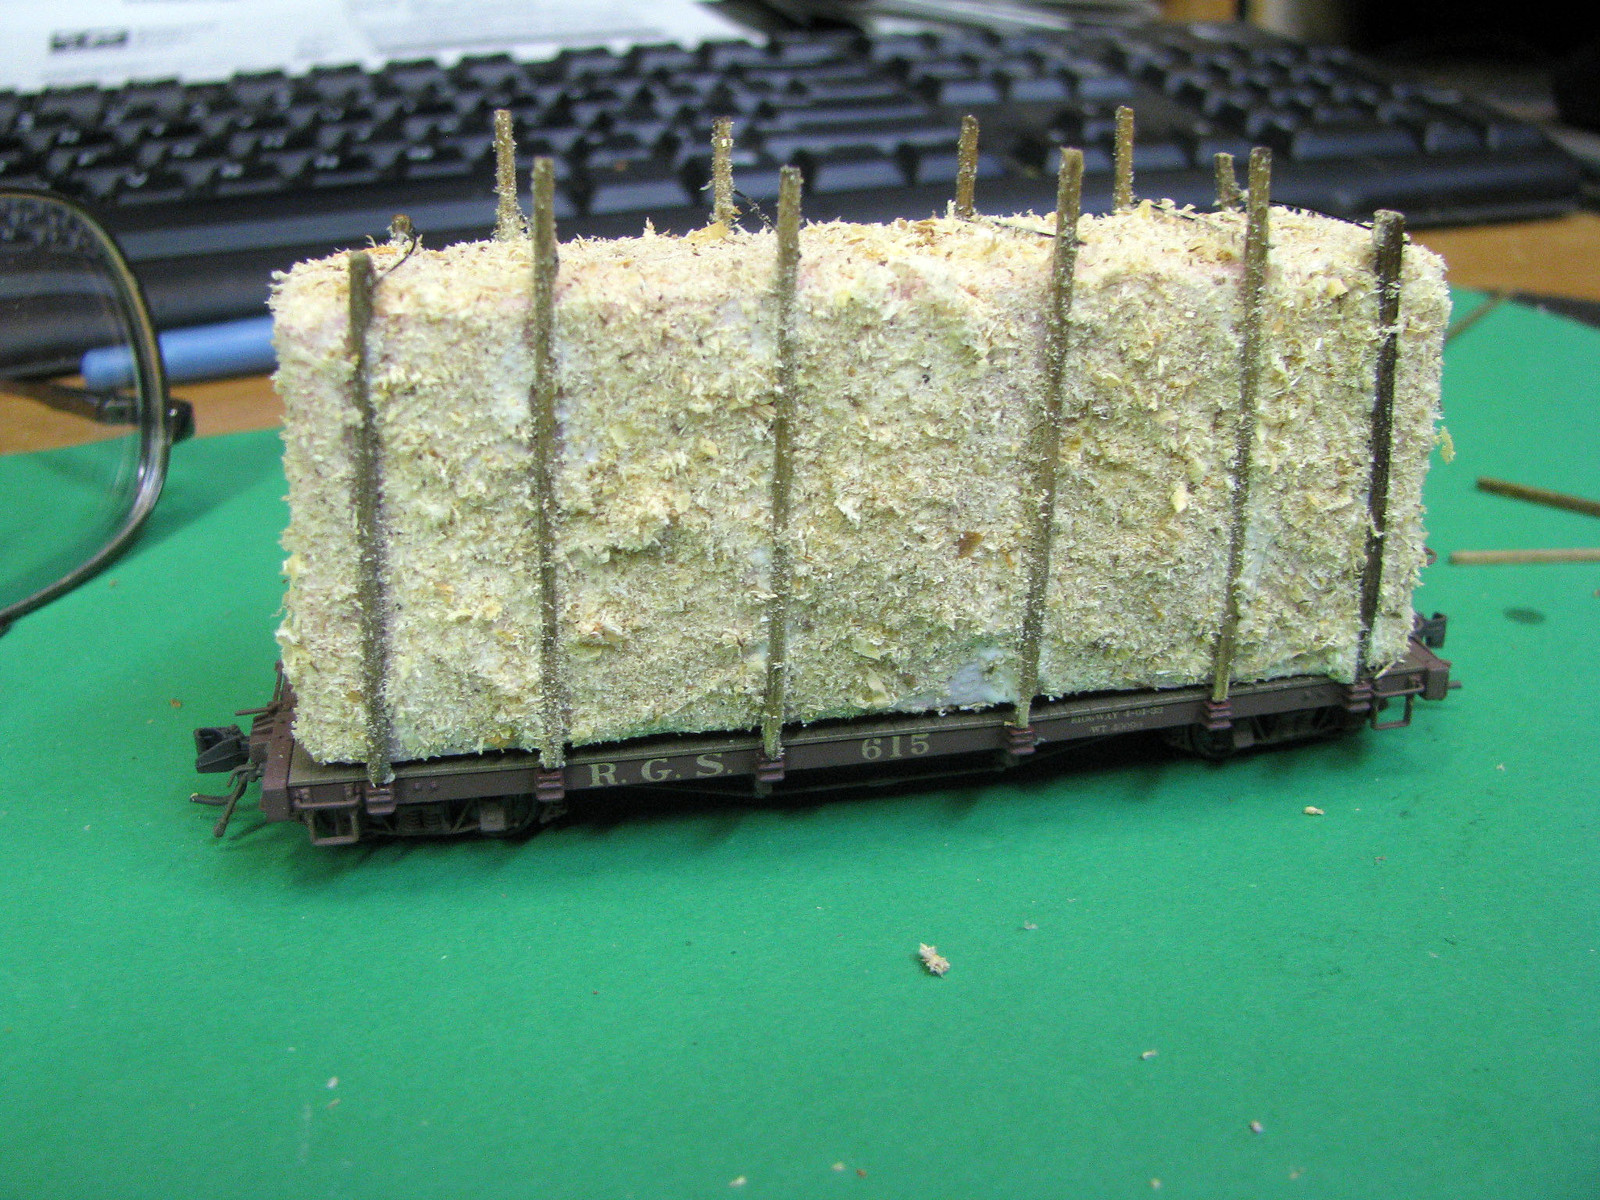 The load may need a tarp, not so much to keep the rain and snow off as to deter embers and sparks from starting a fire. Hay and straw was often shipped in house cars for this reason, but the narrowguage used what it had to get the job done. Obviously, the technique works for hay not on the RR, but sitting around on the farm or along the line at various shippers and customers locations. You can see a stack of hay on the dock at the elevator just behind and to the right of the coaling tower in this pic. 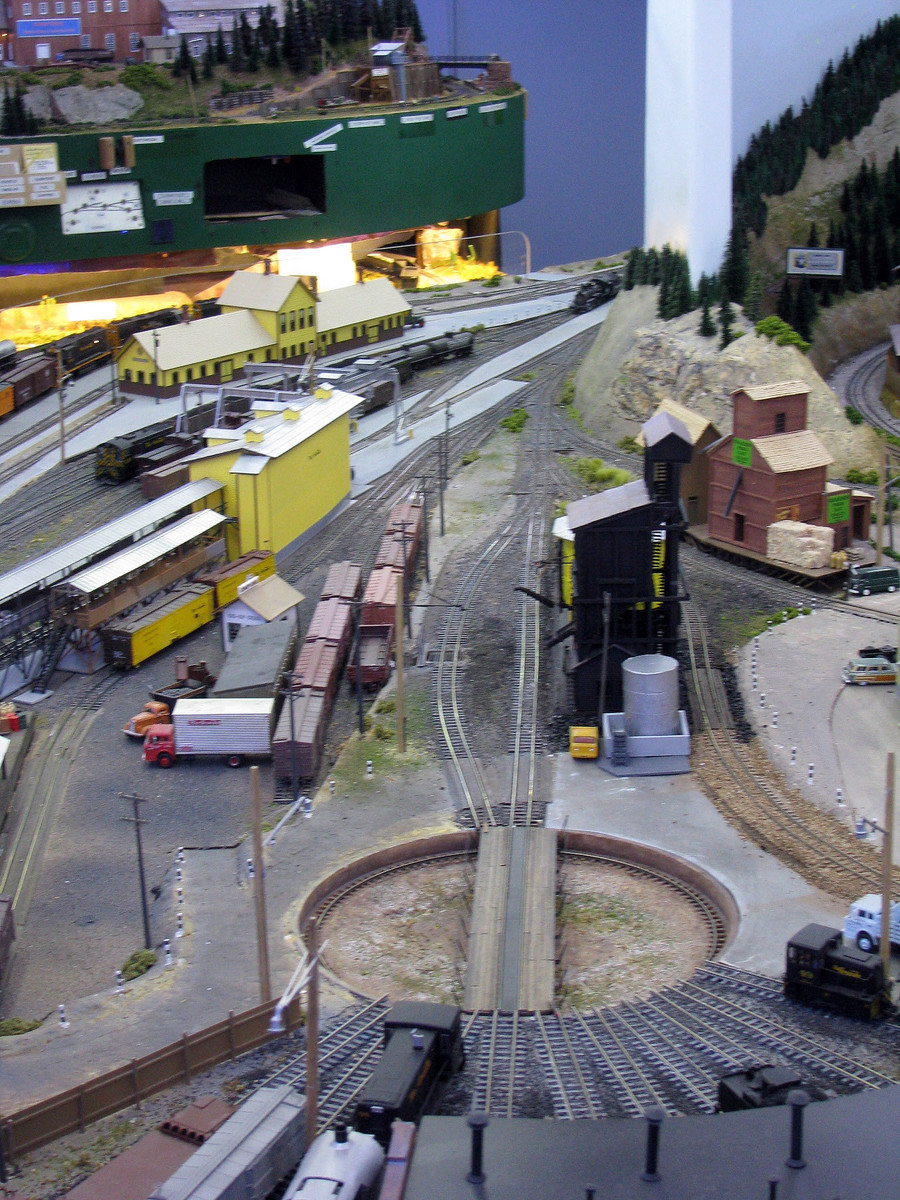 |
|
|
|
Post by mlehman on Jul 1, 2014 20:28:21 GMT -8
This edition is definitely in the EZ category, provided you can manage to saw a block of wood square within 1/16" or less tolerance. So we're back to playing with wooden block standing-in for real model trains? Not exactly. There are a number of sources of lumber and other building material "wraps" to make loads for bulkhead flats that you can find on the internet, plus a few published in magazines over the years, In fact, you can go generic and just use white paper. First, measure the car carefully that the load will go with. It's important to be very close, as big gaps between the load and bulkhead are usually unprototypical. Then consult any pics of actual loaded cars you can find. If there's any overhang, it isn't much, but they usually fill the car well between the bulkheads. The cut your block, being careful to observe safe working practices. Since the piece of wood won't be very large, it can be tricky to hold properly going through the saw. Test fit the block to the car. If all is good, hang in there, you're halfway there already. Next comes whatever wrap you desire to use. If white, it's easy, wrap carefully and straight, then tape it on the bottom. If it is a printed wrap, examine it carefully to find the top centerline of the wrap. This guides you as you wrap the load. Tuck the excess in neatly. Here is where we are... 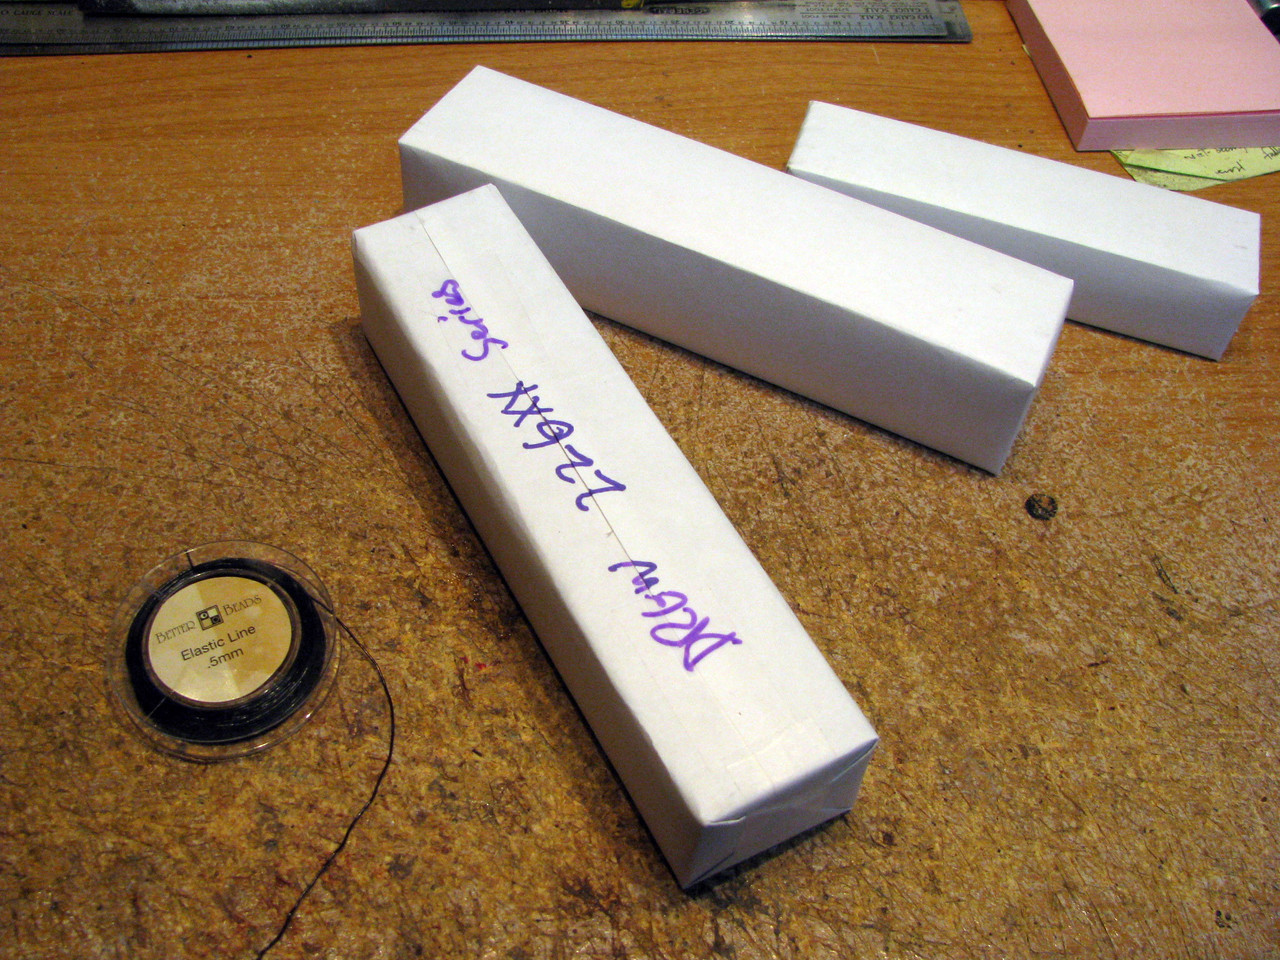 Note the reel of black thread-like material next to the load and car. It actually a stretchy black plastic line used for beading you can get at the art and craft big box. Makes it easy to get a tight tie-down line. CA the loose end at the right intervals on the bottom of the wrapped block. Then bring the length of line around the load back to where it started, apply another dot of CA and hit it with CA kicker to set it up as you apply modest pressure on the line. Once set, cut the excess line loose. 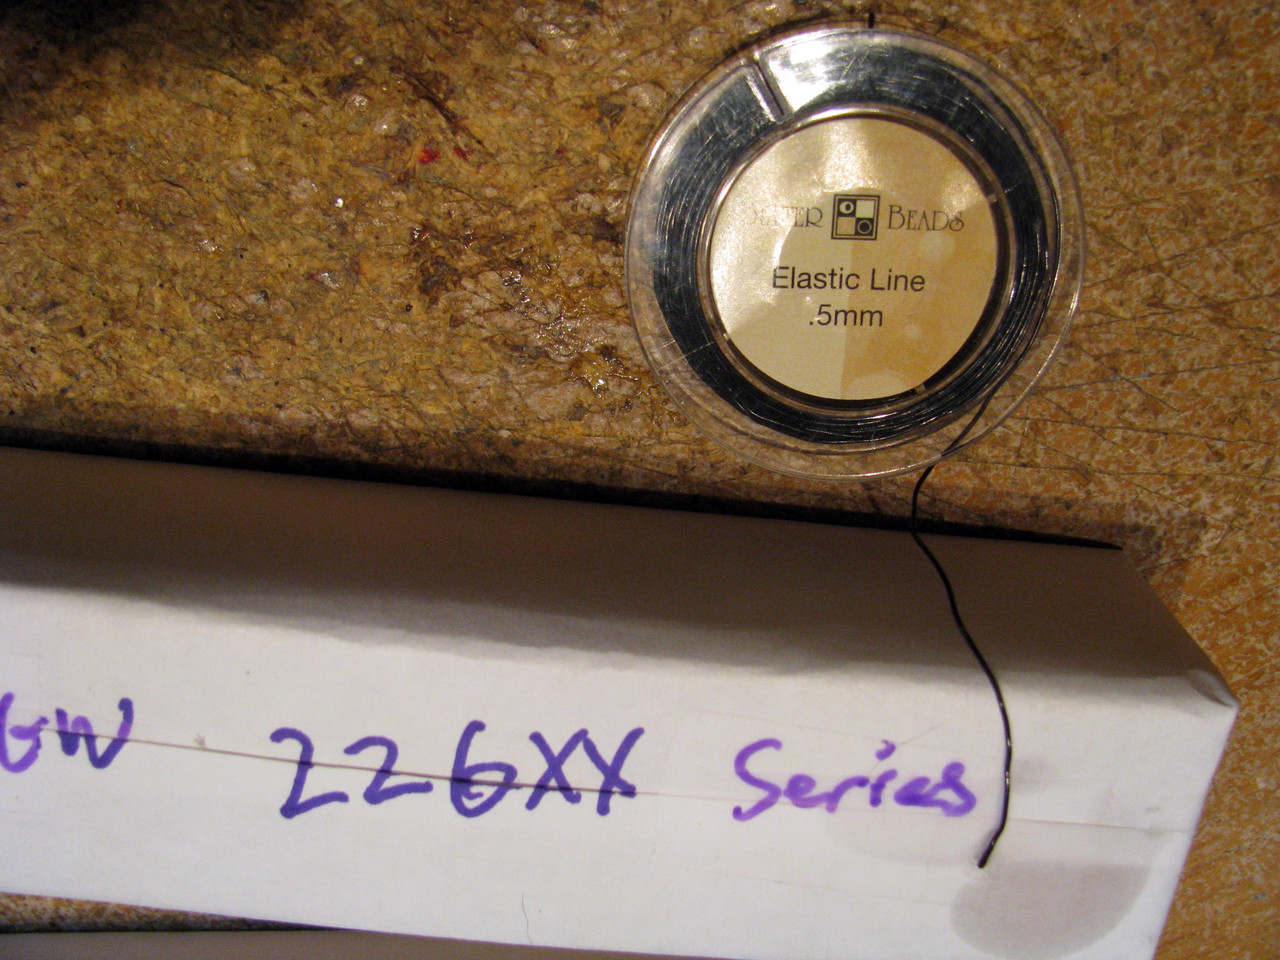 Hang in there, we're almost done. Here's a load with probably too few tie-downs, but it works for our needs here. The lines are at least nice and taut with hardly any trouble. The elastic thread keeps things easy. 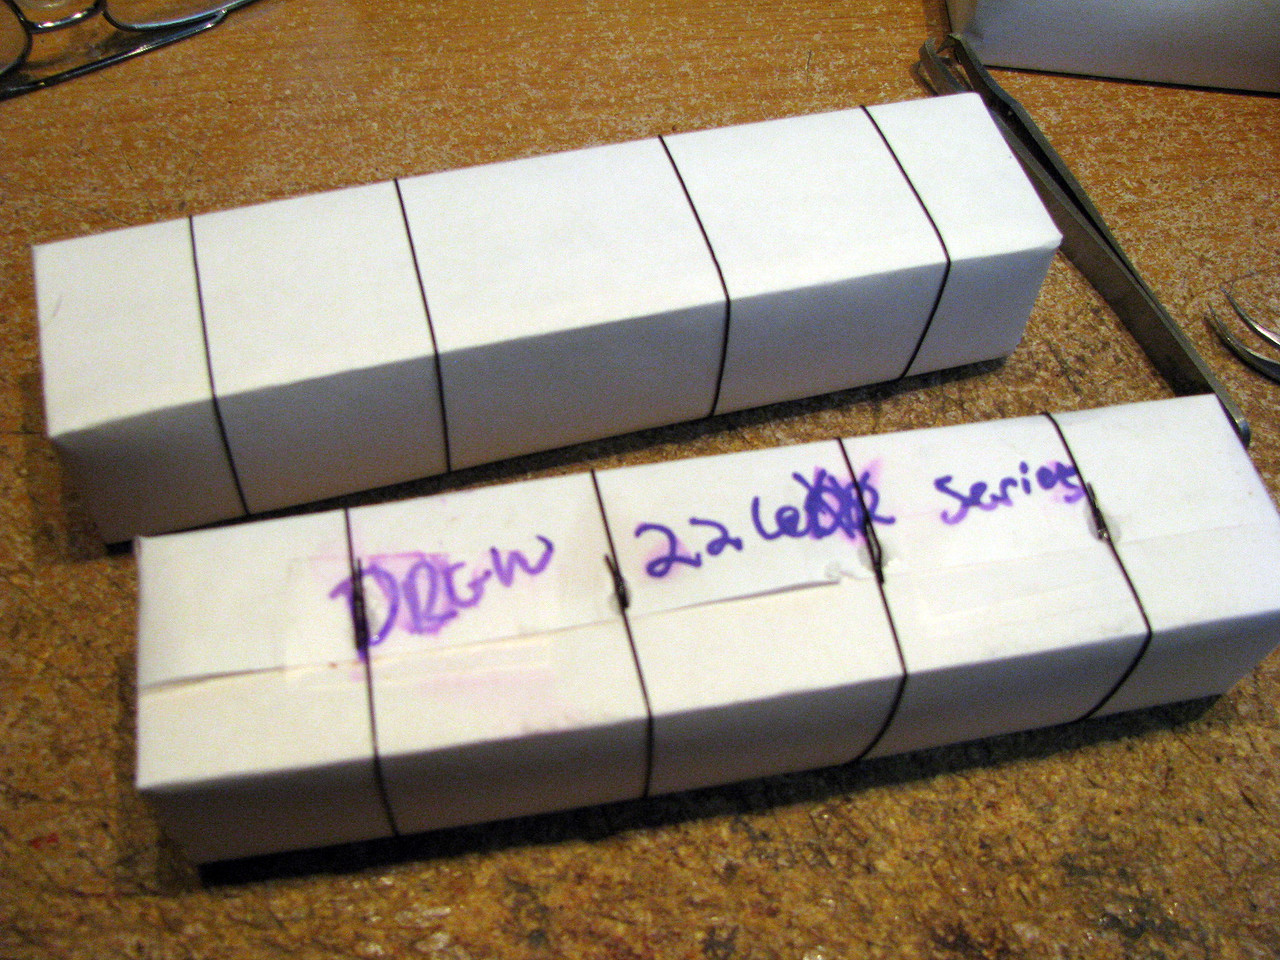 Here is a completed load on the bulkhead flat. Being cut to fit tightly helps the load stay on. But the elastic line that is between the load and the car deck has anti-skid properties, too. I've used it to wrap other loads and they do not tend to vibrate off either, even without the bulkheads to hold them in place. 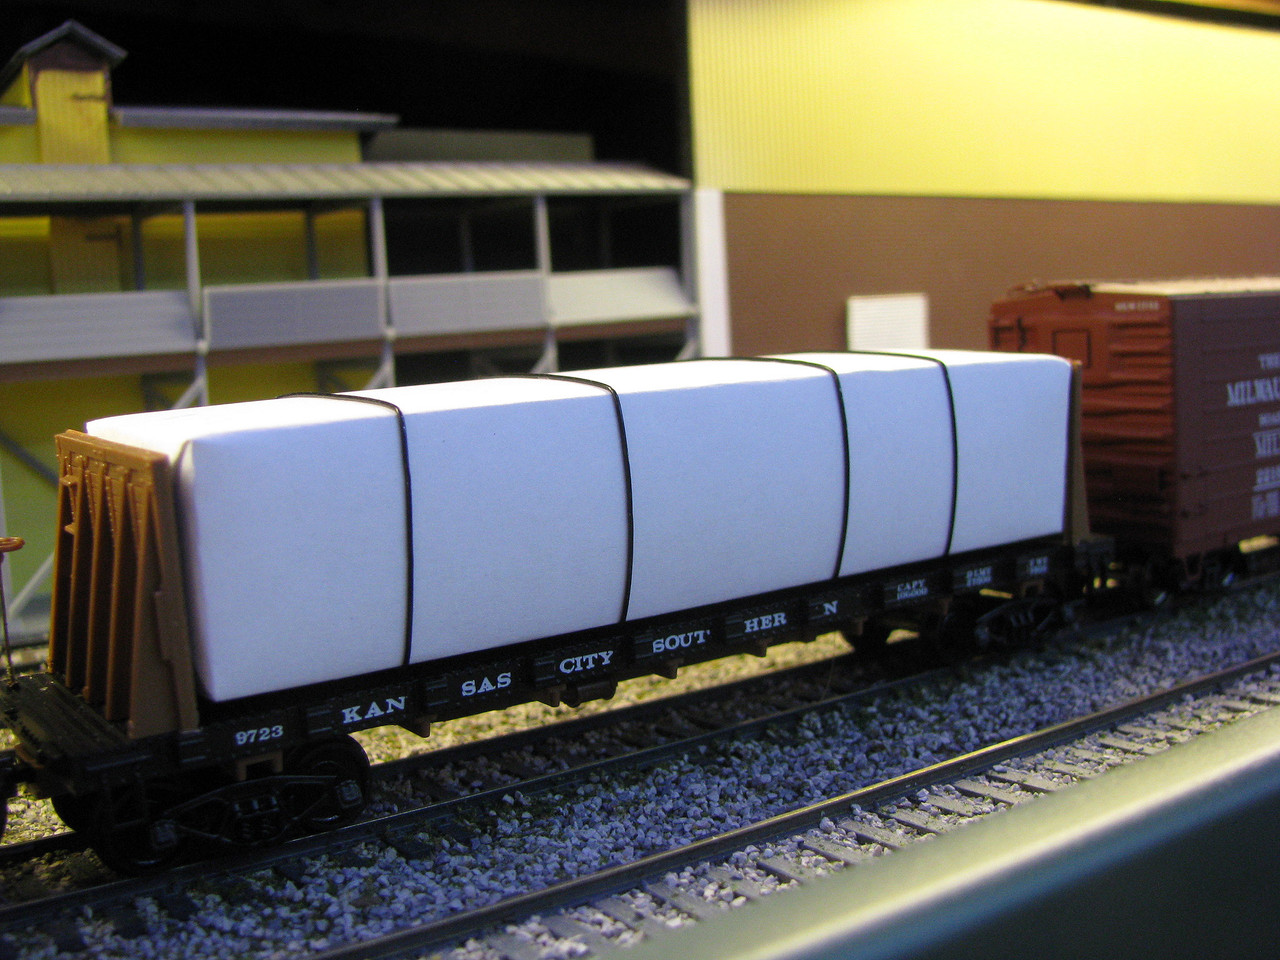 You could also apply some "stickers" or small pieces of wood to go under the load to facilitate gegting a forklift under the load to really jazz it up. Anyway, a very easy build that anyone can create good looking loads with -- and a whole lot less messy than the haystack...  |
|
|
|
Post by mlehman on Jul 4, 2014 9:52:28 GMT -8
Here's a very easy load to make. Virtually everyone already has the needed materials on hand -- good ol' aluminum foil  We're going to make scarp metal bales of aluminum foil. I learned this on in a tip published in one of the model mags in the 70s. Don't recall which one, but don't want to take credit for the idea, just spreading it as an idea, since it sooooo simple. I'm not sure if they even use square balers in scrap metal anymore, maybe it's handled differently or the bales are a different size now. 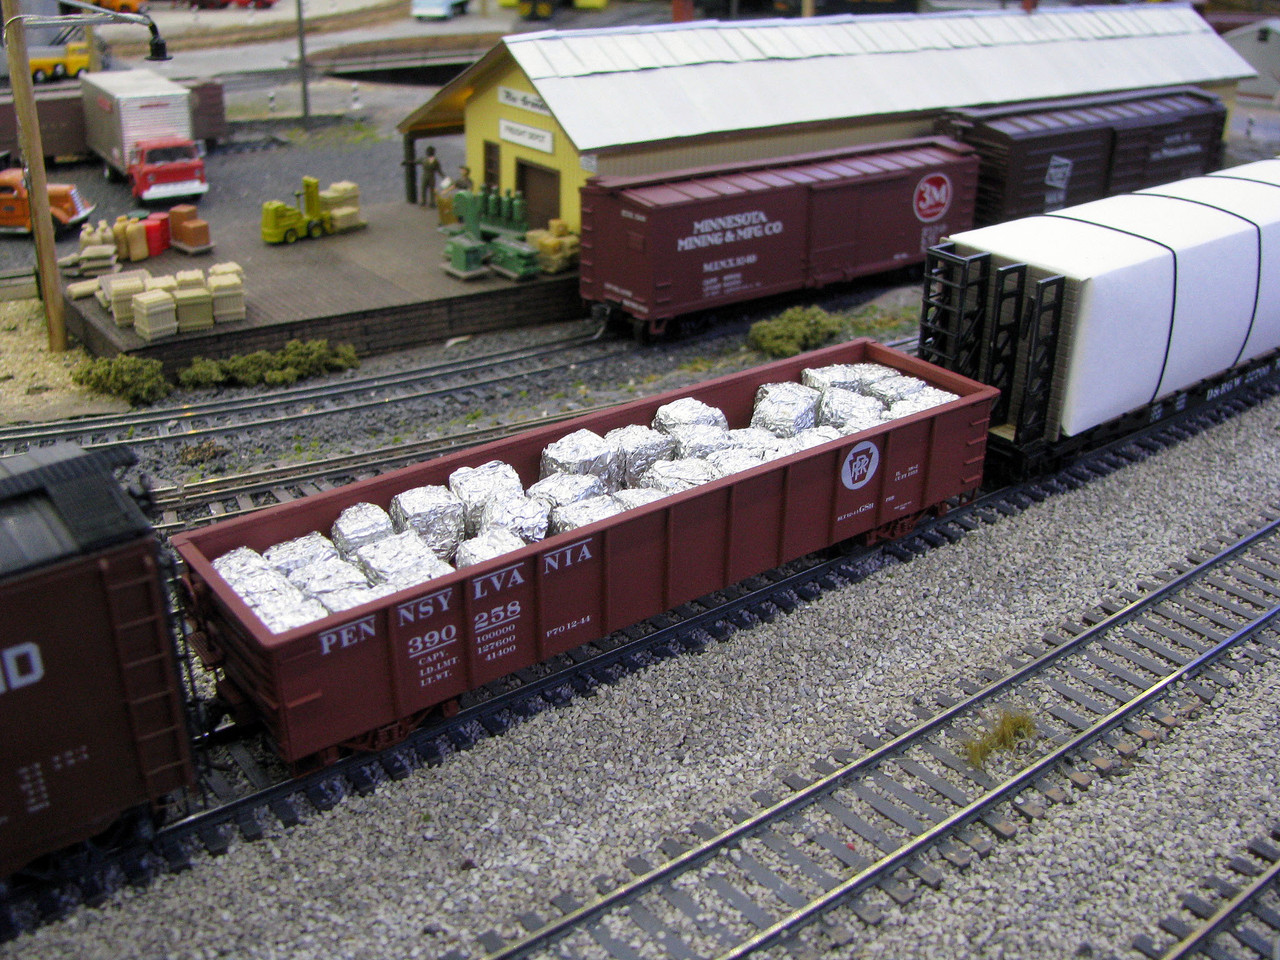 Basically, you get a piece of foil, wad it up, then square up the corners. You can almost make them with you eyes closed. If your bale is too big or small (mine are HO scale), adjust the size of the foil piece you start with. The idea is you want identical sized bales to give the impression they all are coming from the same scrap yard. 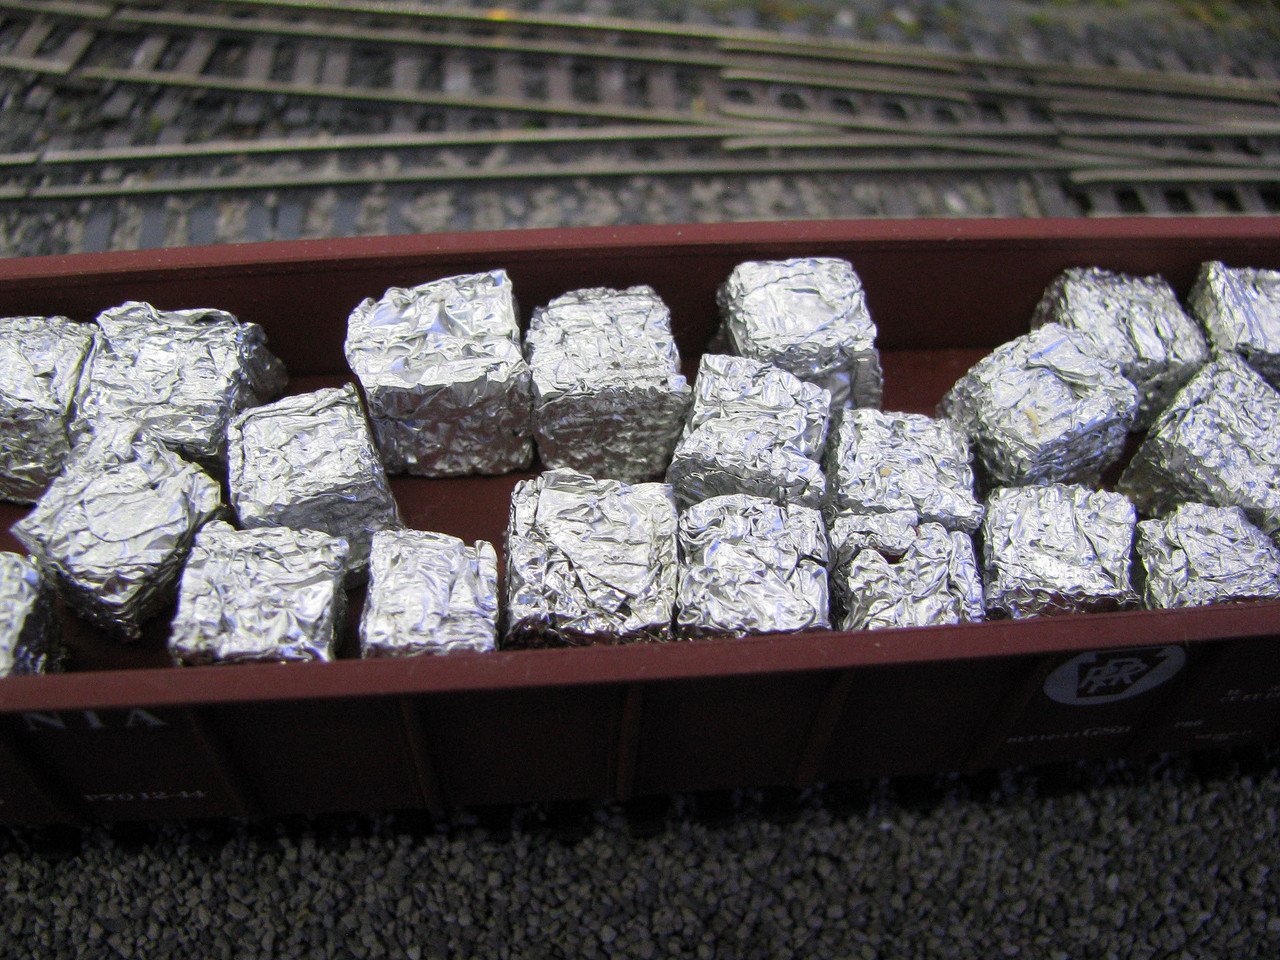 |
|
|
|
Post by bdhicks on Jul 4, 2014 10:24:38 GMT -8
I remember reading an article about making scrap bales that was similar, except it used a form to make them come out the same size.
|
|
|
|
Post by mlehman on Jul 4, 2014 10:33:08 GMT -8
That may have been the article's 80s version  Heck, with a form you could start selling these online for $4.95/car These are made be hand, although IIRC, I used a small block of wood to squash them between the table and my fingers to get that final square shape...been 40+ years ago, so the memory is a little hazy. |
|
|
|
Post by riogrande on Jul 4, 2014 10:34:57 GMT -8
Cool series. Looks like Wall-e has been working on the gondola load! =D
|
|
|
|
Post by mlehman on Jul 4, 2014 11:21:23 GMT -8
Cool series. Looks like Wall-e has been working on the gondola load! =D Jim, Thanks! Now if I can only find a HO scale Wall-e. I could leave him in the car. Don't get many young visitors, but I'd bet they'd enjoy spotting him getting a free ride. |
|
|
|
Post by mrsocal on Jul 5, 2014 5:30:48 GMT -8
Great looking load Mike. Such a simple idea too, I wounder how they would look after being dunked once in say a walnut wood stain and left to drip dry. Hummm, I see a little project coming on. Thanks buddy!!
|
|
|
|
Post by mlehman on Jul 5, 2014 7:31:45 GMT -8
Scotty,
Great idea! Guess you're talking about the sawdust I made the "hay" out of? You can get different colored sawduct, but it's a PITA. The load is looking more like straw to me now. Hay needs a tinge of green maybe to be believable or at least obvious enough to differentiate it from straw.
|
|
|
|
Post by mrsocal on Jul 6, 2014 7:38:02 GMT -8
To be honest Mike I was talking about the alum. cubes. I know, alum. does not rust but my thinking was more towards dirty and powder coated alum. products. Im in the glass trade and I see a lot of anodized and powder coated alum. door and window frames that all get recycled at some point. It would help to give the cubes some depth also. Thanks again for the idea. I will tinker around with it and let you know how I did.
|
|
|
|
Post by mlehman on Jul 6, 2014 8:03:07 GMT -8
Scott,
A-ha, now I see.
I've been thinking of a way to make the aluminum look like steel. Thought maybe of painting the foil when it's still flat with a rusty looking base, somewhat unevenly, then form it into cubes or whatever. The handling and squashing might rub off enough to show bright metal underneath. Haven't tried that yet or the really simple one of daubing the cubes after they are formed with various rusty finishes.
|
|
|
|
Post by theengineshed on Jul 6, 2014 12:24:39 GMT -8
What's being crushed to form the bales? If it is scrap auto, it really would have some color differences. Possibly cut the foil into thin strips, then compact it? Seems like I have seen colored aluminum too, maybe some Christmas tinsel? Anyway, 2:40 into this video is the Goldfinger disposal of a body in the Lincoln scene. Interesting youtube comments, the bale dropped into the pick-up was half a Lincoln, minus engine and transmission. Gives an idea of what a new car body looks like after compacting... Goldfinger |
|
|
|
Post by theengineshed on Jul 6, 2014 12:34:48 GMT -8
I wonder if you can put foil through a paper shredder, then compact it...
|
|
|
|
Post by mlehman on Jul 6, 2014 13:09:05 GMT -8
Yeah, the different colors were why I was suggesting to daub the cubes. I figure if the base coat is rusty looking, then you daub different colors on the bales made from that. After all, only the outside of the bales really needs "detail." I figured between the foil underneath where paint gets scrubbed or scraped off, the base coat of paint, and whatever additional colors to suit your operation. For instance, auto scrap would be different than say mechanical or farm scrap, where rust may actually predominate.
That's another useful thing to remember when making loads. Once you have a design or technique, it can often apply in various forms, like the scarp we are discussing right now. I'll have a furnace filter piece here shortly. The materials and technique are the same, but the loads can appear to be very different depending on paint.
Now, about running the foil through the paper shredder, don't let your better half catch you. I suspect it would work, but wouldn't do it any good.
|
|
|
|
Post by bdhicks on Jul 6, 2014 15:18:45 GMT -8
Thinking about it some more, in addition to the forms, the article I read also mentioned cutting up colored foil candy wrappers for material, which not only gives the bales a variety of colors but also an excuse to eat candy.
|
|
|
|
Post by onequiknova on Jul 6, 2014 16:15:44 GMT -8
I've seen a pair of slip joint players used to make uniform cubes. The kind of players with two settings. Set them to the larger opening so the jaws don't touch, then crush away.
|
|
|
|
Post by mlehman on Jul 6, 2014 18:01:17 GMT -8
Thinking about it some more, in addition to the forms, the article I read also mentioned cutting up colored foil candy wrappers for material, which not only gives the bales a variety of colors but also an excuse to eat candy. That's a tempting idea for us candy lovers  , but my doctor would be appalled you're tempting me with it. |
|
|
|
Post by fr8kar on Jul 7, 2014 8:50:47 GMT -8
Excellent thread. Thanks for all the effort you put into this, Mike.
This should be pinned or at least have a spot in the project archive. It's one of those threads you hate to see fall off.
|
|
|
|
Post by mlehman on Jul 7, 2014 20:27:46 GMT -8
fr8kar, Thanks for the appreciative comments. I enjoy sharing things, as most of these ideas came about because someone shared them with me or put a bug in my ear that caused me to think them up. Hopefully, the computer will cooperate, this may be a little long if I can find all the pics. It's the Giant Foam Load Edition of EZ to Complex. So what kind of foam am I talking about? Lots of experiments with foam to varying degrees of success, so please tell us what or what not works for you. This could almost have a thread of its own, but let's try to fit everyone in, it's a big internet It's humidfier belt/element foam. I got the stuff I'm using now from Menards. It's RPS Products/Best Air Part# HM2, which they call"Replacement Filter Water Pad Humidfier Belt" A really long name...but it has a lot of advantages in making loads. It comes in different sizes to fit different humidifiers. Consider the size of the cars you'll be making loads for. One size may yield more loads or when cut in a certain direction, etc. The HM2 fits both my standard and narrowgauge cars well. It's just less than 7/8" thick, so fills most HO scale cars well. It's black, really a dark grey. So it even looks like coal before you paint it, which we will get to in a moement. It's easy to shape. I use scissors or do it like the Wolverine. It's easy. It holds it's shape. It springs back gently, which is an advantage as cutting close to the size of the car will yield a springy holding effect with a little care. It weighs practically nothing, unlike those beuatiful but heavy loads you can buy instead of this stuff...I have some on my SG, because you just add more units. My NG lines are either this foam or styrofoam for most loads, because weight is a big factor with our puny locos on the NG. It has a texture like coal, little glints and all. This also works for other minerals, just change the paint. This foam takes paint well,..did I say something about paint?...it hasn't melted with anything I've prayed it with so far, a big advantage over some delicate foams. It's cheap. I'm on my second bag/belt, something like $7 or $8 and made literally dozens of load. Course most are NG loads, but compare this DIY project with putting down greenbacks for the same numbers. Spend the money saved on a new loco. There's probably something I missed, but I can see some in the very back are starting to squirm, so I'll show some pics now. |
|
|
|
Post by mlehman on Jul 7, 2014 20:48:57 GMT -8
Foam Loads I've Known Here's a cut of gons with foam coal loads arriving in Silverton. The only thing besides cutting to size done to them was to spray them with flat black paint. 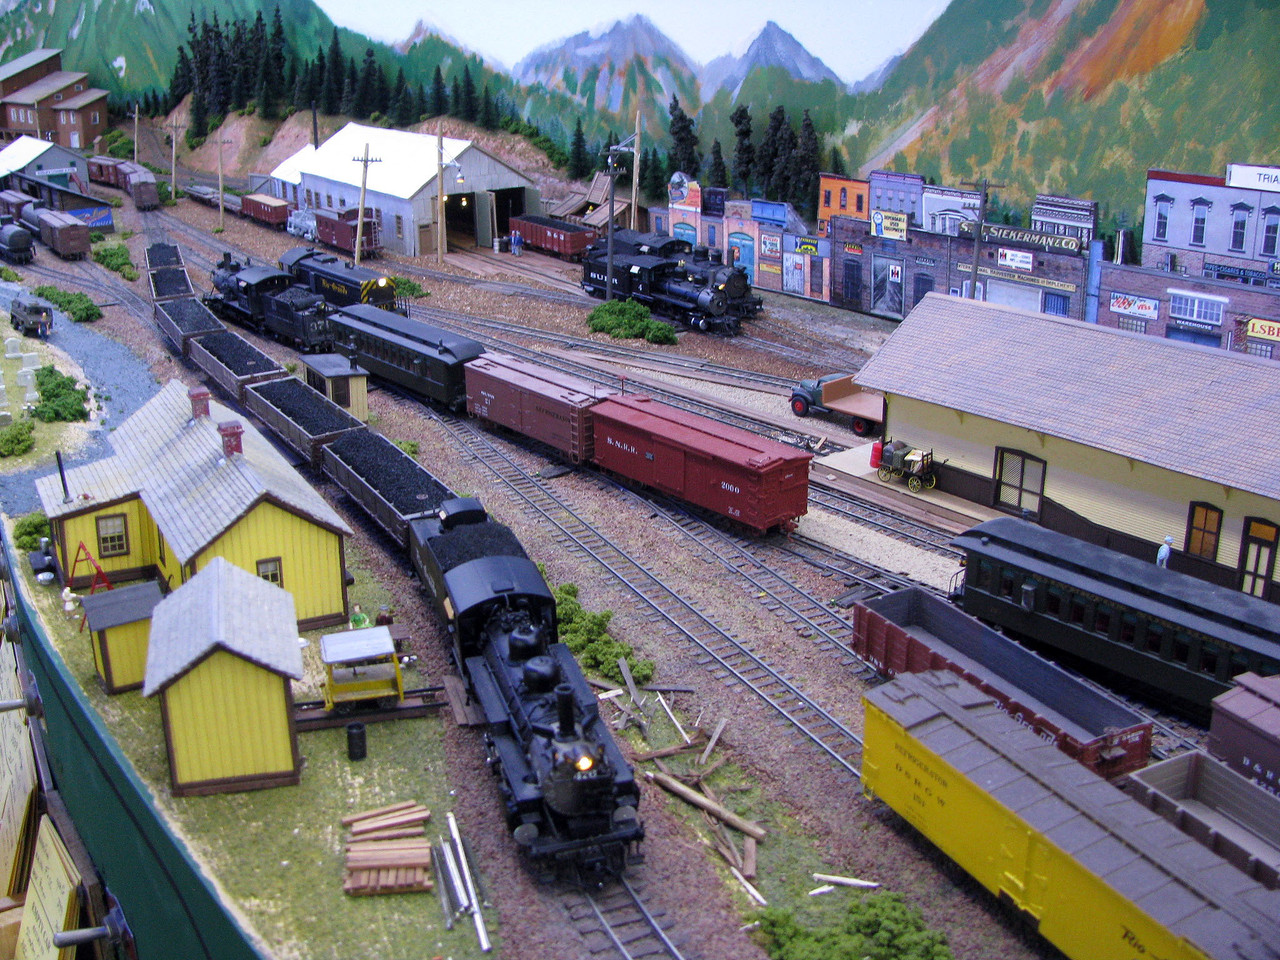 The loader at the May Day Mine in Hesperus. The NG gon has a foam coal load. 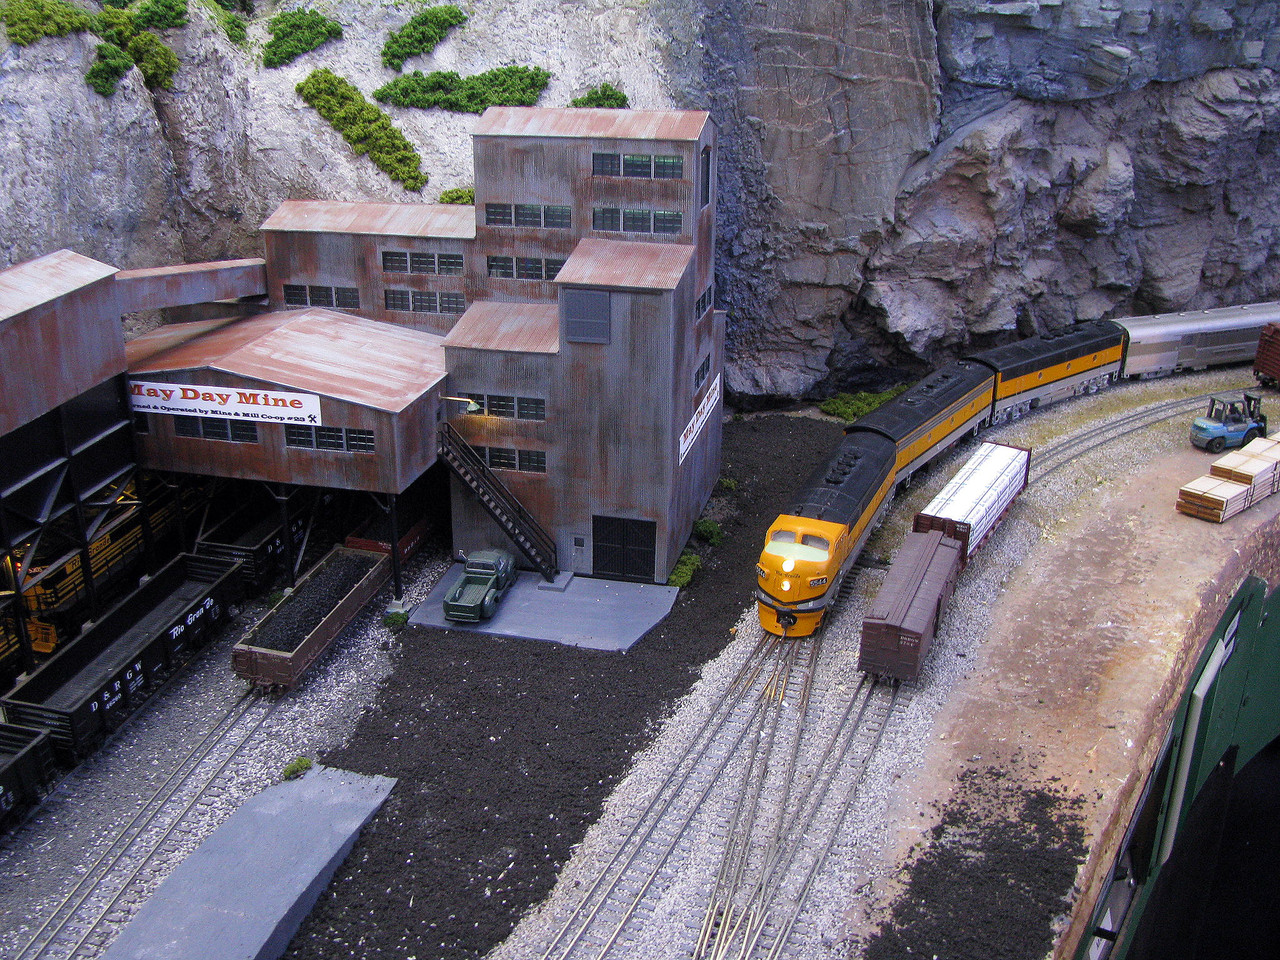 This SG GS drop bottom gon has a load of uranium ore for the ASARCO Mill. I've got at least two different colors of this stuff. Still working on making it glow in the dark, just for fun. I actually have an idea on how to do it...    Another big advantage of this stuff is that you can use your uncoupling pick to snag it out of the car, usually without derailment on days when my hands are steady and my aim is true even in NG cars, which some say jump off the track if you just look at them the wrong way...  For comparison purposes, here what you get elsewhere, a factory Atlas Trainman hopper coal load on the right and a custom resin load in the GS gon. Nice, but they have disadvantages besides costing mores one was "free" but you pay for it anyway). 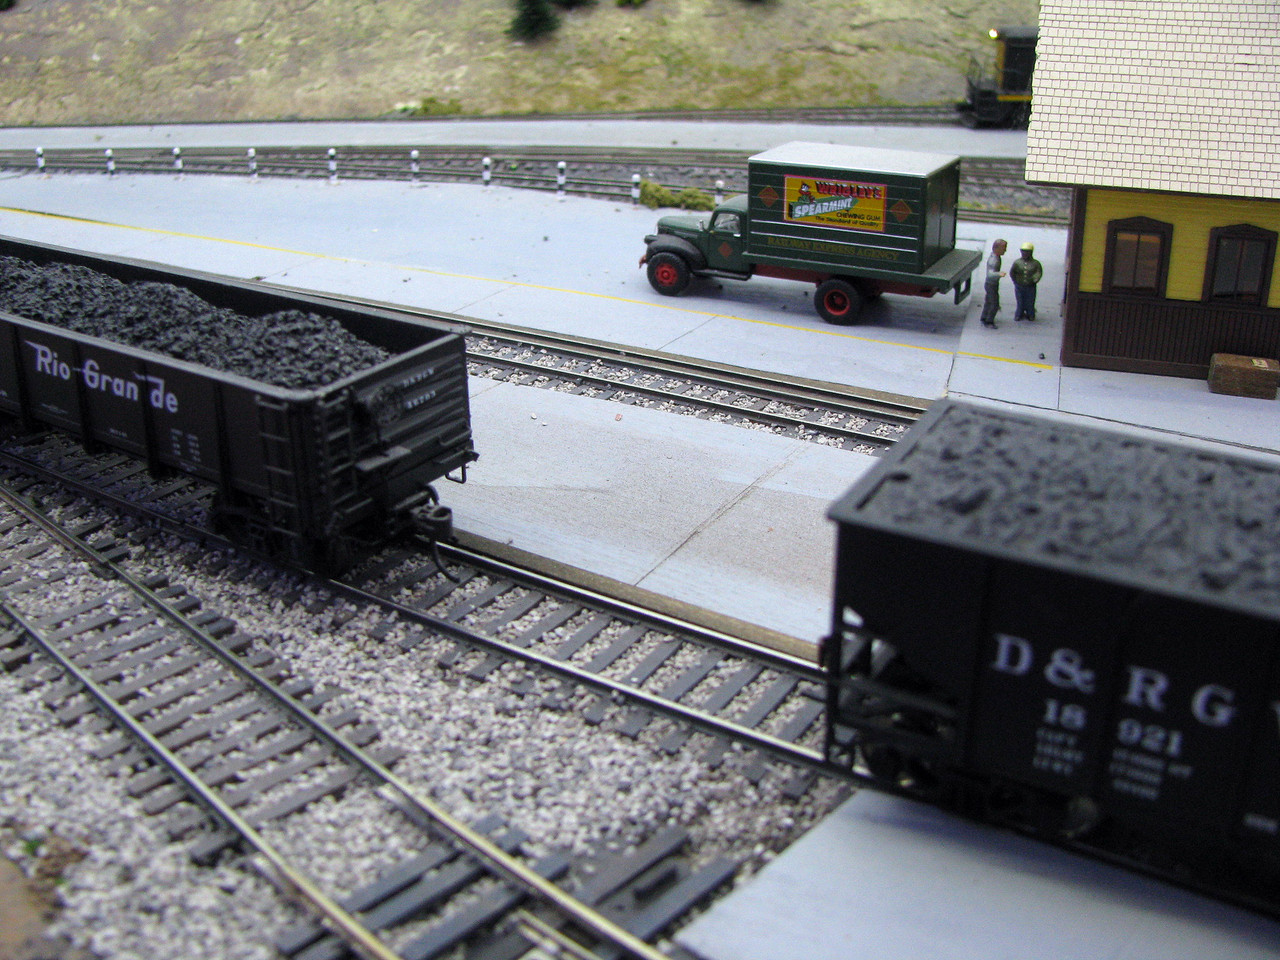 They do make for better derailments than the foam, I'll grant you that.  |
|
|
|
Post by mlehman on Jul 7, 2014 21:58:54 GMT -8
So, there's gotta be drawbacks, givenj the world awaits our concerted efforts to make it a perfect place. This pic of a another U ore foam load on a slab of wood gives a hint... 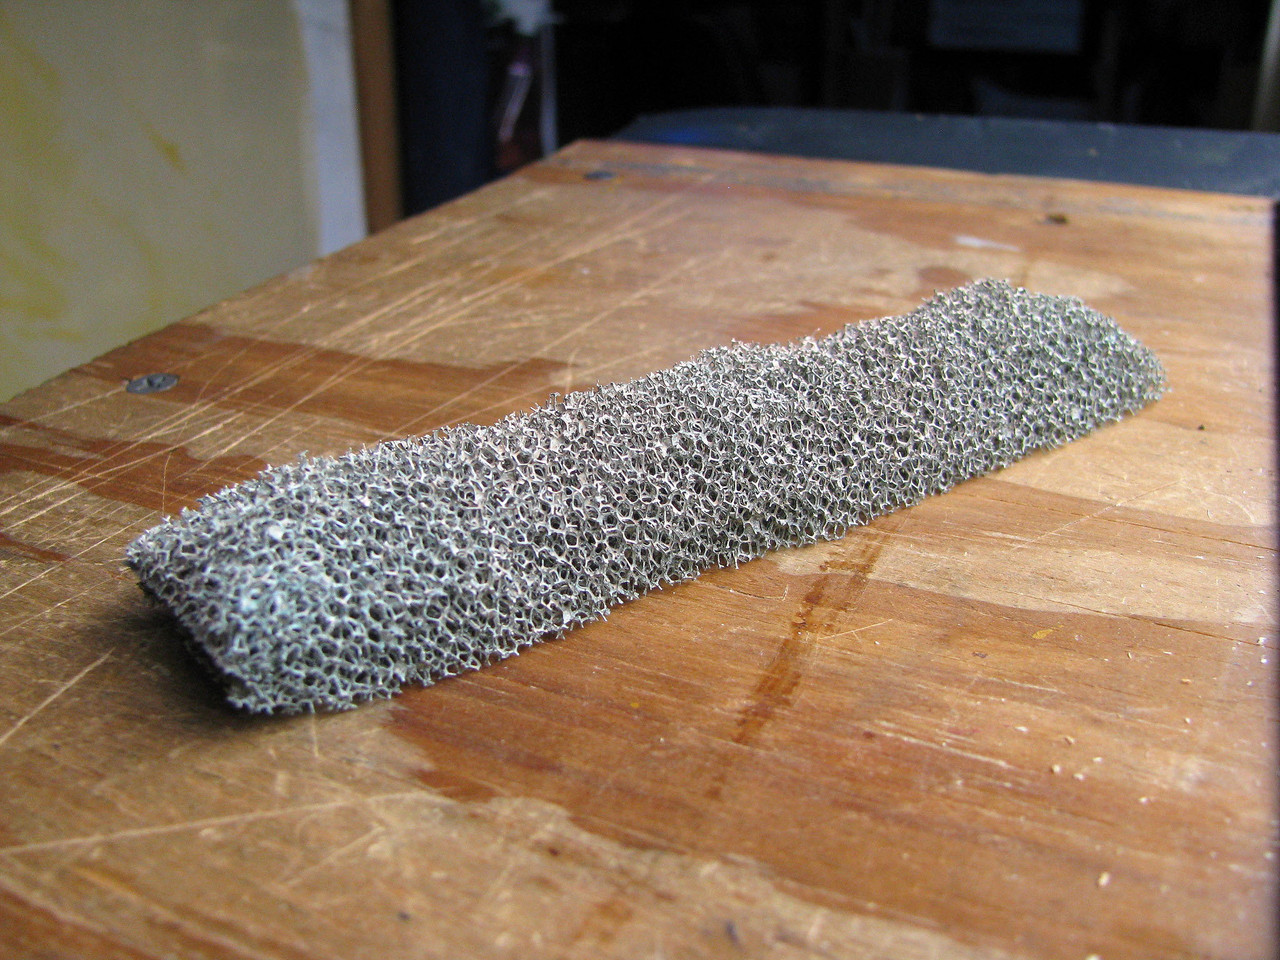 When you get up close, it looks rather strange, as the close-up of some fill in a side-dump car shows. 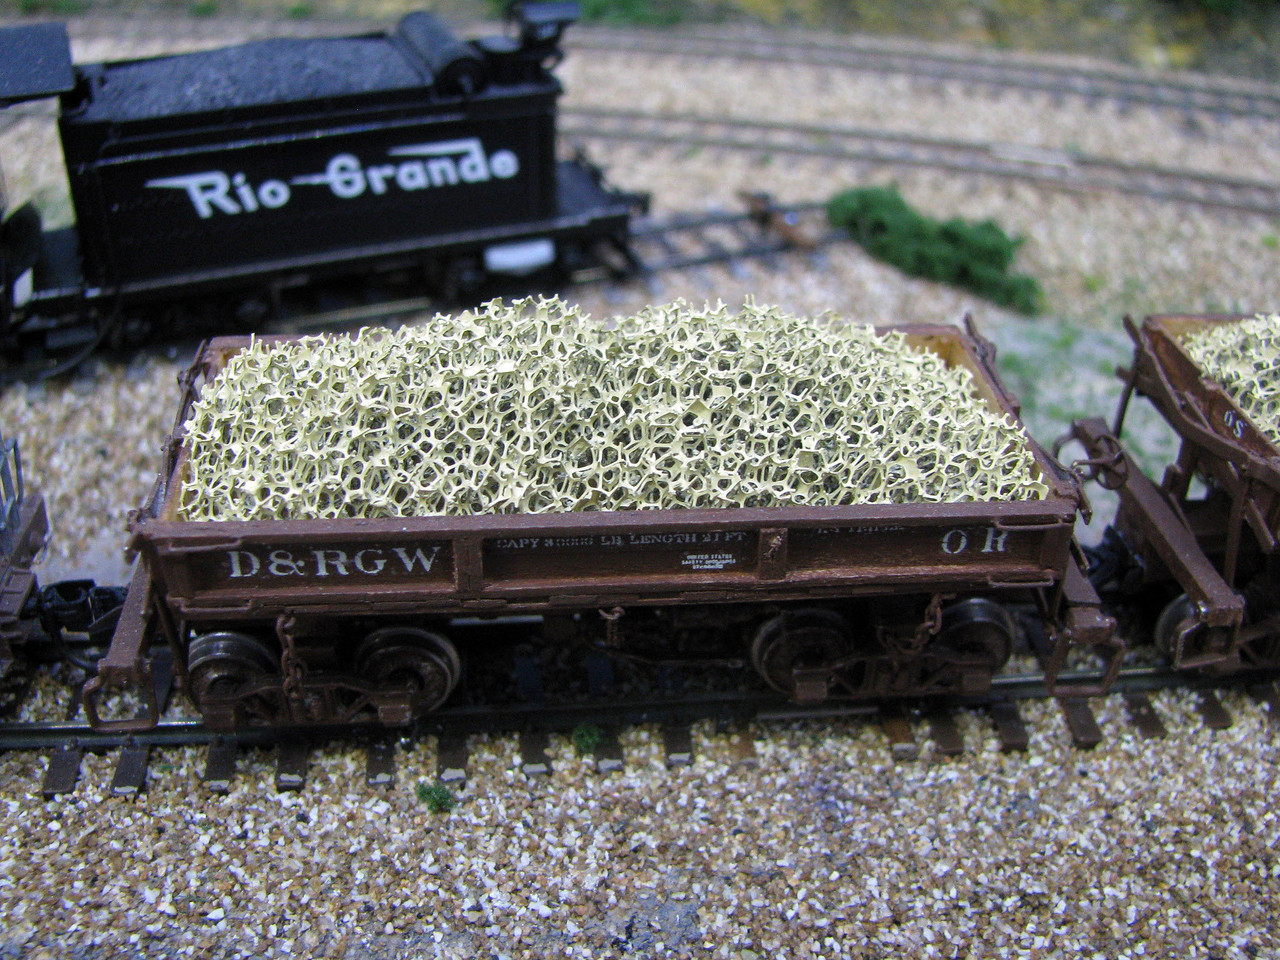 As you back away, the oddness gives way to visual magic once again. Frankly if you use the 3 foot rule, you hardly notice. You could adhere some loose material to help fill things visually, but then you lose another advantage of this stuff. It's not messy at all once the load is made. 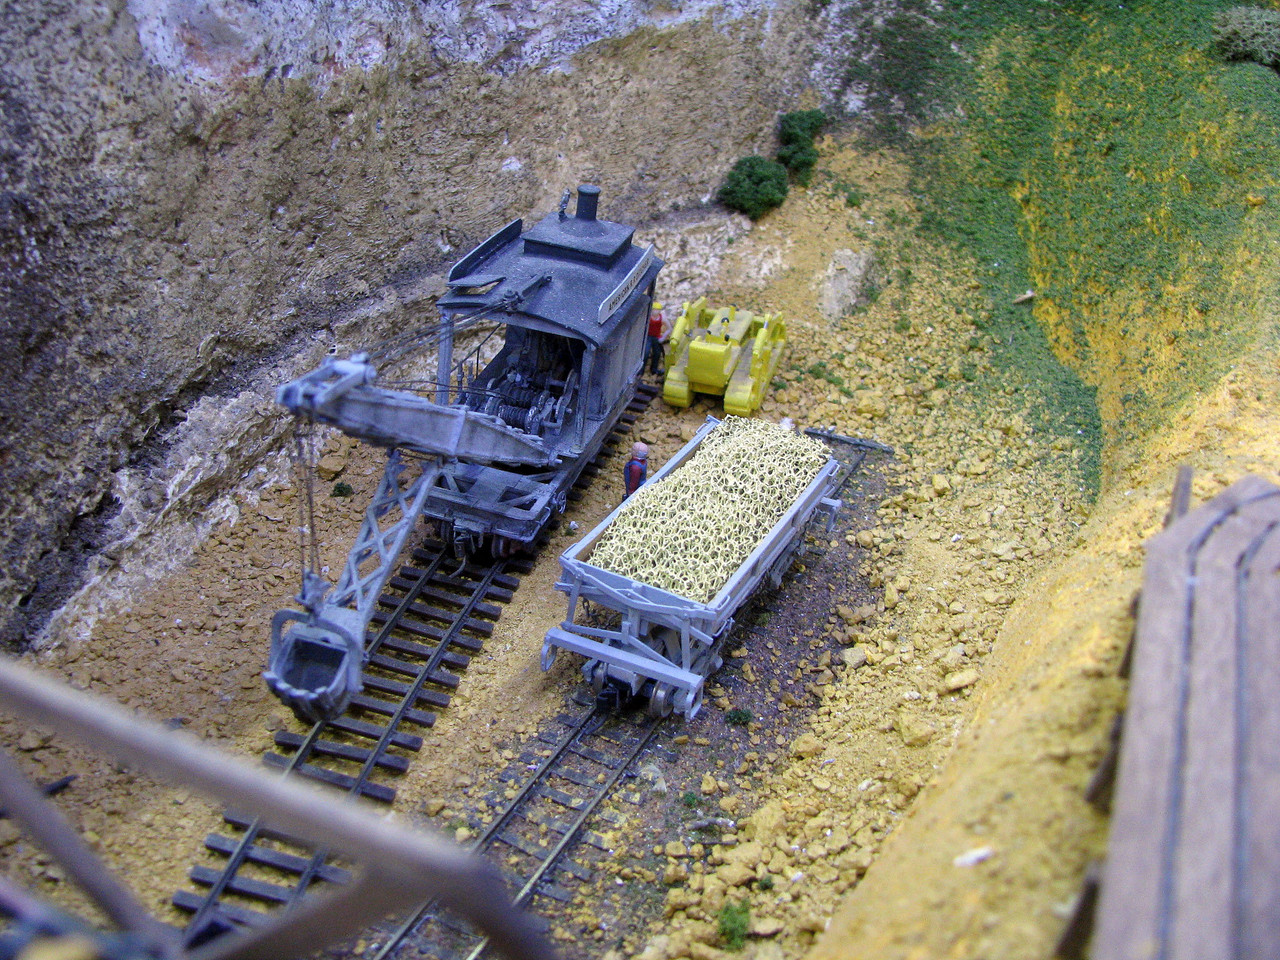 This pic of a coal load that got an especially heavy coat of paint suggests a solution. The cells are on the large size, but the do start filling with paint if you get too heavy. But this could also be used to build up enough to remove some of the less graceful open cell effect. Maybe someone wants to experiment? 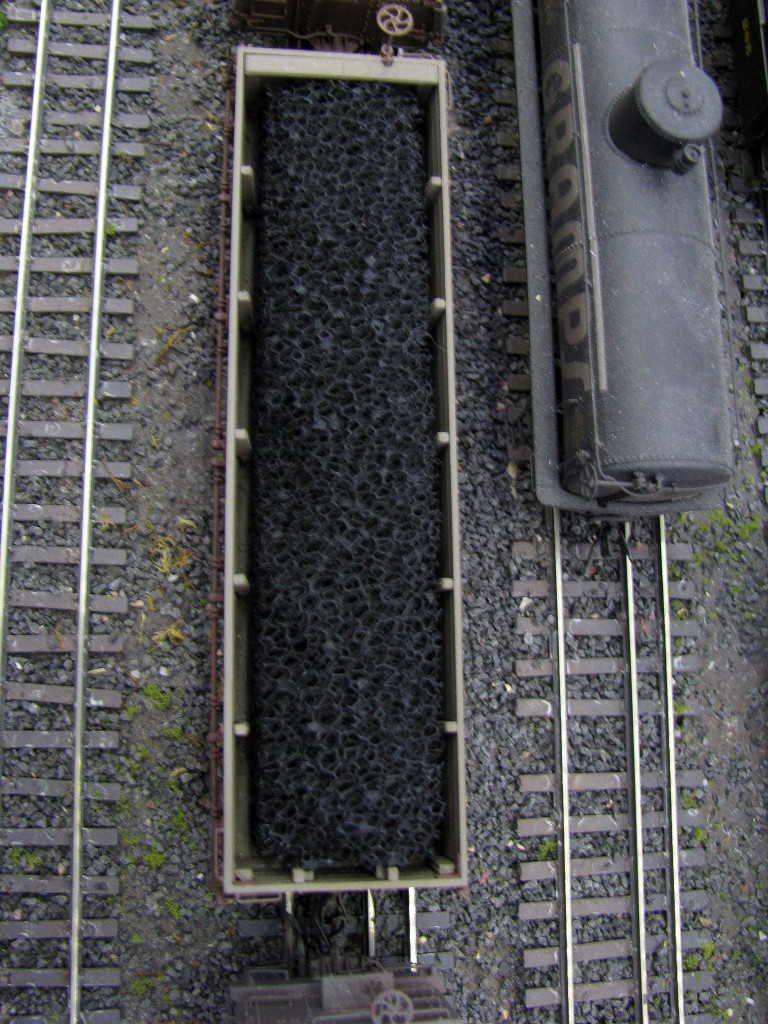 That last pic also shows the other potential sticking point, too. The Rio Grande NG drop bottom gon has stakes on the inside. I'm lazy, so cut the load with straight sides. You could be ambitious and cut neatly to fit around the stakes, but it's not been worth my trouble yet. YMMV. If the car is smoothsided inside, it is a really convincing load for coal. 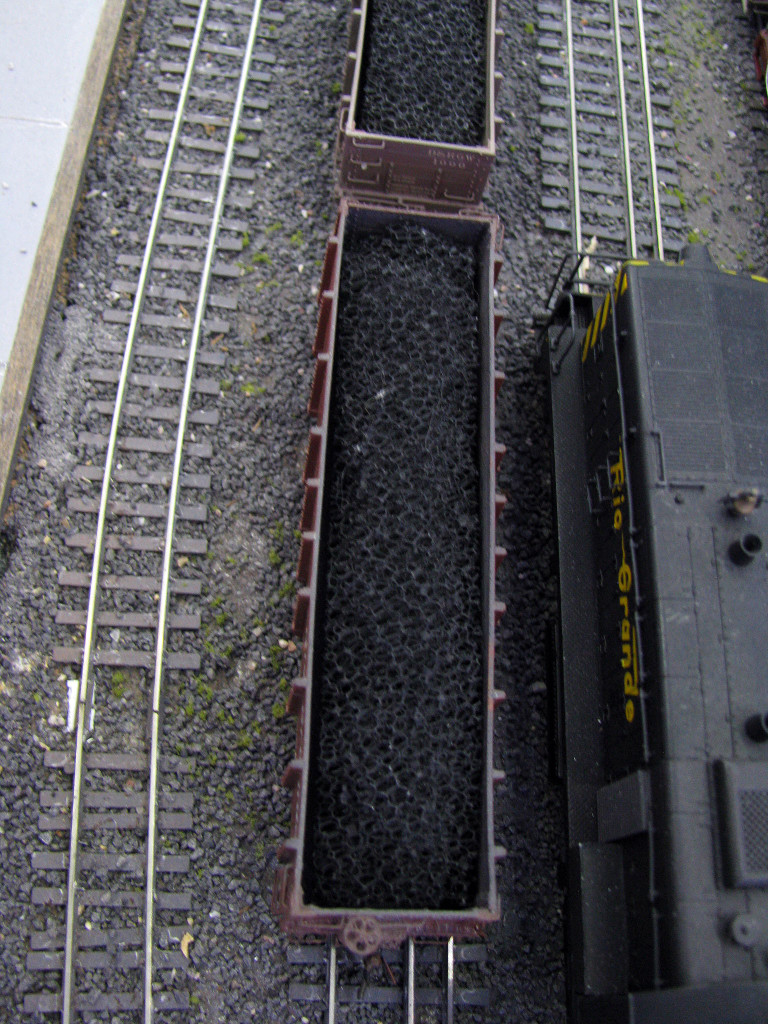 Finally, another set of U loads from some special cars leased in dedicated service to the government. It's easy to make it fit with foam. 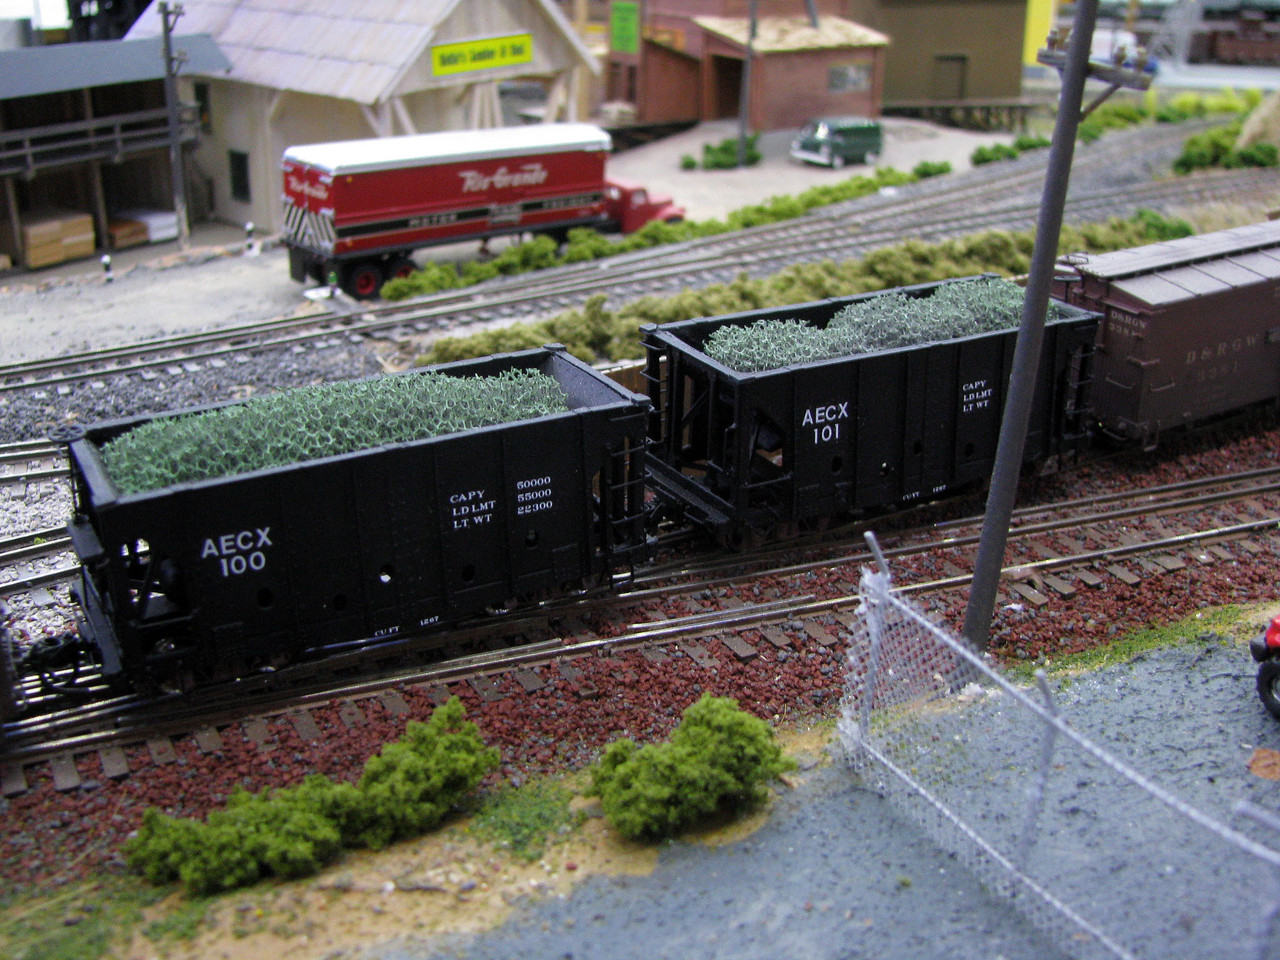 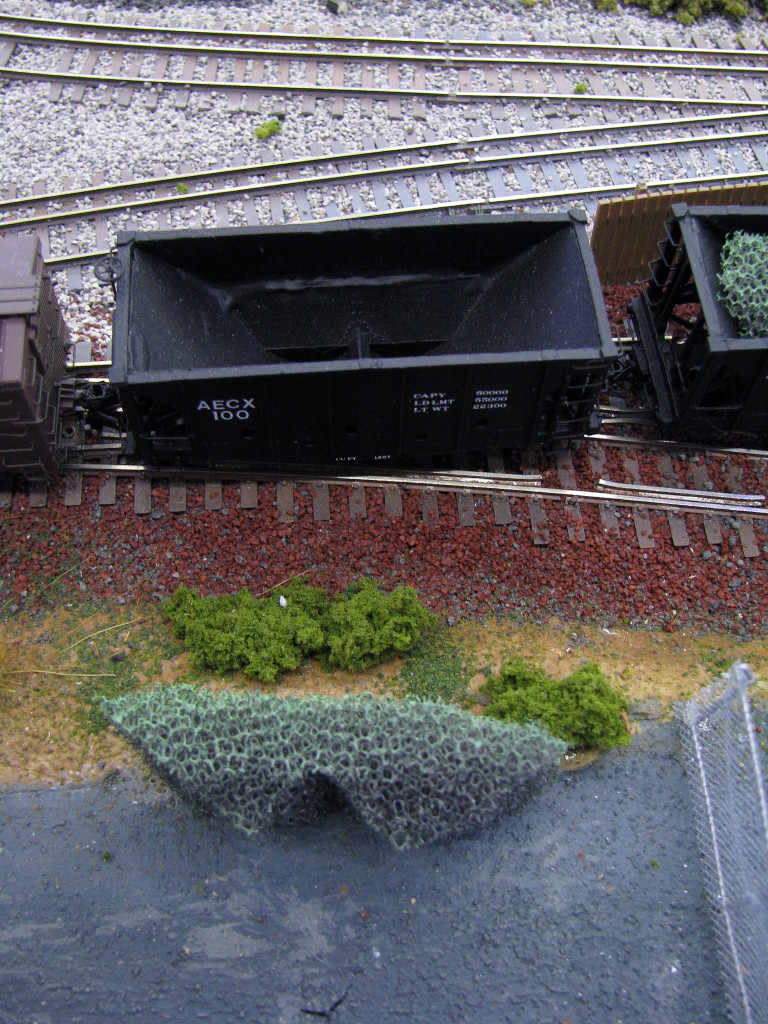 Hope this works for someone. It could even be a holdover until you make or buy some "real" loads. That's actually where it started for me, but it worked so well I've stuck with it for most uses. For closeup pictures, a "stunt double" load can stand-in, I suppose. Hard to beat the price. |
|


 Heck, with a form you could start selling these online for $4.95/car


 , but my doctor would be appalled you're tempting me with it.

