HDK
New Member

Posts: 1 
|
Post by HDK on Jan 4, 2016 3:37:34 GMT -8
Hi, I'm really digging the ATSF cabs. I use two at work: a ce-8 and ce-11. I know they are 43ft 5in from paperwork.
|
|
|
|
Post by fr8kar on Jan 4, 2016 5:26:59 GMT -8
Hi, I'm really digging the ATSF cabs. I use two at work: a ce-8 and ce-11. I know they are 43ft 5in from paperwork. Thanks! I initially did the Frisco and Cotton Belt cupolas but once I realized that if I could somehow figure out how to draw an X panel roof that I could have both late Mopac cabooses and Santa Fe CE-6/8/11s I went all in on this project. It has grown so much from there. Anyway, I'm sure I'll do another Santa Fe caboose after this one, but probably a CE-6 just to shake things up. The ATSF drawing I have, which shows the lettering arrangement on CE-6 cabooses, shows 42' 1-1/2" over the strikers and 44' 10" over the pulling face of the couplers. I wish I could remember where I got it so I could share the link. |
|
|
|
Post by fr8kar on Jan 4, 2016 14:49:06 GMT -8
Here's a better drawing than the lettering drawing I have been using: img.kansasmemory.org/00226830.jpgIt shows the length over strikers as 40' 4-1/4" and the length over pulling faces as 43' 0-3/4". |
|
|
|
Post by icrr3067 on Jan 4, 2016 18:12:58 GMT -8
Could this same process be used for IC Centrailia cabooses?? Because I would be interested in a bunch of those.
|
|
|
|
Post by fr8kar on Jan 4, 2016 19:32:02 GMT -8
Could this same process be used for IC Centrailia cabooses?? Because I would be interested in a bunch of those. I must admit I'm not very familiar with IC cabooses. Are you talking about the same type that Wright Trak did? www.wrighttrak.com/page3.php?view=productPage&product=9I don't believe I could 3D print the roof and cupola for the price of the entire Wright Trak caboose. |
|
|
|
Post by icrr3067 on Jan 5, 2016 14:43:08 GMT -8
Yes that's the one I'm talking about. The reason why I'm asking is because I don't like the wright track caboose. There's a lot of things wrong with it also the caboose had three types of roofs.
|
|
|
|
Post by fr8kar on Jan 5, 2016 16:43:01 GMT -8
Replacement roofs (and any other parts you find objectionable) are certainly not out of the question, but it would require some precise measurements of the Wright Trak kit parts so the new parts would fit as intended.
|
|
|
|
Post by SantaFeSammy on Jan 6, 2016 9:36:46 GMT -8
Super nice Ryan!
|
|
|
|
Post by fr8kar on Jan 6, 2016 10:38:24 GMT -8
Thank you, Sammy.
|
|
Deleted
Deleted Member
Posts: 0
|
Post by Deleted on Jan 6, 2016 17:52:50 GMT -8
Ordered one MP rebuilt with diagonal roof...and some battery boxes...
I'm going to try Tamiya surface primer on the caboose...
|
|
|
|
Post by atsfgp7u on Jan 7, 2016 19:51:49 GMT -8
|
|
|
|
Post by fr8kar on Jan 7, 2016 20:11:19 GMT -8
Hi Dave. Yes, that's the stuff. I use the one on the left, the green bottle.
|
|
|
|
Post by jcatsf on Jan 12, 2016 11:27:01 GMT -8
Nice work!
Question about your end rails. Are you scavenging them from RTR Athearn cabooses, or are they available as separate parts from Athearn or another supplier?
|
|
|
|
Post by fr8kar on Jan 12, 2016 15:19:31 GMT -8
Nice work! Question about your end rails. Are you scavenging them from RTR Athearn cabooses, or are they available as separate parts from Athearn or another supplier? Thank you. The end rails come with the Atlas caboose. They attach with two pins into the end of the roof and three pins into the end of the underframe part. All my roof parts now have the holes for the pins started, but they have to be cleaned/drilled for the ends to fit without modification. |
|
Deleted
Deleted Member
Posts: 0
|
Post by Deleted on Jan 12, 2016 19:27:55 GMT -8
My MP caboose...is supposed to ship by the 15th...I'll post pictures of it when it arrives...
|
|
|
|
Post by everywherewestontheq on Jan 14, 2016 7:47:36 GMT -8
What material are you using to print?
|
|
|
|
Post by laughinghippie on Jan 14, 2016 19:22:30 GMT -8
Very nice! If I had any skill whatsoever at 3-D modeling I'd think about doing this for the Santa Fe's CE-1 rebuilt peaked-roof waycars...the ones that are currently only available in brass. Round-roof are a dime a dozen, but nobody has done an affordable peaked-roof yet, with the exception of the as-built version done a while back by Sunshine Models. I may end up needing some of your parts for another project though.
|
|
|
|
Post by fr8kar on Jan 14, 2016 20:07:39 GMT -8
What material are you using to print? The parts are printed in Frosted Ultra Detail (FUD) or Frosted Extreme Detail (FXD). The customer can choose which material with FXD being more expensive but more crisp and stronger. Having said that, the larger parts cannot be printed in FXD due to the limits of the printer. Where FXD is available I have made it an option to print. I have used FXD for detail parts where the cost difference isn't so exaggerated and I'm happy with it. |
|
|
|
Post by fr8kar on Jan 14, 2016 20:10:43 GMT -8
Very nice! If I had any skill whatsoever at 3-D modeling I'd think about doing this for the Santa Fe's CE-1 rebuilt peaked-roof waycars...the ones that are currently only available in brass. Round-roof are a dime a dozen, but nobody has done an affordable peaked-roof yet, with the exception of the as-built version done a while back by Sunshine Models. I may end up needing some of your parts for another project though. I must admit I did not know such a thing existed. If you can point me to some drawings and/or photos I will see what it would take to adapt such a part to the Centralia Car Shops model. I have one of those models so it should be easy to take off some measurements and get an idea what it would take. |
|
|
|
Post by laughinghippie on Jan 15, 2016 16:27:41 GMT -8
Very nice! If I had any skill whatsoever at 3-D modeling I'd think about doing this for the Santa Fe's CE-1 rebuilt peaked-roof waycars...the ones that are currently only available in brass. Round-roof are a dime a dozen, but nobody has done an affordable peaked-roof yet, with the exception of the as-built version done a while back by Sunshine Models. I may end up needing some of your parts for another project though. I must admit I did not know such a thing existed. If you can point me to some drawings and/or photos I will see what it would take to adapt such a part to the Centralia Car Shops model. I have one of those models so it should be easy to take off some measurements and get an idea what it would take. Actually, the peaked-roof cars are slightly longer than the radial-roof versions among other differences. To do them right you'd need to do the car and cupola sides as one piece (there was no "step" between the car side and cupola), the car ends and cupola ends, and then the roof sections. I don't have drawings myself, but they are on page 40 of "Santa Fe Waycars" by Stephen Priest. Unfortunately these do not include dimensional data. I have seen drawings with dimensional data before, but I can't recall exactly where at the moment. If I come across them again I'll let you know though! |
|
|
|
Post by fr8kar on Jan 15, 2016 19:00:32 GMT -8
Actually, the peaked-roof cars are slightly longer than the radial-roof versions among other differences. To do them right you'd need to do the car and cupola sides as one piece (there was no "step" between the car side and cupola), the car ends and cupola ends, and then the roof sections. I don't have drawings myself, but they are on page 40 of "Santa Fe Waycars" by Stephen Priest. Unfortunately these do not include dimensional data. I have seen drawings with dimensional data before, but I can't recall exactly where at the moment. If I come across them again I'll let you know though! Thanks for the heads up. Knowing where to look makes all the difference! |
|
|
|
Post by GP40P-2 on Jan 15, 2016 21:55:06 GMT -8
Laughinghippie: Are these close? atsfrr.net/resources/zebrowski/folio/c-pdf/c11.pdfThis C-11 appears to have a peaked roof, as opposed to the C-8 that they also have with a radial. I am guessing that C-8 and C-11 are a pre-CE caboose numbering, or these are folio numbers? Jim |
|
|
|
Post by laughinghippie on Jan 16, 2016 14:15:50 GMT -8
Laughinghippie: Are these close? atsfrr.net/resources/zebrowski/folio/c-pdf/c11.pdfThis C-11 appears to have a peaked roof, as opposed to the C-8 that they also have with a radial. I am guessing that C-8 and C-11 are a pre-CE caboose numbering, or these are folio numbers? Jim To the best of my knowledge (which of course may in fact have gaps!) the waycars went by the number series rather than a class designation. The 500-599's were in fact peaked-roof cars, so the measurements are probably accurate, but the drawing seems to be a mix of the radial-roof and the peaked-roof designs. The cupola on the peaked version was wider than the radial version; the sides were flush with the car sides, and were in fact simply extended up from the car sides. |
|
Deleted
Deleted Member
Posts: 0
|
Post by Deleted on Jan 16, 2016 14:25:20 GMT -8
Received my MP caboose parts today...The parts that will require the most clean up or priming are the roof and the cupola. Interestingly...the side pieces printed with the lines visible...but only rough on the inside...the outside of them are extremely smooth...So, that's a plus. All parts were nicely formed.
Overall, I'm very impressed. I think if, in the future, Ryan were to make ABS available...as a printing material...it would be an excellent source for cabooses.
Because...these parts should clean up perfectly for painting...I'll have to do the most sanding work on the cupola and roof panels...but the rest is academic; basic prep, sand, and paint. But, ABS would work really well eliminating any print lines...according to what I've researched on this stuff...due to the way it responds to acetone...
These will get cleaned in Simple Green...and washed with soap and water...air dried...and I'll start prepping them next week.
|
|
|
|
Post by fr8kar on Jan 16, 2016 15:50:34 GMT -8
Tom, I'm glad to hear the parts arrived and they turned out good. I would like to see some improvement in the way Shapeways handles the roof parts because most of the cupola parts I've received turn out better than the roof even though the patterns are essentially the same. I also got the scribed effect on the interior of my caboose sides but the outside is smooth. I've seen some demos on YouTube of people smoothing ABS prints with acetone vapor and it looks like a great solution. If Shapeways can offer ABS at a high resolution I would be very excited to try it out. I got my Moloco parts this week so I hope to get the underframe and ends done soon so I can prep for paint. Down the road I'd like to do one of the late Mop x-panel cabooses and an SCL caboose. I've got some more Atlas models lined up for those projects already. As excited as I am to print more caboose bodies, I really can't wait to try some freight cars.  |
|
Deleted
Deleted Member
Posts: 0
|
Post by Deleted on Jan 16, 2016 16:35:41 GMT -8
Sounds good. If shapeways would use abs for the roof and cupola...I think you'd have a nice combo that would clean up easily.
|
|
|
|
Post by stottman on Jan 17, 2016 0:54:12 GMT -8
Tom, I'm glad to hear the parts arrived and they turned out good. I would like to see some improvement in the way Shapeways handles the roof parts because most of the cupola parts I've received turn out better than the roof even though the patterns are essentially the same. I also got the scribed effect on the interior of my caboose sides but the outside is smooth. I've seen some demos on YouTube of people smoothing ABS prints with acetone vapor and it looks like a great solution. If Shapeways can offer ABS at a high resolution I would be very excited to try it out. I got my Moloco parts this week so I hope to get the underframe and ends done soon so I can prep for paint. Down the road I'd like to do one of the late Mop x-panel cabooses and an SCL caboose. I've got some more Atlas models lined up for those projects already. As excited as I am to print more caboose bodies, I really can't wait to try some freight cars. If you need frieght car measurements, LMK... I measured a number of them. Most would be replacement sides for commercially available models.. |
|
|
|
Post by fr8kar on Feb 5, 2016 15:22:16 GMT -8
Here are the latest build photos of the Santa Fe caboose and the Cotton Belt caboose with the bodies primed. Santa Fe caboose:    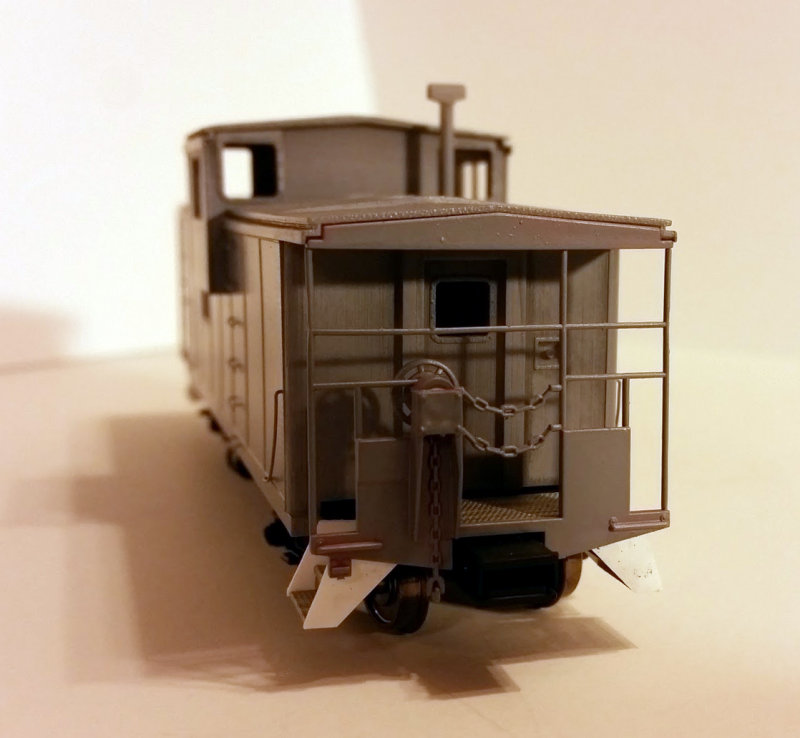 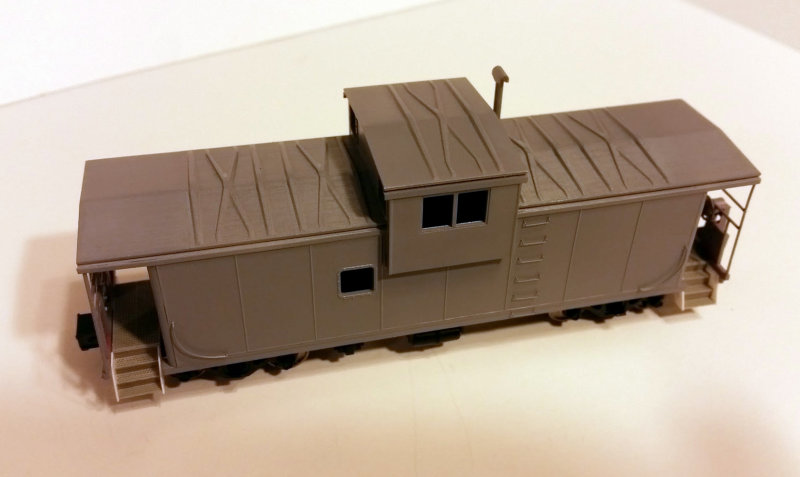 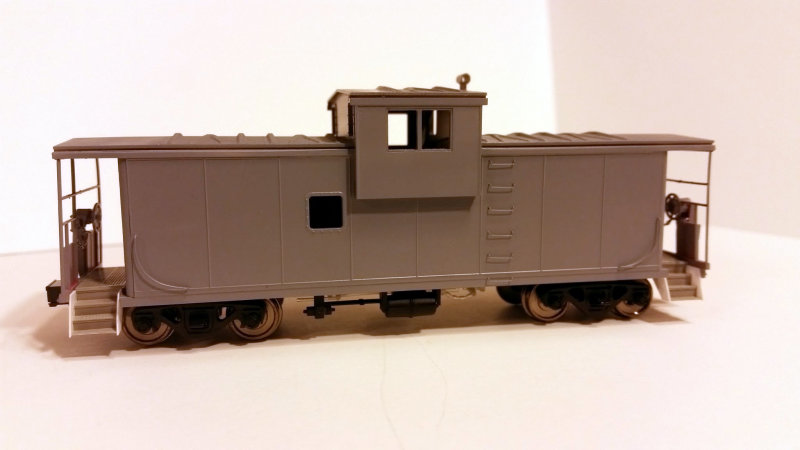 Cotton Belt caboose: 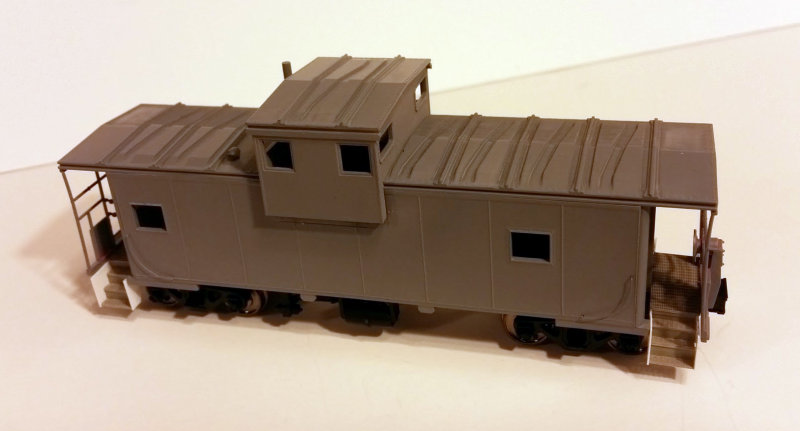  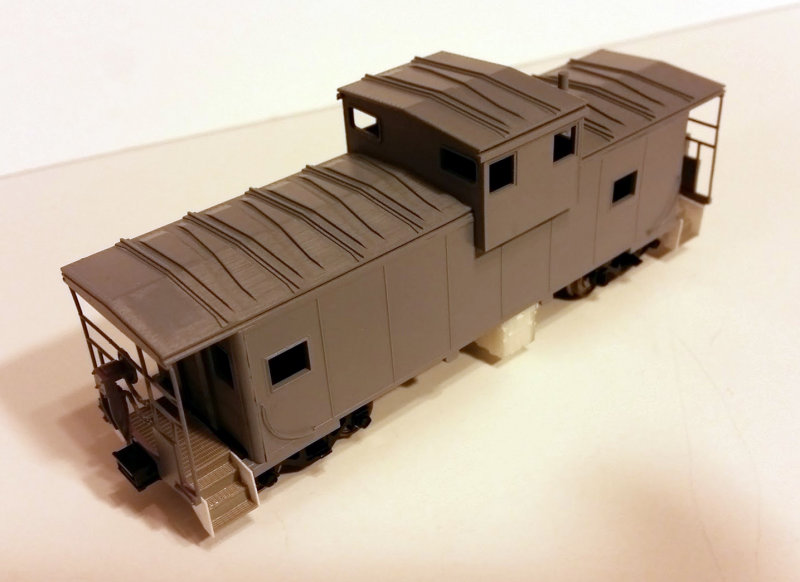 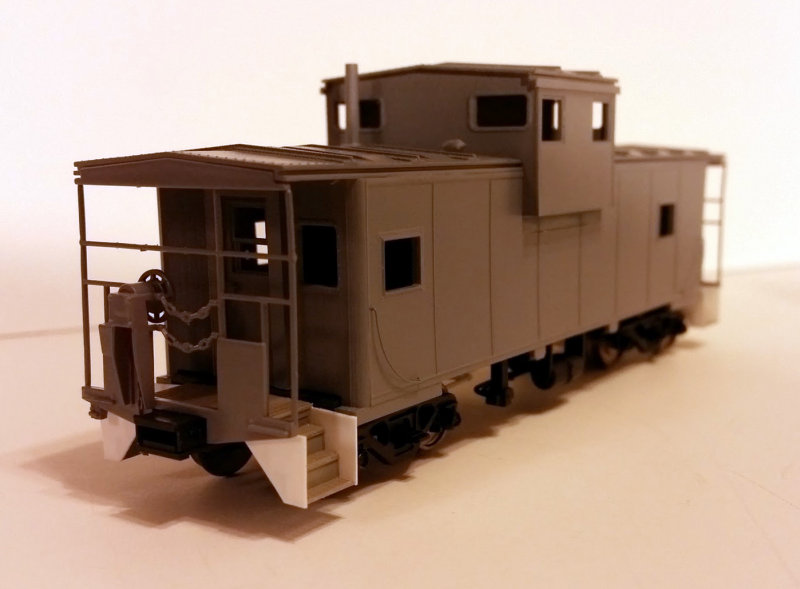 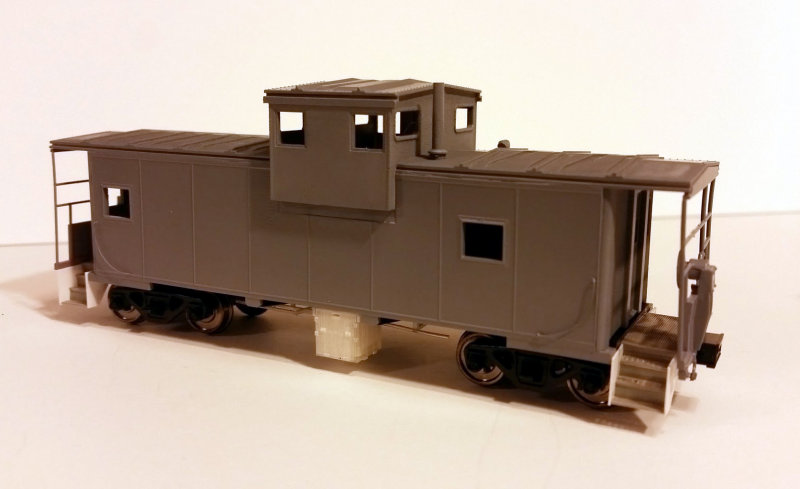 You can see in the last photo the step between the top of the cutout for the cupola and the bottom of the sidewall extension below the cupola that's integrated into the cupola part. Originally I designed the cupolas as replacement parts for the Atlas caboose and incorporated the extension into the cupola so it would sit at the proper height on the Atlas body. Since then I've created all these replacement body kits so I went back and redesigned the cupolas without extensions and made the cutout in the bodies the correct height for the bottom of the cupola only. I'll correct the fit of the cupola and the sidewall on this model next, but I thought it was important to point out here. Edited to add: this was an issue of aligning the cupola on the body, not a dimensional or manufacturing issue. The cupola is a good fit, but without alignment tabs or keys it was very difficult to place on the body. The fact that the standard height cupolas didn't suffer from this problem inspired the design change.The steps are from the Moloco step kit and the draft gear parts are Moloco as well. Building the stepwells was another learning experience, but I think it's safe to say I have it down now. If I could 3D print these thin enough I would, but I like the idea that the steps are see-through even if the crossover platforms aren't. The Cotton Belt caboose lacks the 0.010" x 0.040" styrene strip along the top sides of the carbody to complete the zee angle that makes up the overhanging roof. I didn't want to add that delicate part only to damage it while making the repair underneath the cupola. These bodies also lack any grab iron pressed end/rivet detail, and the Santa Fe model doesn't include the water filler (I missed it when I drew the end parts initially), but the CAD files available to print now include these updates. Now that the primer has killed the translucence it's possible to see the surface detail without refraction in the way. Generally the printing is very clean. I'm happy with how smooth the walls are, which looked ribbed before the primer was applied. There is some stepping that's visible on the roof, but less so on the cupolas which were printed in a different order with Shapeways at an earlier time. I'd like to see Shapeways dial in the printing better and get rid of these print lines. I know they are capable of doing this and I'm sharing these images with Shapeways so they know what the different between the desired result and the end result. Anyway, I'm excited to move to the next stage and get the actual paint and decals on these models. All this 3D printing I've been doing has really cut into my modeling output, so I'm happy to see some progress so far this year! |
|
Deleted
Deleted Member
Posts: 0
|
Post by Deleted on Feb 6, 2016 12:29:35 GMT -8
Those look great! The only draw back are the print lines on the roof...are you planning on working them down...sanding?
|
|
|
|
Post by fr8kar on Feb 6, 2016 15:09:47 GMT -8
The print lines aren't very obvious in normal lighting. I placed a lamp at a low angle to expose the flaws as much as possible for these photos.
Having said that, they are there and difficult to get to without destroying the surrounding detail, especially in the X-panel roof. I sanded one spare cupola to see how the surrounding details take the sanding and it suffered more than I hoped.
I think the best approach is to avoid the print lines in the first place, so communicating this with the printing vendor is the most effective way to resolve the issue. I've received better printed parts in the past so I know it can be done.
I know we've talked about using a heavier primer to fill things in, and I won't rule that out on either of these models. I'll have to see how they look when they have their red and brown paint and go from there. One thing's for sure, though: painting and filling in some details will turn out better overall than sanding the model down and losing detail.
|
|


