|
|
Post by fr8kar on Dec 31, 2015 18:34:23 GMT -8
I'm not sure when I last updated this project. I've had my head down making new parts and making revisions to some of the parts I designed a few months ago. Forgive me if I'm duplicating anything I've posted before, please. Anyway, here are the most recent photos of my adventures in 3D printing caboose parts:   Shown in the photos is a set of 3 different SLSF style smokejacks, toilet vents, a battery box variety pack and four of the caboose brake rigging set. I couldn't wait to use some of the parts as you can see in the photos. Cotton Belt style battery box and brake rigging parts installed: 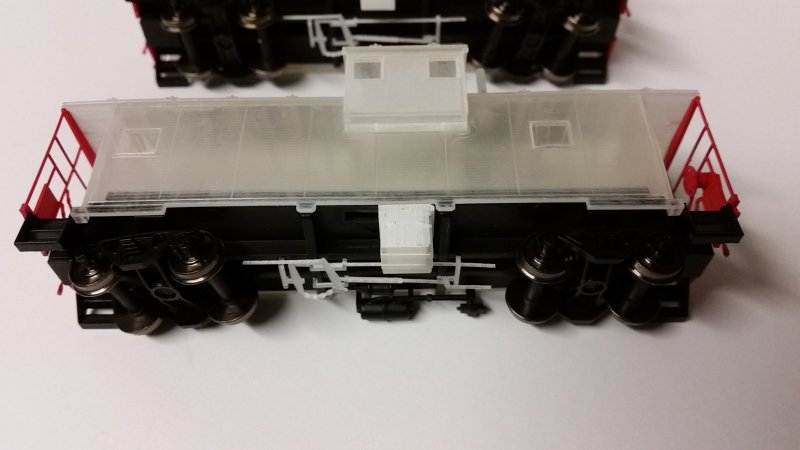 Santa Fe style battery box and brake rigging parts installed: 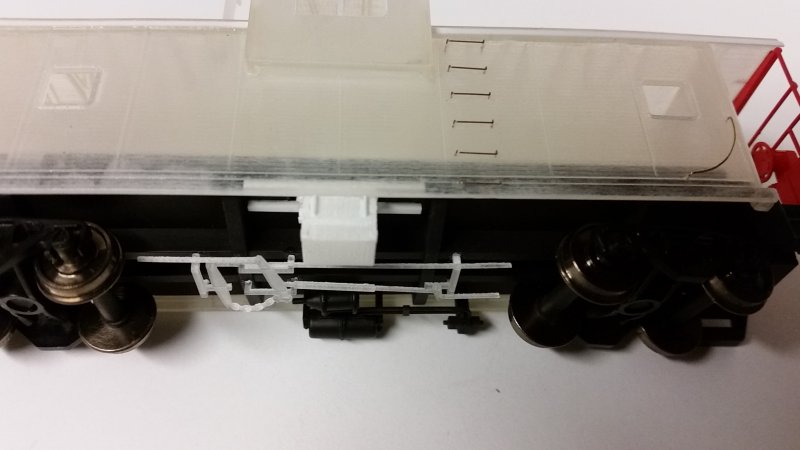 I've since lengthened the rods on the brake rigging set. You can see how they end short of the trucks in the photos above using the original parts as designed. Now they are long enough that the user can trim them to length so they can appear to extend beyond the trucks. Next is a detail of the ladder on the Santa Fe caboose. You can also see the white 0.010" x 0.040" styrene strip that completes the Z angle. It's too delicate to print, so I omitted it on the CAD file. Installing the grabs was challenging and inspired a revised CAD file that now has grab iron ends, bolt detail and starter holes for drilling both the ladders and curved grabs on the corners of the carbody: 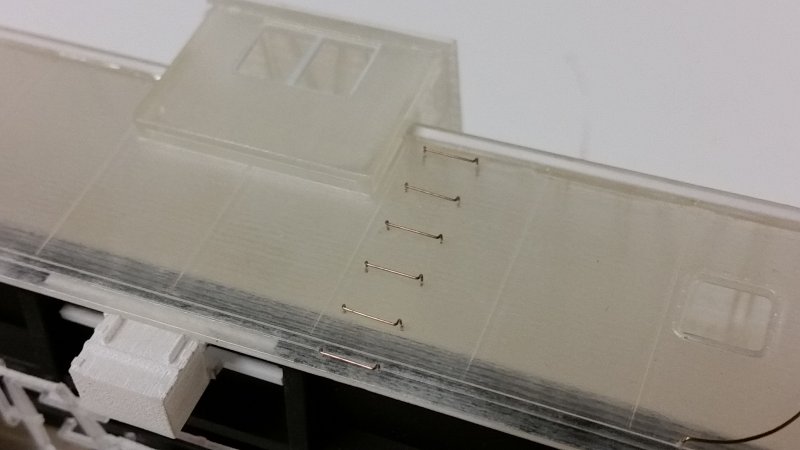 Some comparison shots of the diagonal panel and X-panel roofs. The first photo does a good job illustrating the difference in height of the cupola from early production cabooses to later production models: 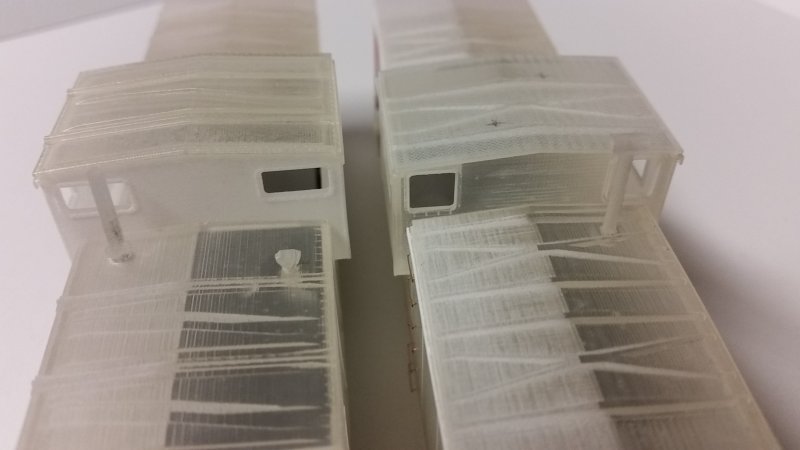 I modified one of the SLSF smokejacks to represent the straight pipe on the prototype Cotton Belt caboose I'm modeling: 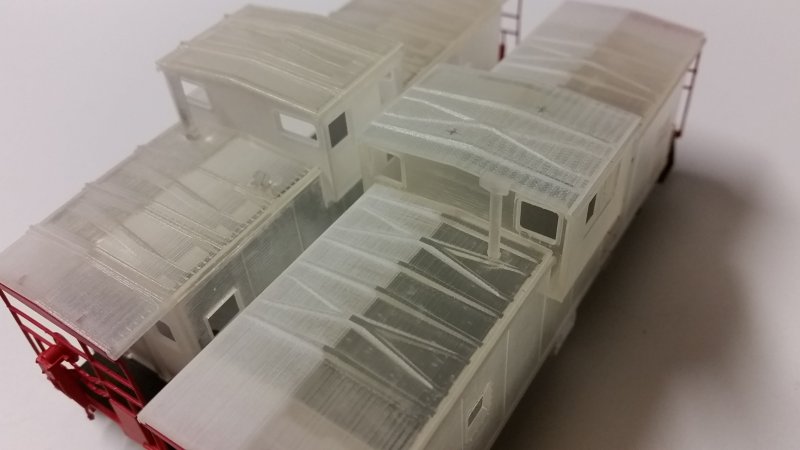 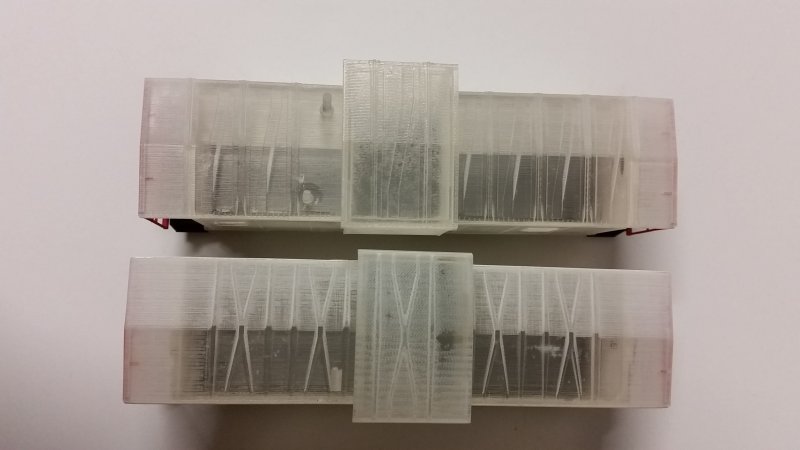 Overview of Cotton Belt 41: 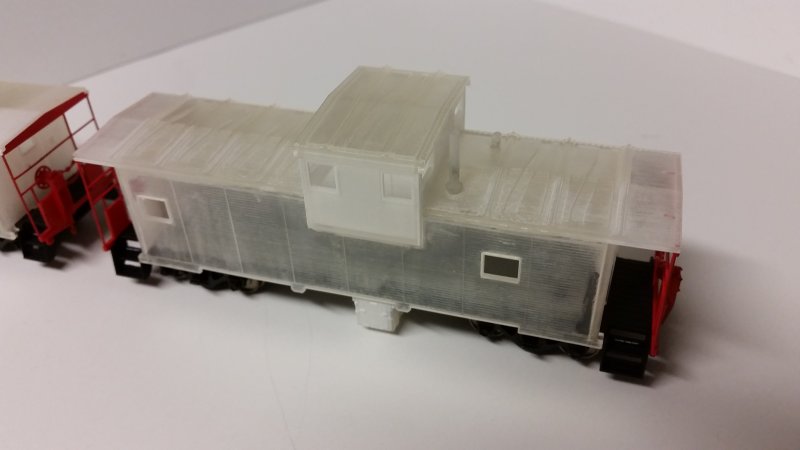 Overview of Santa Fe 999700, which is the one extended vision caboose to wear the SPSF paint scheme: 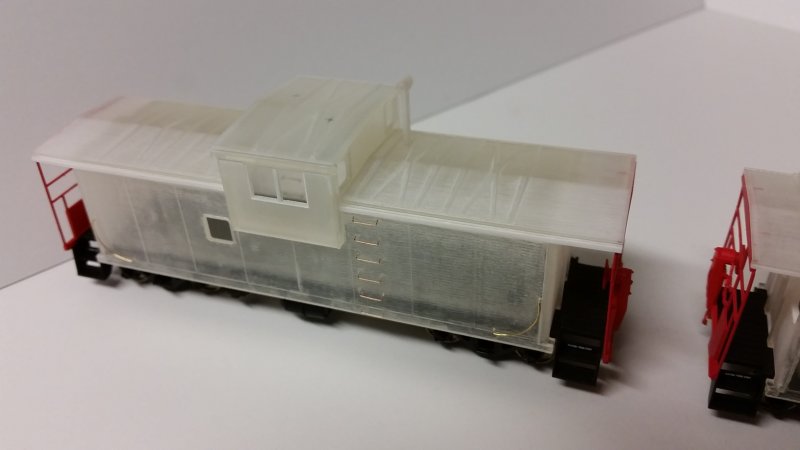 I'm looking forward to getting these in paint. I just need to order a handful of parts from Moloco and it's on. Finally, here's a list of the cabooses that can be modeled using the 3D printed parts I've designed. Thanks to those of you who have suggested your favorite prototypes and inspired many hours of staring at photos of cabooses! I've enjoyed every minute of it.  AT&SF Class CE-6, Nos. 999538-999542 AT&SF Class CE-8, Nos. 999700-999749 or Class CE-11, Nos. 999750-999824 CB&Q Class NE-13/13a/13b, Nos. 13590-13714 or FWD Nos. 151-162 FW&D Nos. 163-199 D&RGW Nos. 01515-01524 DT&I 140-145 GM&O 2951-2958 (to ICG 199041-199048) GN Nos. X31-X40 (Use Moloco #1501 for cupola) GN Nos. X106-X135 GN Nos. X136-X155 MILW 992300-992301 (to SOO 162-163) MKT 100-124 MKT 135-142 MP Nos. 13515-13574 As-built MP Nos. 13515-13574 Rebuilt MP Nos. 13575-13664 As-built MP Nos. 13575-13664 Rebuilt NP Nos. 10400-10424 SP&S Nos. 901-905 SAL M-7/SCL MS-7 05700-05759 SLSF 1200-1274 SLSF 1275-1284 SLSF 1285-1292 SOO 1-15 SOO 16-35 SOO 36-45 SOO 46-55 SOO 56-145 SSW Class C-40-8, Nos. 1-25 SSW Class C-40-9, Nos. 26-49 |
|
|
|
Post by alcoc430 on Dec 31, 2015 18:47:34 GMT -8
Awesome stuff. Thanks for sharing
|
|
|
|
Post by atsfan on Dec 31, 2015 19:06:07 GMT -8
Just great stuff.
What glue or solvent do you use for the printed parts ?
|
|
|
|
Post by fr8kar on Dec 31, 2015 19:15:54 GMT -8
Thanks for the kind words.
I use Simple Green to clean the parts and Loctite CA to assemble them.
|
|
|
|
Post by onequiknova on Dec 31, 2015 20:15:06 GMT -8
Very cool. Have you attempted to paint anything yet? Do you anticipate having to prime and sand to get a smooth surface?
|
|
|
|
Post by edgecrusher on Dec 31, 2015 20:18:50 GMT -8
Very cool, I've just started experimenting with Shapeways myself. I just haven't quite had the rocks to print something very large yet.
|
|
|
|
Post by fr8kar on Dec 31, 2015 20:46:27 GMT -8
Very cool. Have you attempted to paint anything yet? Do you anticipate having to prime and sand to get a smooth surface? Not with the airbrush. It's been too wet around here to fire it up, but about a month ago I received some defective parts that had one surface with uncured resin* so I decided to see how the parts would hold up to the dreaded volatile Scalecoat I. I slathered it on and waited for the part to melt but nothing happened. Aside from the paint being thick, it turned out pretty good and the acrylic parts were unaffected by the paint. These caboose bodies have been cleaned and "primed" with Future but no paint yet otherwise. The finish of the parts is good enough that the Future isn't necessary, but it doesn't hurt. The whitish battery boxes, which have a more coarse finish as a result of cleaning them with acetone, will get a coat of Future to smooth them out. *If you get parts like this from Shapeways, which are characterized by having one or more surfaces that are sticky like honey, do not attempt to clean the parts. Instead take photos and contact Shapeways for replacement parts. |
|
|
|
Post by onequiknova on Dec 31, 2015 20:53:49 GMT -8
Smoothing them out with Future is an interesting idea. I would like to eventually buy a few vehicles printed in FUD. Did you spray or brush the Future?
|
|
|
|
Post by fr8kar on Dec 31, 2015 21:19:45 GMT -8
I just brush it on. It flows like water and one brush load covers nearly an entire caboose side with a thin coat.
|
|
|
|
Post by riogrande on Jan 1, 2016 8:58:01 GMT -8
Not with the airbrush. It's been too wet around here to fire it up Wouldn't you only need a moisture trap to take care of the wet air aspect? I see they do D&RGW but the late wide vision cabooses which is good. Now if they could only do the 01500-01514 version. The Atlas model is only a semi-look alike stand-in. |
|
Deleted
Deleted Member
Posts: 0
|
Post by Deleted on Jan 1, 2016 9:47:26 GMT -8
I'm thinking of getting an MP Rebuilt (original)...
1. Use Tamiya surface primer prior to paint...
2. Tichy brake parts
3. Moloco draft gear
|
|
|
|
Post by fr8kar on Jan 1, 2016 10:43:43 GMT -8
Not with the airbrush. It's been too wet around here to fire it up Wouldn't you only need a moisture trap to take care of the wet air aspect? I see they do D&RGW but the late wide vision cabooses which is good. Now if they could only do the 01500-01514 version. The Atlas model is only a semi-look alike stand-in. I use a moisture trap - always have - but experience shows it's not enough when it's cold and rainy. Best just to wait it out and paint during dry weather, which will certainly appear given enough time. As far as the early Grande cabooses are concerned, I don't have good photos of both sides, both ends and the roof, which is critical to making drawings. The other problem is I'm finding photos of the cabooses after windows have been plated. That helps determine where the windows were, but depending on the size of the plate and its placement, it's not always the best guide for determining where exactly the windows were. |
|
|
|
Post by fr8kar on Jan 1, 2016 10:46:38 GMT -8
I'm thinking of getting an MP Rebuilt (original)... 1. Use Tamiya surface primer prior to paint... 2. Tichy brake parts 3. Moloco draft gear Definitely the Tichy brake components and Moloco draft gear, but also the Moloco step/platform kit. I want to see how it works compared to the Plano parts. |
|
|
|
Post by riogrande on Jan 1, 2016 11:11:05 GMT -8
I use a moisture trap - always have - but experience shows it's not enough when it's cold and rainy. Best just to wait it out and paint during dry weather, which will certainly appear given enough time. As far as the early Grande cabooses are concerned, I don't have good photos of both sides, both ends and the roof, which is critical to making drawings. The other problem is I'm finding photos of the cabooses after windows have been plated. That helps determine where the windows were, but depending on the size of the plate and its placement, it's not always the best guide for determining where exactly the windows were. I've only done a small amount of airbrushing and not for quite a few years but didn't realize the moisture trap wasn't enough. Good to keep in mind. Ah, I didn't realize you were making the drawings yourself, but I didn't read everything. There are photo's of both sides of the pre-plated window 01500-01514 grande gold/silver in Jim Eagers Color Guide although they are slightly angled and not fully broadside. Roof and ends, that's probably harder to find but I'll hunt for some - not sure how the rights issues are. |
|
Deleted
Deleted Member
Posts: 0
|
Post by Deleted on Jan 1, 2016 13:06:02 GMT -8
I'm thinking of getting an MP Rebuilt (original)... 1. Use Tamiya surface primer prior to paint... 2. Tichy brake parts 3. Moloco draft gear Definitely the Tichy brake components and Moloco draft gear, but also the Moloco step/platform kit. I want to see how it works compared to the Plano parts. I've got that one under frame ready...for the step kit...and an interior from Keystone Locomotive Works... |
|
|
|
Post by fr8kar on Jan 1, 2016 13:20:03 GMT -8
Interiors, interiors... if I could overcome the problem of the large weight in the Atlas caboose, I could address the interior issue. I've thought about printing in steel, but the tolerances are built more for pendants and earrings than something the size of a caboose interior.
|
|
|
|
Post by lajrmdlr on Jan 1, 2016 19:14:03 GMT -8
The Santa Fe wide vision cupolas were centered. Can you do those? Some of your parts look like smoke stacks. Can the tops be looked thru?
|
|
|
|
Post by fr8kar on Jan 1, 2016 19:54:42 GMT -8
The Santa Fe wide vision cupolas were centered. Can you do those? Yes, look at the photos above. The Santa Fe caboose has a centered cupola. It's most apparent in the roof view looking straight down. I have drawn both the CE-6 version and the CE-8/11 shown above. Yes, you can see through the rain hood if you look at the smokejack from the side. The Frisco style found on early 200 series cabooses is not see-through. I will probably make a smokejack set for Santa Fe that includes the smokejacks found on the other cupola cabooses, like this one I made on the left:  |
|
|
|
Post by Colin 't Hart on Jan 1, 2016 23:23:45 GMT -8
The Santa Fe wide vision cupolas were centered. Can you do those? Not only were the cupolas centered, the cabooses were also longer. |
|
|
|
Post by stottman on Jan 2, 2016 2:15:17 GMT -8
Here is the DRGW caboose that is at the Ogden UT musuem-   Don't know if this helps. I did shoot it at a 90 degree angle for modeling purposes. |
|
|
|
Post by fr8kar on Jan 2, 2016 10:35:57 GMT -8
The Santa Fe wide vision cupolas were centered. Can you do those? Not only were the cupolas centered, the cabooses were also longer. Correct me if I'm wrong, but I believe these Santa Fe cabooses share 23' 2-1/2" truck centers with the majority of ICC extended vision caboose production (that's what my lettering diagram reads). The length is longer than most cabooses when measured over the strikers or pulling faces, but the carbody itself should be nominally the same as other ICC cabooses of the same period. |
|
|
|
Post by fr8kar on Jan 2, 2016 10:40:25 GMT -8
Here is the DRGW caboose that is at the Ogden UT musuem- View AttachmentView AttachmentDon't know if this helps. I did shoot it at a 90 degree angle for modeling purposes. Thank you stottman. Do you have the other side as well? The window plating leaves no mystery as to the shape and position of the windows. The door appears to have had a rectanglar window previously. I've seen the same thing on some SOO Line cabooses of the same vintage. |
|
|
|
Post by stottman on Jan 2, 2016 11:35:41 GMT -8
I don't. As I remember, its up against a fence.. I assumed that it would be symmetrical, but assuming gets one into trouble.
Its very accessible to the public. I assume there are 1000 photos online of the same caboose.
|
|
|
|
Post by stottman on Jan 3, 2016 0:18:56 GMT -8
I found this  Not a 90 degree shot, but it does show the extra window. And with the other end-  Some more- www.rrpicturearchives.net/rsPicture.aspx?id=30450RR-fallenflags also has a few shots. As well as There are quite a few "preserved" cars out west as well. |
|
|
|
Post by Colin 't Hart on Jan 3, 2016 8:04:35 GMT -8
Not only were the cupolas centered, the cabooses were also longer. Correct me if I'm wrong, but I believe these Santa Fe cabooses share 23' 2-1/2" truck centers with the majority of ICC extended vision caboose production (that's what my lettering diagram reads). The length is longer than most cabooses when measured over the strikers or pulling faces, but the carbody itself should be nominally the same as other ICC cabooses of the same period. I don't have any measurements, but the RMC article and the drawings Stephen Priest made that are in the Santa Fe Waycars book mention and show both ends each side of the cupola to be the same length as the long end of an ICC caboose with an off-center cupola. That would make the whole car a few feet longer I would guess. Attachments:
|
|
|
|
Post by fr8kar on Jan 3, 2016 10:00:28 GMT -8
Thank you, stottman. Those shots are very helpful. Colin, check out this drawing: img.kansasmemory.org/00226831.jpgIt shows an interior dimension of 30' 0-1/2" on the Santa Fe cabooses. I have used a 0.040" thick wall to match the Atlas model. The interior length on the model comes out to 4.134" which translates to 30.006 feet. Unfortunately, I haven't found anything more definitive on the outside length, but I'm still looking. |
|
|
|
Post by onequiknova on Jan 3, 2016 10:27:18 GMT -8
Well, I for one will be looking forward to the Rock Island bay window caboose you mentioned in another thread.
|
|
|
|
Post by fr8kar on Jan 3, 2016 11:31:38 GMT -8
Well, I for one will be looking forward to the Rock Island bay window caboose you mentioned in another thread. This one isn't too far away from me. In fact, it's actually closer than the one in Texas I planned on measuring: www.rrpicturearchives.net/showPicture.aspx?id=4356555Our local Rock Island nutjob fan has family there so I think I can twist his arm to have him help me measure it. |
|
|
|
Post by riogrande on Jan 3, 2016 12:32:41 GMT -8
Isn't Athearns WV caboose based on a RI unit built from a box car frame?
|
|
|
|
Post by fr8kar on Jan 3, 2016 13:58:48 GMT -8
The Jim formerly known as Australian Terrier mentioned working on those cabooses in this thread: atlasrescueforum.proboards.com/thread/4222/rock-island-alco-emd-faI'm not sure if they were old caboose frames or boxcar frames, but I believe the existing frame was the reason for the shorter body. As Jim points out in his thread, the Athearn roof is wrong for these cabooses, so technically the Athearn model isn't correct for anything. |
|


