|
|
Post by thunderhawk on Sept 26, 2019 12:29:29 GMT -8
Possibly.... 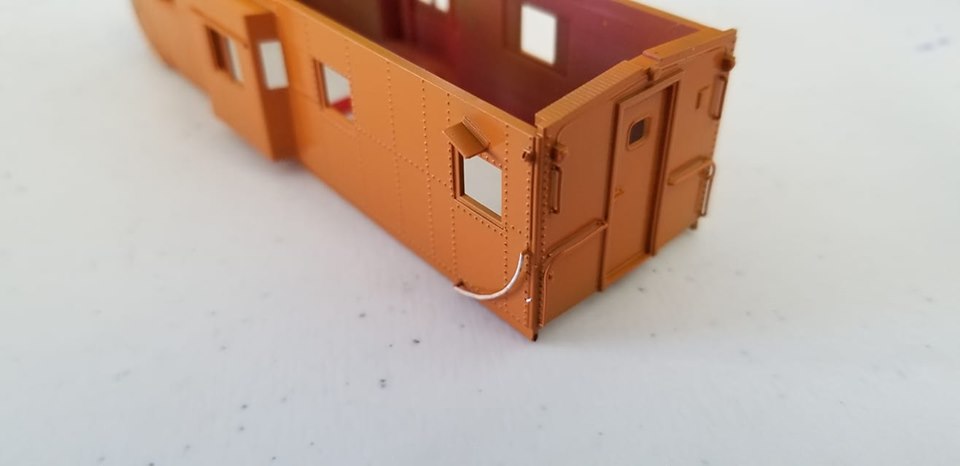 What you see is all one piece. And the grabs are flexible enough to handle normal use. Frankly, I surprised myself with this. I didn't think they would print or would be durable enough. Bending and applying the handrails was by far the most difficult part of assembling the kits, so this is a big time saver. |
|
|
|
Post by riogrande on Sept 26, 2019 12:49:04 GMT -8
I think the bad thing is that traditionally molded on grab irons looked molded in - as in no gap or not a free standing appearance.
That there looks quite good.
|
|
|
|
Post by scl1234 on Sept 26, 2019 13:04:13 GMT -8
Printed. Looks good - Now give that one a couple ops sessions at your favorite club.
...and to answer the Title: Only if you'll never be any closer than 5 feet away!
|
|
|
|
Post by thunderhawk on Sept 26, 2019 13:05:41 GMT -8
I think the bad thing is that traditionally molded on grab irons looked molded in - as in no gap or not a free standing appearance. That there looks quite good. These aren't really "molded", but I'm not coming up with a better term. They are similar in that they are part of the shell. Just free standing. |
|
|
|
Post by thunderhawk on Sept 26, 2019 13:09:16 GMT -8
Printed. Looks good - Now give that one a couple ops sessions at your favorite club. They're flexible. They'll break off the shell, just like molded stirrups, if you mishandle them but otherwise they are fine. This isn't the glass like resin one gets from shapeways. |
|
|
|
Post by sd40dash2 on Sept 26, 2019 13:16:10 GMT -8
Wow that's great. Reminds me of the brake gear on your underframe. Might be a first for hand grabs. Will this be done on the '80s version of your caboose?
Easy to replace with wire if one should ever break in the future.
Great innovation!
|
|
|
|
Post by gevohogger on Sept 26, 2019 13:20:52 GMT -8
I think the bad thing is that traditionally molded on grab irons looked molded in - as in no gap or not a free standing appearance. That there looks quite good. These aren't really "molded", but I'm not coming up with a better term. Monolithic.
|
|
|
|
Post by thunderhawk on Sept 26, 2019 13:25:30 GMT -8
Wow that's great. Reminds me of the brake gear on your underframe. Might be a first for hand grabs. Will this be done on the '80s version of your caboose? Easy to replace with wire if one should ever break in the future. Great innovation! Yes. All of the cabooses, and hopefully the other cars, will have these. Looking at adding them to some of the cab conversions as well. I need to get the 80's version with the blanked windows available. It's not terribly different. The as built version is just waiting for the wagon wheel antennas. |
|
|
|
Post by rapidotrains on Sept 26, 2019 17:26:38 GMT -8
That's really, really cool. Wish we could do that on our models!  -Jason |
|
|
|
Post by valenciajim on Sept 26, 2019 22:48:33 GMT -8
That's really, really cool. Wish we could do that on our models! -Jason Jason--wait a few years until technology improves. The day will come. |
|
|
|
Post by fr8kar on Sept 27, 2019 1:03:49 GMT -8
That's amazing! What's the diameter of rod you're using for the grabs? I didn't know any free-standing object could be printed that fine.
|
|
|
|
Post by thunderhawk on Sept 27, 2019 2:49:44 GMT -8
That's amazing! What's the diameter of rod you're using for the grabs? I didn't know any free-standing object could be printed that fine. The grabs are .4mm (.0157 inch). The side, curved, grabs have .2mm supports from the body to the grab that are flicked out with a sharp blade after printing. There are only three of those supports on the lower half of the grab due to it being parallel to the build plate. The grab is self supporting the upper half. Where the side grabs attach to the body they are .5mm (.0196 inch) for added durability. The end grabs are pretty protected so I didn't thicken up the attach points on those. One can see on the end grabs a support that the prototype has as well, so they only have one added .2mm support on the horizontal portion. The marker grabs have no additional support and print as they appear. |
|
|
|
Post by simulatortrain on Sept 27, 2019 3:32:32 GMT -8
That's great! Just curious, what printer do you use? Wondering if I could do this one some of my cars using my Photon.
|
|
Deleted
Deleted Member
Posts: 0
|
Post by Deleted on Sept 27, 2019 5:08:33 GMT -8
Those look fantastic.
|
|
|
|
Post by thunderhawk on Sept 27, 2019 5:24:18 GMT -8
That's great! Just curious, what printer do you use? Wondering if I could do this one some of my cars using my Photon. I started with a Photon and still have some but haven't run the cabooses on them. However, it should work on them as well as the main difference is the new machine is much bigger while being the same tech. |
|
|
|
Post by craigz on Sept 27, 2019 5:55:37 GMT -8
|
|
Deleted
Deleted Member
Posts: 0
|
Post by Deleted on Sept 27, 2019 7:11:50 GMT -8
thunderhawk,
The model looks really nice. The grabs look great too. From the photo they do appear to be round. Nice!
Brian
|
|
|
|
Post by grahamline on Sept 27, 2019 7:34:25 GMT -8
That's great! Just curious, what printer do you use? Wondering if I could do this one some of my cars using my Photon. I started with a Photon and still have some but haven't run the cabooses on them. However, it should work on them as well as the main difference is the new machine is much bigger while being the same tech. What medium does the Photon use? Apparently something with a bit more flexibility? |
|
|
|
Post by thunderhawk on Sept 27, 2019 7:44:32 GMT -8
They look nice. I give them 20 minutes top in the operating sessions I attend I use masks made from .005 brass sheet to paint them and haven't sliced one off yet, so as long you don't play demolition trains they are fine. As mentioned above, they are flexible. Painting is the only downside. More difficult to paint than separate parts but it's not a big deal. The mask I use just slides under them to keep my non artistic hands from dragging white paint on the body. The coming freight cars will be nice as the grabs were generally not painted white. |
|
|
|
Post by thunderhawk on Sept 27, 2019 7:53:15 GMT -8
I started with a Photon and still have some but haven't run the cabooses on them. However, it should work on them as well as the main difference is the new machine is much bigger while being the same tech. What medium does the Photon use? Apparently something with a bit more flexibility? Photons, and printers like them, are called M/SLA versus the more common FDM style. Not to get into a long drawn out description, they use liquid resin cured by UV light versus melting plastic and ejecting through a nozzle. There are many different resins available with varying levels of detail, flexibility and durability. And of course cost. The lower priced resins are generally very brittle, which I learned with my early kits. Everything I sell now is made from a more expensive bio resin that retains some flexibility and durability. I have a cab that has been sitting in direct sunlight every morning, unpainted of course, for a couple months and I can drop it on the floor and it doesn't break. |
|
|
|
Post by riogrande on Sept 27, 2019 8:08:17 GMT -8
They look nice. I give them 20 minutes top in the operating sessions I attend Just tell them to keep their grubby paws off your MILW caboose there. That or stick with Accurail, Athearn and the like those operating sessions. |
|
Deleted
Deleted Member
Posts: 0
|
Post by Deleted on Sept 27, 2019 8:19:39 GMT -8
I keep wanting to get one of these. Just because cabooses are cool. But I do not model the Milwaukee Road. So when you produce an EJ&E International riveted standard cupola caboose. I'll take a good long look at building a few.
Still though. Cabooses are cool and your kit is very inviting.
Brian
|
|
|
|
Post by gevohogger on Sept 27, 2019 8:35:37 GMT -8
I keep wanting to get one of these. Just because cabooses are cool. But I do not model the Milwaukee Road. So when you produce an EJ&E International riveted standard cupola caboose. EJ&E and Milwaukee crossed each other at a bunch of places. If any are on your layout you could perhaps justify having one, even if its just an engine and waycar tied up for beans. |
|
|
|
Post by thunderhawk on Sept 27, 2019 9:08:50 GMT -8
Brian, The next car will likely be a bit more usable for modelers of roads other than the MILW. Everybody likes Beer Cars.  The rivets make me cry. Maybe I'll do a log car first.... hah ![]() |
|
Deleted
Deleted Member
Posts: 0
|
Post by Deleted on Sept 27, 2019 9:10:24 GMT -8
I keep wanting to get one of these. Just because cabooses are cool. But I do not model the Milwaukee Road. So when you produce an EJ&E International riveted standard cupola caboose. EJ&E and Milwaukee crossed each other at a bunch of places. If any are on your layout you could perhaps justify having one, even if its just an engine and waycar tied up for beans. That would be great if my layout was planned to be EJ&E. EJ&E is my favorite prototype railroad. I like to collect some of its cars when I can. The EJ&E caboose is my all time favorite caboose. I am to lazy to model it though. I grew up near where the Milwaukee road crossed the J tracks. The bowling alley I frequented when I was a kid was right there in Roundout near the diamond. Funny thing is I never saw either railroad until just before the Milwaukee was gobbled up by the SOO. Lived right near them. Never saw them. Except for the Milwaukee commuter that we took to Chicago from time to time. Brian |
|
Deleted
Deleted Member
Posts: 0
|
Post by Deleted on Sept 27, 2019 9:12:17 GMT -8
Brian, The next car will likely be a bit more usable for modelers of roads other than the MILW. Everybody likes Beer Cars. The rivets make me cry. Maybe I'll do a log car first.... hah ![]() That is a cool car! Oh yes it is. I suggest doing two version of the car. One with all molded in place grabs and ladders for club runners and one for high fidelity RPM modelers. Brian |
|
|
|
Post by sd40dash2 on Sept 27, 2019 10:28:47 GMT -8
I have a cab that has been sitting in direct sunlight every morning, unpainted of course, for a couple months and I can drop it on the floor and it doesn't break.
Apologies if you already addressed this somewhere -- how long do we end-users need to leave our purchases in sunlight for? Two months seems like a long time to have a new purchase sitting around curing. I'm normally gung-ho to start building fairly soon after receiving my online shipments.
|
|
|
|
Post by thunderhawk on Sept 27, 2019 10:47:46 GMT -8
Apologies if you already addressed this somewhere -- how long do we end-users need to leave our purchases in sunlight for? Two months seems like a long time to have a new purchase sitting around curing. I'm normally gung-ho to start building fairly soon after receiving my online shipments.
The two months was just to show that they don't become super fragile over time. I know that has been an issue with some pieces from Shapeways in the past. Along with my early parts. These can take a drop onto linoleum without breaking even after extended UV exposure. If there is a fairly strong odor of resin I recommend a couple hours in sunlight. If you should happen to have a UV nail dryer 30 minutes is plenty. I generally don't give them a long final cure as the supports are easier to remove when the resin is slightly soft. The current resin isn't as sensitive to this however. I do still recommend removing the supports before setting them in sunlight however. I leave the supports on to protect the parts during shipment. Shipping is why I am holding off on offering painted kits. The end platforms would likely get bent and take a set in the box. So, they may be RTR at some point. |
|
|
|
Post by csxt8400 on Sept 27, 2019 11:42:43 GMT -8
Off topic, but I noticed the SDL39 offerings seem to have downsized. Any update on that project? Was looking forward to some maroon and gold.
|
|
|
|
Post by thunderhawk on Sept 27, 2019 12:35:49 GMT -8
Working on it as I can. The drivetrain is the holdup, meaning a parts source, right now.
|
|


