|
|
Post by jlwii2000 on Dec 20, 2014 14:23:22 GMT -8
Well, I am happy to have the benchwork completed at a big 21 ft x 22 ft L shape. This is in the utility room off of my basement. The kids get the basement because kids are more important than trains but still plenty of space to build something decent. But now the benchwork is done I need to install extruded foam and eventually cork roadbed. It's been almost 4 years since I built my last layout and I can't recall what options there are to fasten the foam to the benchwork and the cork roadbed to the foam. Suggestions? I need this layout to be sturdy enough to move if needed. 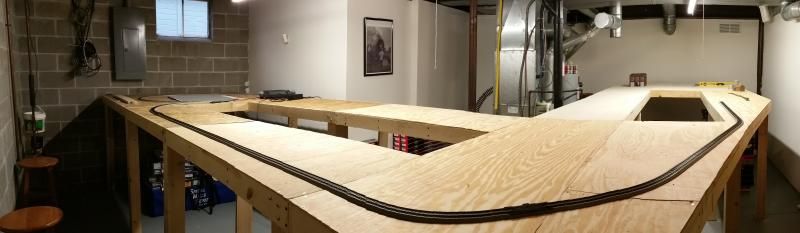 |
|
|
|
Post by kentuckysouthernrwy on Dec 20, 2014 14:46:28 GMT -8
I don't use foam, I attach my cork roadbed directly to the plywood with white glue. I then attach the flex track to the roadbed with a very thin layer of clear latex caulk.
It appears you intend to have your layout all the same level, correct?
|
|
|
|
Post by Chad on Dec 20, 2014 14:48:19 GMT -8
James, I have used and like Liquid Nails. It comes in tubes like caulk and it is some strong stuff.
|
|
|
|
Post by jlwii2000 on Dec 20, 2014 15:30:48 GMT -8
I don't use foam, I attach my cork roadbed directly to the plywood with white glue. I then attach the flex track to the roadbed with a very thin layer of clear latex caulk. It appears you intend to have your layout all the same level, correct? Yes my layout will all be on the same level but I will have some bridges over rivers, culverts, etc. That's why I wanted to use extruded foam. |
|
|
|
Post by jlwii2000 on Dec 20, 2014 15:31:05 GMT -8
James, I have used and like Liquid Nails. It comes in tubes like caulk and it is some strong stuff. Thanks! |
|
|
|
Post by kentuckysouthernrwy on Dec 20, 2014 15:49:28 GMT -8
James, I have used and like Liquid Nails. It comes in tubes like caulk and it is some strong stuff. Thanks! Make sure you check and get the Liquid Nails for foam. Regular Liq Nails eats foam. |
|
|
|
Post by edwardsutorik on Dec 20, 2014 16:29:01 GMT -8
James,
I use Glidden Gripper. I have stuck foam to foam and foam to plywood. It works beautifully. You should use weight to compress the joint. Sandbags would be a great choice, and they're dual-use! It should dry overnight, anyway. I have tested the connection, and it works.
I have not tried it with cork roadbed. It doesn't have a lot of "tack", so you can't count on it being sticky. It won't hold stuff in place too well, I think. For cork roadbed, I think I might try bricks. And/or some of those famous "track nails".
The stuff is, pretty much, paint. And it acts like it.
What's great about it is that it is super easy to apply and spread.
I'm not sorry at all that I used it.
Ed
|
|
|
|
Post by atsfan on Dec 20, 2014 16:59:26 GMT -8
|
|
|
|
Post by ambluco on Dec 20, 2014 17:13:54 GMT -8
Liquid Nails for Projects or DAP 230.
|
|
|
|
Post by WP 257 on Dec 20, 2014 17:13:57 GMT -8
I've used Liquid Nails, too, and had very good results with it.
On my layout, the pink 2" thick foam insulation sheets formed the table top. They were glued to the wood frame using Liquid Nails entirely. The Kato (HO) Unitrack was then glued to the pink foam, using Liquid Nails. First the curves were glued down so they wouldn't slide around under train traffic, and then once the track arrangement was completely finalized (and I removed some turnouts), the tangents were eventually glued down, too, over more than 95% of the layout.
If you use cork, things will be quieter than what I did, but I'm happy with the results, anyway.
If gluing (plastic base like Kato) track down using Liquid Nails, you might need to let it rest at least overnight, if not for a day or so before running trains.
By using Kato Unitrack, my layout was up and operating in about 2 hours, as I had designed the original layout in Cadd based upon the dimensions of the Kato pieces, so I knew how everything would fit. Then I later made revisions by trial and error track arrangement to eliminate some turnouts.
The Liquid Nails is a little flexible, and will not result in track breaking loose during weather changes, as I have seen happen when people used white glue on large attic layouts (where summer heat expansion was enough to create issues). If your mainline run gets up over 100 linear feet in length, and your layout is subject to temperature extremes, then you might see summer heat kinks just like the real railroads do. My layout is in a basement, and I've never had any temperature related issues. The Liquid Nails allows a little flex, and I'm able to see the track joint spaces in the Kato track open up a little bit in the winter time, as the track minimally contracts in the cooler temperatures of my basement. Then in the warm months, those track joints become tight again.
Nothing properly glued down in the first place has ever come loose for me after several years.
Best Regards and Happy Track Laying!!!
John
P.S. I saw that the Liquid Nails, at least the one kind, did eat a little bit of the foam when I changed the track plan. It only ate into the foam while it was curing, and I think the fact it ate into the foam a little bit helped to actually key things in place. Was not a problem. Track is still tight and will not move laterally--only rails expand and contract in length a wee little bit (barely noticeable) with temperature change.
|
|
|
|
Post by slowfreight on Dec 20, 2014 19:04:02 GMT -8
I have moved my layout multiple times, and I use both blue foam insulation and cork. I don't have a plywood subgrade like you...don't really believe in it because the prototype earth isn't flat and it makes holes for wires more of a pain. You can use liquid nails to attach the blue foam. I'd suggest weighting it down while it dries. Unless you decide to remove the plywood, I'd suggest throwing down a layer of 1/2" foam insulation and then building up the scenery with layers of 1/2". Depending how far below track level you want your terrain, you might want 2 or 3 layers of 1/2" foam before laying track because this will make it easier to dig culverts, riverbeds, etc. Otherwise, you could use 1" or even 2" foam as a subroadbed for your track. 1" and 1/2" both flex well if you're making grades. Just glue everything together with liquid nails. I used N scale cork roadbed for my track, and glued it to the foam with cheap latex caulk. I glued the track to the roadbed the same way. I don't split the N scale cork apart. I like it because the HO cork has a crappy shoulder that makes it hard to shape a good ballast profile. The N cork is narrow enough that I can shape my own profile. If you really need elevation, use 2 layers of cork for mainlines and 1 for sidings, yards, etc. Again, I glue track to cork to foam using latex caulk (dries in about 20 minutes when held with lots of straight pins), and I glue foam to benchwork or other foam with liquid nails. This was the only good in-progress pic I could find, after I'd painted track. 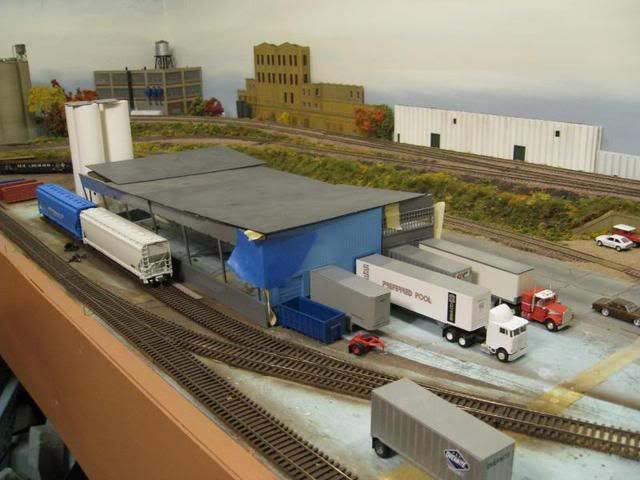 |
|
|
|
Post by WP 257 on Dec 20, 2014 21:39:24 GMT -8
Oh, yes, you definitely need to put weight over the foam sheet until the Liquid Nails dries--which depending upon temperature, etc. can actually take days.
I was going to have a second layer of the 2" foam on my layout, to allow carving of deeper scenic features, but the table top became rather uneven after just one layer of the 2" foam. Those 2" sheets are not totally flat, even when they interlock at the tongue and groove ends, so I had to manicure all the seams to get them reasonably flat prior to adding lightweight plaster.
So the approach of using thinner foam layers might be better.
Some concrete and decorative brick supply places sell a lightweight concrete or indoor plaster containing vermiculite. It's very easy to work with and saves weight on the train layout. I built up hills with Styrofoam, rough cut them with the hot foam cutter and then covered them with the lightweight plaster.
You can also use good old drywall spackling compound, but if applied too thick it will crack--then you have to go over it again--and it takes much longer to dry (as in days) than the lightweight plaster/concrete.
|
|
|
|
Post by edwardsutorik on Dec 20, 2014 22:05:14 GMT -8
Of course, I could be wrong.
Ed
PS: Nah.......
|
|
|
|
Post by atsfan on Dec 21, 2014 7:12:11 GMT -8
Oh, yes, you definitely need to put weight over the foam sheet until the Liquid Nails dries--which depending upon temperature, etc. can actually take days. I was going to have a second layer of the 2" foam on my layout, to allow carving of deeper scenic features, but the table top became rather uneven after just one layer of the 2" foam. Those 2" sheets are not totally flat, even when they interlock at the tongue and groove ends, so I had to manicure all the seams to get them reasonably flat prior to adding lightweight plaster. So the approach of using thinner foam layers might be better.Some concrete and decorative brick supply places sell a lightweight concrete or indoor plaster containing vermiculite. It's very easy to work with and saves weight on the train layout. I built up hills with Styrofoam, rough cut them with the hot foam cutter and then covered them with the lightweight plaster. You can also use good old drywall spackling compound, but if applied too thick it will crack--then you have to go over it again--and it takes much longer to dry (as in days) than the lightweight plaster/concrete. I always use sculptamold over the foam edges. It is fast and easy. PS, add some paint to the mix (brown or green your choice). Saves white spots later on. |
|


