|
|
Post by tankcarsrule on May 3, 2015 5:16:38 GMT -8
I haven't started it in awhile, so here goes. The b & w photo is different and the before photo shows what I added. Regards, Bobby   |
|
|
|
Post by peoriaman on May 3, 2015 7:40:22 GMT -8
Tanks for starting Bobby; nice car! I was working on this GM&O woodchip hopper. Its almost ready for weathering. I used an Accurail kit but I removed all the sides and ends and made new ones from Evergreen styrene and many hundreds of Archer rivets. I riveted the interior too so I just might decide to run it empty all the time...  |
|
|
|
Post by mlehman on May 3, 2015 8:19:15 GMT -8
Bobby, Awesome car! And it's like putty in your hands as you shape it into something masterful.  Advice of the Day: Don't stay up real late, Photoshopping pics for SPF. Get it done early  so you don't phat-finger yourself into fits. Took me two hours past a very late bedtime to fix a filename crisis. Anyway, partly an issue of my sometimes wayward fingers that just don't do what you tell them to. At least I think the pics are better quality this week after having a helpful comment about my wandering ISO #s. The same issues that crept into last night's ordeal don't help when you're in a hurry with the digicam, still not sure of all the settings, and having to reach into the letterboxed scene at Crater Lake. Taking that to heart and finally getting the last of the appendices off to my committee before my defense in a week's time, I celebrated by getting out the big tripod and taking some pics other than of CL. It helped that I had some new inspiration...yet another extension -- and the very, very last barring some major remodeling (although another hole in the wall could get me into my office/workshop) -- I present to you what just got its name. Snowden [its benchwork anyway] 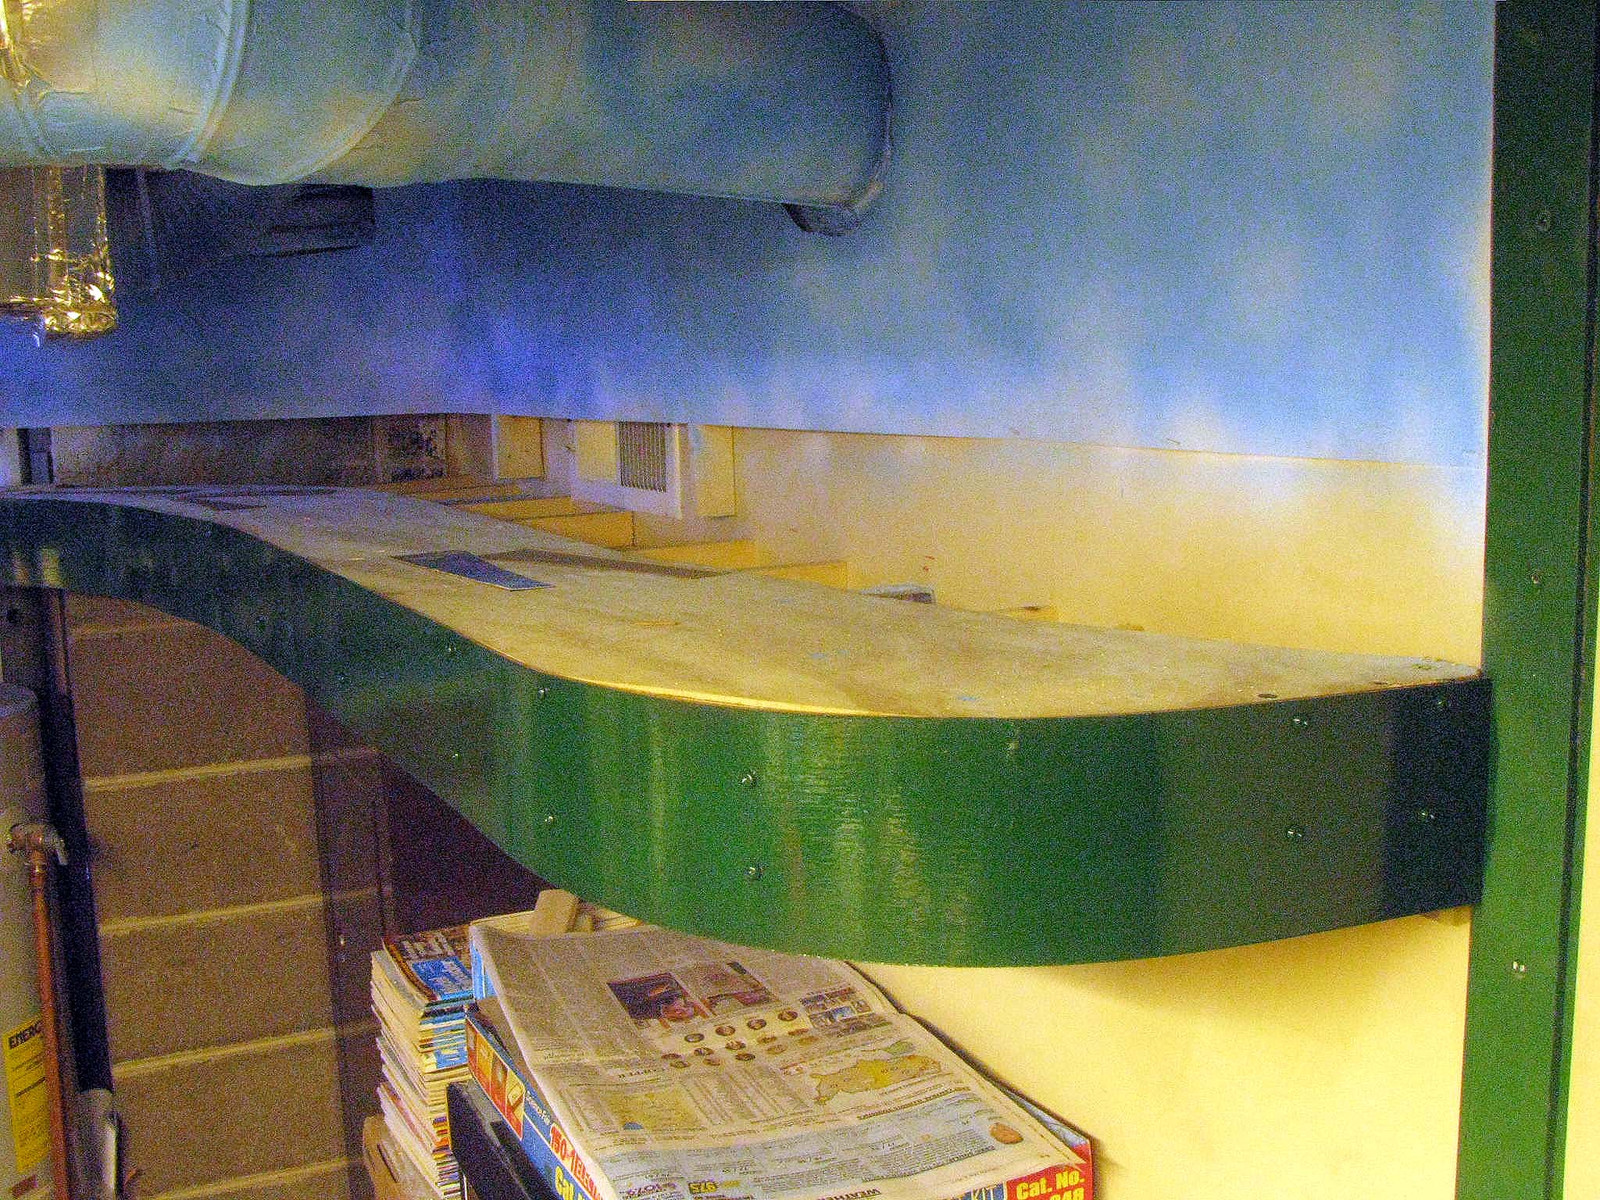 I did some thinking on how to make the supporting structure thin for clearance, as it's right at shoulder height and I have to squeeze past it to get to the backside of Crater Lake. It's actually easier to get back there now that the big storage rack I removed to make room for Snowden is out of the way. The fascia here is 4 1/8" deep. That's basically the over all depth of the system at the back side where the rail along the wall make it about twice as deep at the front needs to be. So the front of the fascia could be as skinny as 2 1/8". That would be clear all the way to the back wall where the rail is, except for the intrusion of the brace on the wall bracket every so often. I can't claim total originality here, as it's based on things I've seen others do, but I think it's so easy to do with common materials that documenting how I did it could help others with multi-deck layouts. These brackets allow it to average about 18" deep here, but longer brackets could probably take you to 2' wide. 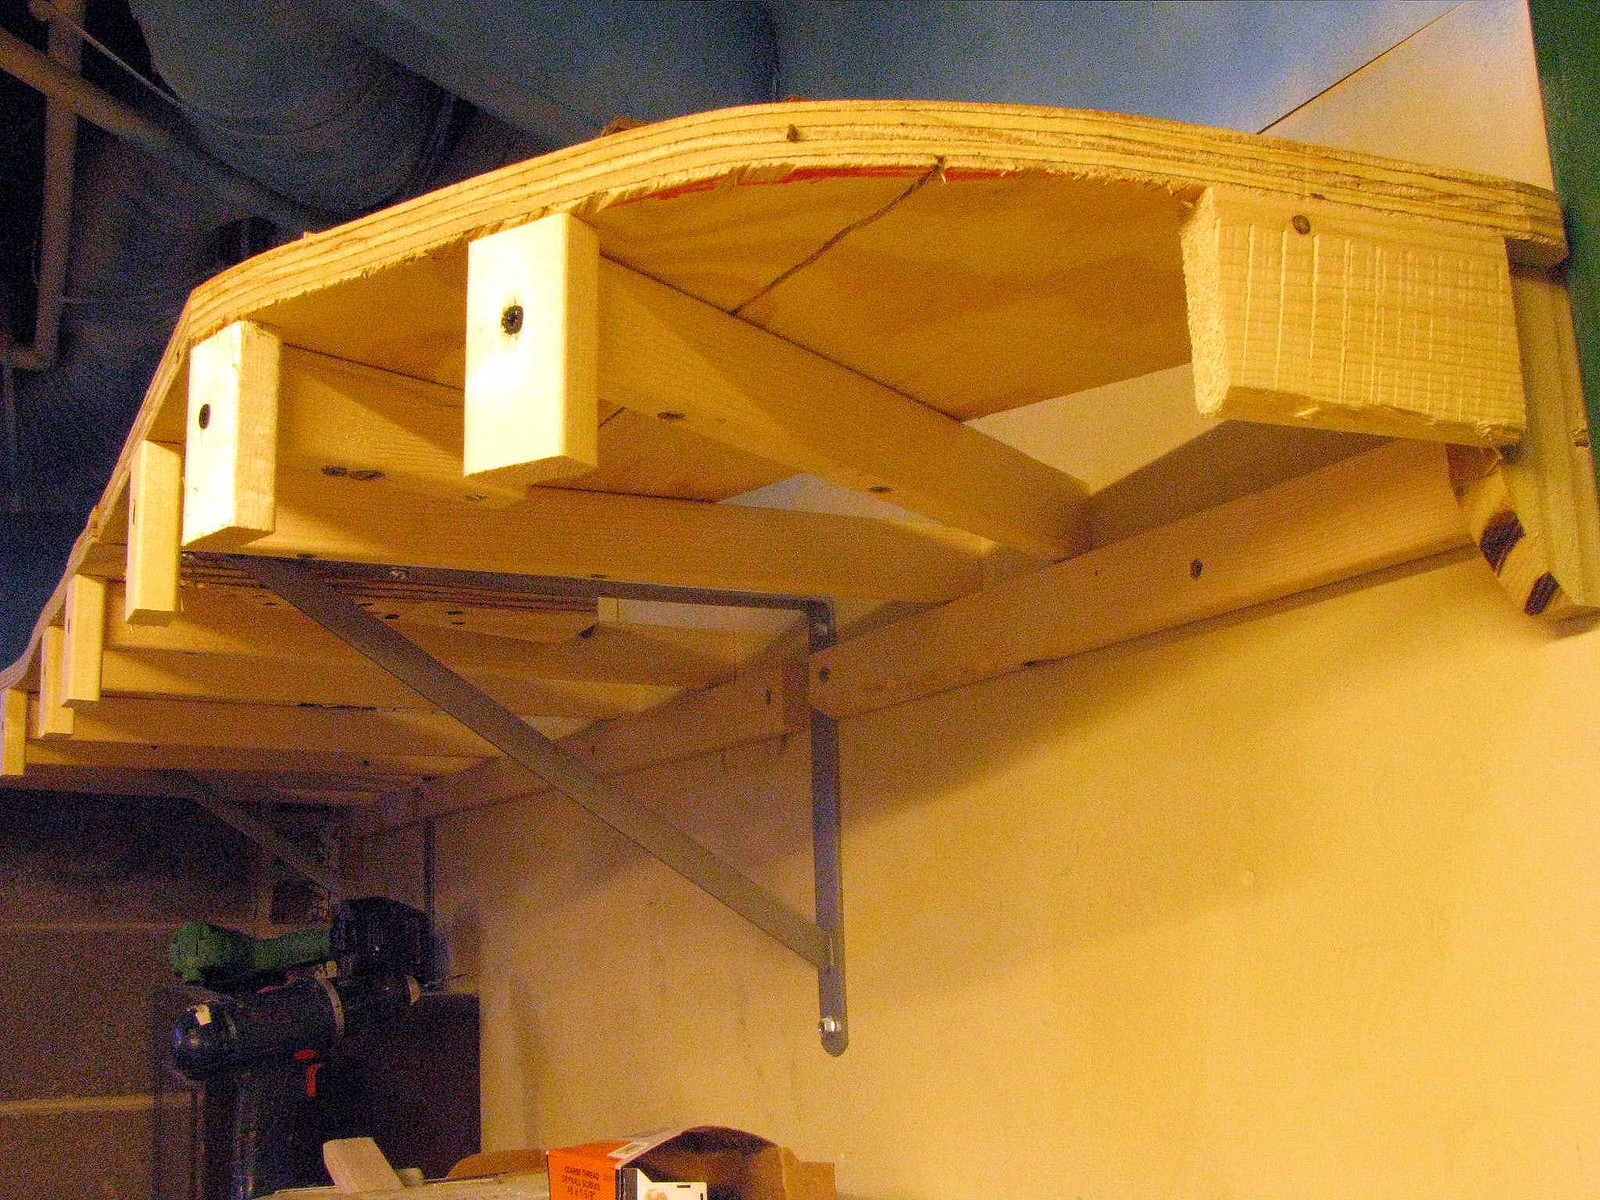 The underview shows how it works. The steel brackets were purchased at the big box. These are about 14" deep, but they had deeper ones (next size up was 20" IIRC). You could try something thinner than the 3/4" plywood, but I don't think that will give you adequate strength to avoid sagging over the ~32" span I used here. With 3/4", you can use all the standard mounting techniques of standard benchwork. The 3/4" is screwed to attach from below to the steel brackets. A rail is set at a height to support the back end of the "crossmembers" that allow for scenic/track elevation like standard benchwork. The crossmember is screwed from below to attach to the 3/4" ply. The fascia attaches to little blocks inset at the end of the crossmembers. Here, I will be running a switchback up behind where the 3/4" subroadbed is now. At the other end of the Cascade Branch where it connects with the Durango-Silverton line at Tefft, the worker's housing area will be moved to Black Cat Junction and a turntable installed in place. This will facilitate helper operations on the ruling grade that heads uphill behind the station and on into the next room where it disappears behind the mountain. 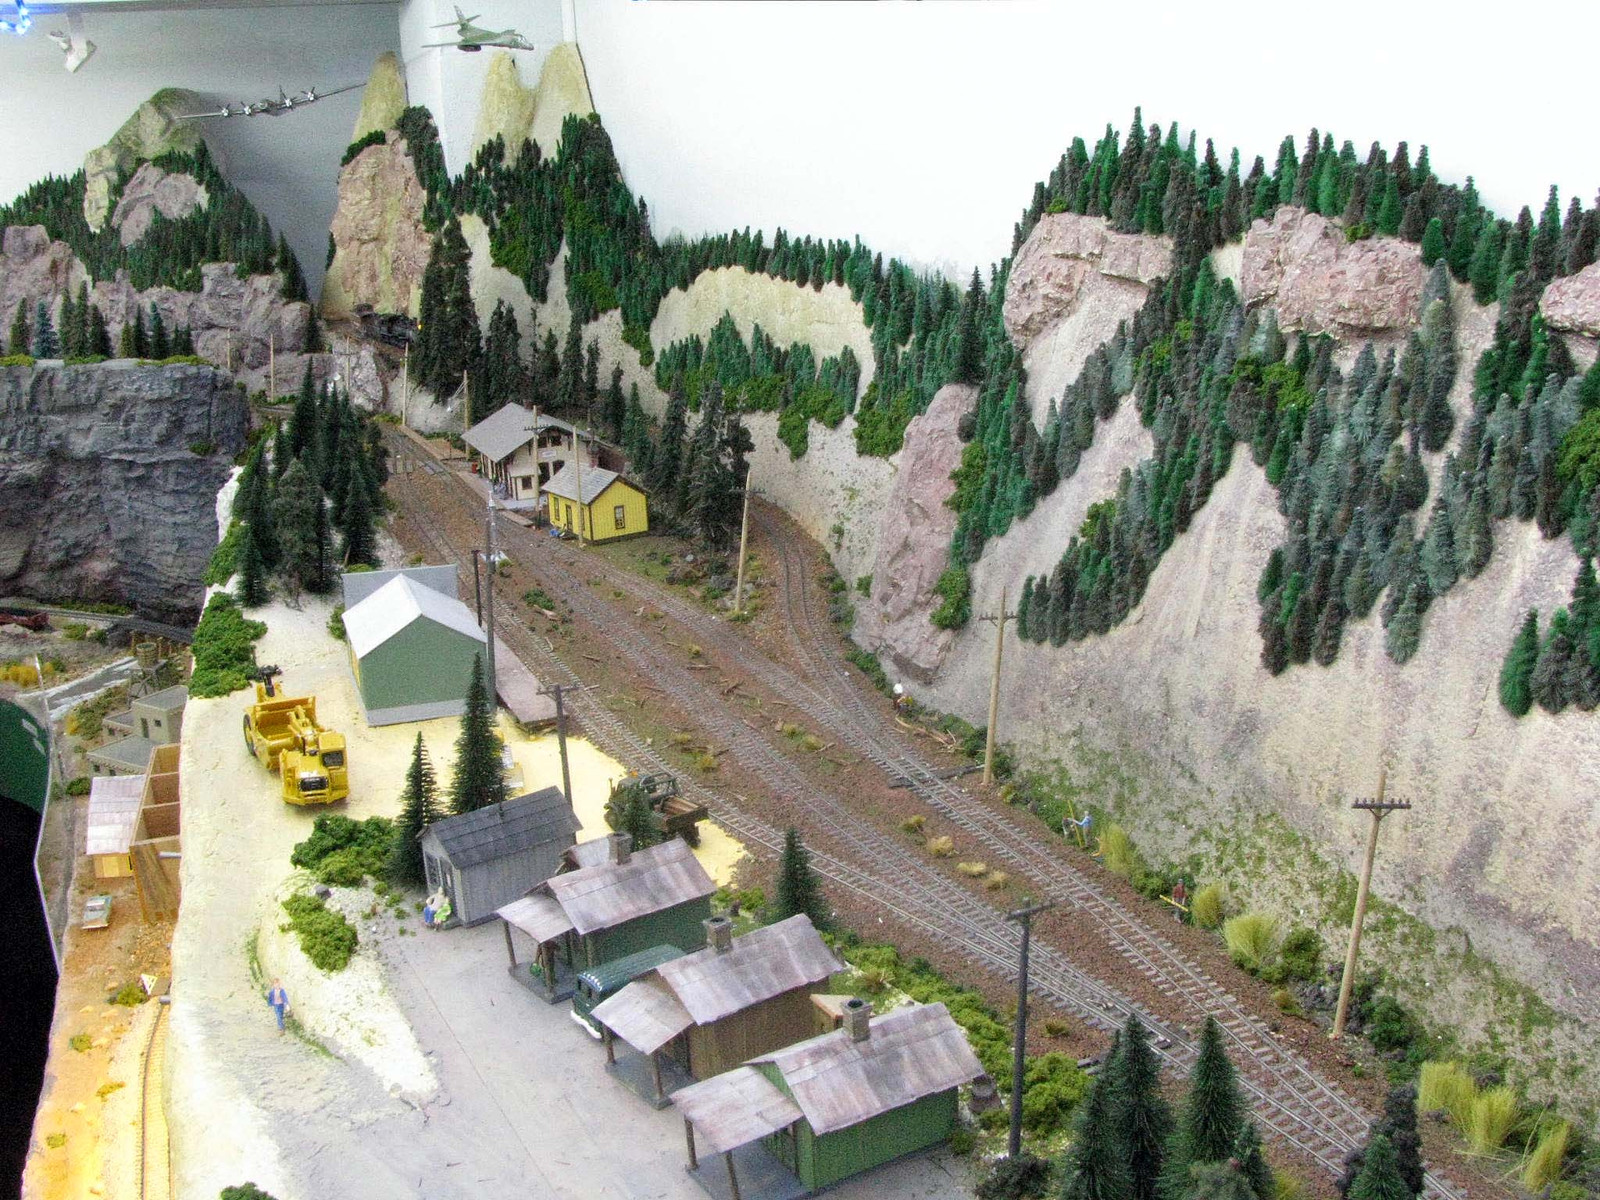 Finally, for all the standard gauge fans out there, a pic of the H-P Zephyr stopping at Durango.  |
|
|
|
Post by TBird1958 on May 3, 2015 9:04:22 GMT -8
Great work this week guys! Love the tank car Bobby, your craftsmanship is simply amazing, the wood chip car is great too, I've never used Archer rivets, they look fantastic! Mike, you're always having such a great time with your layout, wish I were closer, I'd enjoy seeing it in person! Since I don't currently have a layout I'm fortunate in having a good friend that I visit with about once a week to operate on his layout. He's a devout UP '60s- '70s modeler, recently he picked up this Roco crane, originally painted in C&NW black, here it is resplendent in UP silver ( yes it's posuer, it's ok) it'll get a Kenifick Green '53 GSC as boom car   Also, the first of 3 Athearn SD45's, this one is the as delivered austere small herald scheme - the other two will be slightly clear large herald railroad repaints, they'll be along in the next couple weeks.   |
|
|
|
Post by riogrande on May 3, 2015 10:59:46 GMT -8
Nice photo's. Mike - nice to see the benchwork coming along and how how your doing the sky and fascia supports etc. Mark, great job on the SD45, subtle effective weathering and the crane looks great too. the tank car and wood chip car looks nice too.
|
|
|
|
Post by mlehman on May 3, 2015 11:23:22 GMT -8
SNIP Mike, you're always having such a great time with your layout, wish I were closer, I'd enjoy seeing it in person! SNIP Thanks T-bird! Glad you're enjoying it. Yes, too bad you're not closer, but if you ever do get out this way, please, the welcome mat is out. That UP-painted crane is sharp. I've always preferred the small Rio Grande logo over the supersized one, but either way it looks great with your weathering. Speaking of visitors, I'd welcome any forum member here to a visit if you're in the Central Illinois area and are interested. Urbana is not too hard to find. |
|
|
|
Post by mlehman on May 3, 2015 11:26:10 GMT -8
Nice photo's. Mike - nice to see the benchwork coming along and how how your doing the sky and fascia supports etc. SNIP Jim, Thanks! The system really works well. The key to it is actually the fascia, oddly enough. Once it's screwed in place, it stiffens the front edge quite nicely, so doubt I'll have any drooping despite the 32" between wall supports. |
|
|
|
Post by gp74444 on May 3, 2015 14:50:21 GMT -8
just doing some fun stuff trying to get back in the grove.  |
|
|
|
Post by onequiknova on May 3, 2015 19:48:46 GMT -8
Here are a couple progress pics of my Joliet Union Station project. Excuse the poor pics, but this thing is too large for my normal poster board back drop. Again, everything is being cut out on my mill. The large front wall gave me fits, and is actually my second attempt. I ruined the first when I milled the recess behind the large arched windows. (you can see them shining through in the first pic.) These recesses will have large concaved arches set inside of them. Also note the shallow grooves milled near the top to locate the decorative crown moldings similar to the small one story section.   |
|
|
|
Post by runs2waynoka on May 3, 2015 20:21:15 GMT -8
GFSX 582   This is a Atlas 4650, I modified it by adding the weld seams on the carbody sides, and building new modern roof hatch covers, before weathering it. Unfortuately the patched gray areas came out too dark after I added some grime washes. Atlas didn't quite get the lettering correct, it's smaller on the proto and a bi lower. The prototype- rrpicturearchives.net/showPicture.aspx?id=2857887Brad |
|
|
|
Post by stevef45 on May 3, 2015 20:53:51 GMT -8
Nice stuff to start. Not sure when i'll ever post updates of my projects. Wife wants a divorce and i have no will to do anything.
|
|
|
|
Post by TBird1958 on May 4, 2015 5:22:59 GMT -8
That's a path a few of us here have had to travel, take good care of yourself and remember that with time things will get better.
|
|
|
|
Post by riogrande on May 4, 2015 6:06:07 GMT -8
Agree with Mark. I went through it a few years back and it was not fun at all but it did get better. It did knock the wind out of my sales truth be told - I used to be trying more kit bashing type stuff back then and have lost the will do do that, but still enjoy the hobby but at a different level than before. I am remarried and my 2nd wife is supportive of my hobby, goes to train shows with me, remembers train info. After some years of being "on hold" I'm finally building a layout again, even if a small one.
Hang in there Steve and try to find things you enjoy to take your mind off stress and trouble, even if you have to switch gears or something!
|
|
|
|
Post by mlehman on May 4, 2015 11:30:03 GMT -8
Steve, Sending positive energy your way. If things really can't be fixed, it's the right thing to do for both parties. Either way, take care of yourself, even if your better/other-half no longer does. Keep the trains, as they'll be faithful support no matter what, when you're ready for them again. In the meantime, they will be patient and understanding, as will we. |
|
|
|
Post by stevef45 on May 4, 2015 23:06:24 GMT -8
Thanks guys. I'll eventually start up again. I have another project waiting in the wings once I finish my RCPE units. This one will be pretty cool too, its sister unit whenever I get the model will be just as wicked!! hehehehehehehehe
|
|
|
|
Post by emd16645 on May 5, 2015 4:36:53 GMT -8
Keep your head up Steve, everything will work out in the end. We are here for you.
|
|
|
|
Post by kentuckysouthernrwy on May 5, 2015 6:16:18 GMT -8
Steve, been there. Done that. IT's not fun, but you're surely not alone.
I went through that 18 years ago and came out of it and landed on my feet, retired and "D" all within 2 months. Now have a supportive situation and a well supported rail hobby.
Can't wait for your next update.
|
|
|
|
Post by milgentrains on May 5, 2015 11:15:19 GMT -8
Steve,
I've been there twice with the same woman, my trains are one of the main reasons that I've somewhat kept my sanity. She's gone, the trains are still with me.
|
|
|
|
Post by stevef45 on May 5, 2015 20:14:52 GMT -8
I guess one good thing to come out of this situation is I wont have to hear any bitching and moaning about train stuff anymore. lol
|
|
|
|
Post by drolsen on May 6, 2015 3:58:00 GMT -8
This is a Atlas 4650, I modified it by adding the weld seams on the carbody sides, and building new modern roof hatch covers, before weathering it. Brad, that looks awesome! I think the weld seams makes a huge difference on the Atlas model. It's one of those detail that you can't quite put your finger on when it's missing, but it just looks "off." I scribed the lines on an undec that I'm working on, but I'm not sure I made them heavy enough. I'm afraid they may disappear under paint, but I guess some weathering will bring them out again. Dave |
|
|
|
Post by bar on May 6, 2015 9:14:07 GMT -8
Mike, that is solid benchwork. Nice to see I am not the only one using 2x4s for HO. I have a garage's worth of lumber collected from jobsites, mostly 2x4 stud stock and 1/2" plywood. The frugal modeler at work.
|
|


 so you don't phat-finger yourself into fits. Took me two hours past a very late bedtime to fix a filename crisis. Anyway, partly an issue of my sometimes wayward fingers that just don't do what you tell them to. At least I think the pics are better quality this week after having a helpful comment about my wandering ISO #s. The same issues that crept into last night's ordeal don't help when you're in a hurry with the digicam, still not sure of all the settings, and having to reach into the letterboxed scene at Crater Lake. Taking that to heart and finally getting the last of the appendices off to my committee before my defense in a week's time, I celebrated by getting out the big tripod and taking some pics other than of CL. It helped that I had some new inspiration...yet another extension -- and the very, very last barring some major remodeling (although another hole in the wall could get me into my office/workshop) -- I present to you what just got its name.


