mako
New Member

Posts: 16 
|
Post by mako on Oct 17, 2015 1:47:19 GMT -8
Lets getting started. I'm finishing my Athearn NS flared SD70M. I changed the stock Athearn trucks with modified Kato HTCR trucks. Also i replaced the stock plastic handrails with smokey valley stanchions and brass wire. At last i installed a self builded PTC antenna array. An here are the pics.


Have a good week. Marcus |
|
|
|
Post by drolsen on Oct 17, 2015 5:43:44 GMT -8
Marcus, very nice work! Carefully bent and assembled metal handrails like yours still look so much better than plastic.
The only problem is that today (10/17) is Saturday!
Dave
|
|
|
|
Post by TBird1958 on Oct 17, 2015 9:31:18 GMT -8
Very nice work, the handrails look great - I like how you picked out some of the edges in silver too.
|
|
|
|
Post by Christian on Oct 17, 2015 9:54:23 GMT -8
The only problem is that today (10/17) is Saturday! That depends on where Mako is located. "No matter where you go, there you are." Nice finish on the locomotive. Particularly the dry-brush work. |
|
|
|
Post by drolsen on Oct 17, 2015 12:20:40 GMT -8
The only problem is that today (10/17) is Saturday! That depends on where Mako is located. I'm pretty sure that 10/17 (as the subject line reads) is Saturday no matter where you are located. Dave |
|
avel
Junior Member
Posts: 51
|
Post by avel on Oct 17, 2015 12:20:43 GMT -8
How did you make the trucks popout like that!? Drybrushing?
|
|
|
|
Post by Christian on Oct 17, 2015 13:56:43 GMT -8
I'm pretty sure that 10/17 (as the subject line reads) is Saturday no matter where you are located. Now there you go - seeing the elephant while I was viewing the chipmunk. |
|
mako
New Member
Posts: 16
|
Post by mako on Oct 18, 2015 0:56:37 GMT -8
Yes, i drybrushing the trucks with a light grey. I do this also with the shell. Marcus |
|
|
|
Post by nightmare0331 on Oct 18, 2015 4:29:17 GMT -8
Very nice SD70M! Been a long time since I had anything new to post mostly due to no time to build anything for myself. A few weeks ago I finally properly vented my airbrush booth and got it permanently mounted which is alot more convenient than it was...  ...and dug out the media blasting cabinet which had been sitting in the corner getting stuff piled on it forever...  and tore into one of those 'eh...I'll get to this someday' projects for myself. In this case, I reworked a Kato C44-9W as CNW 8646 'as delivered'...I amassed parts for 4 or so of these over the years and there's no time like the present to start building.    Quick modifications involved were new wire grab irons from .012 wire and tichy parts, Details West horn, speed recorders and spare knuckles, Hi Tech MU hoses, sound friendly chassis from an AC4400 (which was then equipped an ESU modern FDL sound decoder), Kadee 58's, a boatload of decaling and safety lettering and touchup paint. All of the handrails and underframe components were abrasive blasted and repainted along with various separate detail parts.    It's not perfect but I'm happy with how it came out. More importantly, I was happy to see all of my tools still worked. lol. Enjoy! Kelley. www.dufordmodelworks.com |
|
|
|
Post by tankcarsrule on Oct 18, 2015 5:04:13 GMT -8
Here's my 2.9 cents worth. It's a highly modified BLI AC60CW. Regards, Bobby  |
|
|
|
Post by dti406 on Oct 18, 2015 6:09:43 GMT -8
Nothing as new on my end, going back to the 70's for my current power! No work done but a lot of stuff in progress that should be finished next week. So I took some pictures at the club with my Penn-Central stuff and a couple of new ATSF Beer cars from BLMA.   Power is provided by Kato SD45 and SD40 Models that were superdetailed referring to articles by Jim Six in Model Railroading Magazine. First few cars are the Beer Cars by both BMLA and Eel River followed by PC Kelloggs Cereal Cars. Thanks for looking! Rick J |
|
|
|
Post by mlehman on Oct 18, 2015 7:15:03 GMT -8
Nice work, fellows, and welcome to the new guy with the NS loco. I've got NS track a couple of blocks away, but don't really follow it. No completed project pics this week, but here are several of a work in progress. This is the Outlaw Mine, no particular prototype, although it incorporates several features found on mines and mills in the Silverton area that I haven't found the space to model. The covered loading area is roughly based on the Silver Ledge Tram's lower station at Chattanooga. It helps protect cars spotted close to the edge of a 5'+ drop to the floor. Here's the foundation.  I mocked up the building starting with cardboard, then switched to black foamcore for the frame once I had the look I wanted.  It's also designed to help disguise a vent duct and the layout support next to it. Looks good to go from here.  |
|
|
|
Post by TBird1958 on Oct 18, 2015 7:41:59 GMT -8
As always, really nice work this week guys! I'm continuing work on the first of 7 Life Like GP30s, this unit was factory numbered 3005 which was seemingly a poor choice as that specific engine was destroyed in a wreck at Swan, CO. in 1970. I choose to renumber it, removing the digits on the cab with 2000 grit wet automotive paper and then lightly shoot some TCP black followed by clear gloss. The chassis is a Kato GP35 that's been milled and has some Evergreen plastic added to make a frame. It's still going to need a horn, rerail frogs, bulbs, crew along with a decoder. This specific unit was unmodified so it could always lead a consist, as it could often be found doing throughout the '70's - The snapshot shows it leading the CZ east in the Price River canyon.  |
|
|
|
Post by riogrande on Oct 18, 2015 9:20:39 GMT -8
Great pictures all.
Mark - I always wondered why LL chose 5005 and 5010 for their phase I GP30's - as you mentioned 3005 was destroyed fairly early in it's career, and 3010 for some reason lacked the orange paint over the windshield section.
|
|
|
|
Post by nsfantodd on Oct 18, 2015 9:55:53 GMT -8
Marcus,
Your SD70M looks great! I'm curious why you changed trucks?
Todd
|
|
|
|
Post by TBird1958 on Oct 18, 2015 10:18:08 GMT -8
Great pictures all. Mark - I always wondered why LL chose 5005 and 5010 for their phase I GP30's - as you mentioned 3005 was destroyed fairly early in it's career, and 3010 for some reason lacked the orange paint over the windshield section.
Yeah, pretty odd choices, the renumbering was super easy tho, I have a lot of sets of Microscale decals to pull numbers from. My 3010 will become 3013 and I'll re do all 4 Ph.II units as well. |
|
|
|
Post by D Bradley on Oct 18, 2015 13:54:24 GMT -8
|
|
|
|
Post by valenciajim on Oct 18, 2015 14:31:31 GMT -8
KCSrailfan--excellent modeling! Its a good thing you have a long bed pickup truck!
|
|
|
|
Post by D Bradley on Oct 18, 2015 15:05:58 GMT -8
KCSrailfan--excellent modeling! Its a good thing you have a long bed pickup truck! Thanks bro that super duty bed comes in handy |
|
|
|
Post by riogrande on Oct 18, 2015 16:58:57 GMT -8
Great pictures all. Mark - I always wondered why LL chose 5005 and 5010 for their phase I GP30's - as you mentioned 3005 was destroyed fairly early in it's career, and 3010 for some reason lacked the orange paint over the windshield section.
Yeah, pretty odd choices, the renumbering was super easy tho, I have a lot of sets of Microscale decals to pull numbers from. My 3010 will become 3013 and I'll re do all 4 Ph.II units as well. Good good - I have 3 phase I D&RGW small herald D&RGW GP30's. Was thinking of renumbering one to 3004, 3007 and 3011 - something like that. Also have 3 phase II - two can stay the with 3020 and 3028 and the other maybe 3016. |
|
|
|
Post by traindude on Oct 18, 2015 16:58:45 GMT -8
Here are a couple of shots of my Pan Am OCS FP9 units made from a pair of Rapido undecorated units. The PAR 1 has a WoW Sound diesel decoder in it.   and a short video of the whole train... |
|
routerock
Junior Member
Rock Island in 1977
Posts: 94
|
Post by routerock on Oct 18, 2015 17:52:22 GMT -8
they did the same thing with the rock island GP9'S, one of them was the wrecked and rebuilt with a chop nose.
|
|
|
|
Post by fr8kar on Oct 18, 2015 17:59:11 GMT -8
I've been really focused on 3D printing for a little while now, which is impacting my "real" model output. Recently however, I've ordered several of my designs and have proof of concept that many of these ideas will work. Here are some examples: First is a set of six carbon black hopper outlet covers. These things are littered everywhere along the right-of-way and in the yard. I told one of my coworkers I wanted to measure one of these things so I could model it in CAD and the next time I went out to my car after work there was one stuck under my windshield wipers! I have a couple different carbon black cars drawn but so far they haven't turned out quite as good as the outlets: 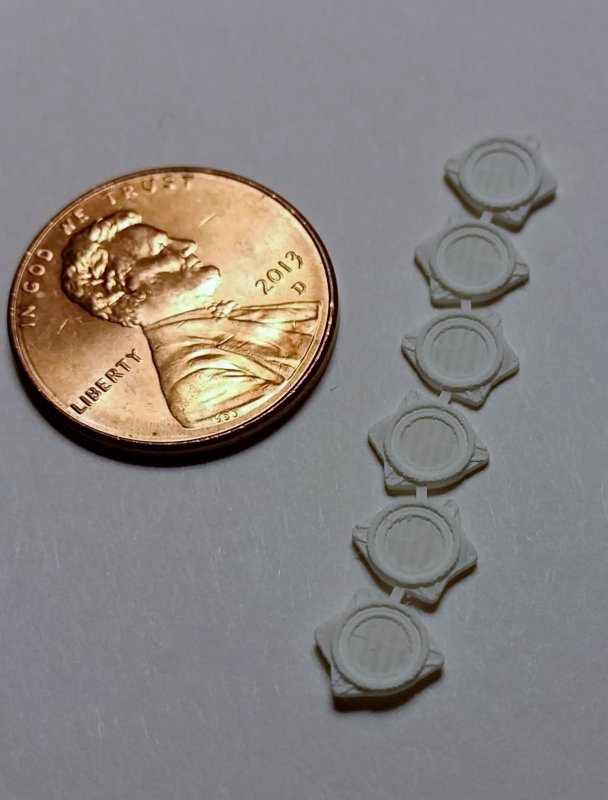 Next are some semaphore blades. A friend is building a model of Dallas Union Terminal set in the early 60s so he'll need some signal bridges with semaphores. The cost to build working semaphores with components I can buy off the shelf is insane, so I've set to the task of building my own: 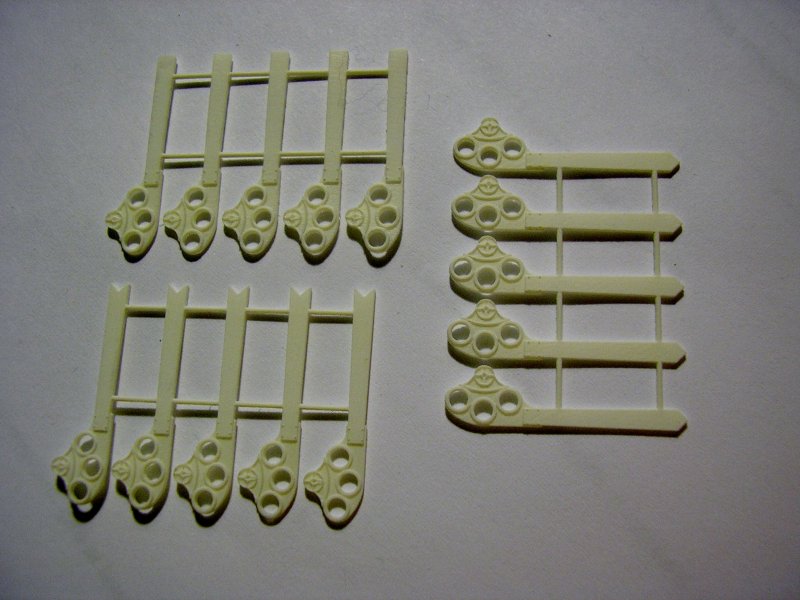 Finally, here are some caboose cupolas I've designed to fit the Atlas Extended Vision caboose. First is a Cotton Belt version with square side windows at the corners and second is a Santa Fe CE-6/8/11 version with X-panel roof: 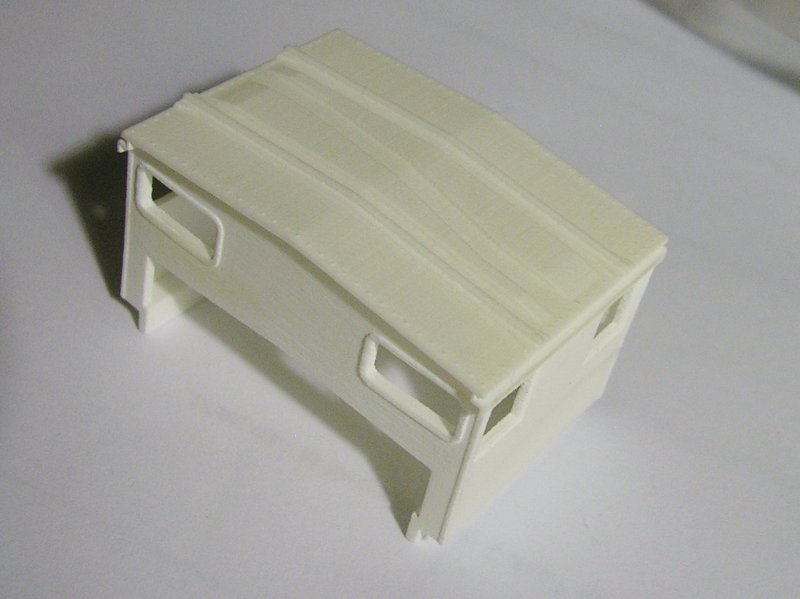 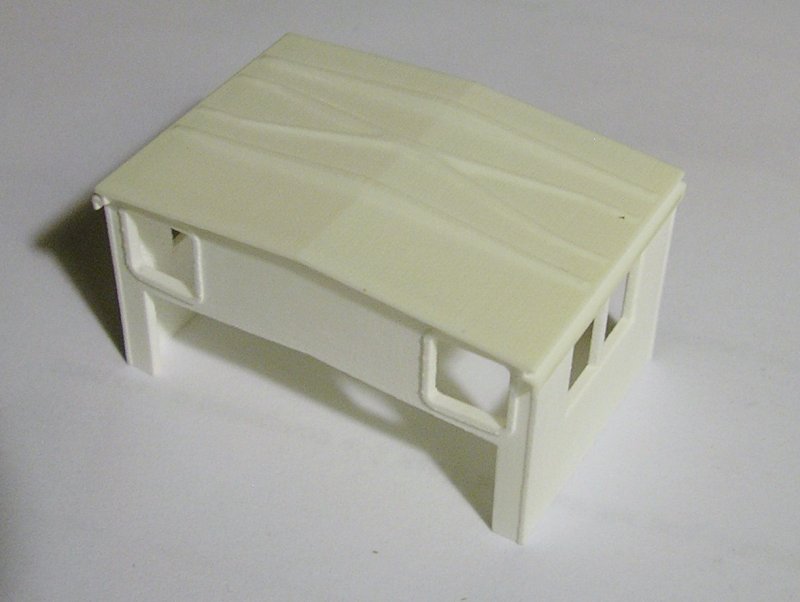 I have a hard time getting good photos of these small parts where they don't look "soft" (they're actually quite crisp). I've since designed more variations on the cupolas along with sides, ends and roofs appropriate for several cabooses so I can build the ultimate caboose collection.  |
|
|
|
Post by SCL618 on Oct 18, 2015 18:39:29 GMT -8
Ryan, Are these cupolas rendered in the frosted ultra detail or the frosted extreme detail? Have you noticed any differences between the two? You're work especially for the SAL/SCL cabs is greatly APPRECIATED!  |
|
|
|
Post by fr8kar on Oct 18, 2015 19:01:54 GMT -8
The cupolas are frosted ultra detail and the outlet covers and semaphore blades are frosted extreme detail. I haven't printed any single part in both materials to make a comparison yet.
I'm glad I can help, but I must admit it's only out of my selfish desire to have one of those SCL cabooses!
|
|
|
|
Post by markfj on Oct 19, 2015 4:41:47 GMT -8
Hello All, Great work and nice photos!
The only thing I can add is that the article Rick referenced is titled:
Modeling Pennsylvania and Penn Central SD40s. Detailing the Kato SD40: Expert Skills not Required. It appeared in the September 98 issue of Model Railroading (pages 52-57).
This article was accessible in the magazine archives on Trainlife, but of course those archives are still not working.
Thanks, Mark
|
|
|
|
Post by edgecrusher on Oct 19, 2015 8:05:59 GMT -8
I know I'm a day late, but here are a couple pics of a Walthers lounge car I finished up over the weekend.   |
|
mako
New Member
Posts: 16
|
Post by mako on Oct 19, 2015 8:49:02 GMT -8
Todd,
i'm not really satisfied with the athearn ones. The quality from the Kato's are much better and the Loco perform also better with the Kato ones. And the Kato has the detail of the chaines near the roller bearing caps 
Marcus |
|
|
|
Post by nsfantodd on Oct 19, 2015 14:43:20 GMT -8
Todd,
i'm not really satisfied with the athearn ones. The quality from the Kato's are much better and the Loco perform also better with the Kato ones. And the Kato has the detail of the chaines near the roller bearing caps
Marcus Marcus, I know the early Genesis Sd70's had horrible trucks (I sold mine off), but I thought the newest run corrected that. Mine runs well, although all I have is a test track. I may have to get mine out and test run it some more. Thanks for the info, Todd |
|


