|
|
Post by mlehman on Dec 20, 2015 5:18:45 GMT -8
Scotty suggested we do a Then & Now: Lets do a Then & Now. Try to find that ol achieved picture or dig down to the bottom of the box buried out in the garage of that 1st 2nd or 3rd model that you auh.... we will say Attempted, ya that's it. You attempted to weather. Post it with a recent weather job and let it roll. We can all see just how much we have progressed and the same time.... we can all have a great laugh together and that is so very important to hang on to in today's world. So please, dig it out and post'em up. Thank you! Gotta busy day ahead, so figured I'd take Scotty's suggestion and run with it in case someone didn't see his suggestion in the Crew Lounge. I certainly have some laughable material here. The loco is the 2nd loco kit I ever built, 40+ years ago, a Mantua Ten-Wheeler. It's mainly a grayish wash, plus a lot of dust grunged in over the years, over my hand-lettered Tonopah & Sumpter Valley line scheme that I identified as a teenager. Had to kill power to a track for its DC funkiness and its horn-hooks to sit on.  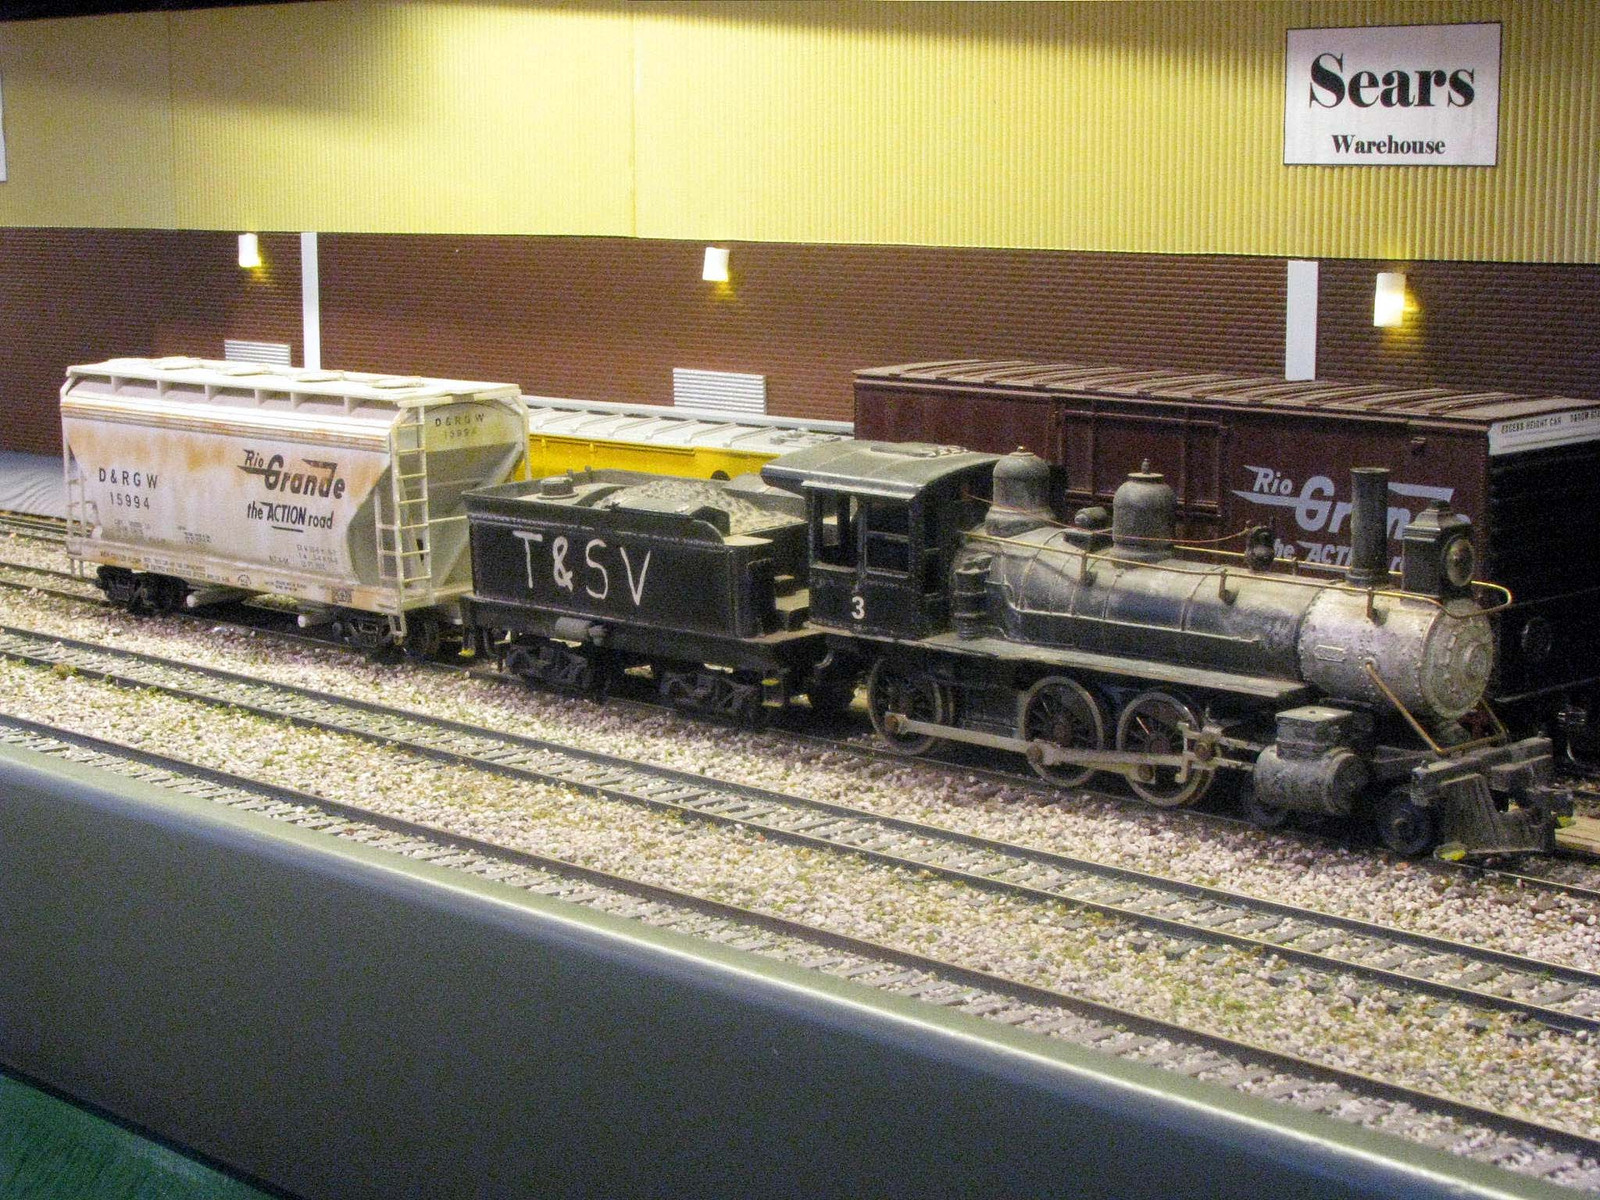 The Now shot is, well, much more recent and is what you would call more like what we think of weathering today. There's different pastels over a clear-coat of Dull-Cote per a prototype pic.   Progress? Of a sort.  |
|
|
|
Post by tankcarsrule on Dec 20, 2015 5:40:51 GMT -8
don't have a then and now, so this is my contribution. It's scratch built. OMI did this car in brass, but it doesn't have open grid walkways.  |
|
|
|
Post by riogrande on Dec 20, 2015 5:53:36 GMT -8
Mike, cool loco - looks like something out of western movies!
Bobby, interesting tank car - 2 dome and lots of detail!
|
|
|
|
Post by milgentrains on Dec 20, 2015 6:16:59 GMT -8
Mike, cool loco - looks like something out of western movies! Bobby, interesting tank car - 2 dome and lots of detail! Mantua's loco was modeled after Sierra RR #3. Among her many film credits was Petticoat Junction and Back To the Future pt 3. |
|
|
|
Post by dti406 on Dec 20, 2015 6:18:02 GMT -8
I am sort of like Bobby, any weathering on my part is a pure accident!  The slight bit of weathering is from the separation of the metallic pigments in the Model Masters Aluminum paint, never had that problem with Floquil, which had finer pigments. Rick J |
|
|
|
Post by icrr3067 on Dec 20, 2015 7:49:48 GMT -8
I have no Then and Now all of my old models were either sold off or were sacrificed. While I'm waiting for decals to be made for my Passenger cars and E Unit I started a photo mod to work on my scenery skills, so when I start building my layout I'm kind of ahead of the game. This photo mod is of Genoa, IL. It's 2'x4' wooden frame with a 1/2" foam insert.  Untitled Untitled by Timothy Alund, on Flickr This photo is a Mike Schafer Photo. I'm using Vinyl Bed for the roadbed, Micro Engineering Code 87 for the track.  Untitled Untitled by Timothy Alund, on Flickr I added some bolt bars to the track and believe it or not this is my first structure I ever built and modified it to the prototype which is still standing.  Untitled Untitled by Timothy Alund, on Flickr |
|
|
|
Post by runs2waynoka on Dec 20, 2015 8:37:07 GMT -8
|
|
|
|
Post by TBird1958 on Dec 20, 2015 9:46:52 GMT -8
I've always enjoyed weathering models.......Over the years I've culled a lot of my older equipment off the roster - better models becoming available and my own abilities changing, (hopefully) getting better. This from sometime in the '90s, Mainline Modeler ran an article about auto parts cars and this was one presented, it's a modified Robins Rails car that's had it's rivets shaved off and a new sill made. The weathering is all done with an airbrush, very thinned out Accu-Paint (now TCP) and paper masks to create the streaks down the car side.  There's some airbrush on the Reading car too....  When it first came out, the Intermountain 4750 was the best covered hopper you could buy, this is one that I painted and lettered, then weathered with chalks. I used some very stiff small brushes to push the pigment into the paint, trying to duplicate the dirt collecting in wavey welded panels, again this was from a Mainline article.  I'm afraid the model is a bit crude by today's standards but this is a Carbonic car that I built from a Walthers 65' LPG car ( back when it was new!). This was weathered with artist oils, which worked very nicely to make the patches of rust....... 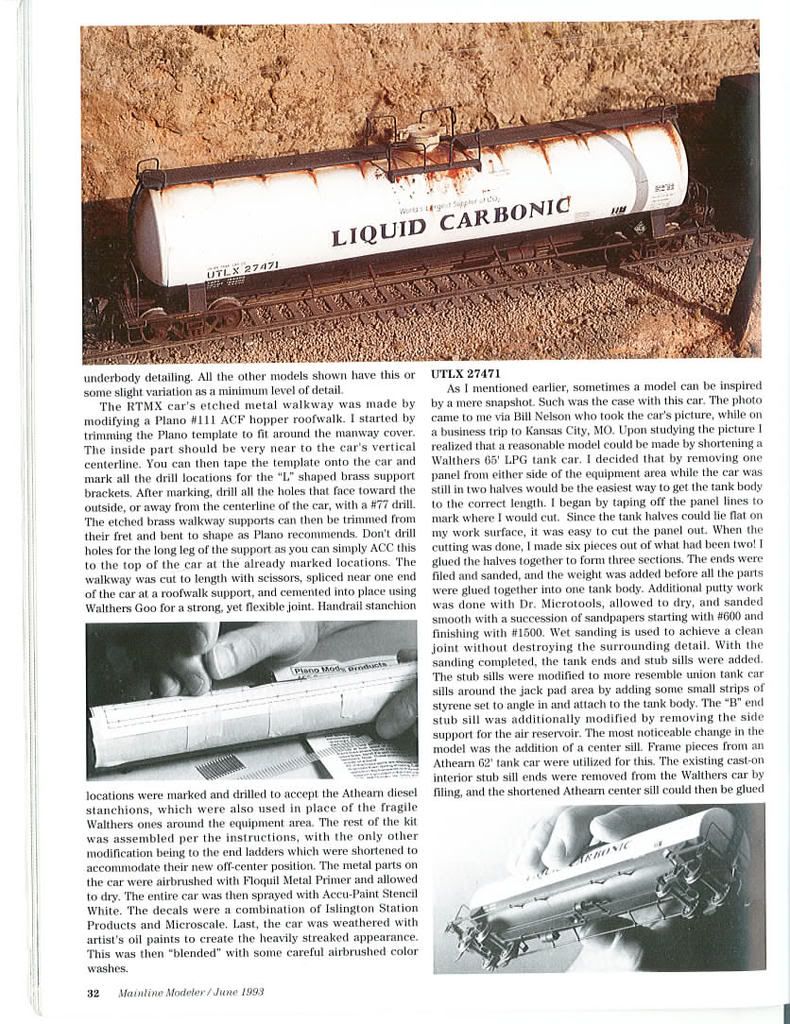 Lots of oil paint on this car too....... 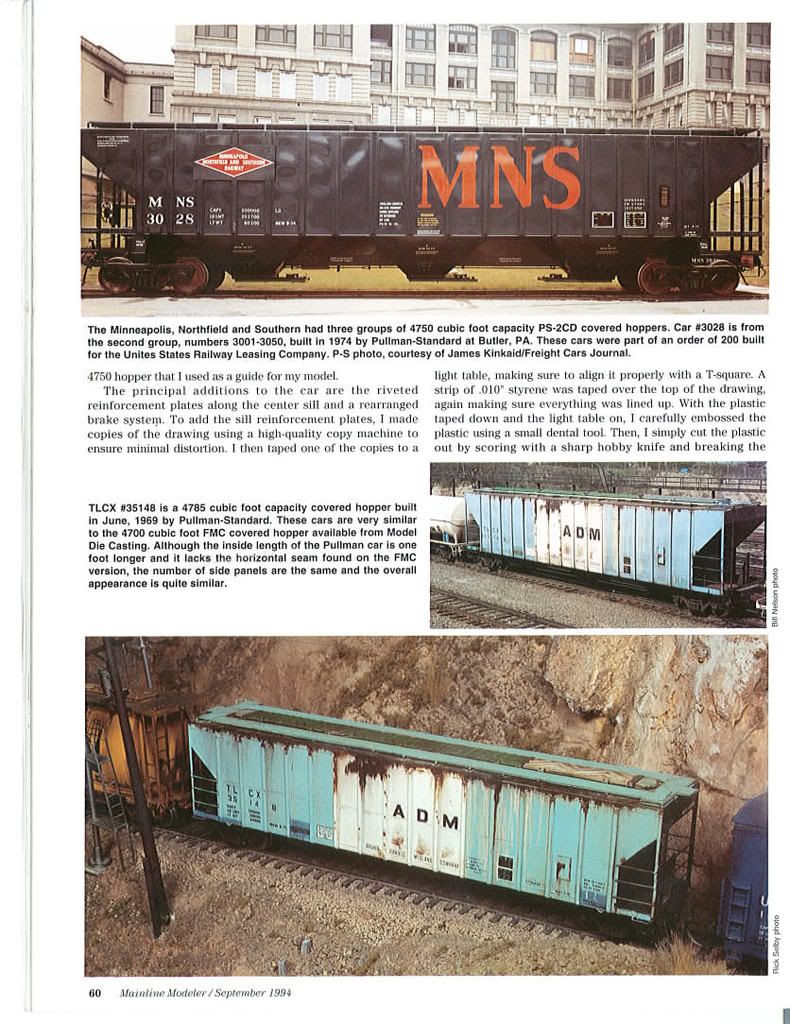 This is more recent, with lots of colored chalks and colored pencils, I really enjoy the subtle effect. As my layout concept has evolved and become more refined to just represent the very late '60s through the late '70s I try to focus on period correct rolling stock weathered to represent it's age, thankfully the internet makes this much easier - Thanks to all the guys that went out and took freight car pics well before it became fashionable to model them seriously!  Since joining this forum this weekly feature has served as great inspiration, there are several participants who's work I truly admire, They've been kind enough to share their work and techniques which I appreciate a great deal. Thanks Bobby Pitts, Scotty, Tom, Brad, Ryan and everyone that builds model and shares them here! Best Regards, Mark |
|
|
|
Post by kentuckysouthernrwy on Dec 20, 2015 10:40:53 GMT -8
Early weathering on RS-3, also 'fake' ballast using speckled texture paint: 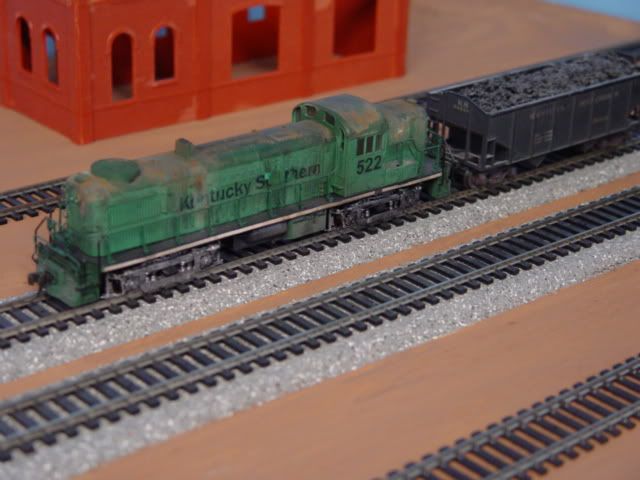 More current weathering on RSD-15  |
|
|
|
Post by tankcarsrule on Dec 20, 2015 11:40:36 GMT -8
This was my most difficult build.  |
|
|
|
Post by TBird1958 on Dec 20, 2015 11:44:30 GMT -8
That is some beautiful, tight work, simply awesome Bobby!
|
|
|
|
Post by tankcarsrule on Dec 20, 2015 13:57:33 GMT -8
Thank you very much Mark!
Regards, Bobby
|
|
|
|
Post by mlehman on Dec 20, 2015 15:52:40 GMT -8
Mike, cool loco - looks like something out of western movies! SNIP Jim, Thanks! Steve's right, you've probably seen that loco in a 100 different episodes of TV and in movies. She was a real workhorse. I never really liked the odd wheelbase on the 3rd driver. But that's the kits we had then and it was way before I got more comfortable about hacking things to suit my taste. My first HO loco was another Mantua kit, an 0-4-0 tank engine. I don't recall it's deposition. These kits were very simple, unless one added fancy valve gear. Not quite shake-the-box, but close, as it was mostly screwdriver assembly, plus a few rivets, a little glue, etc. Biggest challenge was the paint, which I'm pretty sure I did with a brush. No decals, except the number, just handlettered. She was on the deadline for decades and I just recently got her running on DC again. It would need a hi-amp rated decoder, plus some KDs, just not sure If I should bother. It's more a museum piece than a working loco. |
|
|
|
Post by kentuckysouthernrwy on Dec 20, 2015 16:10:56 GMT -8
Mike, cool loco - looks like something out of western movies! SNIP Jim, Thanks! She was on the deadline for decades and I just recently got her running on DC again. It would need a hi-amp rated decoder, plus some KDs, just not sure If I should bother. It's more a museum piece than a working loco. If it was mine I'd update the weathering to severe, put on a dead track next to the engine shop with maybe a part or two cannibalized from it. I built a Mantua 2-6-6-2 logger kit once and when I switched to doc believed all the wild horror stories on the Internet About putting in decoders and sold it. Build was a mild challenge but worked out well. Easier than a Hobbytown of Boston diesel. I still have an FA-FB set with Lyndsay diecast shells and about 3 lb of Linotype slugs in the 'A' unit for weight (motor is in the 'B'). Pulled over 100 cars on the dealer's layout, all he had. Would have pulled more if he'd had them. Hardest part of that was drilling the diecast shells for handrails and grab irons. |
|
|
|
Post by valenciajim on Dec 20, 2015 16:57:46 GMT -8
Hey Mike your weathering and lettering 40+ years ago may not meet your contemporary standards, but at least that layout had "world class topless girls!" As usual, excellent modeling. Tbird1958, I am relly interested in finding out more about "weathering the wavy panels on the hoppers.
|
|
|
|
Post by mlehman on Dec 20, 2015 17:51:51 GMT -8
Karl, I just don't have a standard gauge engine terminal or finding her a resting spot could work. Not enough room around the Durango station to stuff onto a pedestal here. I'll probably keep it as is and drag it out for arguments about "too low quality for too much money. IIRC, it was circa 1970 and about $14.95. I had to do everything to build it except for casting it, tune, paint, tune...and it was DC, no headlight that lit, and ran indifferently, probably more the result of my limited skills than the quality of the kit. No doubt it could be made to run nicely, just some doubt I ever could. I became aware of its limitations early on and felt lucky just to get it running with my better skill and tool sets Hey Mike your weathering and lettering 40+ years ago may not meet your contemporary standards, but at least that layout had "world class topless girls!" As usual, excellent modeling. SNIP Well, Thanks.  However, that's the current layout at Dove Creek, Colorado. And I thought it better to avoid needless controversy, the inadvertent pics of the redlight district were probably distracting  This was the layout that #3 was the primary steam power on, over in Germany, built with Dad's help at the base hobby shop and assembled in the storage unit in the basement of our apartment building.  I have other stuff from back then that's on the layout now. I'll try to find a Then & Now like that. 40+ years of bouncing around applies a lot quite naturally in a process easily managed by the modeler who is in no hurry Hope just leaving that one as background noise will be OK, I have better pics, but think best to not further illustrate my gritty red light district outside the main gates of the nuke plant.  You might run into Homer Simpson there... It's based on Downtown Deco's Addams St. Part I. That's the Thunderbird Club with the flashing sign and word is that they're exaggerating things quite a lot. But the flashing -- the sign, not anyone else -- is the story here. It's made of some flasher LEDs you get with some lights to make the whole string flash IIRC. I took a bunch of them and wired the + and - legs into a daisychain, There are no other operating parts. It flashes entirely on it's own. I went with very cheap randomly flashing because I'm not enough of a geek to figure anything more than that. It is a technique that can come in handy with building flashing effects into a lot of things. |
|
|
|
Post by mlehman on Dec 20, 2015 17:57:28 GMT -8
OK, you can even see #3 sitting at the head of the Overton-equipped passenger train, with the Atlas tower partially blocking the view of its tender. You can see the handlettering on the other part of the tender, though. I have pics of the angled warehouse in the mid background now in Silverton and the brown enginehouse in the lower right now at Tefft. Let me find them. The angled warehouse is in the middle right of this pic with the boxcar spootted at the door.  Here's a couple of pics of the old enginehouse restored to better than its former glory with working hinges, a floor, stone foundation, etc.   |
|
|
|
Post by valenciajim on Dec 21, 2015 15:43:29 GMT -8
Mike--the red light district was great--every teenage modeler would want one on his layout. All kidding aside, it is great to see all of these models!
|
|
|
|
Post by mlehman on Dec 22, 2015 1:48:50 GMT -8
Jim,
Didn't mean to sound unenthusiastic about your positive feedback. I just decided that even in the background, it was probably something that people might focus on more than the modeling and then take offense. I'm just trying to portray real life, and have a little fun doing it.
|
|
|
|
Post by valenciajim on Dec 22, 2015 6:44:55 GMT -8
I am just trying to figure out how to upload photos from Photobucket. it seems as though I am a putz at uploading.
|
|
|
|
Post by tankcarsrule on Dec 22, 2015 8:45:28 GMT -8
It doesn't work on a table or anything smaller. Lift click on the photo you want to upload and when it reappears as a larger photo you'll see a list of options. Left click on the bottom one. It will tell you when you captured the photo by turning yellow. Go to the post you want to load it on. Right click and a list will appear. Left click on paste and the photo code will appear. Click on post as usual and the photo will be on your post. It took someone explaining it to be in simple terms, so I hope this helps.
Regards, Bobby
|
|
|
|
Post by valenciajim on Dec 23, 2015 21:06:53 GMT -8
Thanks. I think this worked. This is an Athearn car which I weathered with colored pencils. I used Weathering Solutions decals on the roof. Using colored pencils was new for me. The Grafitti worked out pretty well, but I am not so sure about the rust marks.  |
|
|
|
Post by valenciajim on Dec 23, 2015 21:09:08 GMT -8
Here is another one I did using the same technique, except I used Bragdon powders on the roof.

|
|
|
|
Post by valenciajim on Dec 23, 2015 21:12:46 GMT -8
Here is a car I did using more conventional techniques. Decals and craft paints. The yellow dripping from the lettering were made using a colored pencil. The other cars were weathered to match an exact prototype, this car was not.  |
|
|
|
Post by valenciajim on Dec 23, 2015 21:30:12 GMT -8
Here are some Rio Grande box cars that I weathered with Bragdon powders several years ago.  |
|
|
|
Post by valenciajim on Dec 25, 2015 15:13:41 GMT -8
Here are pictures of one of my earliest weathering attempts:


Here is a more subtly weathered Gorre & Daphited box car
 |
|
|
|
Post by mrsocal on Dec 26, 2015 18:18:50 GMT -8
Gang I do apologize for being so late to this but I will now gett'r done. Here is one on my earliest attempts.   And something more resent.  Thanks to all of you that posted up your stuff. |
|


 You might run into Homer Simpson there...


