|
|
Post by onequiknova on Mar 20, 2016 6:12:48 GMT -8
|
|
|
|
Post by dti406 on Mar 20, 2016 6:22:25 GMT -8
John,those are great looking vehicles and the bad part is I remember them all! Managed to get some cars done this week to represent some Southeast Railroads.  Branchline 1937 AAR Boxcar Kit, painted with Scalecoat II Boxcar Red and lettered with Champ Decals.  IMRC 40' PS1 Boxcar Kit, painted with Scalecoat II Boxcar Red and lettered with Mask Island Decals. This was a repaint done by the Southern Railway after taking over the S&A Railroad. Also did some more work on my New Haven C-425!   The top picture is the same one I posted a couple of weeks ago, and it was pointed out to me that the exhaust stack was for the dynamic braking and not for the prime mover as I assumed (and you know what that means). So I removed that stack and completed the lift rings, (second picture) now for some cab detailing and then off to the paint shop. Thanks for looking! Rick Jesionowski |
|
|
|
Post by danpik on Mar 20, 2016 6:27:05 GMT -8
|
|
|
|
Post by riogrande on Mar 20, 2016 6:46:35 GMT -8
John, lovely cars; wow to have a couple open autoracks with those would be the cat's meow.
|
|
|
|
Post by mrsocal on Mar 20, 2016 7:18:05 GMT -8
Good looking start for the day guys. Here is what I have been working on and I am very close to complete this Power lash.   |
|
|
|
Post by TBird1958 on Mar 20, 2016 7:41:29 GMT -8
Really nice work this week guys, love the cars John! Nice set of NS power, Scotty! There was a nice break in the weather on Friday so I managed to get some early morning shots of some of my recently finished projects. Here's a very lightly weathered Atlas '50 box, it represents a 1974 railroad repaint so it's quite clean with just a little colored pencil down the rivet lines and a bit of dust on the frame.  60868 illustrating why the D&RGW repainted a lot of cars, the silver didn't hold up too well....  Here's the rebuilt RBM waffle box in some better light, you can see the in set trucks - it's a strange car!  Here's something from the bench that I spent way too much (very enjoyable)time on this past week - It's a CB&Q 50' boxcar largely from Evergreen styrene, my first attempt at something like this. The only problem is that now I need to build another one just like it and the rest of the car, stay tuned! Have a great Sunday! Best Regards, Mark  |
|
|
|
Post by tony45324 on Mar 20, 2016 8:11:01 GMT -8
Awesome stuff so far today everyone ! Yesterday at sunrise, my yard crews were busy...  |
|
|
|
Post by fr8kar on Mar 20, 2016 9:34:06 GMT -8
|
|
|
|
Post by mlehman on Mar 20, 2016 9:52:54 GMT -8
An awesome start to WPF. Will refrain from individual comments, as I'm totally overbooked today and scrambled to get these shots up. I will give a shout out to Rick J for having the courage to show the process of achieving great models is a lot less sanitary than the carefully curated pics of perfection often would lead you to believe. You don't get a tasty omelet unless you're willing to break a few eggs, which is where the learning and development of great modeling actually takes place. I will have a thread when I get the chance to explain my own example that is similar to Rick's philosophical approach. For now, the results... Overview of most of the interchange track I added in Silverton in several steps over the last few months, the unweathered track in the middle. This weekend I added the turnout which is just off the bottom of the pic here.  Here are a couple of K-27s traversing what will admittedly be a rather restrictive diverging route.  And some cars standing on the interchange add to the railroady ambiance.  Then I added a storage track for MOW equipment behind the depot, but found I could also move the freight station to this better location and free up some foreground space. It was formerly where the piles of lumber are in the lower foreground of this pic.  The new spur also helps with the transition to the building flats that make up more of Silverton.  Finally, a visiting PFM Cowichan Shay on a test run up to the Merry Widow.  |
|
|
|
Post by kentuckysouthernrwy on Mar 20, 2016 10:10:25 GMT -8
|
|
|
|
Post by steveturner on Mar 20, 2016 11:04:11 GMT -8
|
|
|
|
Post by stevef45 on Mar 20, 2016 13:11:41 GMT -8
All fans installed, i know the last one is not centered. I wasn't about to make another lid cause of it. 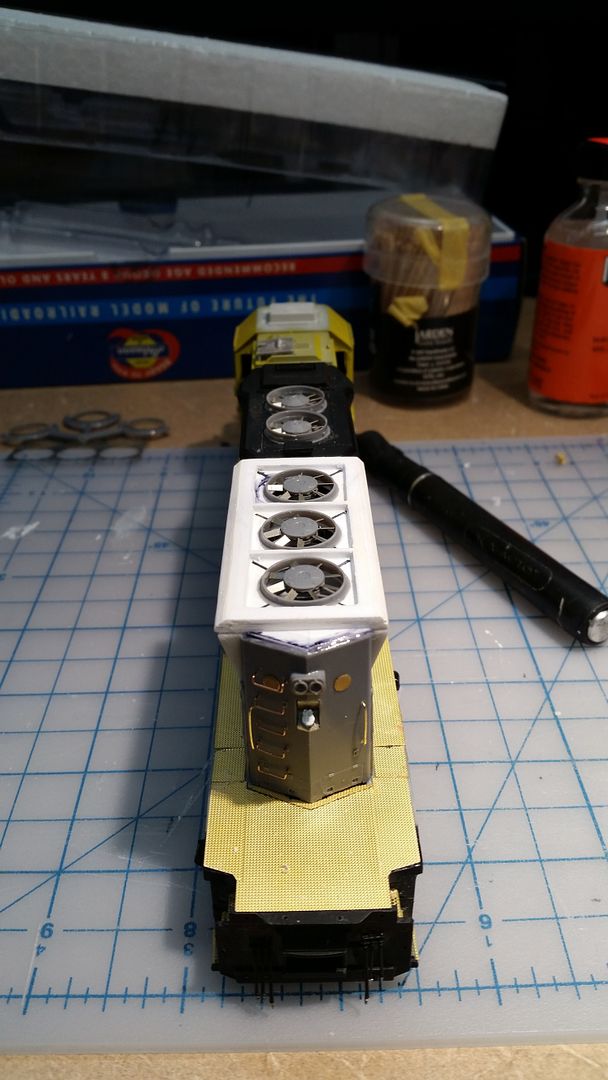 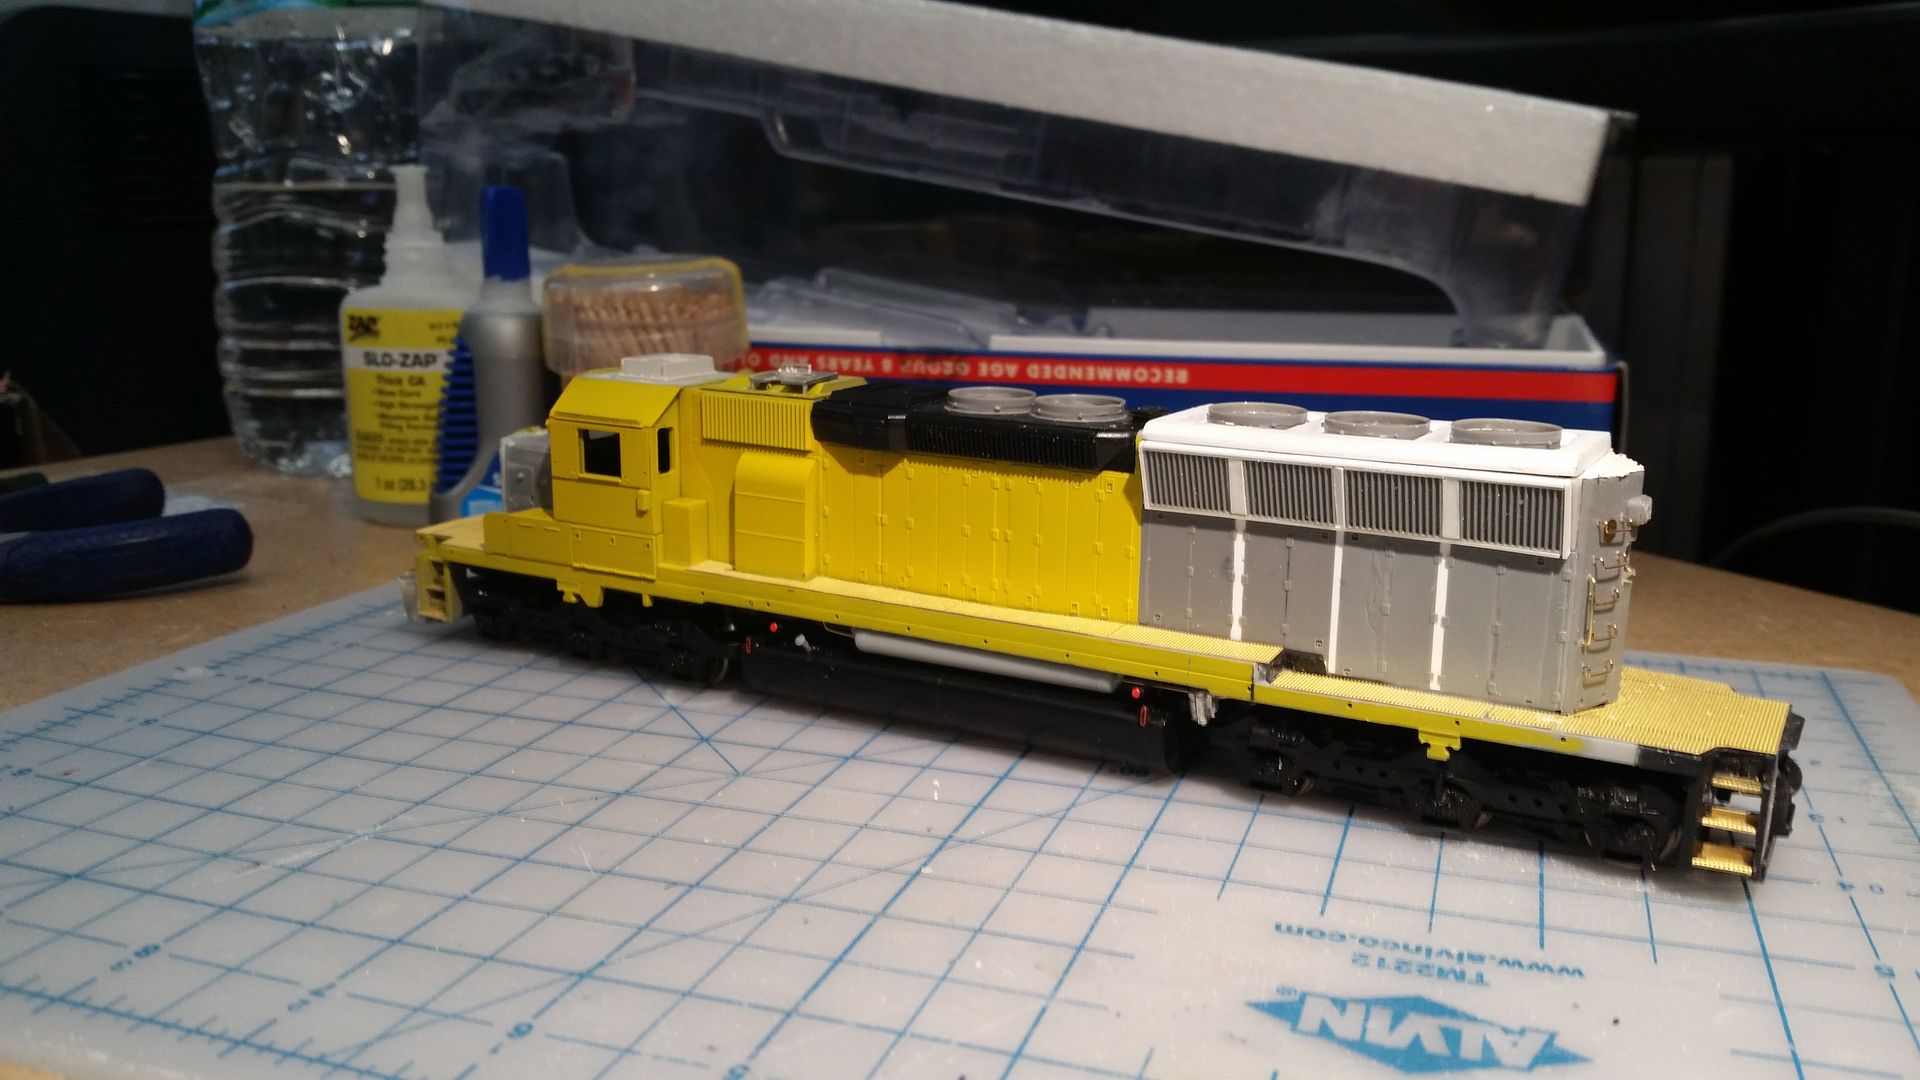  Very very close to painting time. I just need to find a true color paint close to the yellow NYSW uses. |
|
|
|
Post by wp8thsub on Mar 20, 2016 15:44:12 GMT -8
I built some additional shrubbery for my Cedar Creek scene. 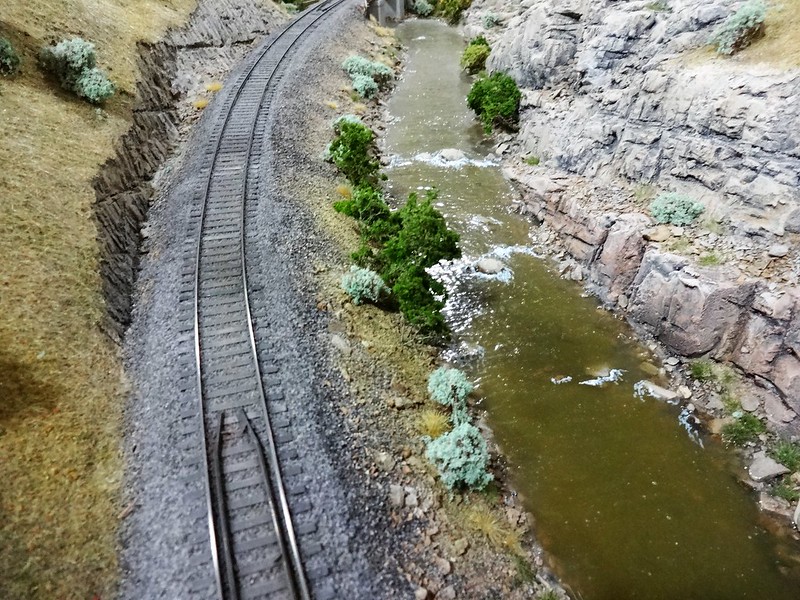 It's Super Tree material from Scenic Express, planted in groups to make the individual pieces look more robust. |
|
|
|
Post by dtinut on Mar 20, 2016 16:31:32 GMT -8
Great stuff! Ryan, i hope you are making resin molds, cause I would love to buy some of your vehicles  ? Been working on the track work in Ford Park on the lower level of my layout. This is located in Lima, OH on the DT&I, and is where a Ford engine plant, and some other businesses wher located, on RR property. I am building any turnout required that are not already in my stash, so, for this area, I am building a more lefthanded wye, which is at bottom of the photo. Also a LH curved TO not seen, for a lead to one of the industries around the corner. Here, all track is fitted:(except the 3 industry tracks)  I got the curved TO almost finished:  I also checked to make sure my standard train fit in the siding/main. Two engines/ 10-50ft cars/ caboose.  |
|
|
|
Post by lnrrfan on Mar 20, 2016 16:48:59 GMT -8
dti406
Where did you get the Brass shield over the C425 air intake?
Thanks Pat Coleman
|
|
|
|
Post by riogrande on Mar 20, 2016 18:26:08 GMT -8
Rob, great looking schrubery!
|
|
|
|
Post by nsc39d8 on Mar 21, 2016 3:26:34 GMT -8
Pat,
The shield I used and looks like the same part is a Cal-Scale part number 190-538 Century Intake rain shield. If you haven't looked at Cal-Scale in awhile, check them out as the new detail parts Bowser makes for new models goes into this line of parts.
|
|
|
|
Post by riogrande on Mar 21, 2016 4:34:46 GMT -8
Been working with cardboard and hot glue for sub-scenery base. Added a mesa on the top of one area and filled in another:   |
|
|
|
Post by danpik on Mar 21, 2016 5:08:04 GMT -8
Also did some more work on my New Haven C-425! The top picture is the same one I posted a couple of weeks ago, and it was pointed out to me that the exhaust stack was for the dynamic braking and not for the prime mover as I assumed (and you know what that means). So I removed that stack and completed the lift rings, (second picture) now for some cab detailing and then off to the paint shop. Thanks for looking! Rick Jesionowski Since you removed the stack on the engine, what did you replace it with? |
|
|
|
Post by dti406 on Mar 21, 2016 7:08:49 GMT -8
Dan, the stack is at the rear of the unit opposite of what EMD Does, which is what confused me when I first removed the dynamic brake housing. Here is a picture noting the exhaust location:  Pat, James Wall answered correctly it is the Cal-Scale part, has etched lines for making the proper bend to the shield, and two prongs for which I drilled holes in the side of the unit, so any bad handling will keep the rain shield from being broken off. Rick J |
|
|
|
Post by dtinut on Mar 22, 2016 4:53:42 GMT -8
Here is the finished turnout.  Brian |
|
Deleted
Deleted Member
Posts: 0
|
Post by Deleted on Mar 22, 2016 6:42:56 GMT -8
An awesome start to WPF. Will refrain from individual comments, as I'm totally overbooked today and scrambled to get these shots up. I will give a shout out to Rick J for having the courage to show the process of achieving great models is a lot less sanitary than the carefully curated pics of perfection often would lead you to believe. You don't get a tasty omelet unless you're willing to break a few eggs, which is where the learning and development of great modeling actually takes place. I will have a thread when I get the chance to explain my own example that is similar to Rick's philosophical approach. For now, the results... Overview of most of the interchange track I added in Silverton in several steps over the last few months, the unweathered track in the middle. This weekend I added the turnout which is just off the bottom of the pic here. Here are a couple of K-27s traversing what will admittedly be a rather restrictive diverging route. And some cars standing on the interchange add to the railroady ambiance. Then I added a storage track for MOW equipment behind the depot, but found I could also move the freight station to this better location and free up some foreground space. It was formerly where the piles of lumber are in the lower foreground of this pic. The new spur also helps with the transition to the building flats that make up more of Silverton. Finally, a visiting PFM Cowichan Shay on a test run up to the Merry Widow. Model Railroader cover quality. This is what model railroading is about |
|
|
|
Post by mlehman on Mar 22, 2016 7:53:20 GMT -8
Model Railroader cover quality. This is what model railroading is about Thanks, I appreciate your kind comment. I did have one of my pics posted at the MR forum chosen to grace their Facebook page. I appreciated that, even though I don't do Facebook. Still trying for cover material, but mostly just trying to up my game in photography. Got plenty of great scenes, just need to depict them better. My main theme is that anyone can now do an authentic looking narrowgauge layout (and standard gauge, too, for that matter) with the help of RTR and a modest skill set that most can acquire with little effort. I think far too many worry about doing it "right" but fear not getting to "right" on that first step and the cycle of procrastination begins... I say go ahead and try. "Right" or fail, you'll learn, in fact, you often learn more overall by failing first, so don't fear it, welcome it, even as you try hard to succeed. I'll get around to a thread very much in that vein soon, partly inspired by Rick's great example earlier in this thread. We all like finished works of the modeling art, but we'd learn more if people weren't so afraid of letting others learn from their mistakes. |
|
|
|
Post by riogrande on Mar 22, 2016 9:24:59 GMT -8
... the process of achieving great models is a lot less sanitary than the carefully curated pics of perfection often would lead you to believe. You don't get a tasty omelet unless you're willing to break a few eggs, which is where the learning and development of great modeling actually takes place. For sure. What little time I've been getting has being going into the layout so far; I even had a 4 day weekend but with anniversary, lots of errands and chores, wife sick, doing both our taxes (ug1), shopping etc. I wasn't able to carve any hobby time out at all. Hopefully next weekend - just glad the taxes are done now! When I do switch from layout to giving weathering a try, I ain't going to break any expensive eggs to get a tasty omelet! I'll be practicing with some cheap eggs like Athearn blue box or E&C shops and save the $45 Moloco or Exactrail cars for later.  |
|
|
|
Post by emd16645 on Mar 22, 2016 17:04:51 GMT -8
... the process of achieving great models is a lot less sanitary than the carefully curated pics of perfection often would lead you to believe. You don't get a tasty omelet unless you're willing to break a few eggs, which is where the learning and development of great modeling actually takes place. For sure. What little time I've been getting has being going into the layout so far; I even had a 4 day weekend but with anniversary, lots of errands and chores, wife sick, doing both our taxes (ug1), shopping etc. I wasn't able to carve any hobby time out at all. Hopefully next weekend - just glad the taxes are done now! When I do switch from layout to giving weathering a try, I ain't going to break any expensive eggs to get a tasty omelet! I'll be practicing with some cheap eggs like Athearn blue box or E&C shops and save the $45 Moloco or Exactrail cars for later. Finishing taxes are a necessary evil to fund more trains! |
|
|
|
Post by riogrande on Mar 22, 2016 17:59:53 GMT -8
In years past I ended up owing a good chunk but since last couple years now that I can itemize, it has helped tremendously!
|
|
|
|
Post by mrsocal on Mar 24, 2016 15:36:26 GMT -8
I will say this... any of you guys or gales that bust out your own ture outs are the bomb. It is way above my pay grade!!!
|
|
|
|
Post by dtinut on Mar 25, 2016 7:48:00 GMT -8
I used to wonder how hard it was to handlay TO, but after talking with the FastTracks owner, I bought one of the #6 kits and some of the tools. The point form and stockaid tool are so nice, they really help make it easy.
I haven't yet built a TO using the jig, but I have a machinist friend who made me roller gauges, and thes halp soo much! It's really a matter of having the right tools.
Being able to solder helps also.
Brian
|
|