Deleted
Deleted Member
Posts: 0
|
Post by Deleted on Aug 30, 2012 16:07:42 GMT -8
In conjunction with my Cannon parts order for the Fast Forty, I ordered the parts for my Union Pacific EMD DD35A and DD35(B). Save on shipping!  In order to build the DD35A and DD35 cabless booster, the starting point is the venerable Athearn DD40. Now before y'all get yo' panties in a knot about the hood width......stay calm my gentle readers....  You start with two complete Athearn DD40's and two DD40 bodies. The Athearn DD40 is actually NOT a bad model. The side door, radiator and dynamic blister detail isn't that bad. A tweek here and there but usable. Yes, I know its a WIDE BODY.... As usual Jimmy's (me) photograph stinks!!!!   DD35A the game plan.... On the first shell you remove the inertial air filter, turbo hatch, fans, air reservoirs, air intake, molded on grabs and blower housing. The side details could be removed later but if you are stripping the shell on top might as well do the sides while the shell is still in one piece. The turbo and inertial filter housing are sanded smooth to the roof. The fans are sanded smooth to their bases. I marked the spots on this donor shell that should be removed. Its headed for the stripper so marking it up with a marker doesn't hurt a thing.     I'll cover the cutting of the shell in half and removing material to make it scale-width later. The DD40 is old time Athearn when it comes to the trucks. Die cast side frames with brass bearings for the axles to ride in. The end of brass journal bearing is flush with the surface of the truck with the over-sized Hyatt roller bearing removed. I tested the theory on a scrap truck side frame before going "live".  I'll use DA Hyatt bearings as a replacement. Some of the particulars moved behind the build. From the first shell, I'll be using the long hood which will have been narrowed and has had the walkway and everything from the cab forward removed. The second shell will supply the walkway which will need some additions to the walkway along the long hood due to the new narrow hood. The DD35B The first shell will have EVERYTHING cut off the walkway and up. The cab, front porch, etc. will be discarded. The second shell will also have everything above the walkway removed and about the rear third of the walkway will be attached to the back two thirds of the first shell. This forms the base. The hoods will come from RPP GP35 shells. Much much more to follow. |
|
|
|
Post by onequiknova on Aug 30, 2012 16:16:39 GMT -8
This should be an interesting build. I haven't seen a fat body narrowed in a long time.
|
|
|
|
Post by Donnell Wells on Aug 30, 2012 17:54:40 GMT -8
I'm in! (And, any project like this is gettin' stickied!!!  ) )
Donnell
PS - Spekaing of fat, ot wide hood Athearn diesels, my first Athearn locomotive was an SDP40 in red and silver ATSF Warbonnet colors! Was it prototypical? No! Did I care? HECK NO! It was my first "real" model train and I cherrished the thing!
PSS - I am working on a couple of "relic" models (2 Athearn, 1 Bachmann) in order to see if I can turn them into something usable. I am not going to post any pictures until I make further progress. However, I think you guys will get a kick out of what I'll be posting in the future!
|
|
|
|
Post by roadkill on Aug 30, 2012 18:23:55 GMT -8
I like where this is heading...
|
|
Hergy
Full Member

Posts: 117
|
Post by Hergy on Aug 30, 2012 19:24:39 GMT -8
Now that Jim's "all in" on the DD35 I just know that Athearn's next announcement will be a DD35. I spent several years (off and on) creating a UP light pacific from an SP P-1 in brass. This was a class of loco that had never been offered in UP. . Shortly after finishing my conversion, Key came out with a limited run of, you guessed it, a UP light pacific.
I dig these posts on kit bashing. I've been reading the posts by onequicknova with great interest also and I'll be watching this one for sure.
|
|
|
|
Post by sd40t2 on Aug 31, 2012 22:22:05 GMT -8
I made a DD35B some years ago.
I took 2 Kato GP35 shells and an Athearn chassis. The ends and walkways were made from styrene.
Each truck has it's own motor and decoder. This way I got a real puller.
Only point of slight unhappiness are the way the couplers are mounted to the trucks.
|
|
|
|
Post by calzephyr on Sept 5, 2012 9:07:24 GMT -8
I'm in! (And, any project like this is gettin' stickied!!! )
Donnell
PS - Spekaing of fat, ot wide hood Athearn diesels, my first Athearn locomotive was an SDP40 in red and silver ATSF Warbonnet colors! Was it prototypical? No! Did I care? HECK NO! It was my first "real" model train and I cherrished the thing!
PSS - I am working on a couple of "relic" models (2 Athearn, 1 Bachmann) in order to see if I can turn them into something usable. I am not going to post any pictures until I make further progress. However, I think you guys will get a kick out of what I'll be posting in the future!
Donnell Show us some of the progress when you are ready. Those Bachmann units can be made to look decent once the pilot holes are filled in. Larry |
|
|
|
Post by TREBOR on Sept 7, 2012 5:11:10 GMT -8
Glad I found you guys!
Just keep in mind that the Athearn new DDA40X trucks can be easily provided with the 35 frames "if necessary"
TREBOR
|
|
|
|
Post by Donnell Wells on Sept 7, 2012 10:28:09 GMT -8
Glad I found you guys! Just keep in mind that the Athearn new DDA40X trucks can be easily provided with the 35 frames "if necessary" TREBOR
Hi TREBOR,
I'm not dense, but think I may be missing your point... 
Can you further explain your meaning?
Thanks,
Donnell |
|
|
|
Post by TREBOR on Sept 7, 2012 10:40:45 GMT -8
Athearn may do the model hopefully in the ner future.
|
|
Deleted
Deleted Member
Posts: 0
|
Post by Deleted on Sept 16, 2012 7:00:31 GMT -8
Small update. The Hyatt roller bearings on the Athearn DD40 are oversized. The solution is to replace them with Detail Associates Hyatt roller bearing castings. First step is to remove the cast on Hyatt bearings and pedestal liners. Don't fear as you'll expose the axle bearing.  Here is a reference photo of an unmodified Athearn DD40 truck frame. You can see the bearing caps sticking out like turkey timers that have popped!  Here is a truck frame with the new DA parts installed. A big improvement. I'm going to prime this truck this afternoon which should make pictures even more revealing.  |
|
Deleted
Deleted Member
Posts: 0
|
Post by Deleted on Sept 20, 2012 16:06:15 GMT -8
We are onto body and fender on the DD35B using Rail Power shells for most of the long hood. I'll start with the dynamic hatch. I primed the parts before I start working on them. It gives me an easy way to see where I'm removing material and highlights areas. In the these two photos you can see the mold lines and a part of the sprue.   Its difficult to see but in this photo I've removed the mold lines, sprue and generally dressed up the part.  The opening for the fan is much too small for the Cannon dynamic brake fan. It needs to be enlarged. To accomplish this, I used a hand reamer, round file and calipers. Remember measure twice and cut once!  I'll have photos tomorrow of the exhaust hatch in place and the dynamic fan. |
|
|
|
Post by Donnell Wells on Sept 20, 2012 19:34:35 GMT -8
Hi Jim,
I don't know how far you plan on going with this build detail-wise, but here is a Rob Saberenyi gallery showcasing a heavily reworked RPP GP35 by Clyde King:
www.pbase.com/espeef5/sp_gp35
Seeing the point at which you are regarding your model, and again, depending on how far you want to take it, here's how Clyde King addressed the RPP GP35 Dynamic brake hatch:
www.pbase.com/espeef5/image/142865865
I also reworked quite a few Athearn ex-RPP GP35s, and on one particular model, a Conrail unit I was going to rebuild the dynamic brake hatch similar to what Clyde did, but to take it a step further, I actually machined all of the angled portion of the fairing and dynamic brake grille in preparation for rebuilding. You can see examples in the pictures below:

And this last picture shows the top all sanded flush in preparation for new sheetwork:
Donnell
|
|
Deleted
Deleted Member
Posts: 0
|
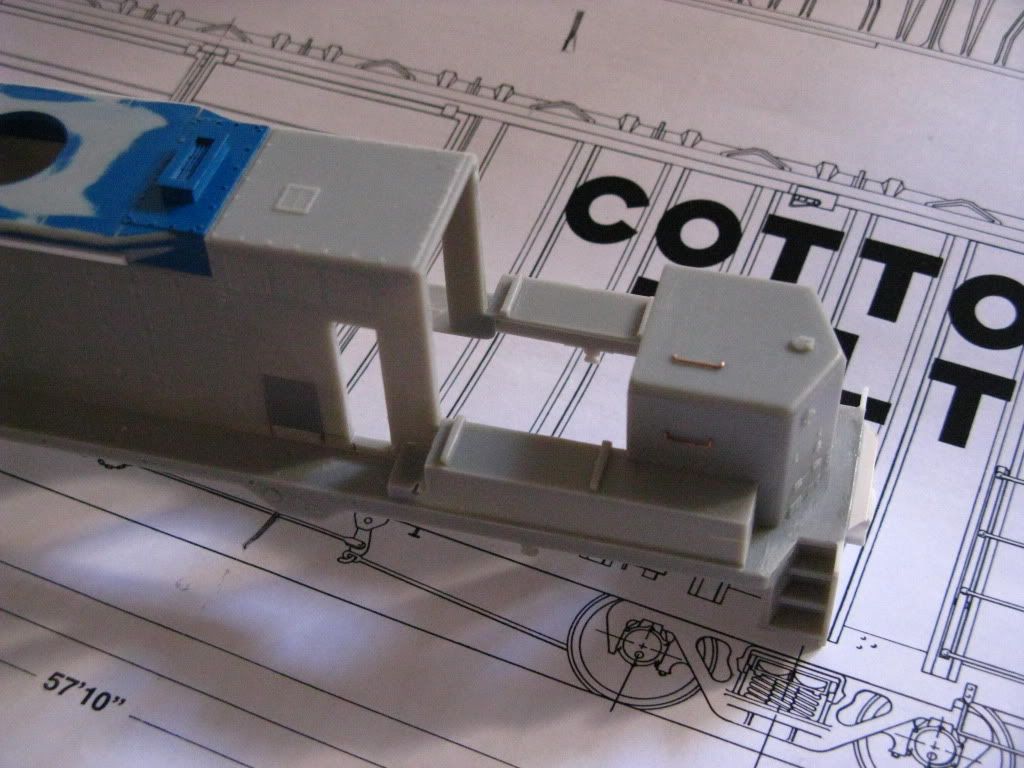
Post by Deleted on Sept 24, 2012 16:41:43 GMT -8
I've begun work on the body. The first up is the front engine compartment of the DD35B. What I have discovered is that I forgot the numerous warts of the Rail Power products shells. You will notice I have not cut the long hoods off of the shells walkways and cab. I will not be cutting the unused portions away until I'm done with the cutting and sanding necessary to mount the Cannon parts. The shell with everything still attached is much stronger and easier to handle. Here are some of the issues with the out of the box, or baggie, RPP GP35 shell. 1. The fans are not positioned correctly. They are shifted towards the rear of the model. 2. The radiator grilles are set too high on the body Good thing for sheet styrene and Cannon products! A photo of the number one engine shell with the Cannon radiator grilles and fans.  Here is a photo of the number one engine shell with its Cannon parts, sitting besides the unmodified shell, which will form the number two engine. You can see the differences between the modified and the unmodified.  The number one engine with the inertial air filter housing, inertial filter air intake and blower housing removed and awaiting Cannon parts.  The "as-built" RPP shell with the number one engine shell which has had the fan openings modified to prototype placement and Cannon fans installed.  This is a photo of an unmodified original Athearn DD40 side frame (left) and the modified side frame(right) with Detail Associates Hyatt bearing covers. Its a big difference.  |
|
Deleted
Deleted Member
Posts: 0
|
Post by Deleted on Oct 2, 2012 6:53:20 GMT -8
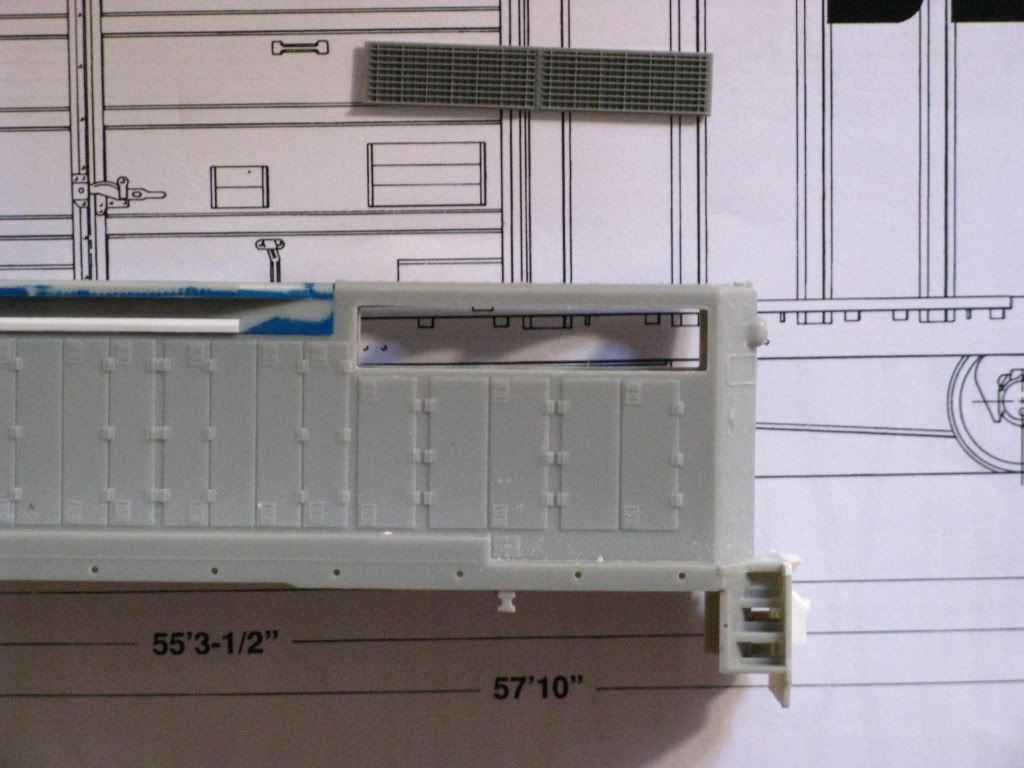
Made a revolting discovery about the Rail Power shell. Its hood height is about a 1/16" too short. This in turn makes the hood doors too short. This also means the DD35B's hoods would be noticeably shorter than the DD35A's long hood. Solution? Removed the RPP doors and install Cannon doors....WHAT A JOB!!!!! Here is a photo of one of the GP35 shells for the DD35B with all but one of the long hood doors replaced by the correct length Cannon doors.  |
|
|
|
Post by drolsen on Oct 4, 2012 8:40:41 GMT -8
And this last picture shows the top all sanded flush in preparation for new sheetwork:
Donnell - Who makes those sanding handle / stick things? Those look great. I must not be spending enough time exploring the hardware store (unless they're actually hobby tools). Thanks! Dave |
|
|
|
Post by craigz on Oct 6, 2012 14:54:19 GMT -8
And this last picture shows the top all sanded flush in preparation for new sheetwork:
Donnell - Who makes those sanding handle / stick things? Those look great. I must not be spending enough time exploring the hardware store (unless they're actually hobby tools). Thanks! Dave My same thought. The green thing is a "Marvy Uchida" punch; I can't find anything like those little sander things. Dave, if you haven't tried the razor saw from UMM-USA, get one. They are wonderful tools...very sharp with a very thin kerf. umm-usa.com/onlinestore/index.php?cPath=21_28 |
|
|
|
Post by riogrande on Oct 8, 2012 10:28:39 GMT -8
In the photo of the side by side "side frames" I can't really see the difference between the one with the added on details. Although they are at different angles so that may affect how the view is in the photo. Perhaps the gray primer doesn't show the details to best effect.
|
|
|
|
Post by buffalobill on Oct 8, 2012 17:53:45 GMT -8
I disagree the Hyatt NFL Bearing covers make a huge difference, over the old die cast blobs. Unfortunately the DD-40 was one of the few Athearn mechanisms that did not get the mid 80's remake with the plastic side frames. The plastic side frames made a huge difference.
Bill
|
|
|
|
Post by Donnell Wells on Oct 9, 2012 8:43:19 GMT -8
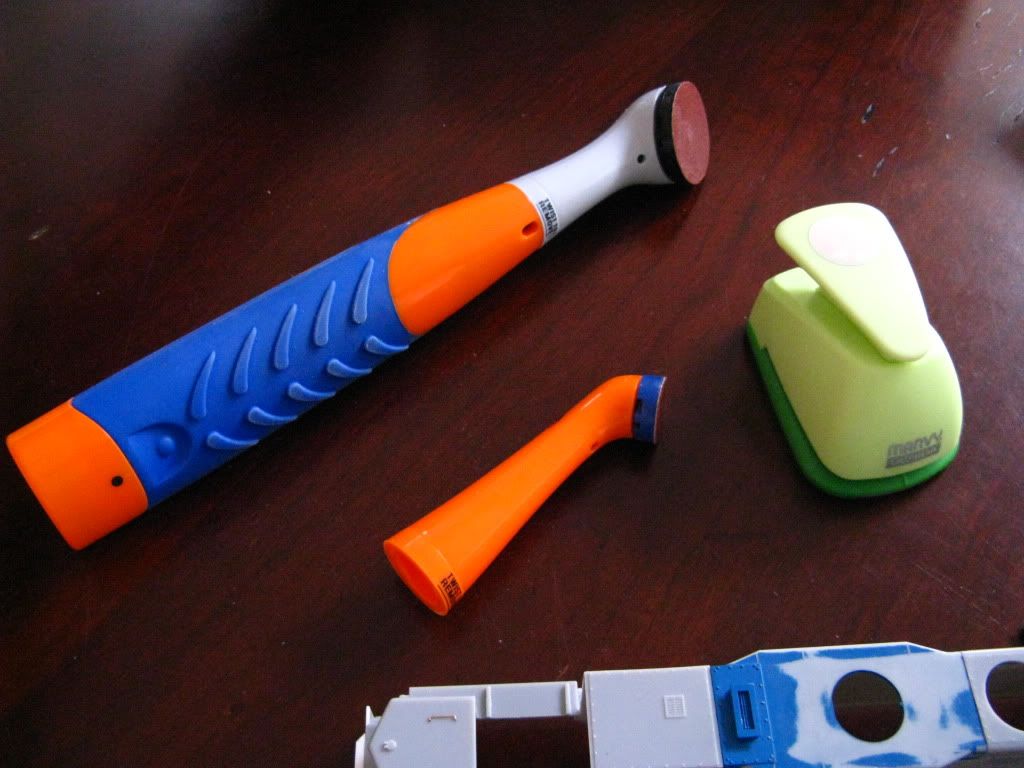
Donnell - Who makes those sanding handle / stick things? Those look great. I must not be spending enough time exploring the hardware store (unless they're actually hobby tools). Thanks! Dave My same thought. The green thing is a "Marvy Uchida" punch; I can't find anything like those little sander things. Dave, if you haven't tried the razor saw from UMM-USA, get one. They are wonderful tools...very sharp with a very thin kerf. umm-usa.com/onlinestore/index.php?cPath=21_28
Hello Dave and Craig,
The sanding tool pictured is dubbed a "Sonic Sander", but actually started out as a Sonic Scrubber. You used to be able to buy this locally at Walgreens, Walmart, Rite Aid, CVS, and Bed Bath & Beyond, but for some reason all available local sources have dried up. The only places I've seen them for sale is on Ebay, or the Sonic Scrubber UK site.
Donnell
|
|
|
|
Post by tracktime on Oct 11, 2012 23:13:54 GMT -8
Thanks Donnell! I was able to find some Sonic Scrubbers on Amazon. Is the "Sonic Sander" something you did to modify the head?
Anyways, I look forward to seeing more progress on these DD35s. Great work so far by the OP.
Cheers,
Harry
|
|
|
|
Post by Donnell Wells on Oct 12, 2012 7:32:33 GMT -8
Thanks Donnell! I was able to find some Sonic Scrubbers on Amazon. Is the "Sonic Sander" something you did to modify the head? Anyways, I look forward to seeing more progress on these DD35s. Great work so far by the OP. Cheers, Harry
Hi Harry,
To turn a Sonic Scrubber into a Sonic Sander, just remove all of the bristles from the scrubbing head, and replace them with an adhesive-backed sand paper of your choice. The surface is already flat, so no further modification is necessary.
The bristles are held in with little slivers of metal. I used Xuron needle nose pliars to grab at the base of each bristle and twist (like a roll-up gate) to pull it out of its hole.
Donnell
|
|
Deleted
Deleted Member
Posts: 0
|
Post by Deleted on Jul 1, 2013 6:14:22 GMT -8
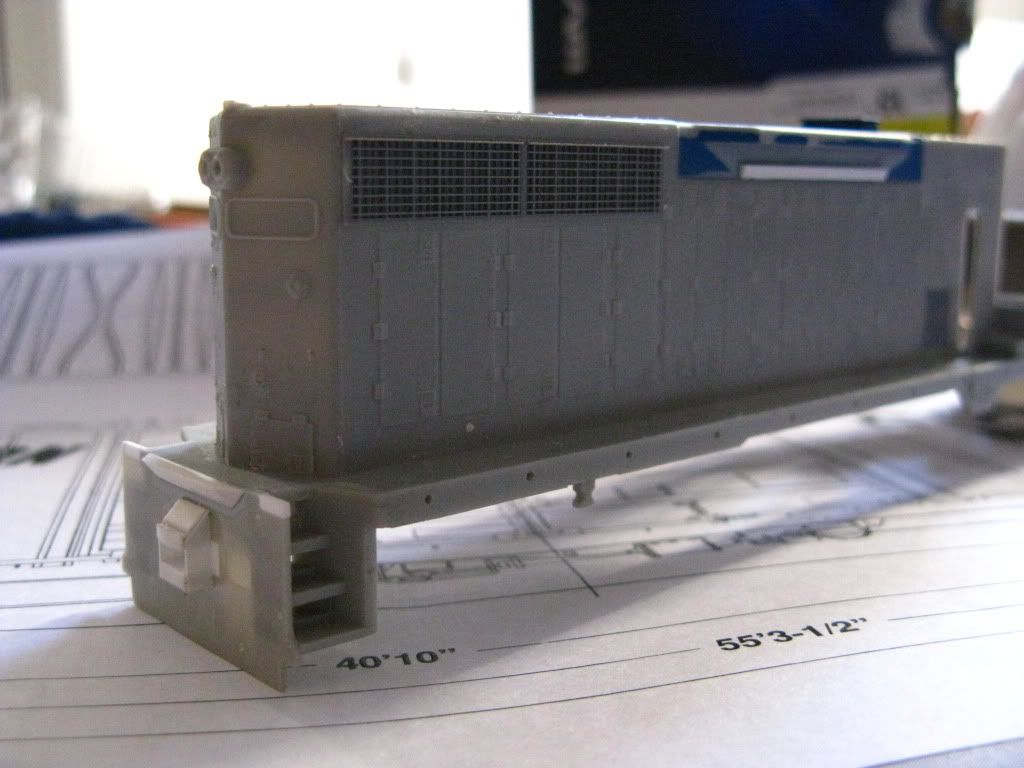
We begin the task of cutting an Athearn wide body DD40 down to scale width. First you cut the long hood and cab off of shell number one. I used a Dremel with a cutting wheel so I like to leave some meat for more careful carving and sanding. Remember this sill will need to have its walkways enlarged inward.  Next we begin the task of removing all the fans, inertial intake filter housing and exhaust stack from the shell that will form the long hood..  Now lets look at one of the RPP shells which will form roughly half of the DD35(B)'s long hood. It has had Cannon fans, exhaust and doors added. One side of the shell is modified  The other side of the shell which has the blower duct. RPP's shell is too short. To get the necessary length and to install the Cannon doors on this side, the sill and walkways will need to be cut off.  |
|
|
|
Post by trebor on Jul 1, 2013 8:45:48 GMT -8
Nice, lotsa work too. Keep going so Athearn gets a brain fart and does the 35's in Genesis saving me the effort and likely not as thorough a job as your effort!
|
|
|
|
Post by mlehman on Jul 1, 2013 10:57:55 GMT -8
There's diesel bashing...and then there is this labor of love. You're in too deep now to turn back. Full throttle!  |
|
|
|
Post by Spikre on Jul 1, 2013 11:04:19 GMT -8
this is really Deep Bash !!!
Good Luck.
believe that Steamer10 has built some of these with the
emphisis on traction.
not a Bash for the weak at heart.
Spikre
|
|
|
|
Post by calzephyr on Jul 1, 2013 11:25:14 GMT -8
Great project. Thanks for keeping us informed.
larry
|
|
Deleted
Deleted Member
Posts: 0
|
Post by Deleted on Jul 4, 2013 21:07:03 GMT -8
Here is the DD45A's body with the exhaust stack/base, fans, inertial air filter intakes, inertial air filter hatches and blower housings removed. The rest of the body has been cut away and scrapped. The long hood is now ready to be split in half and narrowed.  |
|
|
|
Post by stevef45 on Dec 3, 2013 11:22:19 GMT -8
any new updates on this project?
|
|
|
|
Post by Spikre on Dec 3, 2013 12:37:47 GMT -8
is somebody dragging the DD45s over from the Crew Lounge ? or is that just a Typo ? guess that Babalooey cant fix the Terrier's posts anymore ? well it makes for an intresting day at least. Spikre 
|
|


