|
|
Post by Great-Northern-Willmar Div on Sept 9, 2018 7:42:32 GMT -8
|
|
|
|
Post by deaconmark on Sept 9, 2018 8:03:22 GMT -8
I got my coal train today it has been years since I ran it through the plant. Needs to get up and around.   |
|
|
|
Post by fr8kar on Sept 9, 2018 8:44:49 GMT -8
This unpowered SDP45 was built, painted and weathered by Sean Steele from an Athearn underframe and Rail Power shells. I have done some detail painting and added decal patches to take the model from its time with Conrail into the late 80s and early 90s as a lease locomotive operating on the SP system.  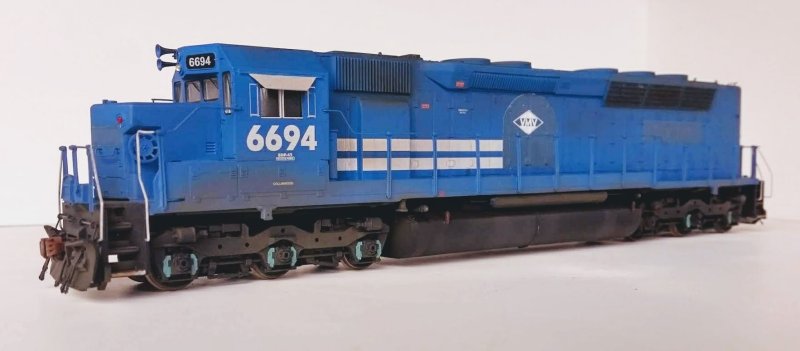 |
|
|
|
Post by simulatortrain on Sept 9, 2018 9:00:54 GMT -8
Nice looking 45s!
|
|
|
|
Post by riogrande on Sept 9, 2018 9:56:27 GMT -8
Deaconmark,
What coal train did you get? Can you post any photo's of the coal cars?
|
|
|
|
Post by TBird1958 on Sept 9, 2018 10:17:40 GMT -8
I gotta finish some stuff and get outside for a photo shoot before the 9 1/2 month rainy season sets in.........


|
|
|
|
Post by valenciajim on Sept 9, 2018 12:04:37 GMT -8
TBird1958--I love that SP hopper. What did you use for the loads?
|
|
|
|
Post by TBird1958 on Sept 9, 2018 12:20:05 GMT -8
TBird1958--I love that SP hopper. What did you use for the loads?
Thanks!
They're wire spools that were part of a truck offered by Herpa. I took them apart and painted them.
|
|
|
|
Post by deaconmark on Sept 9, 2018 13:11:00 GMT -8
Deaconmark, What coal train did you get? Can you post any photo's of the coal cars? Riogrande, I have a few photos hope it is ok not too many. I have the typical 5 UP cars that were basically RTR. but the others are rotary couple cars not sure what I have. I know when I got them years ago I made myself the loads that go in with kitty litter and black paint. I really like the looks of those cars and they are a real treat to run all at once. I must tell the group that I have been modeling for a number of years but just got busy the last 3-4 years. The layout sat unused and neglected for the last 3-4 years and I retired early to take care of my wife she battles breast cancer. Doing ok but it can be trying. With retiring I clean up the railroad and I built it sturdy and to last and sure enough things have been running good now. Funny the I enjoy cycling, running, and my church gig but the railroad the last 5 weeks has been a place of refuge. I forgot how nice it is to get a nice moving train going again! I should go DCC but I am solo operator and just cannot see doing it right now. Anyway I hope you enjoy the photos.    |
|
|
|
Post by riogrande on Sept 9, 2018 13:36:04 GMT -8
Mark, Love that SP G-100-22 gondola with the spool loads; the GN and NW cars look great too.
Deaconmark, Thanks for the coal car photos!
|
|
|
|
Post by wp8thsub on Sept 9, 2018 13:54:12 GMT -8
I picked up a Tangent flatcar yesterday and it begged for some weathering. 
DSC03175 by wp8thsub, on Flickr I started by dry-brushing the deck with black acrylic, followed by a black wash to fill the bolt holes and between the boards. Dry brushed gray and tan with a small brush followed, then some pastels.  Here's the stock plastic deck from www.tangentscalemodels.com/product/mp-eagle-and-buzzsaw-60-gsc-flatcar/ . I had to exercise care around the ends to keep paint off the metal areas. The "wood" was securely held in place, and I didn't want to damage the car attempting to remove it if I didn't have to. ExactRail's approach with the separately packaged deck makes weathering somewhat easier as the wood areas can be weathered without affecting the rest of the car. Prototype photos, including the one on Tangent's site, suggest the trucks were painted to match the carbody. For my next act I think I'll paint the trucks. *Edit* David from Tangent tells me he thinks the photo on his site shows overspray only. Other photos seem to indicate otherwise, but now I'll look some more.  *Edited again* I reviewed the prototype photos I was looking at last night again based on David's feedback. Some of them were inconclusive, although mostly they were after my era or the photo quality was too poor to tell. This one from rr-fallenflags was the first one that got me thinking I should paint the trucks. Again, that may be overspray, but there was oftentimes A LOT of it, and MP at the time was typically ordering new cars with body colored trucks, as well as including them on repaints (or overspraying so heavily there was no real difference in how you'd model it). None of the analysis would suggest Tangent was incorrect in deciding to offer the car as they did. |
|
|
|
Post by riogrande on Sept 9, 2018 14:40:20 GMT -8
Nice flat Rob. Hopefully Tangent will re-run them again and some of the other roads for their GSC flat.
|
|
|
|
Post by tangentsm on Sept 9, 2018 14:51:48 GMT -8
Prototype photos, including the one on Tangent's site, suggest the trucks were painted to match the carbody. For my next act I think I'll paint the trucks. *Edit* David from Tangent tells me he thinks the photo on his site shows overspray only. Other photos seem to indicate otherwise, but now I'll look some more. Rob, your model looks terrific! I thought you modeled an earlier era so when I saw it at first on your layout I was surprised! For the record, I own the high res slide of the MP car that is on our site and the car clearly has overspray on the truck sideframe. It is for this reason we did not paint the trucks on our model. I was matching THIS subject photo. Best wishes, David Lehlbach Tangent Scale Models |
|
|
|
Post by simulatortrain on Sept 9, 2018 15:53:16 GMT -8
I too worked on a Tangent flat this week: 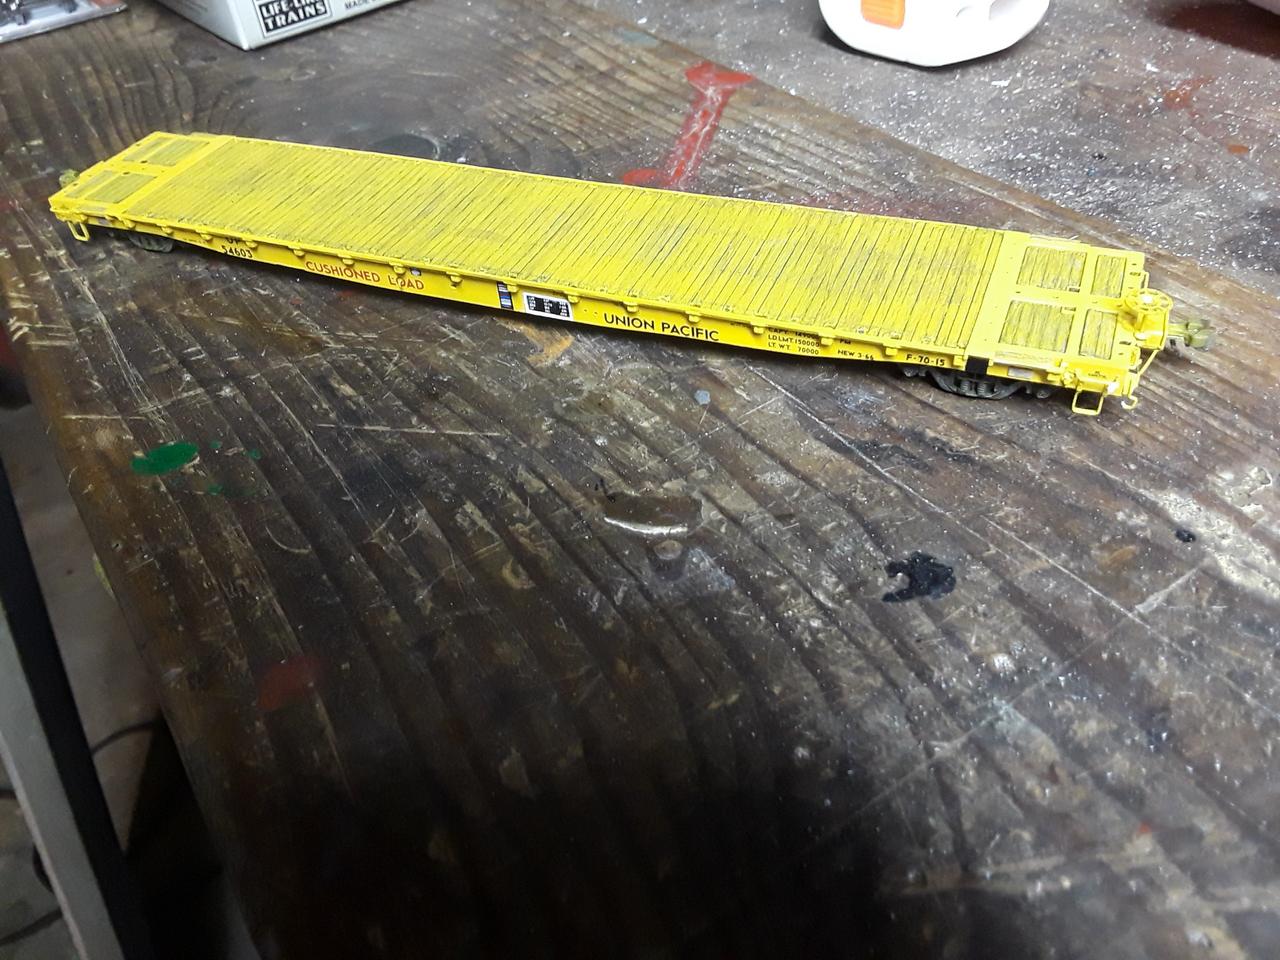 New wood deck with "steel" plate along the sides, brass stirrups, new air hoses and brake wheel, ACI and COTS decals. Also sprayed some yellow onto the tops of the sideframes and the coupler shanks per the picture on Tangent's site. Still awaiting weathering! I don't get the point of the "retainer valve" lettering on the center of the car as both the model's and prototype's arrows seem to be pointing at nothing. |
|
|
|
Post by packer on Sept 9, 2018 20:02:25 GMT -8
I assembled these 2 boxcar kits over the week.   The Chessie car involved my first ever decal work (it's actually pretty simple). Adding wheel dots based on a proto photo I found. I did paint over the reweigh or rebuild date (It had HAG something-84) because I model '82. Not perfect, but good enough for now. The aforementioned flatcars are kind pushing me to finish actually work on my Tangent and WoT bulkhead, but I need to get lube plate and wheel dot decals. |
|
|
|
Post by mvlandsw on Sept 10, 2018 9:05:40 GMT -8
"I don't get the point of the "retainer valve" lettering on the center of the car as both the model's and prototype's arrows seem to be pointing at nothing."
The retainer valve on the prototype is located below and inboard of the side sill and is not very visible. Hence the arrow pointing to its location. I don't know if the valve is included on the model.
Mark Vinski |
|
|
|
Post by simulatortrain on Sept 10, 2018 16:06:29 GMT -8
"I don't get the point of the "retainer valve" lettering on the center of the car as both the model's and prototype's arrows seem to be pointing at nothing."
The retainer valve on the prototype is located below and inboard of the side sill and is not very visible. Hence the arrow pointing to its location. I don't know if the valve is included on the model.
Mark Vinski Makes sense. It's there on Exactrail's UP GSC flat, so I tried looking for it on all the prototype shots I could find, but came up empty. The Tangent car has a retainer valve on each side of the B end (you can barely make it out in my picture.) I suppose it's not too late to move it on mine. |
|
|
|
Post by tom on Sept 10, 2018 16:07:31 GMT -8
Finished another Penn Central boxcar. This is a PC (PRR) X29G that on the prototype was a rebuilt boxcar that combined the frame from an old X29 boxcar and new boxcar body. I basically did the same thing by adding a Red Caboose X29 frame to a Branchline boxcar. The most noticeable feature is the new side sill and longer wheelbase. I painted it in PC's first scheme that included a red "P" in the logo which quickly faded to pink. Microscale makes both the red P and the pink P logos.  |
|
|
|
Post by simulatortrain on Sept 10, 2018 16:09:25 GMT -8
Another fantastic model, Tom! Is there a reason you go that kitbash route instead of using one of the resin X29 rebuilds out there- I assume just what you have on hand?
|
|
|
|
Post by mvlandsw on Sept 10, 2018 16:34:17 GMT -8
"I don't get the point of the "retainer valve" lettering on the center of the car as both the model's and prototype's arrows seem to be pointing at nothing."
The retainer valve on the prototype is located below and inboard of the side sill and is not very visible. Hence the arrow pointing to its location. I don't know if the valve is included on the model.
Mark Vinski Makes sense. It's there on Exactrail's UP GSC flat, so I tried looking for it on all the prototype shots I could find, but came up empty. The Tangent car has a retainer valve on each side of the B end (you can barely make it out in my picture.) I suppose it's not too late to move it on mine. There should be only one on most cars. The Tangent web site does seem to show one on each side. Maybe he added an extra one to make up for leaving it off of the 3 dome tank car.
Mark
|
|
|
|
Post by tom on Sept 10, 2018 16:37:57 GMT -8
Another fantastic model, Tom! Is there a reason you go that kitbash route instead of using one of the resin X29 rebuilds out there- I assume just what you have on hand? The resin versions are of an earlier rebuild that not too many made it to PC paint. The X29G was a later rebuild and most lasted until Conrail in either PRR or PC paint. I also think that starting with a Branchline car end up as a better car....plus it probably is a little cheaper. |
|
|
|
Post by fr8kar on Sept 11, 2018 8:33:57 GMT -8
Tom, could I trouble you to go more in-depth on the build? The end result is incredible. That side sill is really distinctive.
|
|
|
|
Post by tom on Sept 11, 2018 13:39:43 GMT -8
Tom, could I trouble you to go more in-depth on the build? The end result is incredible. That side sill is really distinctive. Sure. See my PM. |
|
|
|
Post by cf7 on Sept 11, 2018 15:19:44 GMT -8
Tom, what is your favorite brand of PC green paint? The boxcar looks fantastic!
|
|
|
|
Post by tom on Sept 11, 2018 16:44:41 GMT -8
Tom, what is your favorite brand of PC green paint? The boxcar looks fantastic! I use Scalecote PC Green. This was originally made exclusively by the Penn Central Historical Society but is now in the regular Scalecote line. Since this car was one of the first cars painted green I added some white to the mix. ModelFlex PC green is OK but the Scalecote PC green is my favorite. |
|
|
|
Post by riogrande on Sept 11, 2018 16:57:45 GMT -8
I wonder if the Scale Coat PC green would match the Moloco PC box cars I have. The stirrups are bare metal in part and we're missed by the spray at the factory. I need to touch them up.
|
|
|
|
Post by slowfreight on Sept 12, 2018 16:12:57 GMT -8
Another fantastic model, Tom! Is there a reason you go that kitbash route instead of using one of the resin X29 rebuilds out there- I assume just what you have on hand? The resin versions are of an earlier rebuild that not too many made it to PC paint. The X29G was a later rebuild and most lasted until Conrail in either PRR or PC paint. I also think that starting with a Branchline car end up as a better car....plus it probably is a little cheaper. I'd agree to that. Starting with the F&C kit wasn't any less work once I extended the side sills, and I still had to replace quite a few kit components to get the car looking good. Unfortunately, I didn't have the proto knowledge Tom does, so I didn't start with the Branchline car. For comparison, here's what you get starting with a resin X29D and ending up with an X29G: 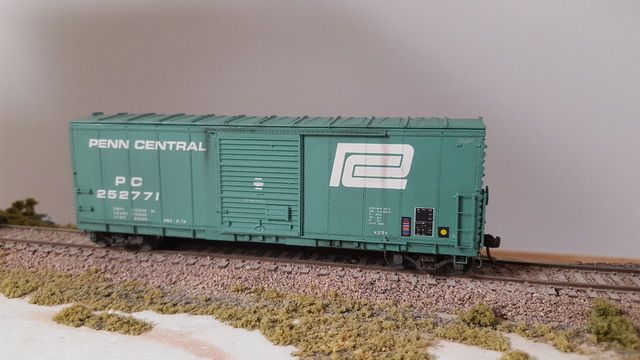 |
|
|
|
Post by roadkill on Sept 13, 2018 6:51:13 GMT -8
Tom, could I trouble you to go more in-depth on the build? The end result is incredible. That side sill is really distinctive. Sure. See my PM. Could you PM me your in-depth build too? Thanks! |
|
|
|
Post by ln1263 on Sept 13, 2018 11:35:28 GMT -8
Hi Tom. I also am interested in creating an X29G like your PC boxcar. Could you also PM that information as well? Plus my one question to you is where do you find the X29 underframe? I have recently acquired a 40' branchline boxcar with 8'door that I'm going to strip and paint PC green. I have the scalecoat PC green so I'm good there. Thank you, Andrew.
|
|
|
|
Post by roadkill on Sept 13, 2018 13:00:34 GMT -8
Hi Tom. I also am interested in creating an X29G like your PC boxcar. Could you also PM that information as well? Plus my one question to you is where do you find the X29 underframe? I have recently acquired a 40' branchline boxcar with 8'door that I'm going to strip and paint PC green. I have the scalecoat PC green so I'm good there. Thank you, Andrew. You can get the X29 underframes direct from Red Caboose. |
|


