|
|
Post by rhpd42002 on Dec 24, 2012 17:13:03 GMT -8
Watching all the work involved in this loco is just awe inspiring. Congrats on the soon to be, new arrival. Not sure when you're going to find time for the project(s) for a while after that big event!!  |
|
|
|
Post by onequiknova on Dec 24, 2012 18:06:25 GMT -8
Thanks, guys. Next up I want to tackle the vented box that sits over the HEP fan. This is another area that is unique to 9906-08. On the rest of the fleet the fan and cover sit on a rather large,raised flat panel like in the link below. www.flickr.com/photos/tall_dude/4134083606/lightbox/ 9908 doesn't have the large flat panel. From what I can tell, the roof is round with only a small raised panel for the fan to sit on. www.flickr.com/photos/bjbuttons/5823748382/lightbox/www.flickr.com/photos/22244341@N06/4328802341/sizes/o/in/photostream/ 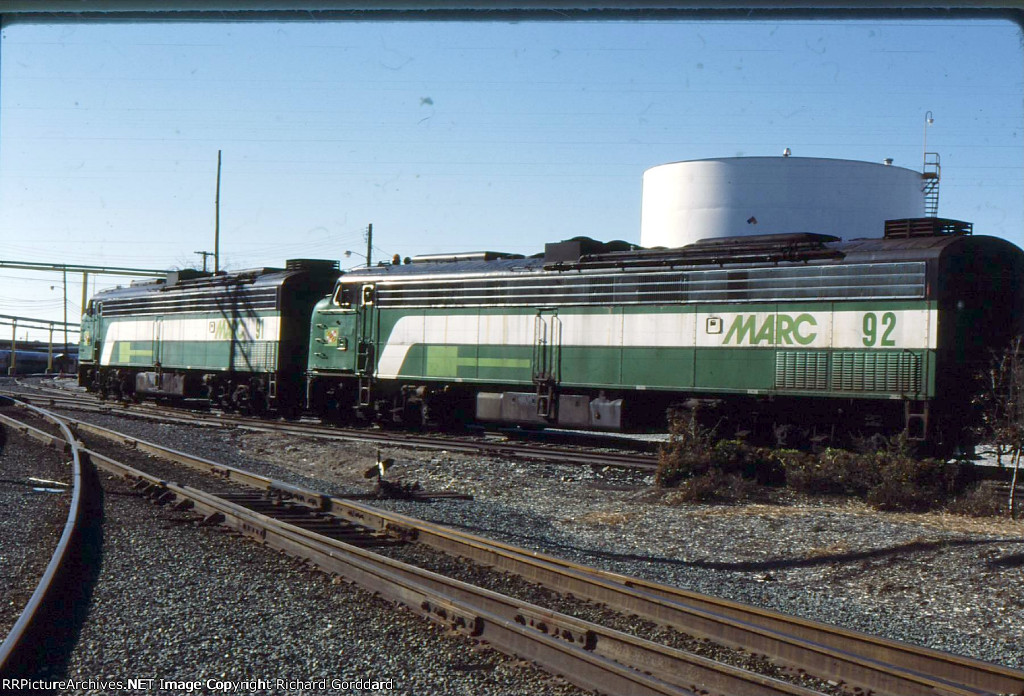 The box itself looks like this. 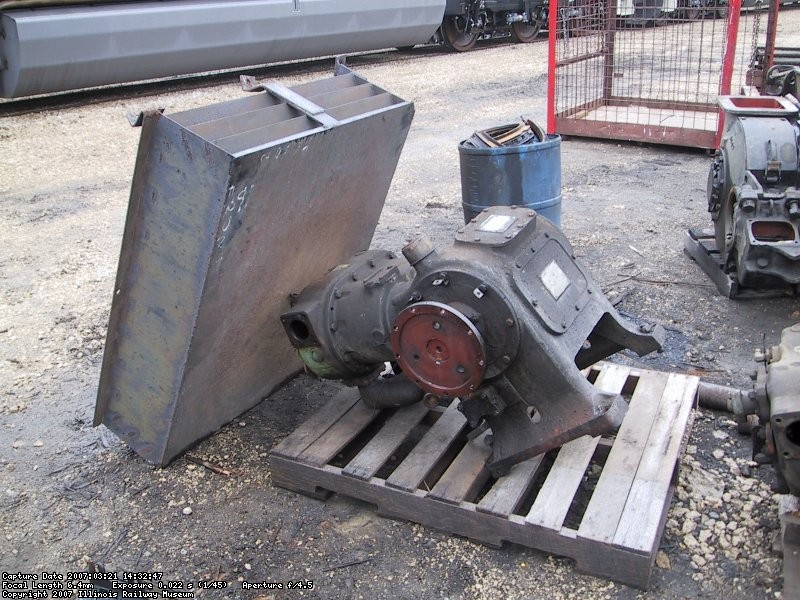 The sides and rear are vented, while the front is solid. Note the box isn't contoured to fit the curve of the roof, instead they extended the outer legs to reach down to the roof. I build the box from styrene. The top is .020, the slates are made from .010x.060 strips,and the vertical braces are cut from .005. The corner legs are made from .040 brass L stock.   As you can see, the brass L "legs" are positioned so there is a flat area on each side to glue the horizontal slats to. As far as I can tell, this matches the prototype fairly close. I also trimmed some of the L away so the end could be folded over to create a "foot" or mounting bracket.  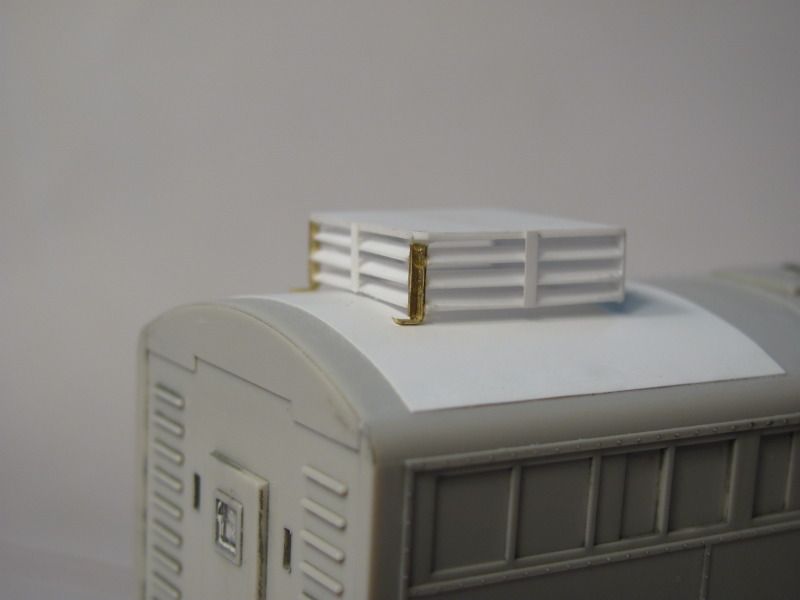 After looking at it completed, I'd say I made it a bit too tall, but I'm willing to live with it at this point. The rest of the mounting brackets still need to be built. |
|
|
|
Post by tankcarsrule on Feb 18, 2013 16:44:45 GMT -8
I love all of those scratch built parts, my favorite part of the hobby. Sir, your work is outstanding!!!!!
|
|
|
|
Post by onequiknova on Feb 18, 2013 17:45:21 GMT -8
Thanks! I hope to get back to this project soon. Our new born son decided he wanted out 3 weeks early, so we've had our hands full lately.
|
|
|
|
Post by slowfreight on Feb 18, 2013 19:32:59 GMT -8
Thanks! I hope to get back to this project soon. Our new born son decided he wanted out 3 weeks early, so we've had our hands full lately. Been there! Hopefully, at 37 weeks he's big enough that you didn't have to spend much time in the NICU. Either way, congrats, and enjoy the diversion for all it's worth! |
|
|
|
Post by onequiknova on Feb 18, 2013 19:48:14 GMT -8
Thanks! I hope to get back to this project soon. Our new born son decided he wanted out 3 weeks early, so we've had our hands full lately. Been there! Hopefully, at 37 weeks he's big enough that you didn't have to spend much time in the NICU. Either way, congrats, and enjoy the diversion for all it's worth! He was in the NICU for 20 days. He was small but healthy, he just couldn't figure out how to eat enough on his own. He came home on Feb 8th, his due date, oddly enough. |
|
|
|
Post by rockisland652 on Apr 12, 2013 9:10:39 GMT -8
After being rare birds for years, BLI's E-8's are back.
Get 'em while you can!
|
|
|
|
Post by onequiknova on Apr 15, 2013 13:02:25 GMT -8
Time to get back to this project. First let me state, I hate the new Photobucket.  The winterization hatches on the BLI unit bother me. They're too narrow, and the grills, which are molded in place, are oddly shaped. Here's a comparison of the BLI and original run Proto. BLI on the left, Proto on the right. The etched grills are by Plano, which are designed for the Proto hatch. 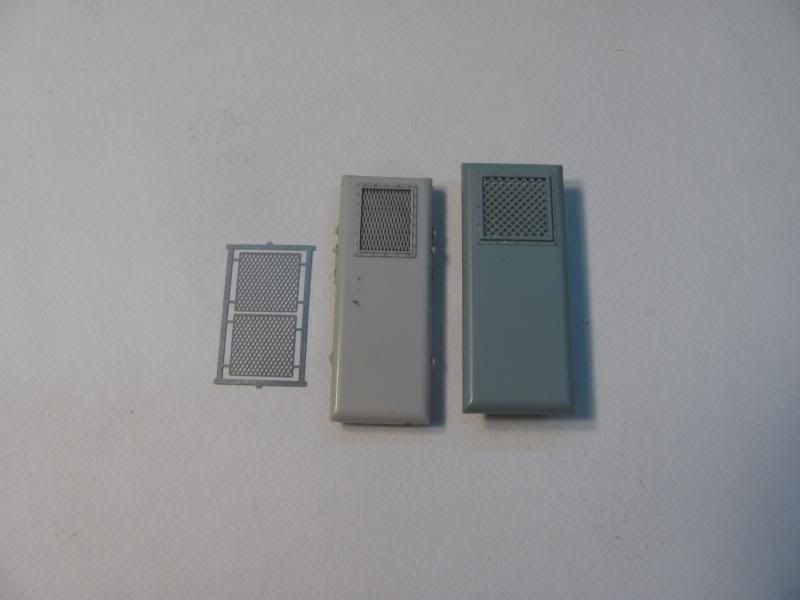 I decided to use the Proto hatches on this build since they look closer to the correct size. In order to use the Proto hatches on the BLI, I need to first build up the bottom of the hatches to get the proper height. I added .030 styrene to make up the difference. Here it is just sitting on the model. 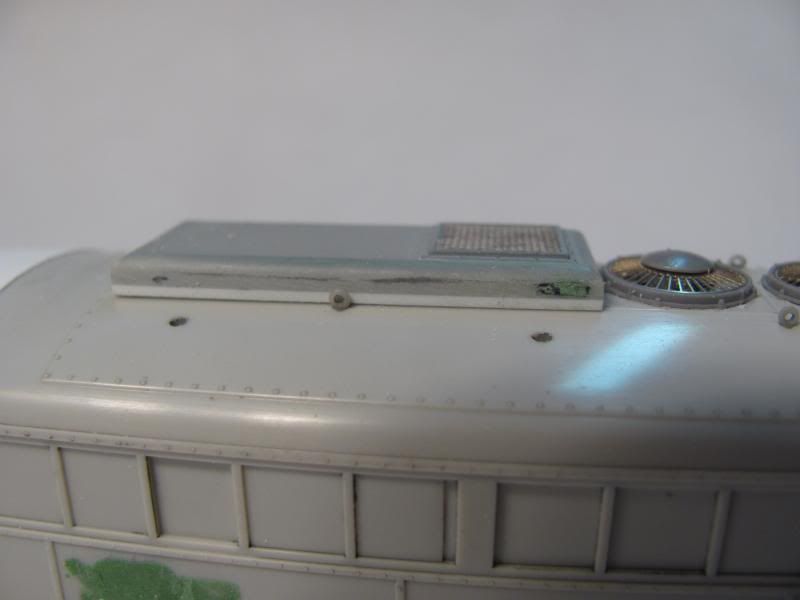 Note, even though the BLI fans are too small, the larger C&C fans still fit on the fan hatch. I still need to find out what to do with the fan beneath the winterization hatch. Are they countersunk like the original Proto E8's, or on the same level as the rest of the fans? 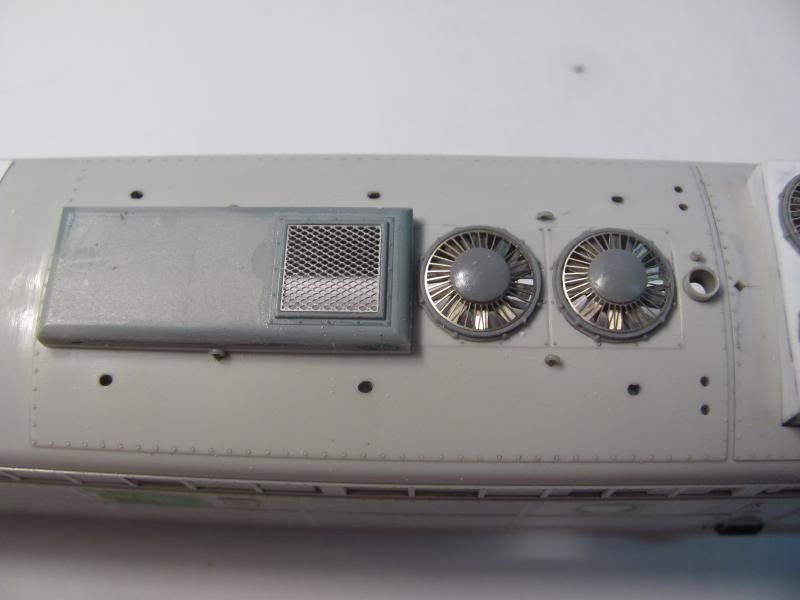 |
|
|
|
Post by slowfreight on Apr 15, 2013 19:09:11 GMT -8
Looking good. Is there a way to get the P2K hatches (or any suitable) without scrapping out a P2K unit?
|
|
|
|
Post by onequiknova on Apr 15, 2013 19:57:48 GMT -8
Not that I'm aware of. I scored a basket case Proto off EBay a while back to scavenge parts from. If I didn't have it I would have made a larger opening in the BLI hatch and used the Plano grilles on them. This would require scratch building new frame work around the grill.
|
|
|
|
Post by onequiknova on Apr 16, 2013 14:53:13 GMT -8
I started adding the louvers to the side panels. The Archer louvers are a bit narrower than what's on the prototype, so I had to add a few extra rows to get that full look of the prototype. I felt that looked better than adding the correct number of rows with larger gaps between them. here's a prototype pic. www.flickr.com/photos/40264766@N06/3969081707/lightbox/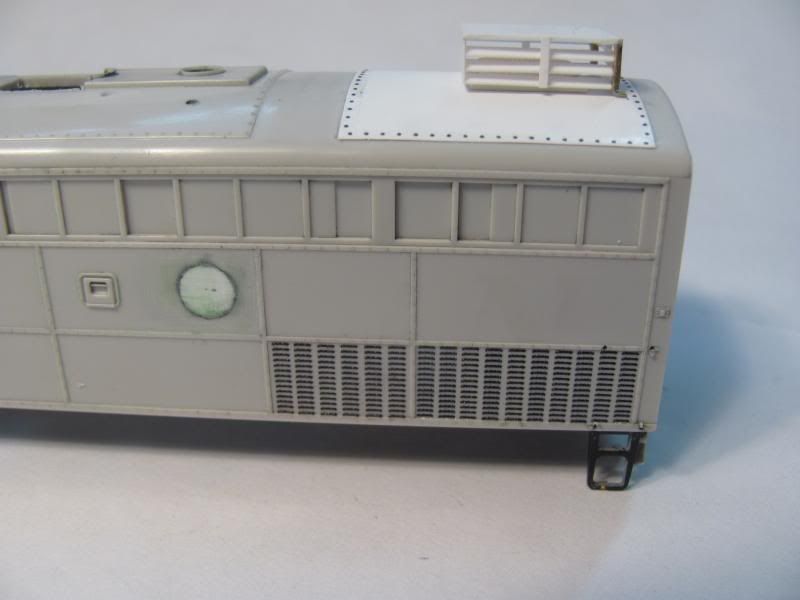 I also added rivets to the HEP hatches using Micro Mark rivets. Obviously, the rivet spacing didn't allow for nice neat corners, but I'm not about to install them one at a time to achieve them. I'm not that anal.  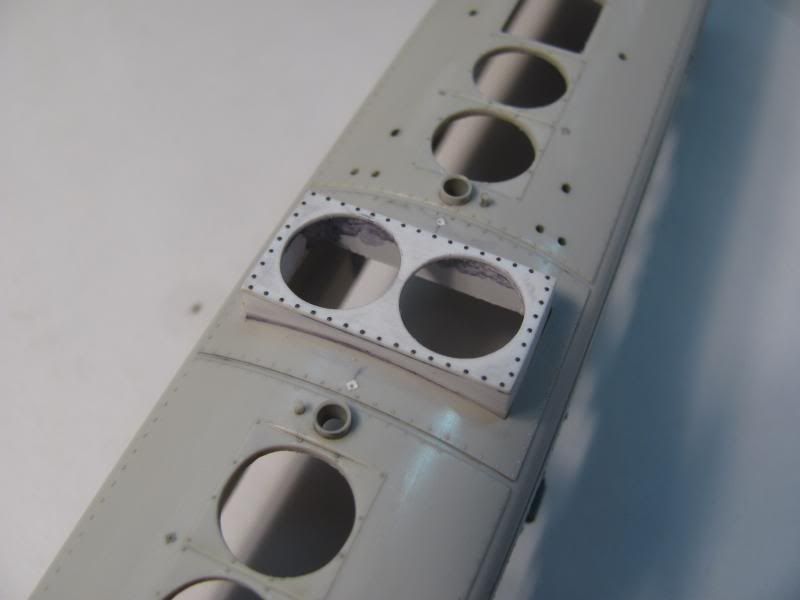 You can also see the rear HEP fan was added. This area will be all but hidden by the louvered box I built earlier, so It's sparsely detailed. The fan is a DA part. 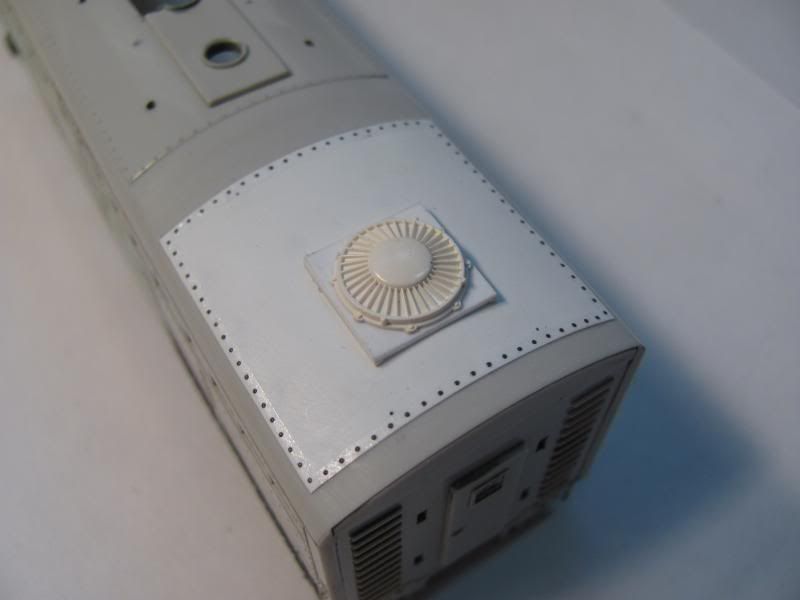 I wanted to show a close up of the Custom Finishing 2 chime Lesie I talked about earlier in this thread. 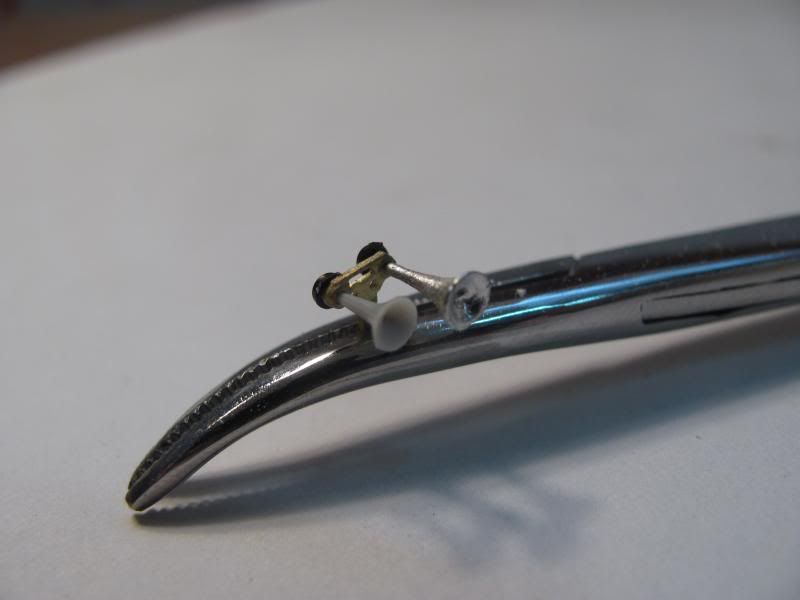 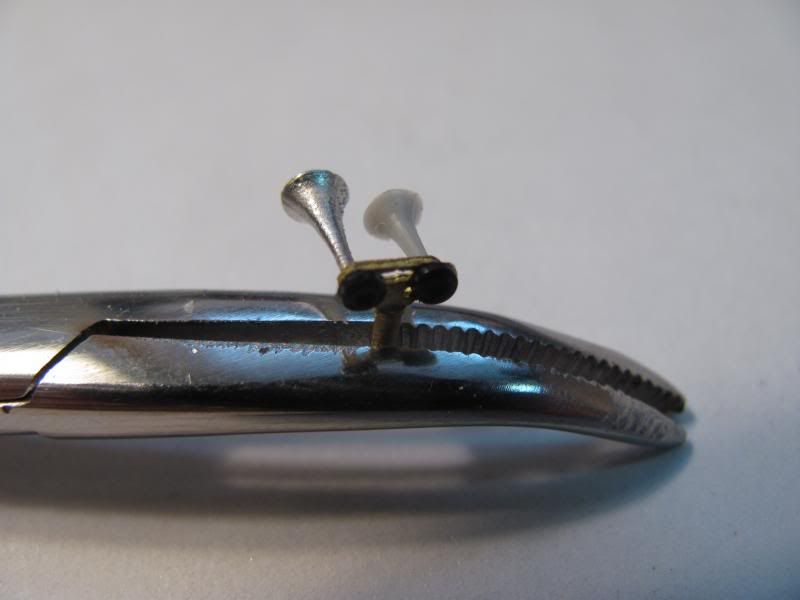 I ended up only using the bracket and one bell from the kit. the second, shorter bell is from my parts box, which I believe to be from Intermountain. The diaphragm housings are from a DA horn kit, which look nicer than the Custom Finishing parts. |
|
|
|
Post by onequiknova on Apr 17, 2013 14:27:47 GMT -8
I started on detailing the nose today. The louvers on the front of the nose, as well as the small access hatched on the side of the nose have been chiseled off and sanded smooth. All the grabs were bent from .011 wire. The flag holder brackets were carefully shaved off the rear of the unit. then reinstalled on the side of the nose above the sand filler hatches. 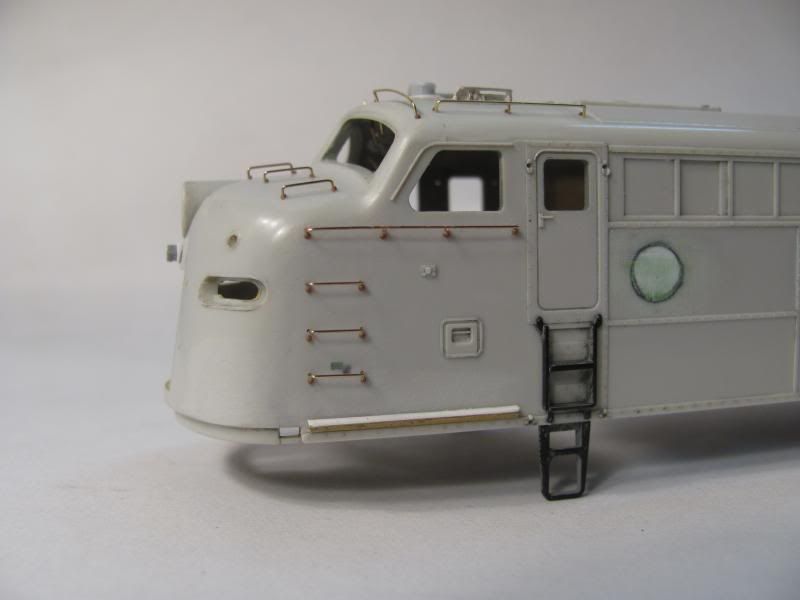 The roof received a DA beacon sitting on a scratchbuilt base consisting of a .100 x .100 x.02 styrene square with a thin styrene disc on top of that. A roof vent, Sinclair antenna, horns and conduit round out the roof detail. 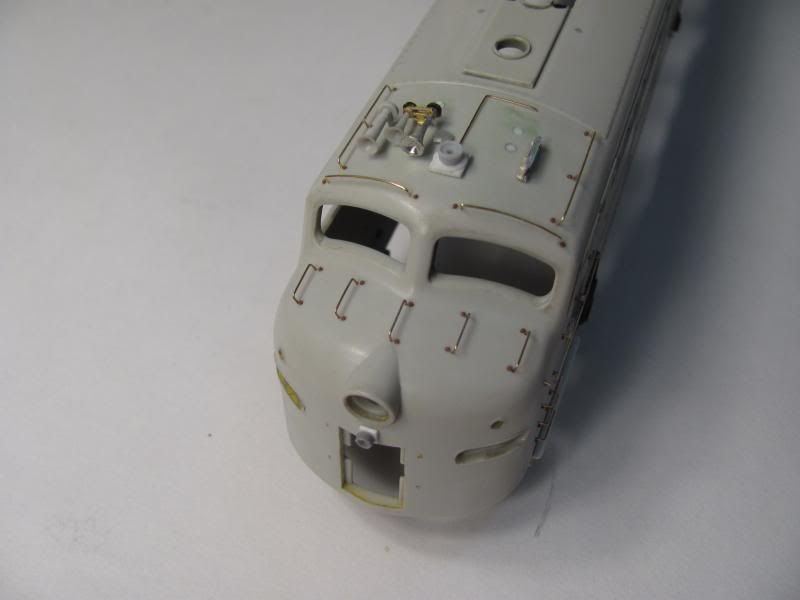 the small marker under the headlight was made from a Cannon & Co. Conrail style marker found in their nose kits. It was carefully whittled away until I had just the light housing. The base is a piece of .080x.080 styrene shaped to fit the nose contour. I'm betting an N scale ditch light or F unit back up light might be a better option here. Since the marker will get in the way of decaling the nose stripes, it's just pinned into place for the pictures. It won't get glued on till the model is finished. 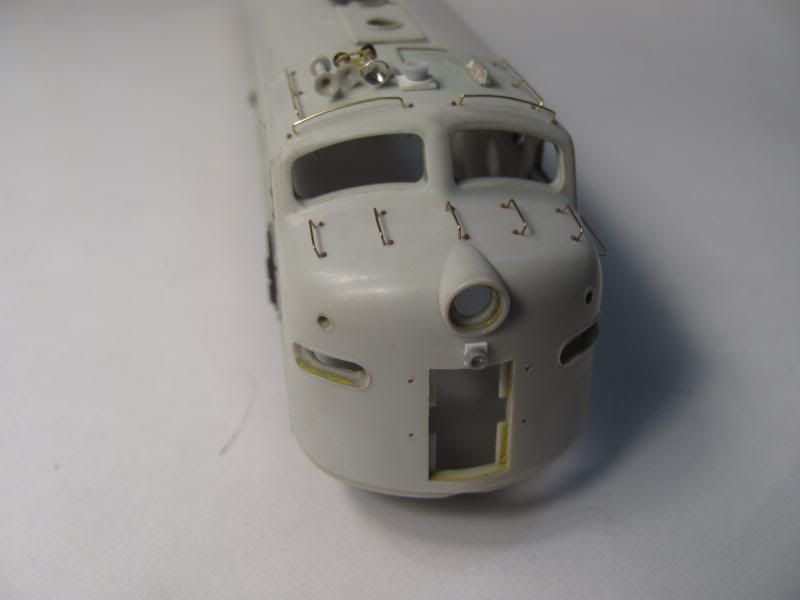 The egineer's side is sparsely detailed. The only detail added being the flag holder. 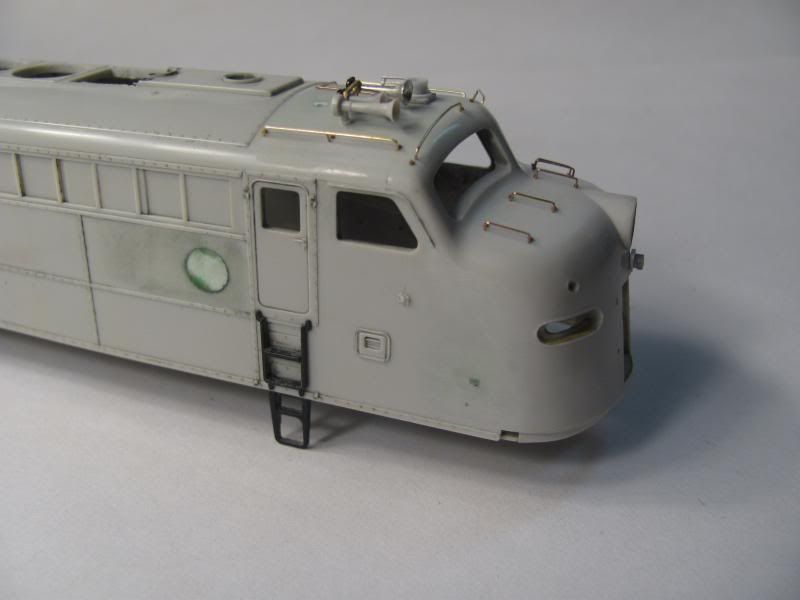 |
|
|
|
Post by buffalobill on Apr 17, 2013 18:48:52 GMT -8
John: Coming together very nicely. It is going to be an exquisite model. Your attention to detail is amazing. It will look great in Cascade Green.
Bill
|
|
|
|
Post by onequiknova on Apr 20, 2013 16:21:02 GMT -8
Got a little more done over the last few days. I installed the MU door and Highliner nose door. Though I'm tempted to remove the MU door and cut a hole in the nose for a flush fit. The pilot still needs a bunch of work. 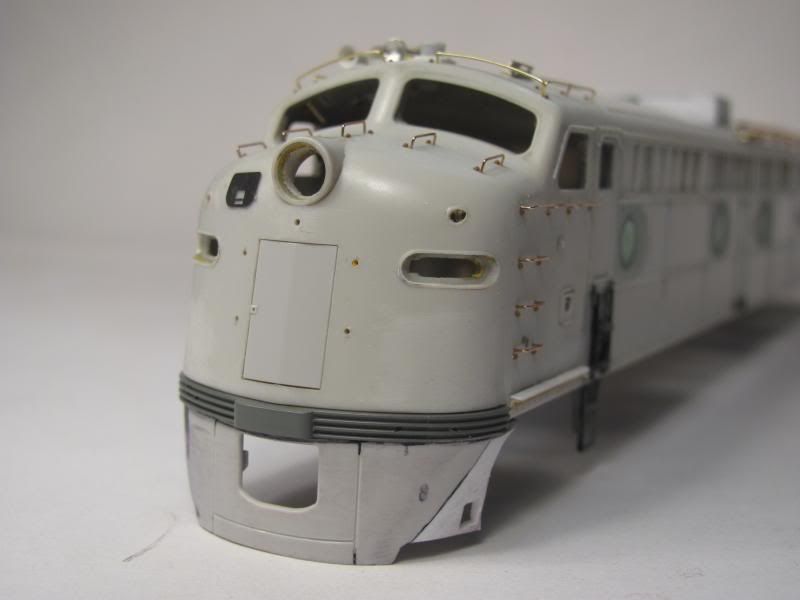 The rear got some work as well. The door and frame work were replaced with DW parts. My Rock Island E8 thread goes into more detail on the replacement. The lower buffer was reshaped to match the prototype better. I also shave off the three lower ribs on each side and added the square plates per the prototype. The back up light conduit is magnet wire. I still need to add the MU and HEP connections. 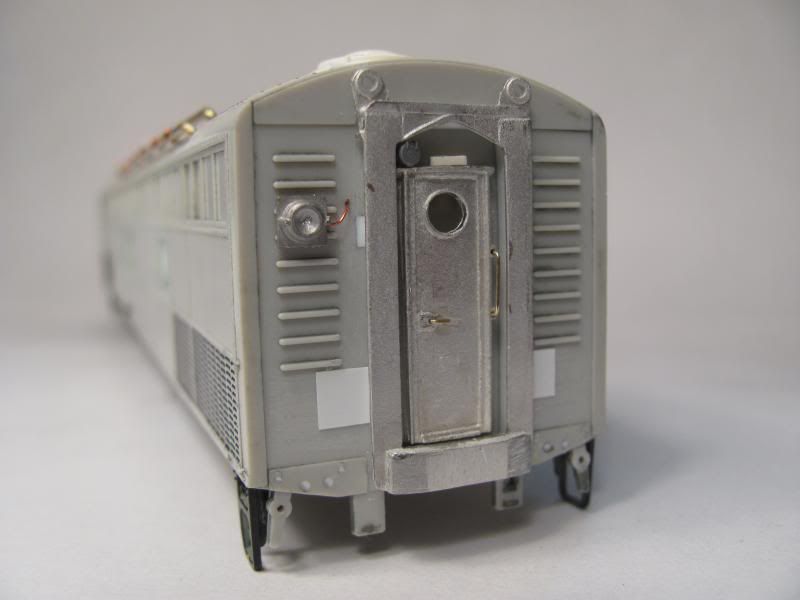 I also started adding the four roof top HEP cooling pipes. I used .046 brass wire, and scratchbuilt the brackets. I made the lower brackets by first drilling a .046 hole through a piece of .30x.060 styrene, then I cut the hole through the middle to make the bracket. The upper clamps were made with magnet wire. The pipe couplings were represented with slivers of brass tubing. I still have three more to detail. 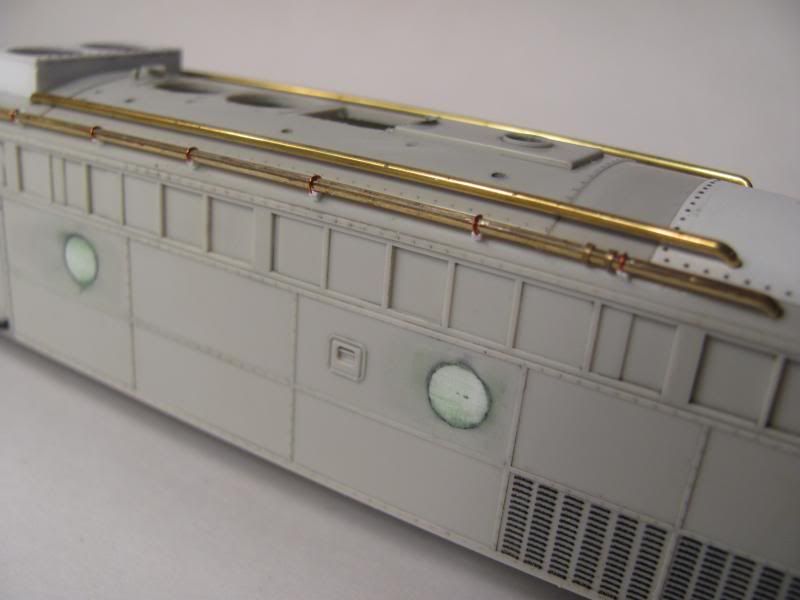 They're not perfect, but I don't think anyone can focus this close with their own eyes. 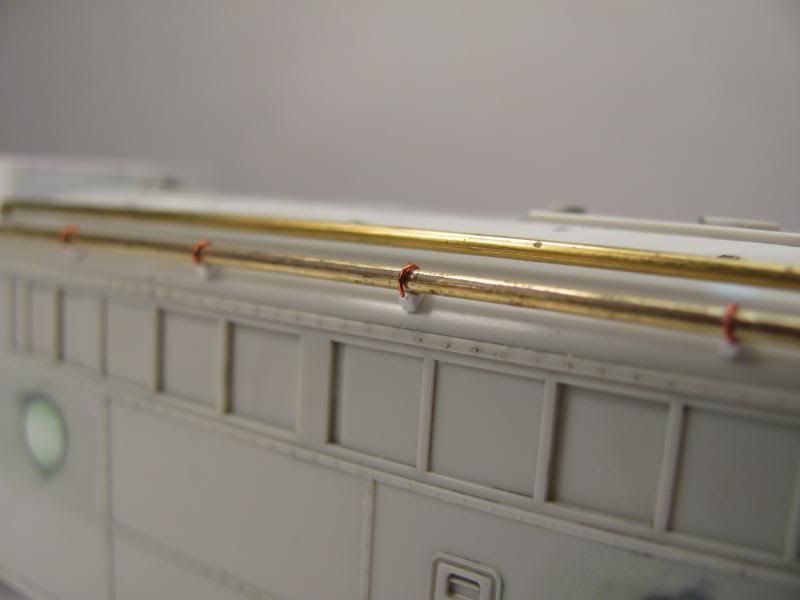 |
|
|
|
Post by tankcarsrule on Apr 20, 2013 17:34:35 GMT -8
I'm enjoying this build. You seem to enjoy doing each step, that makes for excellent results.
Bobby
|
|
|
|
Post by slowfreight on Apr 21, 2013 5:25:38 GMT -8
I haven't seen any satisfactory way to add the nose MU door on an E/F shell, so that etched part is probably about the best solution you'll find. Can't tell if your nose marker light is hanging funny, but it should ride higher when installed. I see what you mean by not being happy with it, but it's close to the right shape: www.irm.org/gallery/BN9908restoration/aai |
|
|
|
Post by onequiknova on Apr 21, 2013 9:51:47 GMT -8
Good eye. The nose marker is a bit low. I need to drill the hole a bit higher. As far as the MU door goes, I'm tempted to cut a hole in the nose to mount it flush. I'm just reluctant to attempt it.
|
|
|
|
Post by slowfreight on Apr 21, 2013 18:09:42 GMT -8
I would be, too. Something tells me that by the time you get it set in, either it will be nearly invisible in the wrong way, or it won't look much better than if you scribed around the etching and popped it off.
|
|
|
|
Post by onequiknova on Apr 21, 2013 18:34:29 GMT -8
There's always the Microscale MU door decals. ;D I think I'm going to pop the etching off and try to get it to fit the nose contour a bit better. right now it's a bit too flat.
|
|
|
|
Post by calzephyr on May 1, 2013 13:53:55 GMT -8
That is some very nice detail work.
Larry
|
|
|
|
Post by nscaler711 on Aug 16, 2013 3:19:34 GMT -8
crazy skill... you must have really steady hands!
can not wait to see it finished!
|
|
|
|
Post by c415rock on Sept 12, 2013 10:31:38 GMT -8
Hi John,
I am really enjoying this build. Could you please explain or show detail close up photos ( like the HEP cooling pipes ) of how you did the roof & fireman side long grab irons. I am most interested in how you attached the support pieces to the long grab irons.
Erik
|
|
|
|
Post by onequiknova on Sept 12, 2013 15:17:16 GMT -8
The model is packed away until I get some time to work on it. Work has been crazy all summer, which has left me with zero time to model.
The brackets for the long grab are simply short lengths of .012 brass wire secured to the grab with a dot of CA. There are DW nut/bolt/washer castings installed directly beneath them as well as under the grabs.
|
|
Deleted
Deleted Member
Posts: 0
|
Post by Deleted on Sept 12, 2013 18:45:50 GMT -8
The brackets for the long grab are simply short lengths of .012 brass wire secured to the grab with a dot of ACC. There are DW nut/bolt/washer castings installed directly beneath them as well as under the grabs. You didn't solder the short lengths of wire to the grab? The horror!!!!!  Your skills are better than a few drops of CA!!!! So hard to find good help these days....  |
|
|
|
Post by c415rock on Sept 12, 2013 23:40:00 GMT -8
Hi John,
Thanks for the info.
Erik
|
|
|
|
Post by onequiknova on Sept 13, 2013 3:34:12 GMT -8
The brackets for the long grab are simply short lengths of .012 brass wire secured to the grab with a dot of ACC. There are DW nut/bolt/washer castings installed directly beneath them as well as under the grabs. You didn't solder the short lengths of wire to the grab? The horror!!!!!  Your skills are better than a few drops of CA!!!! So hard to find good help these days....  Haha. Especially for a guy who has scratch builds brass steam. I'm sure it'll come back to bite me. |
|
Deleted
Deleted Member
Posts: 0
|
Post by Deleted on Sept 13, 2013 5:17:19 GMT -8
You didn't solder the short lengths of wire to the grab? The horror!!!!!  Your skills are better than a few drops of CA!!!! So hard to find good help these days....  Haha. Especially for a guy who has scratch builds brass steam. I'm sure it'll come back to bite me. Not to say "I told you so".....but my personal experience with CA and gluing brass wire together for the long roof and rear corner grabs on my Metra, RTA, C&NW and Milwaukee Road commuter E's, F's and FP's didn't end well. The both the 90 degree with a leg rear and the long roof grabs at first seemed stout. But just don't touch them for they fell apart. I then sanded the brass wire, set up a jig, and soldered. Had to leave a little solder for strength so maybe it wasn't as purty as the CA version but they don't crumble like one of grandma's soft cookies either. |
|
|
|
Post by stevef45 on Sept 13, 2013 14:05:31 GMT -8
Do the archer louver decals need to have the shell sprayed with gloss to make them stick? or can you apply them right to the bare plastic?
|
|
|
|
Post by onequiknova on Sept 13, 2013 17:30:28 GMT -8
I applied them directly to the plastic to see if they'd stick, and they seem to be holding on just fine.
|
|
|
|
Post by atsfan on Oct 9, 2013 14:45:32 GMT -8
I wish I had the eyesight and hand eye dexerity to work those small details.
Great work. Beyond my limits and probably patience level. I admire your detail work.
|
|