|
|
Post by onequiknova on Nov 20, 2012 17:38:34 GMT -8
I haven't set foot in my train room since completing the Rock Island E8 a couple months back. Work's been crazy lately so I don't have much spare time, but I have the itch to build something. I scored a BLI L&N E8 off of Ebay last week for a price too good to pass up, and after thinking for a while about which E unit I want to build, I decided to build another BN E9Au. A unit I first built when I was only 15. First step was an alcohol bath, and for those who weren't sure, BLI's paint came right off after a night of soaking. It came out so clean I don't even need to blast it. Some of the steps in this build will be nearly identical to my RI E8 build, so I won't go into as much detail on certain aspects of this build. Enough babbling. On with the build... I decided to start with the pilot. When these units were rebuilt by Morrison Knudsen, they received a new, somewhat oddly shaped pilot. It resembles your standard passenger pilot, but there is no "rake" to it. It stand nearly 90* to the rails. Here's a shot of one... The picture is to big to post here. www.irm.org/gallery/albums/BN9908restoration/aaa.jpg After some head scratching, I decide to cut up a Highliner passenger pilot and see if I could make it work. My first step was to get the correct angle on the front of the pilot. to do this I want to reshape the top of the pilot where it meets the anti-climber. I found that if I rest the shell on top of the locating pin on the Highliner pilot, I get the angle I need. I now set my caliper to where it just touches the notch for the Anti-climber on the shell and the top of the pilot, dead center, like in the picture. Now firmly hold the pilot in that position and scribe a line around the pilot following the anti-climber notch all the way around. (The pilot in the pic above is a stand in. on the original, I first shaved off the rivet heads and colored the pilot with a black sharpie so the scribe can be easily seen.) 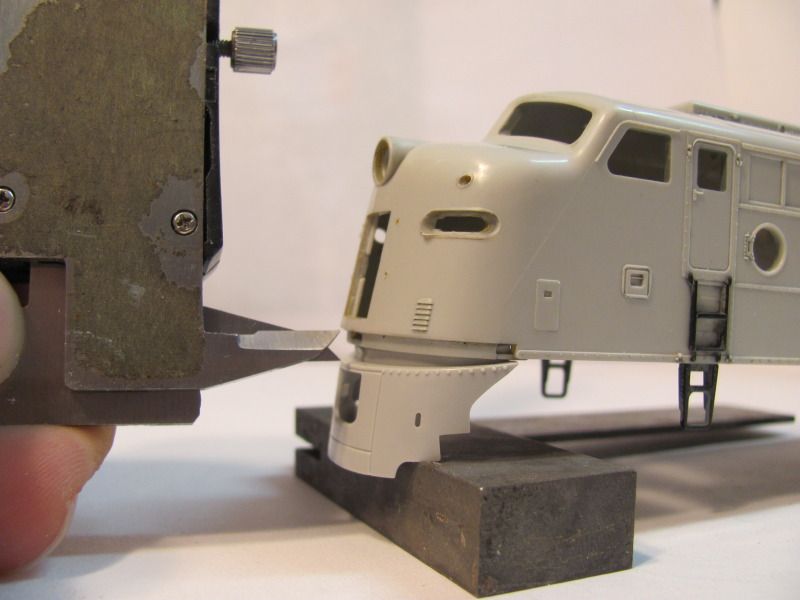 :Edit: This gives a better idea of what I'm trying to describe.  Here is a side by side. The modified pilot already has the BLI anti-climber glued to it after being cut from it's original pilot. 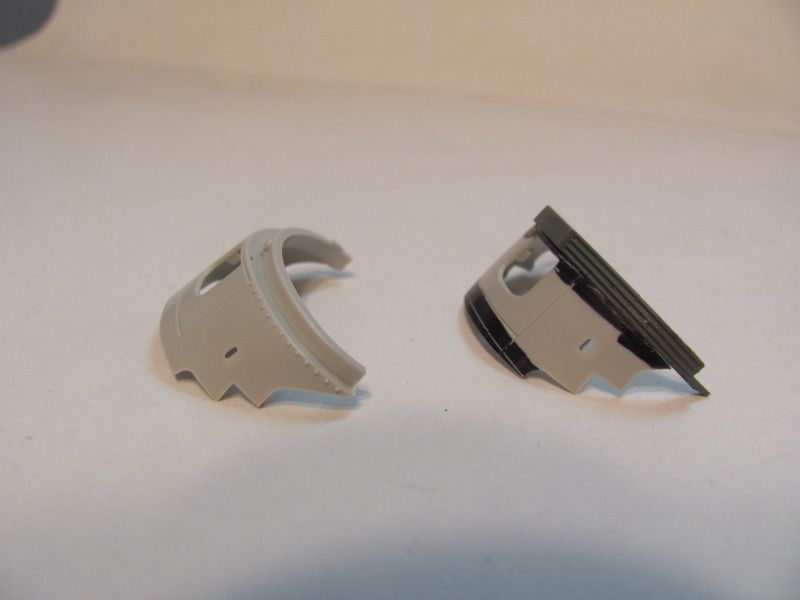 Now it's time to square up the bottom of the pilot. I used my dial caliper again and scribed a line to remove just enough to square the bottom. Removing too much will create a big gap between the pilot and the rails. 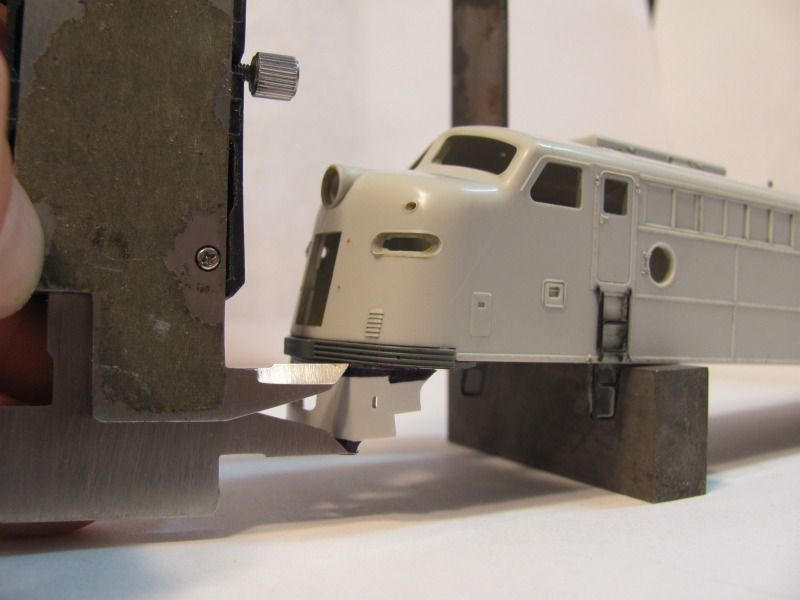 This is what I ended up with. The angle on the pilot is good, but now I'm left with crooked corner steps. 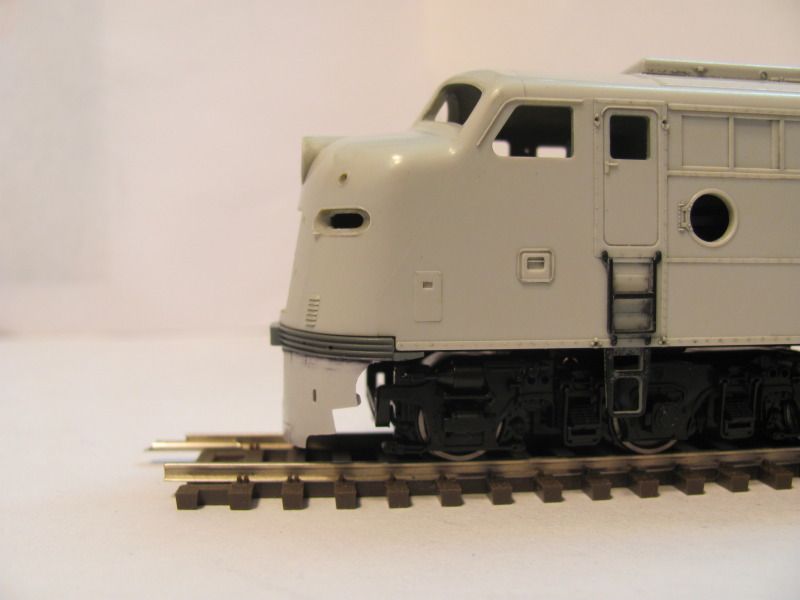 To fix that issue I scribed a line and clipped the corners off. 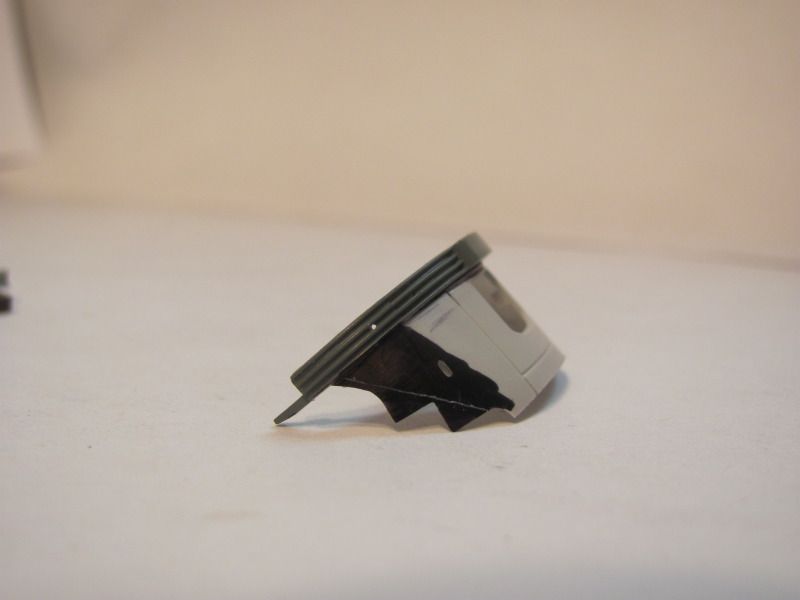 Lastly, I cut a piece of styrene to fit, glued it to the pilot, then shaped my new edge, using another Highliner pilot as a guide to get the step notch the correct size. 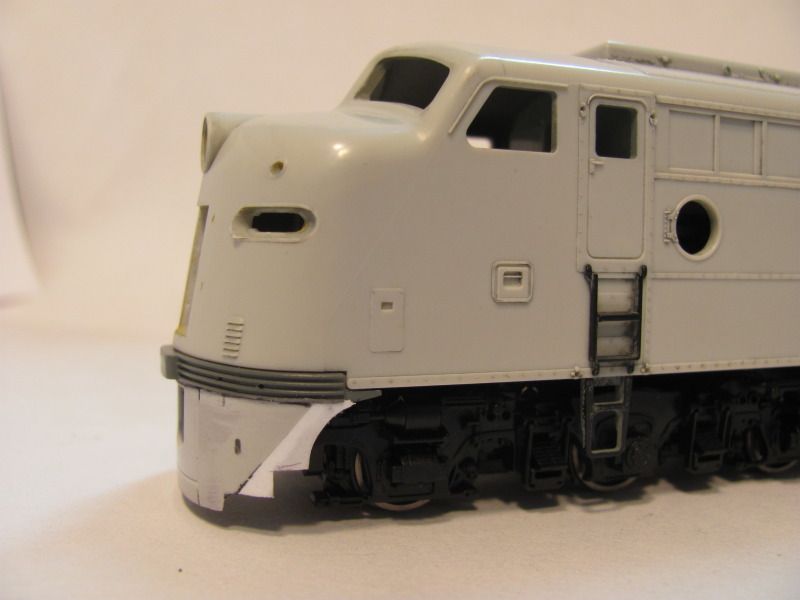 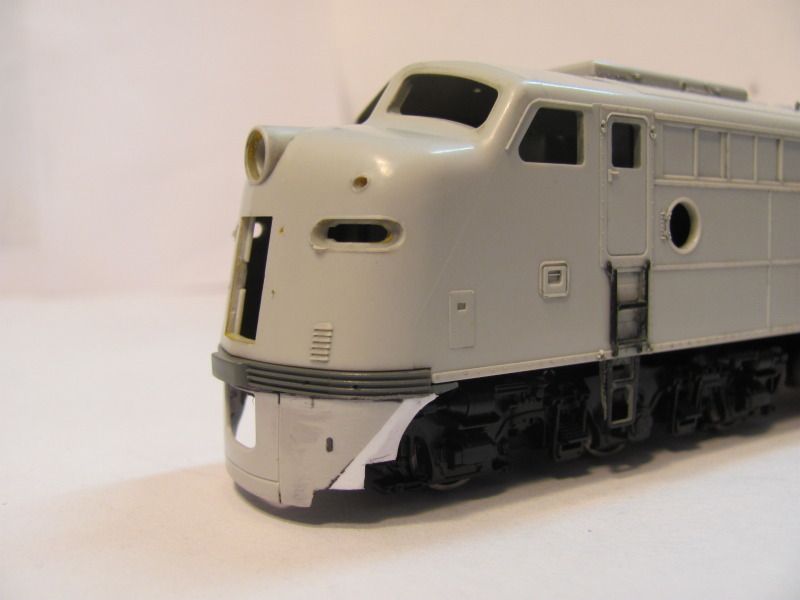 I still need to reshape the coupler opening, fine tune my new styrene edge, and fill in the molded seams on the Highliner pilot with putty. For s**ts and giggles, here's a couple shots of the one I built when I was 15. 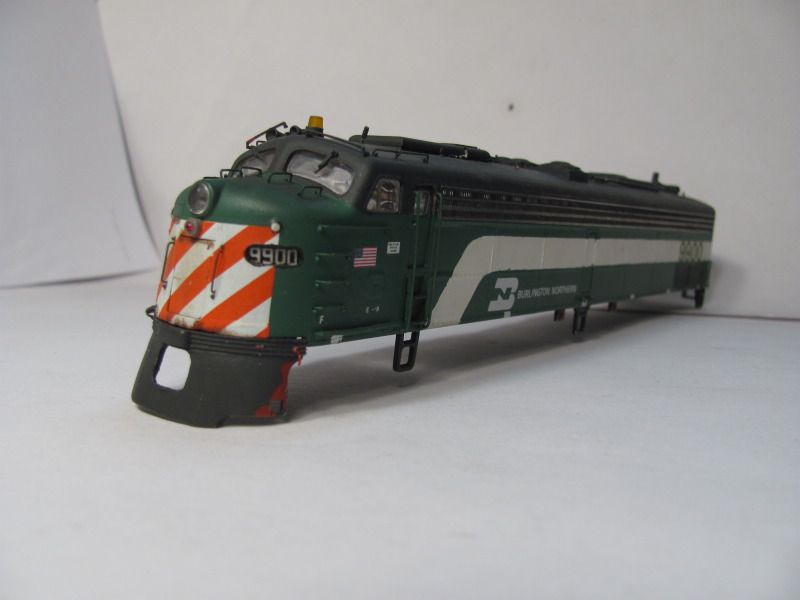 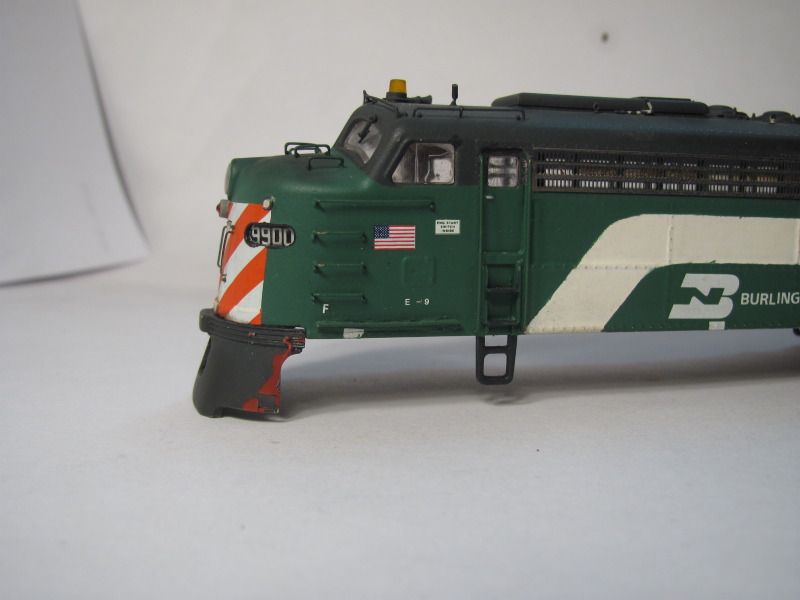 It's pretty banged up and the chassis was stolen long ago for another project, but I kept the shell as a memento. Based off a then new Rock Island Proto E8. I don't think I even stripped the paint. I was a broke kid, so I used what I had on hand. The white and black is spray paint. The green, while shot from an air brush, is the wrong color green. Let's see how far I've come in 19 years. |
|
|
|
Post by rhpd42002 on Nov 20, 2012 18:22:23 GMT -8
John, I like the project you've taken on. I have the VHS tape of those BN units and they're favorites of mine, even though I can't run 6 axle power on my layout.
The unit done at 15 still has a lot going for it!!
|
|
|
|
Post by onequiknova on Nov 20, 2012 18:35:18 GMT -8
John, I like the project you've taken on. I have the VHS tape of those BN units and they're favorites of mine, even though I can't run 6 axle power on my layout. The unit done at 15 still has a lot going for it!! I've always had a soft spot for them since they were the only E unit's I got to witness in regular service. I couldn't have been more than 13 when they were retired, so my memory of them is pretty vague at this point. |
|
|
|
Post by buffalobill on Nov 21, 2012 11:56:07 GMT -8
John: This looks like a very interesting build project. I will have to get a pair of BLI E's and follow your instructions. At what point during their 20 year post the MK rebuild careers are you going to model? Mike's right, your 15 year old Proto rebuild is nothing to sneeze at.
Now I wish someone would do Plastic Budd Bi-Levels.
Bill
|
|
|
|
Post by onequiknova on Nov 21, 2012 13:19:50 GMT -8
I plan to model it right near the end from when I remember them. Though the only real changes I've noticed so far over their careers is to the HEP details on the roof.
|
|
|
|
Post by metraupwest on Nov 22, 2012 9:15:25 GMT -8
John-
Great job so far, looking forward to checking out the rest of the build!
|
|
|
|
Post by rockisland652 on Nov 24, 2012 7:43:29 GMT -8
This will be another great build.
What amazes me is that you found another BLI E8!
|
|
Deleted
Deleted Member
Posts: 0
|
Post by Deleted on Nov 26, 2012 16:31:56 GMT -8
What are you using for horns? The BN E's have a single chime and two chime, the same as they did when they were painted silver and owned by the Q.
|
|
|
|
Post by onequiknova on Nov 26, 2012 17:00:20 GMT -8
What are you using for horns? The BN E's have a single chime and two chime, the same as they did when they were painted silver and owned by the Q. I haven't gotten that far yet. I knew of the two/one chime combo, but don't know what parts to buy yet. Any suggestions? |
|
Deleted
Deleted Member
Posts: 0
|
Post by Deleted on Nov 26, 2012 20:05:23 GMT -8
What are you using for horns? The BN E's have a single chime and two chime, the same as they did when they were painted silver and owned by the Q. I haven't gotten that far yet. I knew of the two/one chime combo, but don't know what parts to buy yet. Any suggestions? OMI #9015 for the two chime, but its a tough find, but does appear on e-Bay. |
|
|
|
Post by railthunder on Nov 28, 2012 1:04:32 GMT -8
Great work on the E unit so far! I'm also in a similar situation regarding the Overland air horn part #9015. They are indeed very hard to find. I've been looking to update several CB&Q E units with them and haven't had much luck either.
Does anyone have a good picture of the air horn on the prototype? I'm going to research buying a three chime and cutting/filling the third rear facing horn off etc.
If anyone knows of a stash of these Overland horns at a reasonable price send myself and onequiknova a private message.
|
|
|
|
Post by onequiknova on Nov 28, 2012 14:47:17 GMT -8
Regarding the horns, I found on another site that the two chime is a Leslie S-2M, bells 31 and 44. The single-chime over the fireman's side is a Leslie A-125-247. Here's a good shot of what the bracket should look like. Note the bells are reversed on this particular horn. www.flickr.com/photos/81004993@N08/7547738630/ judging by this pic of Ex BN 9902, I'd say it's the correct bracket. Notice the single horn is mounted just to the right of the 2 chime.  This is the Overland horn. Close, but not exact. It appears to be a pretty basic bracket. If an Overland part can't be found, a scratchbuilt bracket with a couple brass or plastic bells should be doable.  |
|
|
|
Post by onequiknova on Nov 28, 2012 15:12:34 GMT -8
|
|
|
|
Post by onequiknova on Nov 28, 2012 19:51:09 GMT -8
Obviously, this build isn't progressing as fast as my last, but I'm still plugging away. I decided to tackle the dual fans where the dynamic fan usually goes . Judging by the piping running from the HEP at the rear of the unit to this box, I'd guess it now functions to cool the HEP generator. There are two way to go about adding this box. You can make the box fit the contour of the roof , or you can cut a rectangle hole in the roof and build a box to fit. I chose the latter. I started out by scribing where the box will go. Again I used a sharpie to color in the area before hand so the scribe shows up easier. The opening measures .510"x1.015". I eyeballed the measurements for this since I don't have any real data handy. 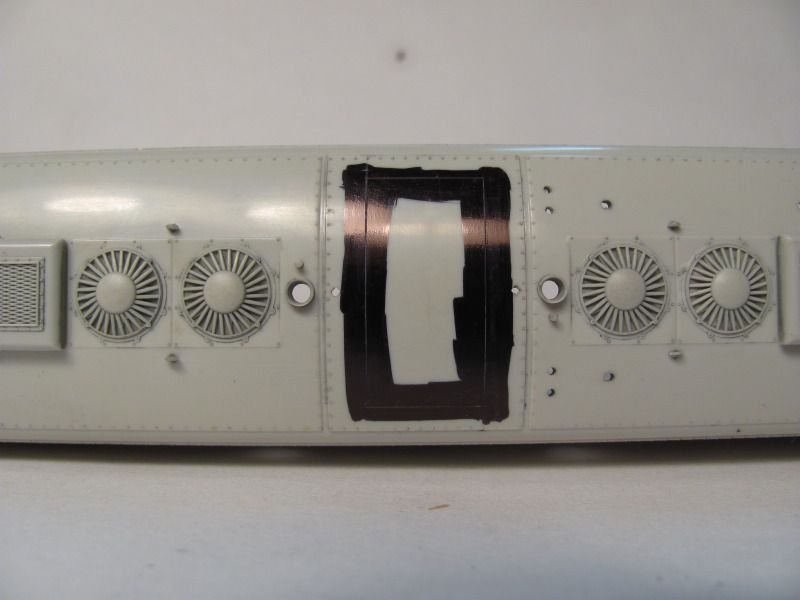 In case anyone is wondering, this is what I use to cut holes in my shells. 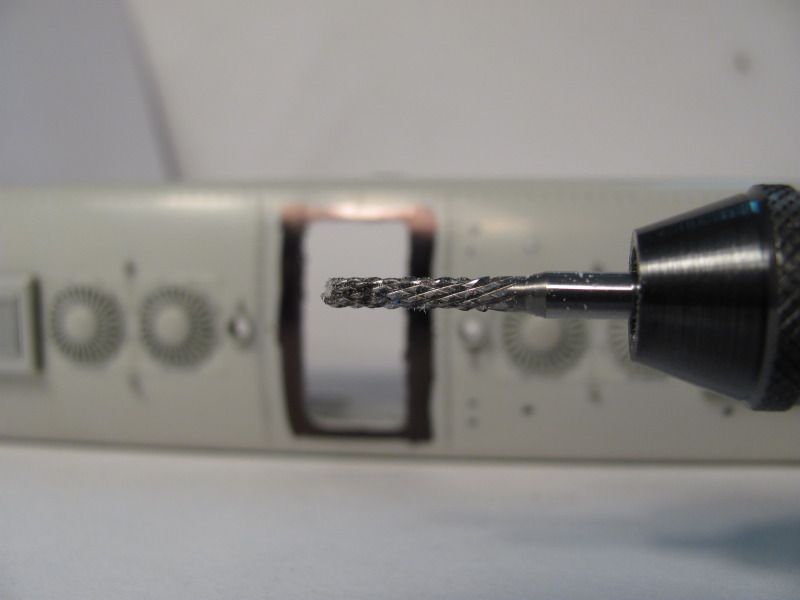 It's a rotary bit from MicroMark. It makes fast work of removing material, but you need to be careful, it can get away from you in a hurry. I hate to file, so I get as close as I dare with the tool first. 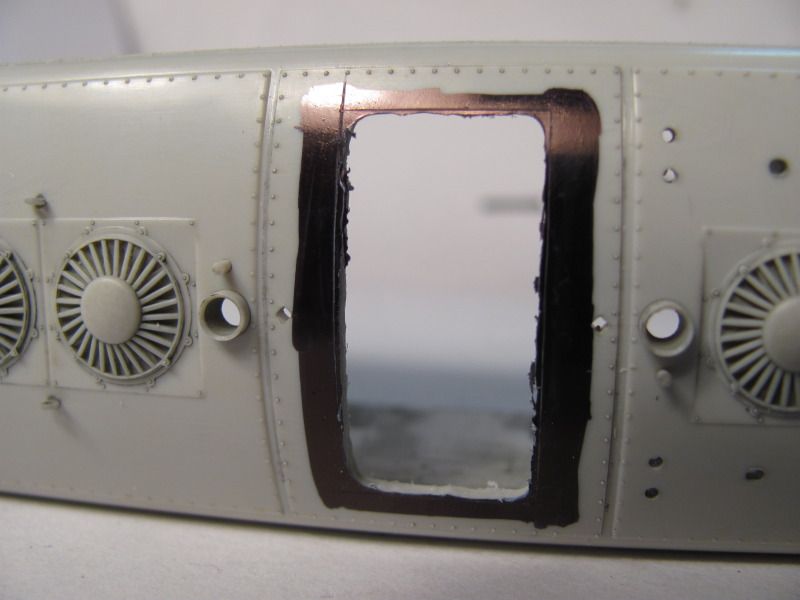 The hole squared up and the ink removed with alcohol.  I fashioned a styrene box using .020 for the top and .040 for the sides. I made the box .245" tall. After gluing the box in it's new opening I used a compass to layout the openings for the Cannon 36" fans. 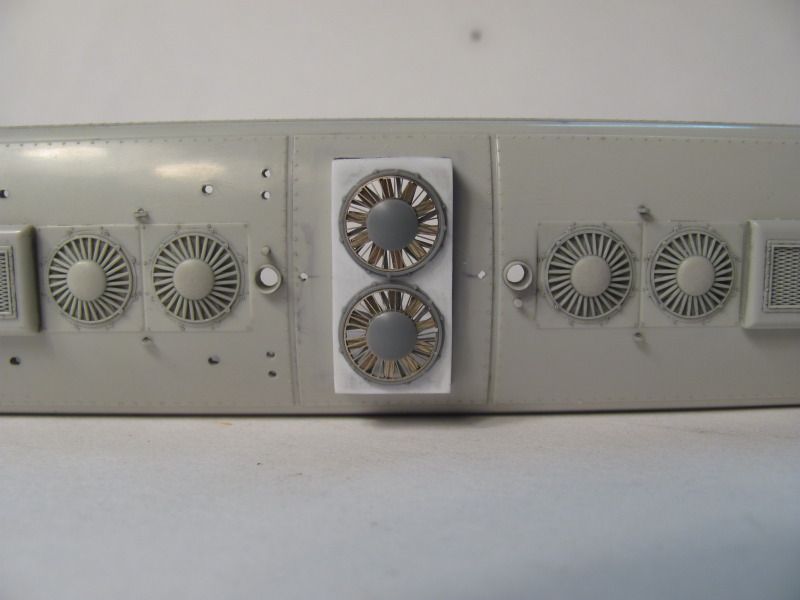 The box stands 9 scale inches above the roof at it's peak. Again, it's just eyeballed. The height of the box varied on some units so consult a prototype picture. Those are not gaps, it's left over sharpie ink. 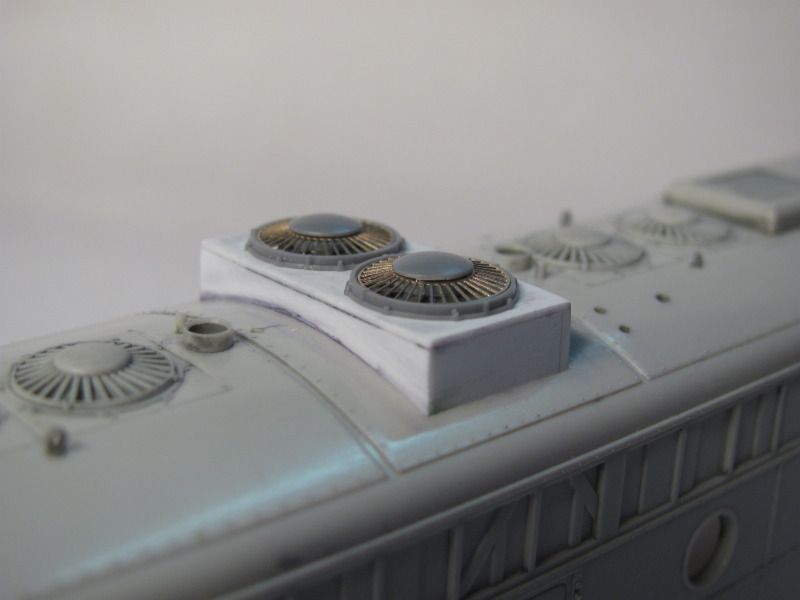 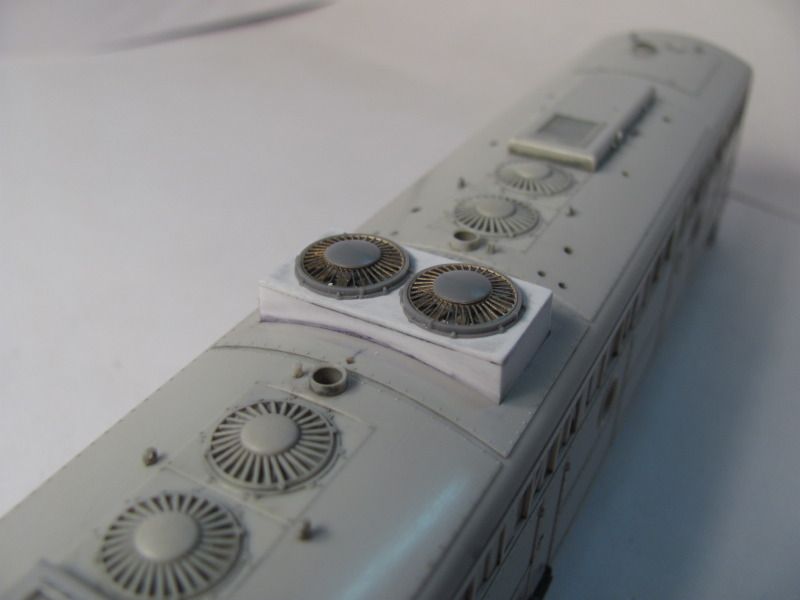 These last pictures show a fatal flaw in the BLI roof. The fans are too small. Either that or C&C fans are too big. I decided to measure a few shells I had on hand. C&C measures .430 from the outside of the rim just above the base. Highliner measures .415, Intermountain .423, and BLI a puny .394. Who's right? In any event, replacing the rest of the fans with Cannon's may become a challenge.  |
|
|
|
Post by fr8kar on Nov 29, 2012 4:44:02 GMT -8
Nice work. I take it those are the new Cannon 36" fans.
The Sharpie trick is pretty clever. I usually use some brown or black pastel chalk and rub it into the scribed line after I've made it to help find it. You're marking the area before you scribe which I can imagine is helpful.
|
|
Deleted
Deleted Member
Posts: 0
|
Post by Deleted on Nov 29, 2012 6:08:36 GMT -8
These last pictures show a fatal flaw in the BLI roof. The fans are too small. Either that or C&C fans are too big. I decided to measure a few shells I had on hand. C&C measures .430 from the outside of the rim just above the base. Highliner measures .415, Intermountain .423, and BLI a puny .394. Who's right? In any event, replacing the rest of the fans with Cannon's may become a challenge. Cannon = 37.41" Highliner = 36.11" Intmountain = 36.80" BLI = 34.28 I'd say the Cannon's are oversized and the BLI's are undersized and Highliners is like Baby Bear's porridge....just right.... ;D The Cannon's look to be about the size of the Proto 2000 fan used on the GP7/9's. |
|
|
|
Post by drolsen on Nov 29, 2012 6:48:26 GMT -8
John - Every update you're able to share is fascinating. I'm definitely going to save this one for my future MARC project. Just to add to what Rich said, your Sharpie technique is definitely one that I'm going to try. I've been scribing lines for kitbashes for a while and have never thought of doing that. I have used the technique (learned from Dave Hussey) of applying Gunze Sangyo Mr. Surfacer to an area on the model and then wet sanding it until the Mr. Surfacer is removed except in the small cracks and gouges that weren't visible before. That's come in handy a bunch of times, but I like your technique for prior to cutting. I decided to measure a few shells I had on hand. C&C measures .430 from the outside of the rim just above the base. Highliner measures .415, Intermountain .423, and BLI a puny .394. Who's right? In any event, replacing the rest of the fans with Cannon's may become a challenge. If I was a betting man, I would put my money on Highliner, with Cannon a close second. I'm not sure if Highliner or Cannon fans would be easier to install, but I think you could insert pairs of Highliner fans into cutouts in the roof as an entire section, since they are molded into their square mounting plates. I think you'd have to cut the F-unit fans into single fans with mounting plates, then glue the pairs back together, because they have a gap and a hole in the middle of each pair for the exhaust stack (photo from Walthers):  Maybe easier than adding individual Cannon fans, but of course you'd have to buy the Highliner parts and etchings. Dave |
|
Deleted
Deleted Member
Posts: 0
|
Post by Deleted on Nov 29, 2012 8:47:51 GMT -8
This is my RTA ex-CNW E8A with Highliners fans for the HEP cooling.  I cut the fans apart and then glued a piece of strip styrene on the back to join the two separate castings together. The outer "box" is strip styrene which is glued is cavity I cut (like John) in the non-dynamic hatch. |
|
Deleted
Deleted Member
Posts: 0
|
Post by Deleted on Nov 29, 2012 9:21:53 GMT -8
Highliner fans with Plano material for guards.  |
|
|
|
Post by drolsen on Nov 29, 2012 9:49:25 GMT -8
Jim, that looks great! It actually looks easier to inster the whole Highliner fan with square baseplate into the roof, since you don't have to worry about preserving the bolt detail around the original fan as you cut it out. I'll keep that in mind if / when I start work on my own project.
Dave
|
|
|
|
Post by onequiknova on Nov 29, 2012 14:23:06 GMT -8
Thanks guys. Here's what the hatch looks like. for the model, I plan to duplicate the flat plate on top with shim brass or .005 styrene and use Archer rivet decals to represent the bolt heads. (the Cannon fans are not glued on yet.) 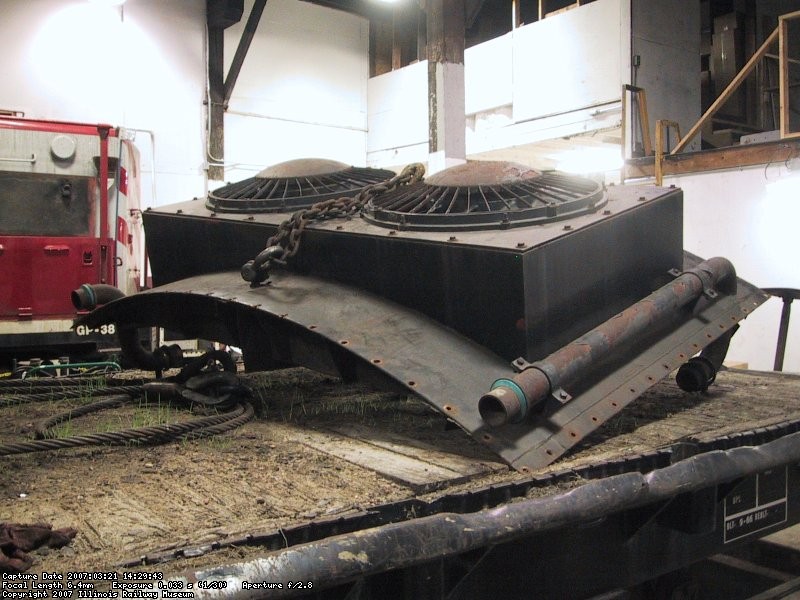 Re: the Sharpie. I started using it when I was scratchbuilding steam engines with brass. Guys use a blue dye to coat metal before marking/scribing it, being frugal, I used a Sharpie instead of buying the dye. The scribe lines show up much better in person than than do in the photo's. My first thought after finding out about the fan issue was to use Highliner fans instead. Problem is, I already spent the money on the Cannon fans, and finding Highliner parts is problematic these days. I have a couple ideas to make the Cannon fans work. |
|
|
|
Post by drolsen on Nov 30, 2012 19:28:28 GMT -8
Here's what the hatch looks like. John, that's a fantastic photo for modeling purposes. It's rare to find photographic information like that to use in modeling a rebuilt detail like that on a diesel. Thanks for sharing. Dave |
|
Deleted
Deleted Member
Posts: 0
|
Post by Deleted on Dec 1, 2012 5:35:17 GMT -8
Here's what the hatch looks like. John, that's a fantastic photo for modeling purposes. It's rare to find photographic information like that to use in modeling a rebuilt detail like that on a diesel. Thanks for sharing. Dave Here are more photos from the album www.irm.org/gallery/MARC91www.irm.org/gallery/967B-August2nd2007 |
|
|
|
Post by drolsen on Dec 3, 2012 8:04:35 GMT -8
Thanks a lot, Jim, that's a great resource, especially since I want to build a MARC unit.
Dave
|
|
|
|
Post by railthunder on Dec 5, 2012 16:40:52 GMT -8
Take a look at the Cal Scale 190-400 Horn. It's a three chime, but the rear facing chime appears to be elevated above the foward facing two that it could be clipped off and the existing horns facing forward would appear to more closely match the prototype than the out of stock/production Overland part.
|
|
|
|
Post by onequiknova on Dec 5, 2012 16:53:12 GMT -8
Actually, the Custom Finishing part I posted earlier turned out to be perfect. The bracket is separate from the "bells", so I can arrange them in any orientation I want. I'll post a picture later.
|
|
|
|
Post by railthunder on Dec 16, 2012 7:04:57 GMT -8
Actually, the Custom Finishing part I posted earlier turned out to be perfect. The bracket is separate from the "bells", so I can arrange them in any orientation I want. I'll post a picture later. I'm looking forward to it. I ordered several of them to apply to my CB&Q E9, E8, and E7As for a late 60s just before BN era. |
|
|
|
Post by onequiknova on Dec 16, 2012 9:02:44 GMT -8
this is the Custom Finishing horn.  The only problem is the bells are the same size. I'll either need to substitute one of the bells, or modify one of the existing bells to make it smaller. |
|
|
|
Post by onequiknova on Dec 23, 2012 20:51:13 GMT -8
Sorry for the slow moving thread. I've got my first born due in about 6 weeks, so I've been busy getting ready for that. Still a bunch to do before he's here, but I had a couple spare hours today to spend at the work bench. I decided to model 9908 since there are numerous pictures of it online, and it's preserved within driving distance at IRM. 9906,9907 and 9908 are kind of oddballs compared to the rest of the fleet. They received the taller twin fan box, which I modeled earlier in this thread, and their HEP hatch differs from the rest as well. The rear HEP hatch (ex steam gen hatch) on the rest of the fleet stayed the same size as original, while 9906-08 received a larger hatch. Here's how I went about modeling it. First off I needed to remove the small hatch from the roof. I did this with progressively finer sanding sticks. Starting with 220 and finishing with 600 grit. 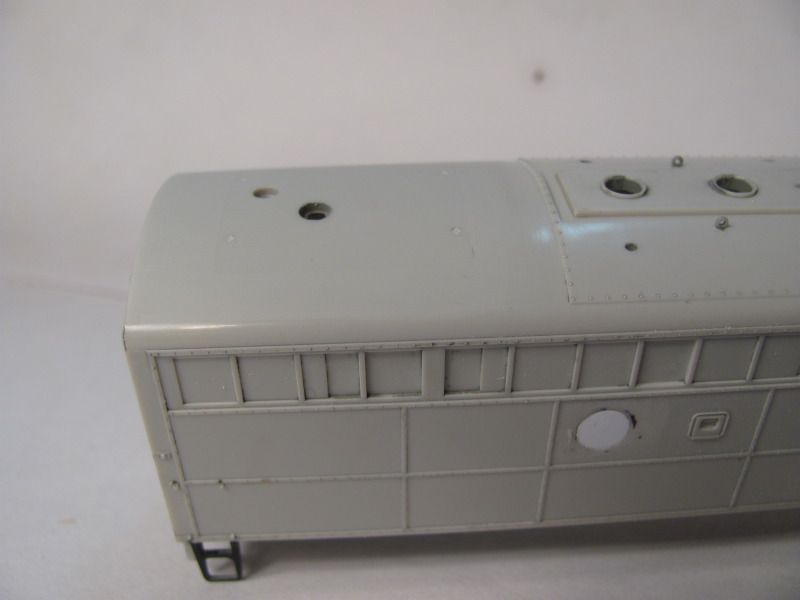 There is a slight shadow left, but I assure you it's dead flat. After determining the size of the new hatch from pictures, I cut it out of .005 styrene and traced it's outline on the roof. I then drilled 1/16" holes around the inside perimeter. These holes will aid in gluing the hatch to the roof. Note I filled in the large holes left over from the steam gen details. 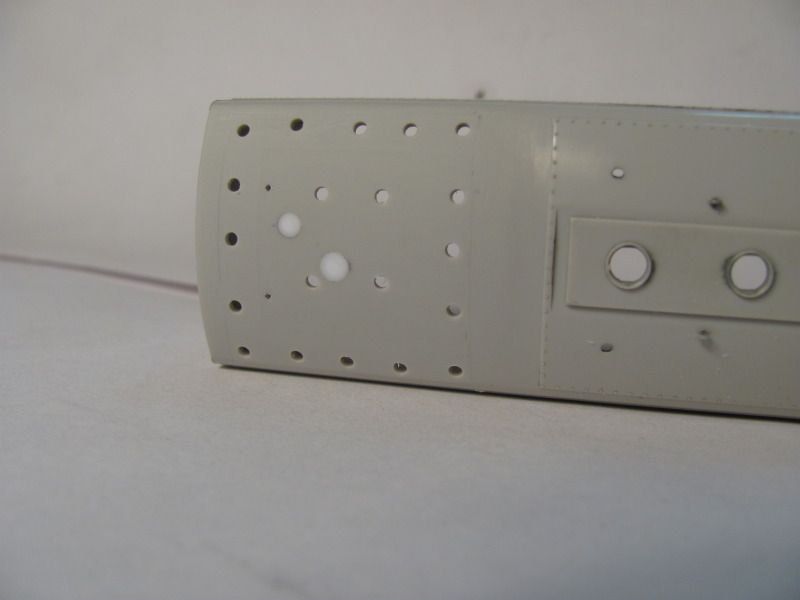 The hatch is then held in place with enough rubber bands to hold it completely flat, then thin CA is added from inside the shell through the previously drilled holes. You don't want to use plastic cement on .005 styrene. It will melt it. 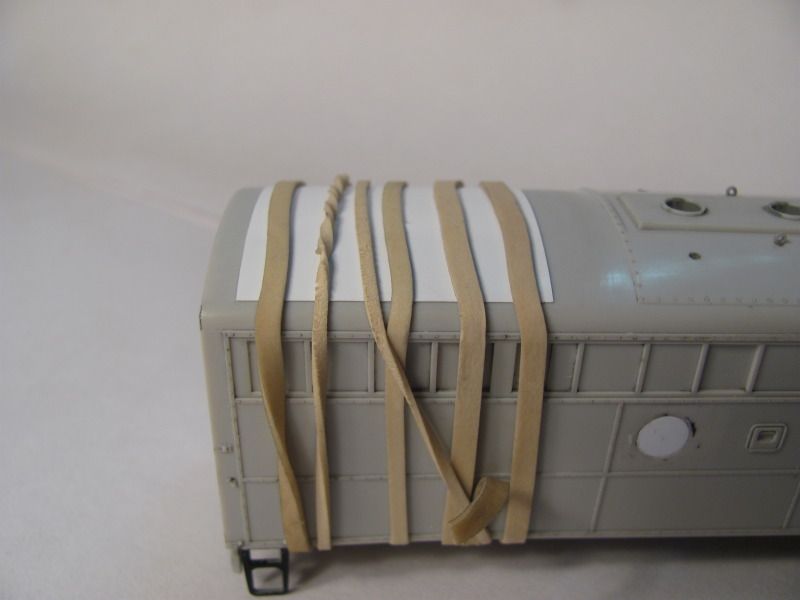 .005 styrene is still a bit too thick for this application, so after the glue dried I sanded the hatch with a 400 grit sanding stick to remove a couple thousands. Archer decals will be used to add the bolt head detail. 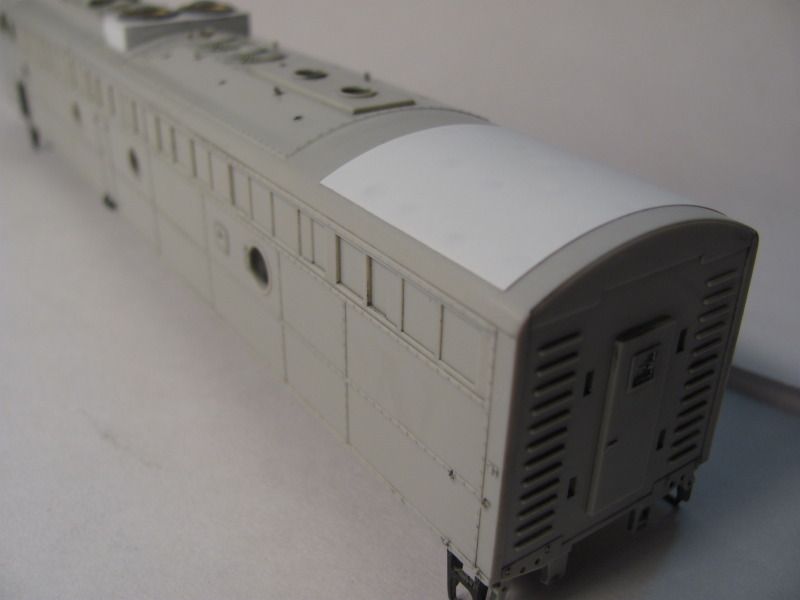 That's it for now. |
|
|
|
Post by BEDT26 on Dec 24, 2012 17:03:53 GMT -8
Looking good I can't wait to see it finished!  |
|