|
|
Post by Donnell Wells on Dec 4, 2012 11:04:48 GMT -8
Hey Guys,Here are a bunch of progress shots of the reworked bluebox shells. Please excuse all of the ugly sanding marks and scratches. This will all be taken care of before painting!left to right: BN F7, CNW Commute F7, BN F7, Late BN F7 w/48" dynamic brake fan, SP FP7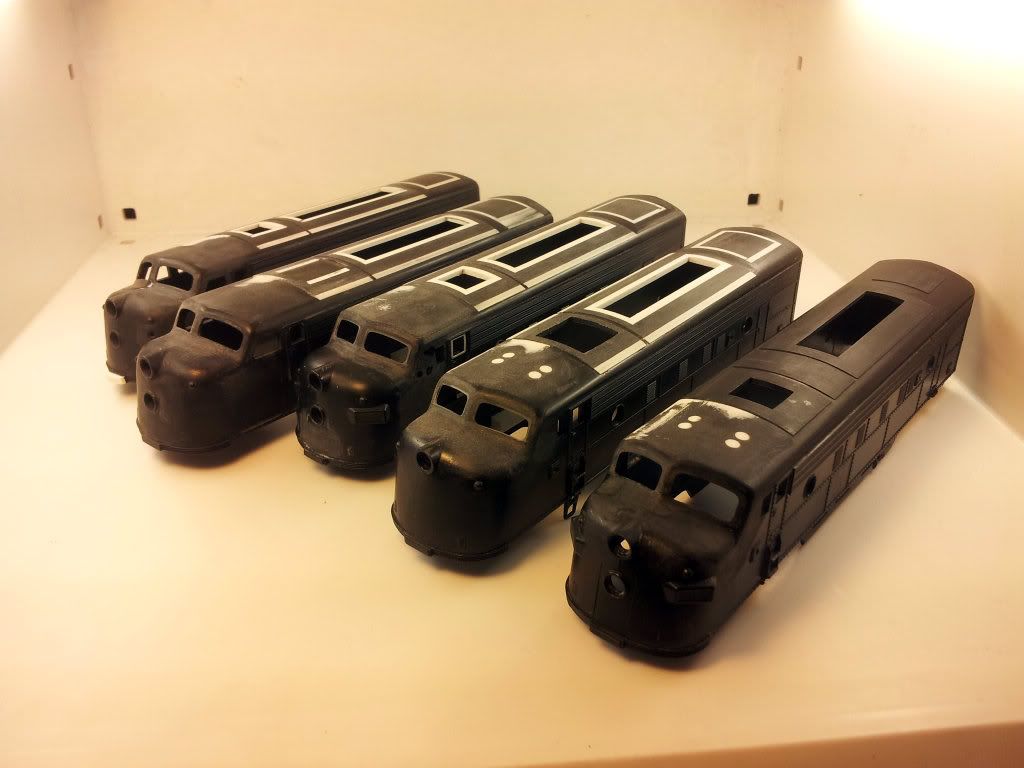 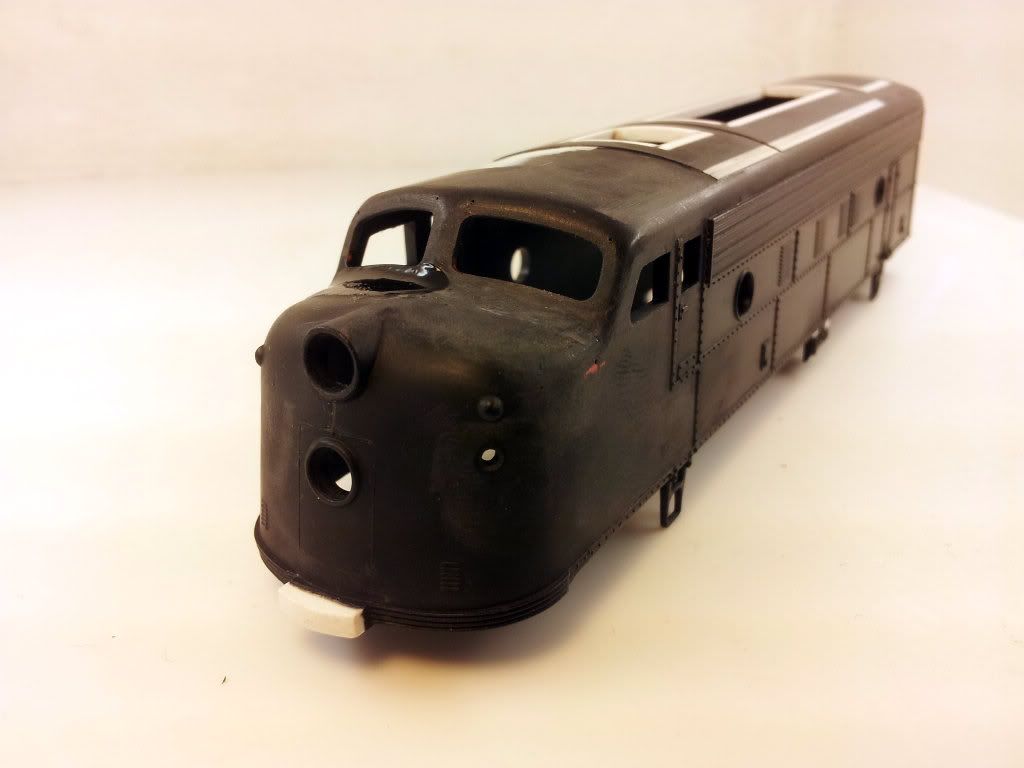 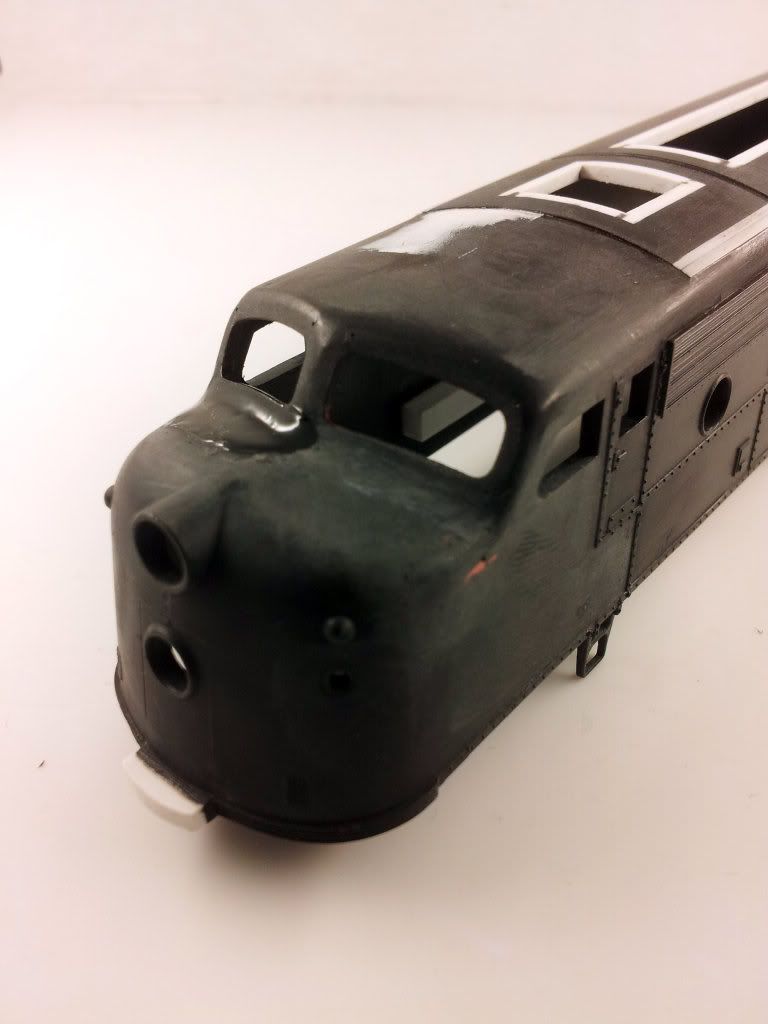 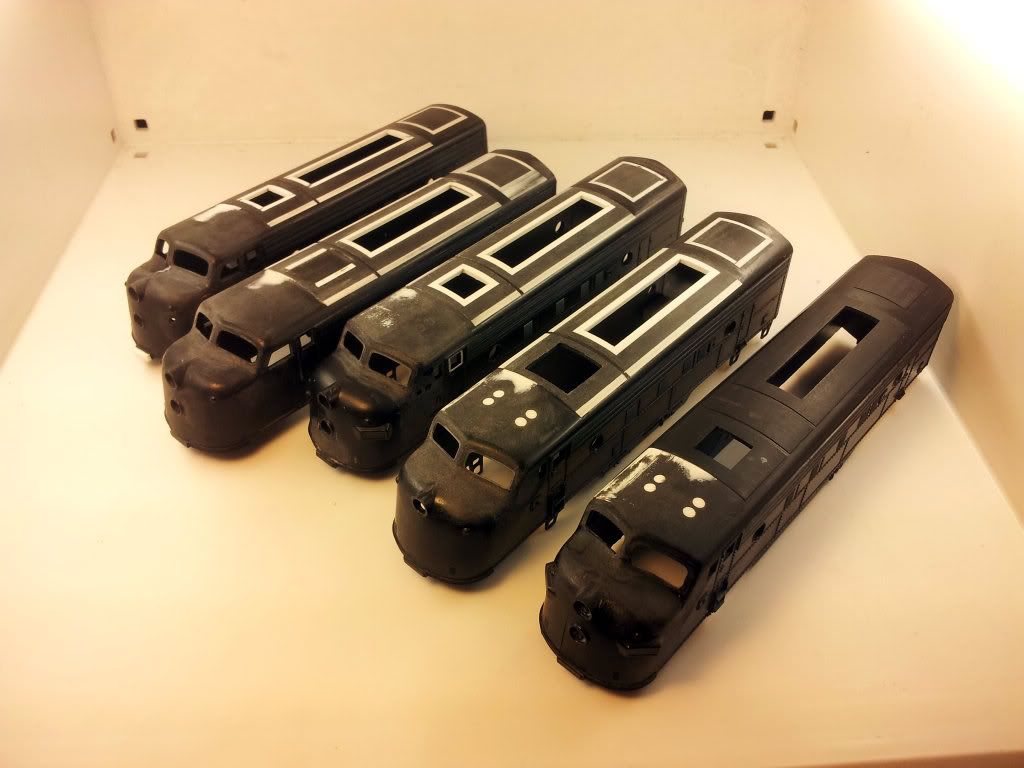 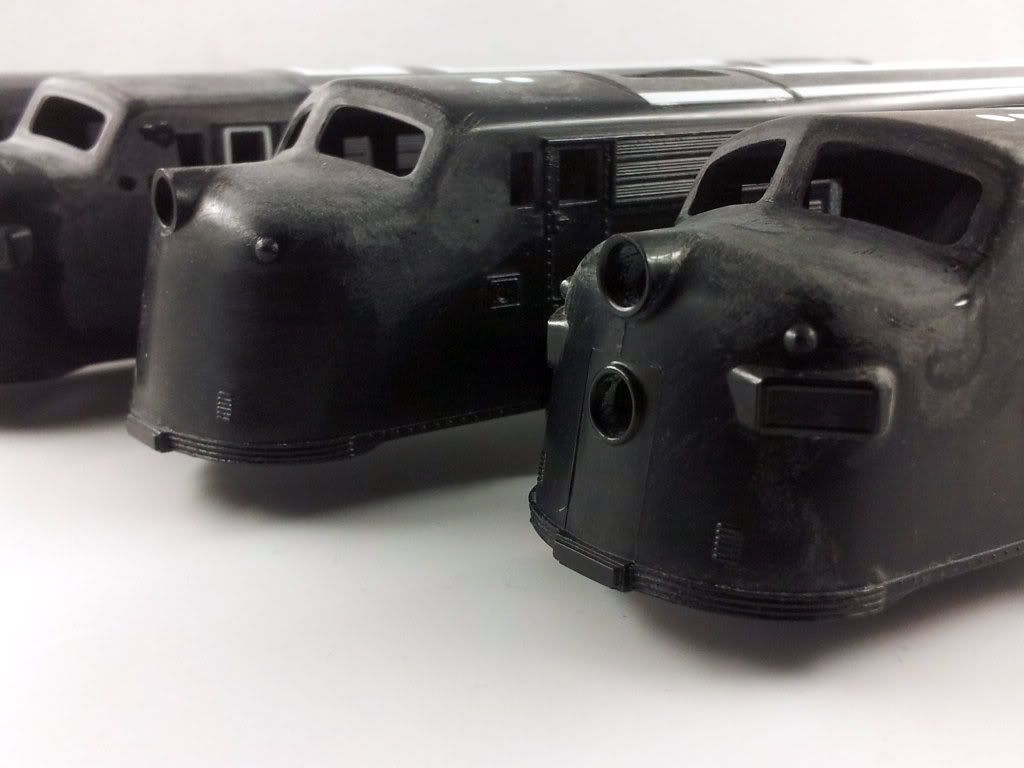 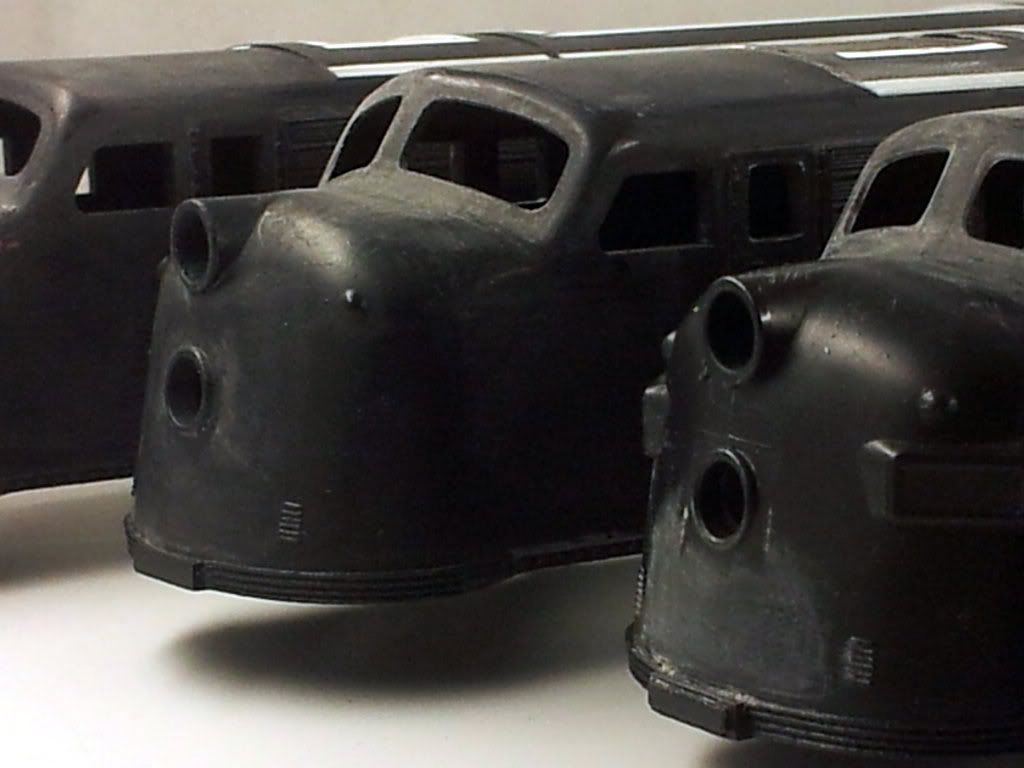 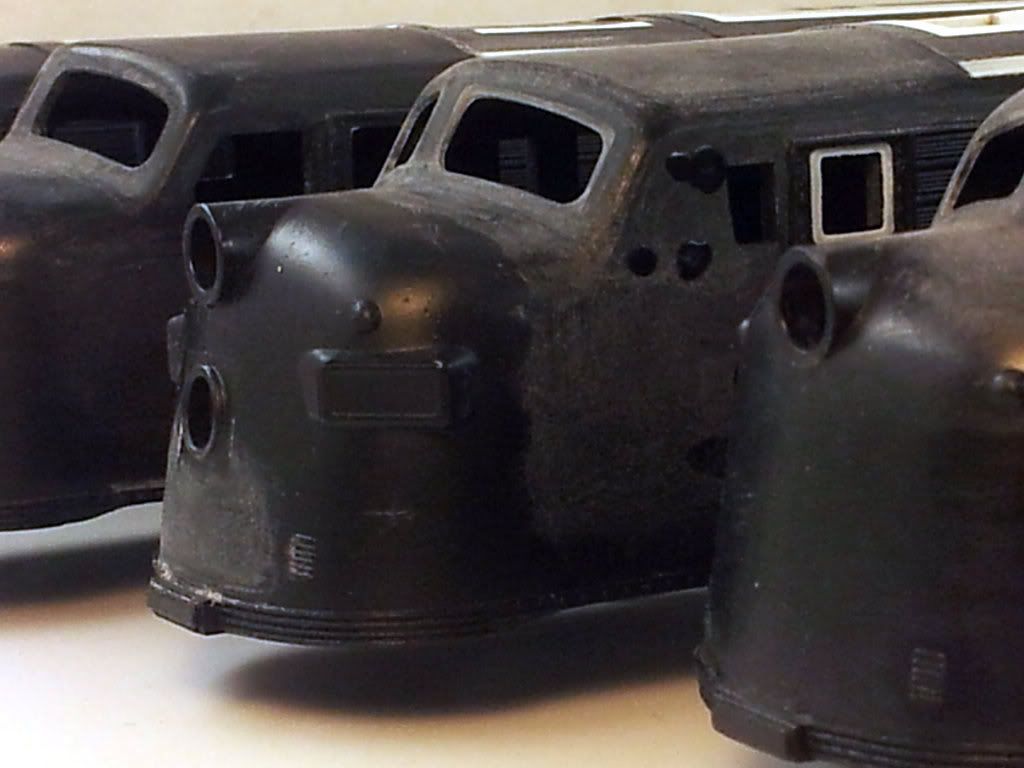 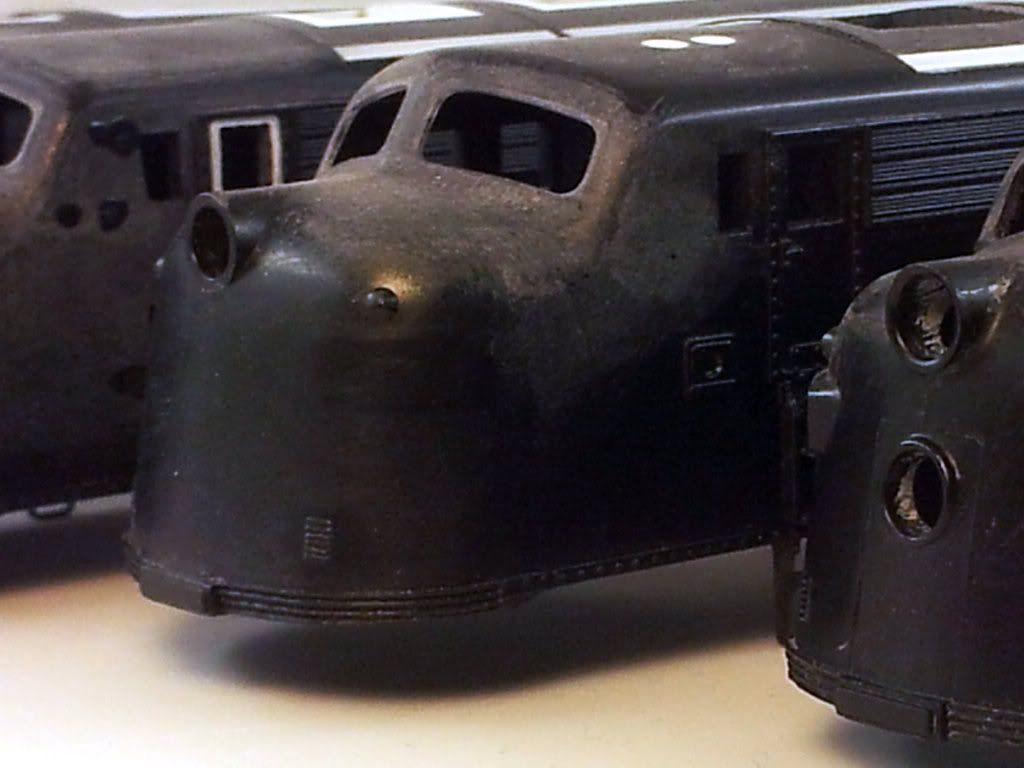 SP FP7 SP FP7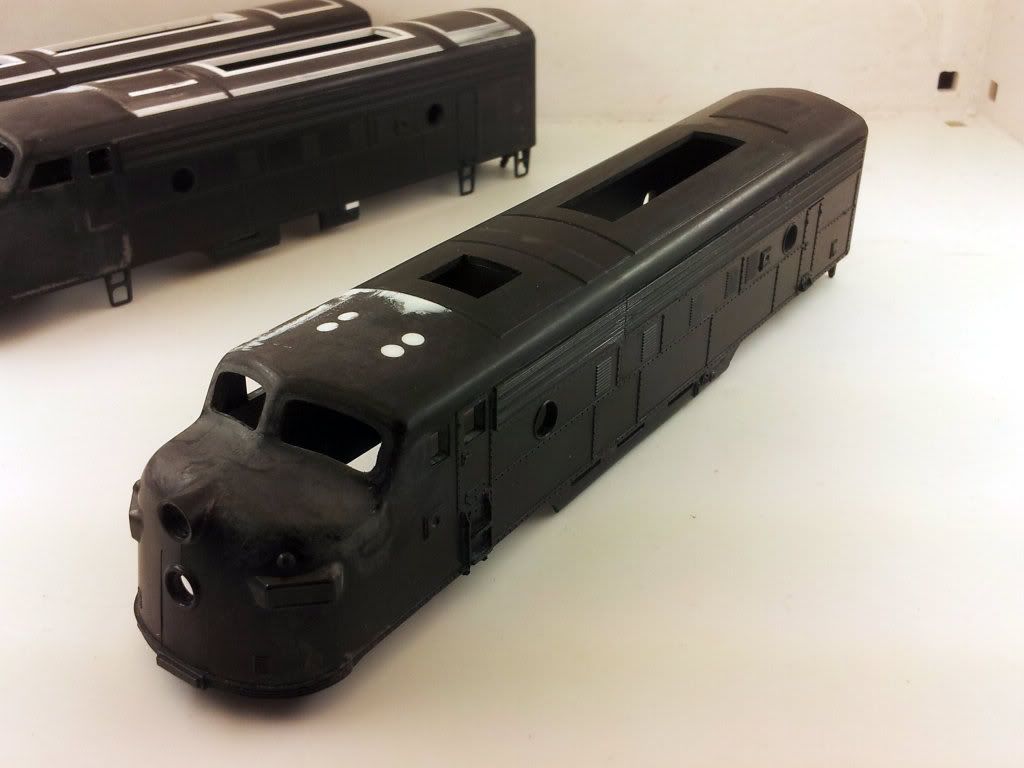 SP FP7 - Two BB F7As spliced together to get the extra 4 feet of body length. SP FP7 - Two BB F7As spliced together to get the extra 4 feet of body length.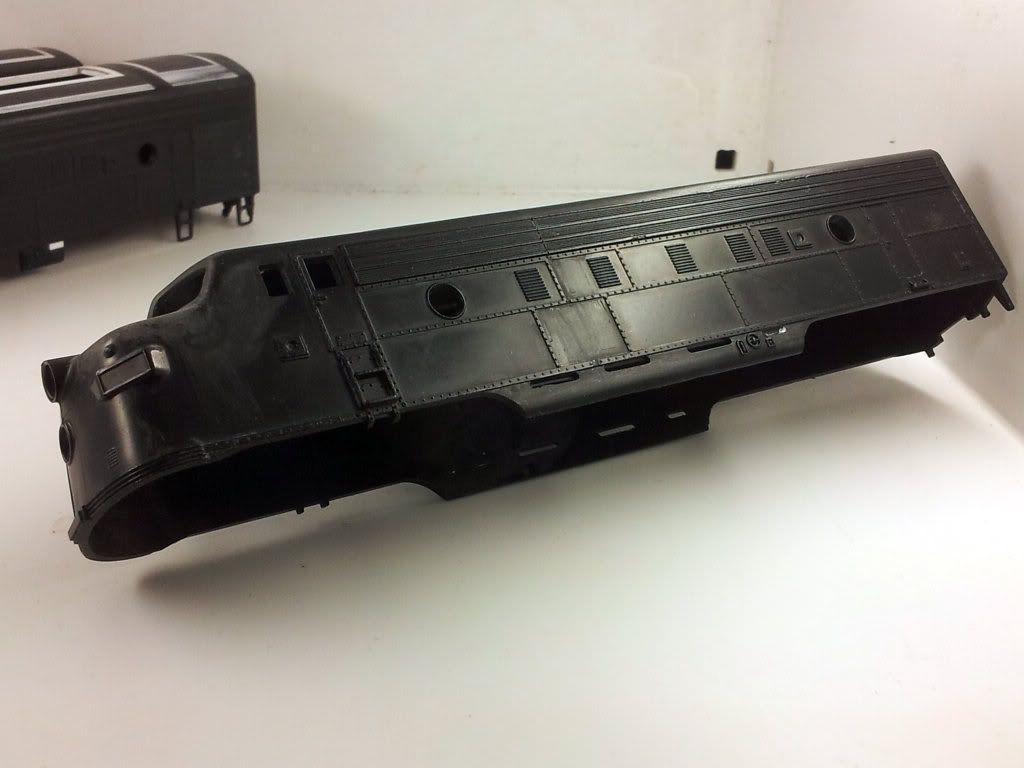 SP FP7 - close up of body joint SP FP7 - close up of body joint 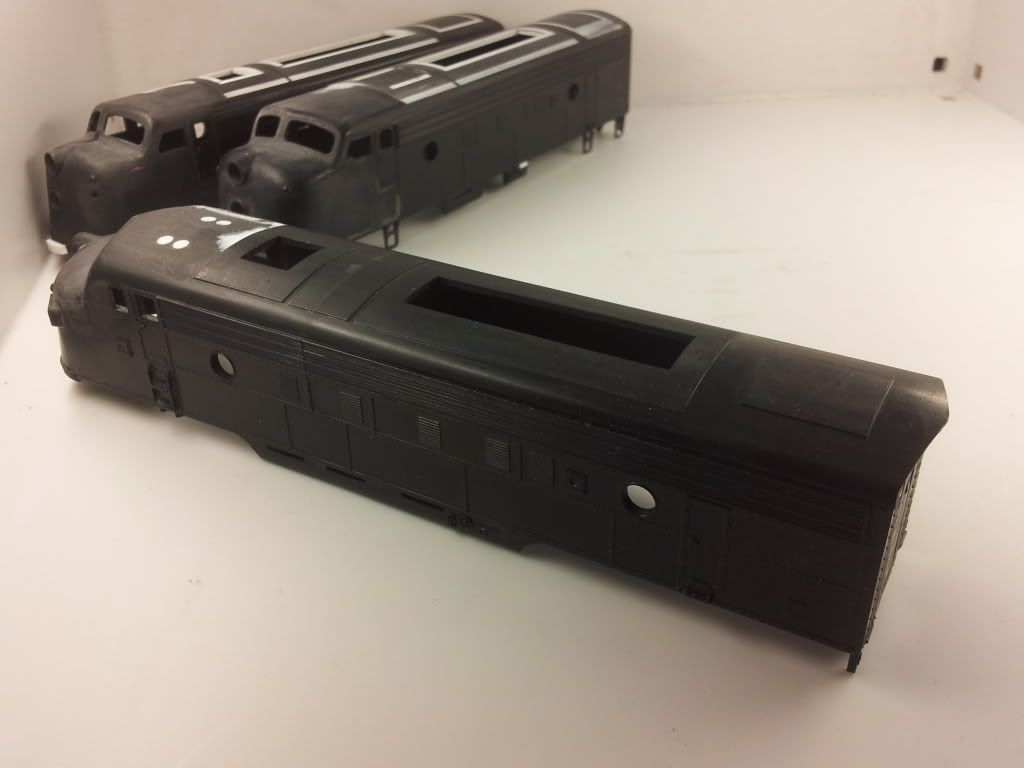 SP FP7 SP FP7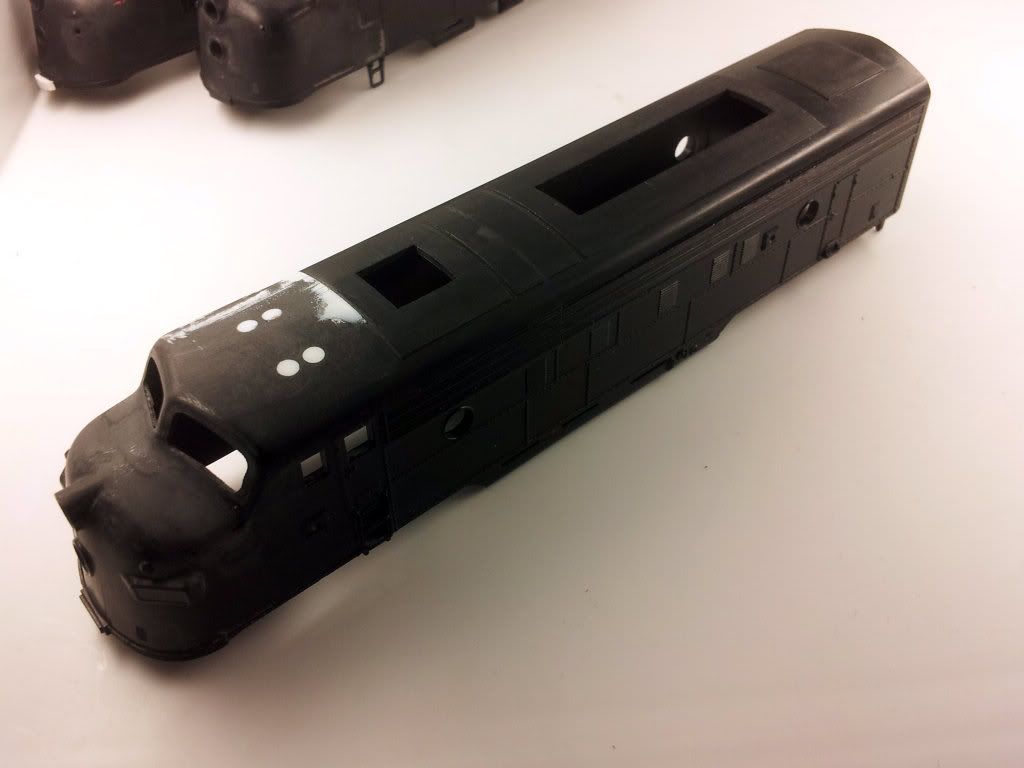 SP FP7 SP FP7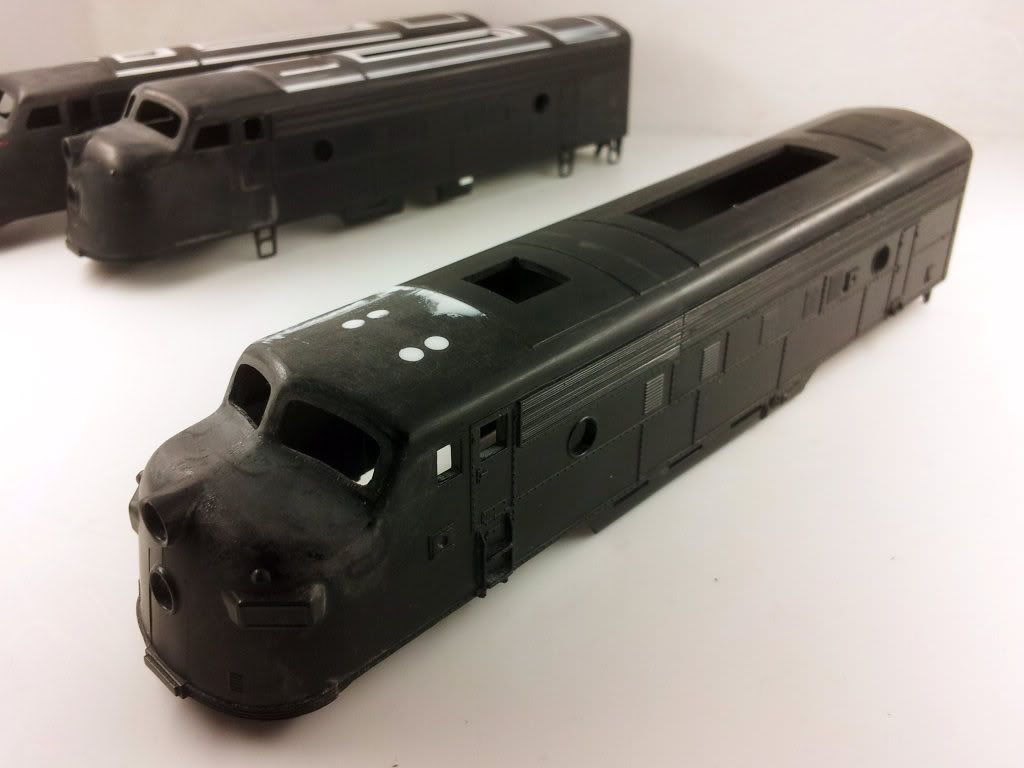 SP FP7 SP FP7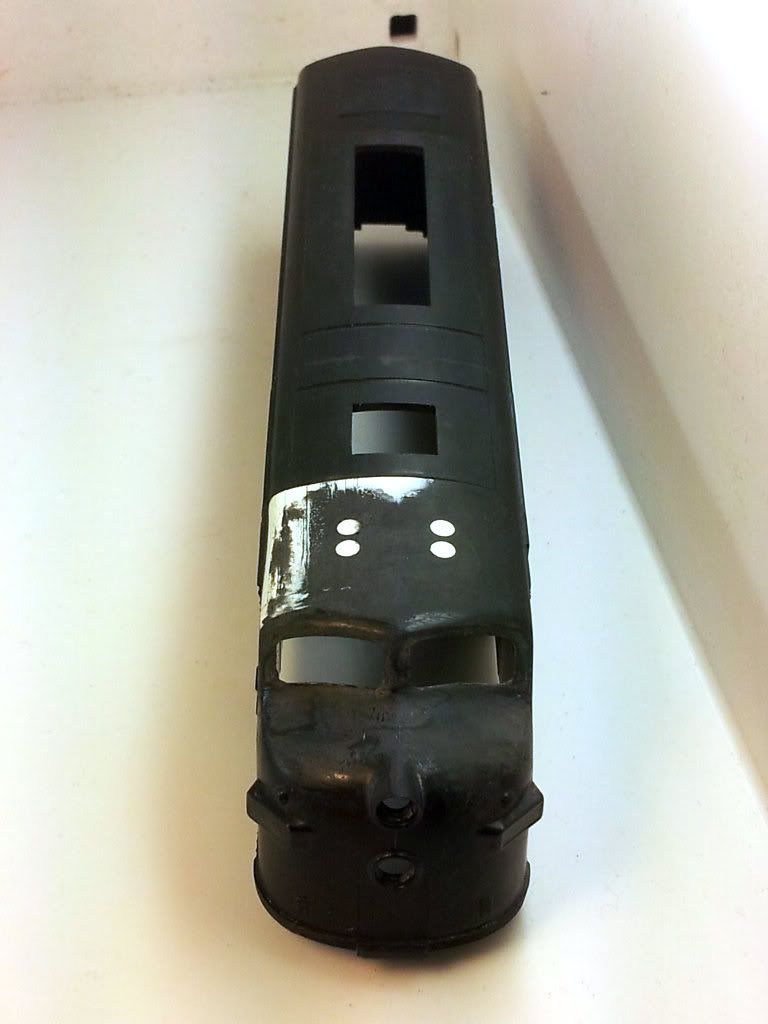 CNW Commute F7 CNW Commute F7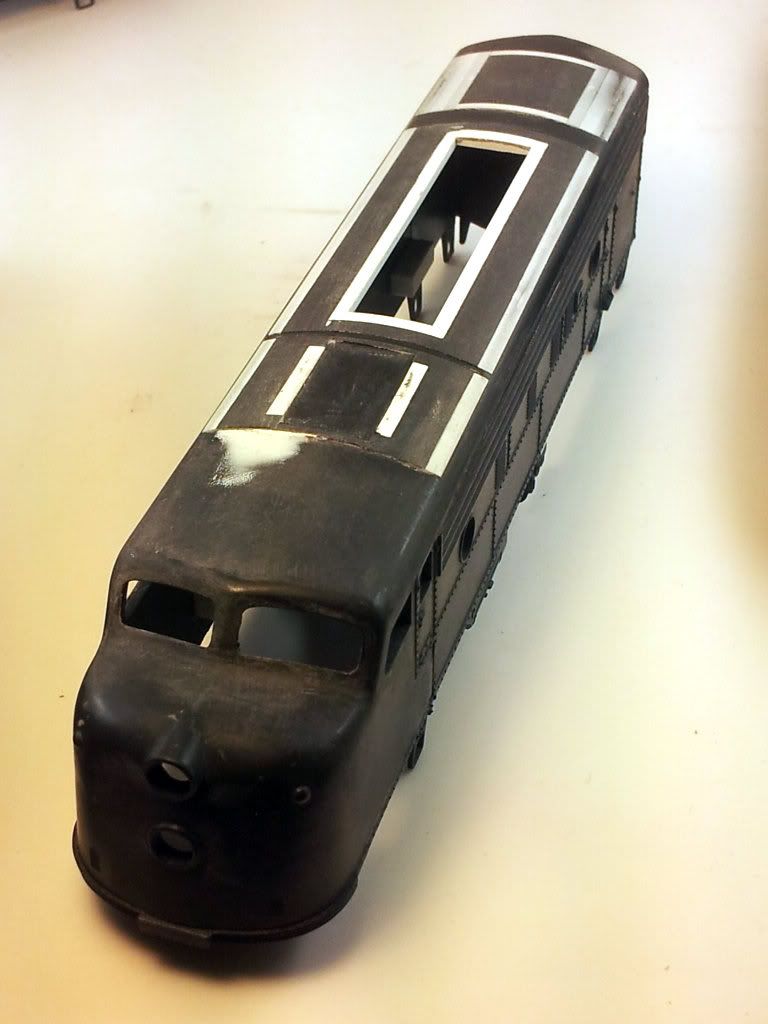 CNW Commute F7 and SP FP7 CNW Commute F7 and SP FP7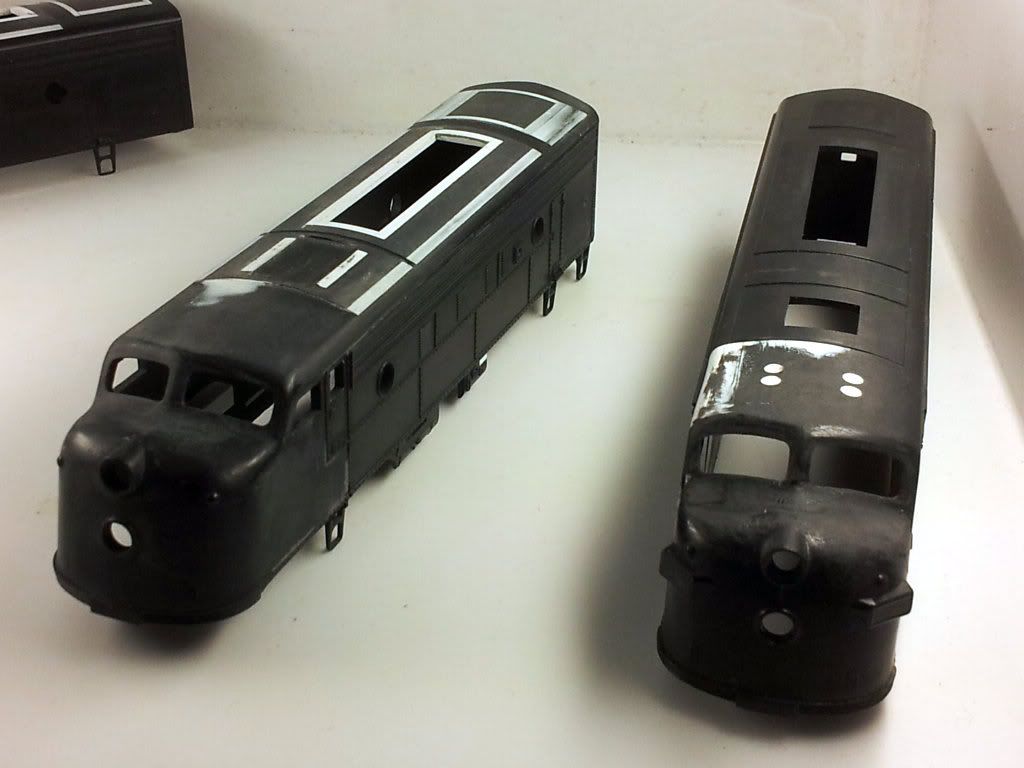 Close up of nose - note the fillet under the windshield Close up of nose - note the fillet under the windshield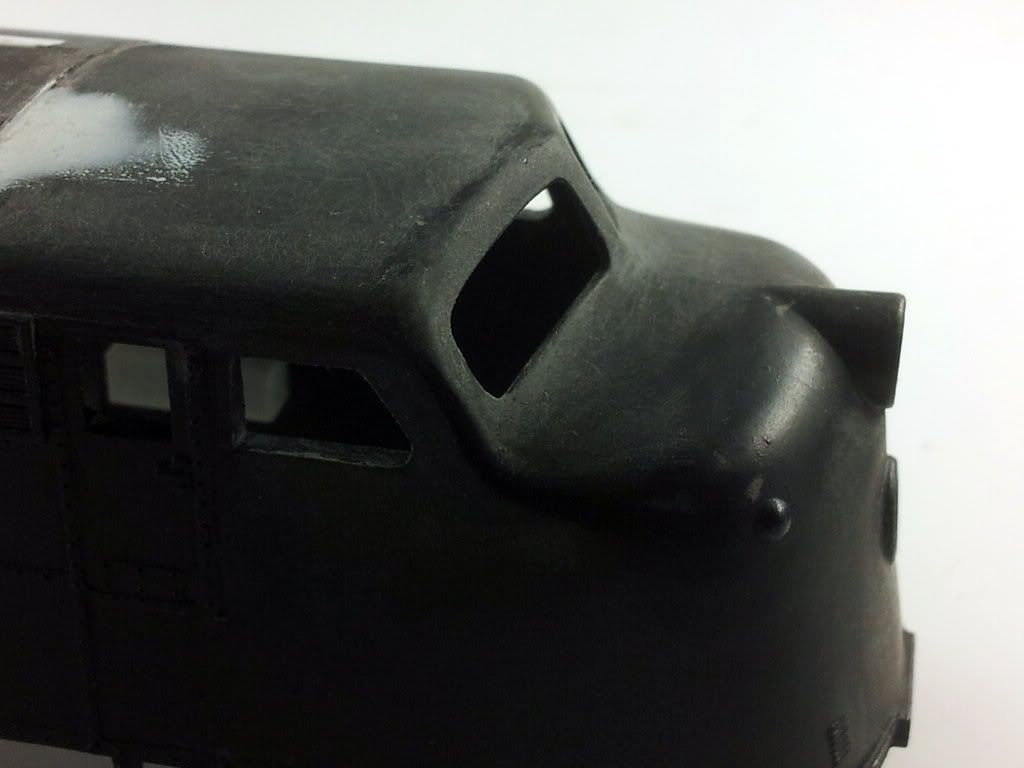 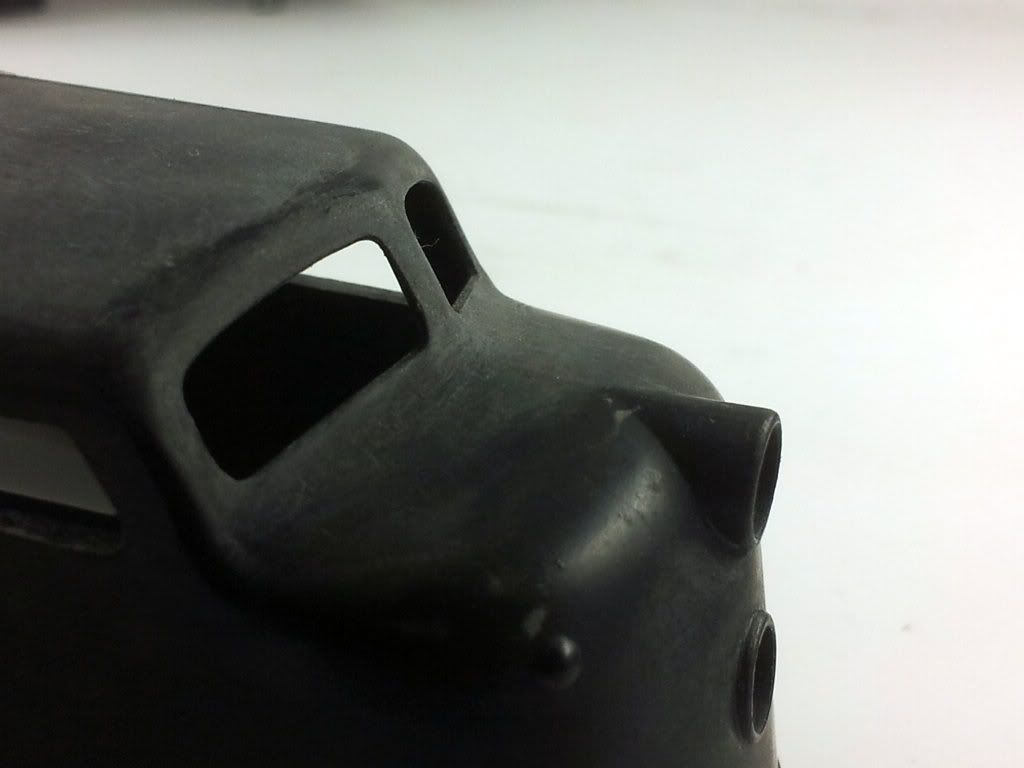
|
|
|
|
Post by onequiknova on Dec 4, 2012 14:04:36 GMT -8
Hey Donnel, I've been waiting for an update on these. What are your plans for the stainless grills? Are you going to mill off the original molded grills?
Did you ever get anywhere with the rapid prototyping? Especially the HEP fans.
|
|
|
|
Post by fr8kar on Dec 4, 2012 15:09:17 GMT -8
It looks like you've removed quite a bit of material on those windshields and noses. How did you do it?
|
|
|
|
Post by calzephyr on Dec 4, 2012 15:47:18 GMT -8
Donnell
That is a great project! Keep us up to date with pictures and detail, please.
Larry
|
|
|
|
Post by riogrande on Dec 4, 2012 17:35:28 GMT -8
Wow, looks major, but the old Globe shell takes a lot to improve it. Then you still have the over sized windshield openings. I think American Ltd, forget their name, build an insert to improve the windshields on Athearn.
Years ago before the advent of the Stewart F9, I embarked on a project to try to model the RIo Grande Zephyr F9 5771 from an Athearn blue box F7 - it was on the way to what you showed, but I never could figure out how do get decent looking vertical slit louvers and in the right place - I gave up and sold the shell as a project shell on Ebay in the early 1990's.
|
|
|
|
Post by el3637 on Dec 5, 2012 12:23:24 GMT -8
What's with the partially blanked side window on the FP? Is this going to represent a rebuild?
I still kind of have to ask why? Unless you're shooting to make a low-cost/no-cost build, or just prove a point... I'd think if you didn't want to pay Genesis prices, or bother with the P2K, BLI, or Intermountain, there are probably still vintage Stewarts available at a decent price out there. And you get a Kato drive to boot.
Andy
|
|
|
|
Post by shoofly on Dec 5, 2012 14:33:13 GMT -8
|
|
|
|
Post by onequiknova on Dec 5, 2012 14:48:28 GMT -8
Take a closer look at the pictures.......  |
|
|
|
Post by Donnell Wells on Dec 5, 2012 23:33:57 GMT -8
Hello guys,
I'll try an answer your questions:
@ onequiknova - I actually have a drawing for grille etchings to fit the blue box F7 A and B units, but not the bashed FP7. I have some Intermountain and Highliner grilles that I test fit, and they are both jus a tad longer than the cast grilles. I considered removing the rear verticle batten strip and repositioning it back a little to fit the available grille etchings as opposed to having a custom run made. Also, I don't think I'll remove the cast grille, as the real grille seem to sit a few inches proud of the carbody. Although, I may modify the grille to add that "see-thru" effect! I really am open to anything at this point.
I did finish the drawing for the HEP fans, however, at the time 3D printing wasn't where I needed it to be for the quality I was looking for, and now that I have a better grasp on how Jim did his fans, I amd highly considering his method, especially since they will be covered by a grille anyway...
@ rch - I actually added material to the windshield area and then contoured it with a more correct profile. I took a scrap Athearn shell and "liquified" the plastic with Tamiya Extra Thin Cement. I applied the "liquid plastic" to the area under the windshield (after filling in and reshaping the the windshield), let it dry for a few days until all of the solvent was evaporated, then used a series of sanding and filing tools to reshape the fillet.
@ riogrande - The windshields were the first thing I had intended to change. I used two methods; using the American Model Builders laser-cut inserts, and second, filling the windshield opening with styrene and using a Genesis/Highliner window insert as pattern to draw new windshield contours.
Honestly, the modifications I am making to the original F7 could actually be made to the tooling because all of it would be subtractive, meaning material would only have to be removed from the mold. Now, some would say, "Why bother?" But I say, "Why not?" Yes, I know there are much better alternatives, Highliner, Intermountain, Walthers Proto, Stewart, LL Proto 1000, and even the all new Bachmann (yes Bachmann) F7, but I want to use this shell.
@ el3637 - the partially blanked window is a fill for the purpose of reshaping the incorrectly shaped side cab windows. Regarding why I chose this route, well...simply because I could. I'm not trying to prove any points, or make any statements.
As I mentioned earlier, there are many much better alternatives. In fact, I have more than 20 Genesis F-units, 16 complete Highliner A and B kits, and at least 10 matching Genesis drives. So, cost is not an issue. I have over 30 blue box F7 frames, of which some will go under a few of those Highliner shells after they are modified!
Along with the blue box units, I have Model Power E8/9s that will get a treatment similar to what John (onquiknova) is currently working on. When it's all said and done, and I post a pocture of a finished ABBA lashup hopefully you'll understand my passion for these units. And if you don't, that's okay too!
Donnell
|
|
|
|
Post by shoofly on Dec 6, 2012 3:36:46 GMT -8
I'm down donnell...sometimes great things happen from the most modest of sources.
|
|
|
|
Post by johndmock on Dec 6, 2012 10:14:36 GMT -8
I'll watch for the updates....It's way more work than I'd ever want to do myself.
Quite an impressive amount of work already.
John
|
|
|
|
Post by milgentrains on Dec 6, 2012 11:57:49 GMT -8
I'll watch for the updates....It's way more work than I'd ever want to do myself. Quite an impressive amount of work already. John I'll second that, Sir. I'll be watching for updates also. |
|
|
|
Post by Donnell Wells on Dec 6, 2012 14:24:07 GMT -8
I'll watch for the updates....It's way more work than I'd ever want to do myself. Quite an impressive amount of work already. John
Donnell |
|
|
|
Post by riogrande on Dec 6, 2012 15:09:21 GMT -8
The old Globe shell takes a great deal of work to make improvements that stand up to newer shells such as Stewart or Proto 2000 or Genesis!
Obviously there are some stand out details like the number boards, wind shields, air grills and more that beg for improvement. In this day and age, the challenge is higher than ever!
|
|
|
|
Post by onequiknova on Dec 6, 2012 15:20:03 GMT -8
I'll say, I think the windshields that you patterned after the Highliner glass look better than the American limited inserts. Buying enough Highliner glass for your fleet would be problematic though.
What are your plans for the number boards?
Can you explain your "melted plastic" filler? Approximate ratio, and does it keep, or do you mix some up when you need it?
|
|
|
|
Post by Donnell Wells on Dec 6, 2012 17:49:13 GMT -8
I'll say, I think the windshields that you patterned after the Highliner glass look better than the American limited inserts. Buying enough Highliner glass for your fleet would be problematic though. What are your plans for the number boards? Can you explain your "melted plastic" filler? Approximate ratio, and does it keep, or do you mix some up when you need it?
I think so too John! Also, I will be using clear styrene and sutting my own window inserts as the filing process does not produce exact copies. Nonetheless, the results are sill eons better than the original!
Regarding number boards, I'll be using the Details West part. I believe they were made specifically for this shell (if not, it's still good enough!) The plan is to drill a hole for the mounting pin, and then, with thick or gel CA secure it to the shell. Once the glue sets, I'll fill the gap around the numberboard with thin or medium CA. What this will do is further secure the number board, and will also add a small fillet between the part and the shell, making a seemless transition between the two.
The "melted" or "liquid" plastic is my preferred method of filling holes in plastic models. I usually use a scrap piece of plastic from the model I'm working on, or a piece of the sprue because it's the same color as the model.
There are two ways I melt the plastic. The first is by adding drops of Tamiya Extra Thin Cement on the flat surface of the donor or scrap shell, enough to make a puddle about 3/4" in diameter. Let this sit for a few minutes until the plastic softens. Make sure to keep this puddle "wet" by periodically adding more cement. The other method starts by cutting the scrap shell into tiny 1mm (roughly) sized pellets.
Pile the pellets into a small metal dish or container (I used the inside of an Athearn BB F7 frame), and flood them with TETC. It will take a while, but the small size of the plastic pieces will make it easier for the solvent to permeate and soften the plastic, effectively turning it to liquid plastic.
There is no mixing ratio. I just keep the area on the shell, or the pile of pellets wet. You'll know when you need to add more solvent because the plastic will begin to thicken up.
Donnell
|
|
|
|
Post by valenciajim on Dec 8, 2012 6:08:58 GMT -8
Donnell---my hat is off to you. You are experiecing model railroading the old fashioned way. There is a lot of staisfaction from building difficult kits or doing difficult projects. Most of us don't have the time and with all of the great new RTR products we no longer have the patience to do these sorts of projects. I am really inspired by your project. Please continue to show your progress in this thread.
|
|
|
|
Post by Donnell Wells on Oct 18, 2014 18:56:04 GMT -8
I suppose it's time for an update...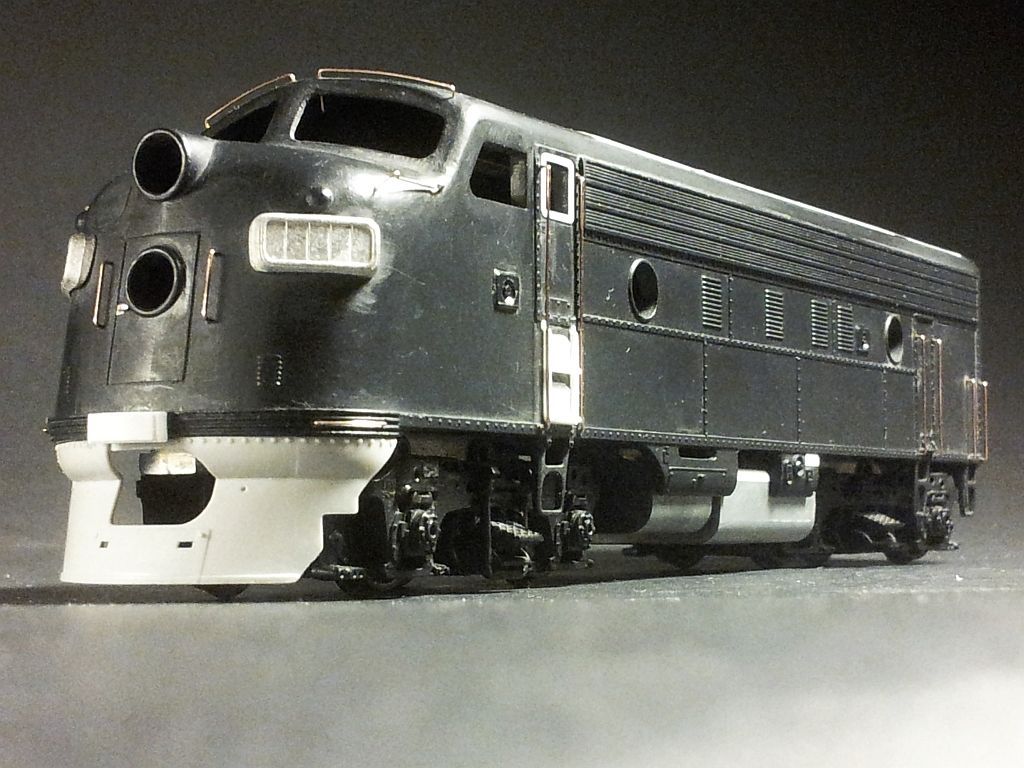 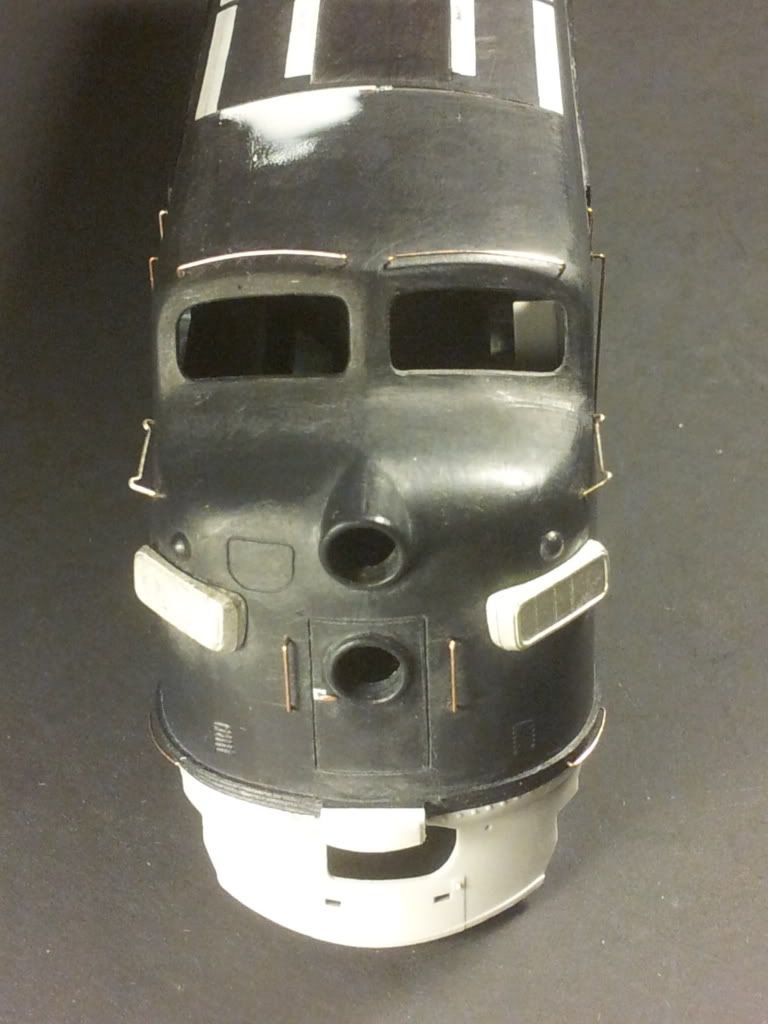 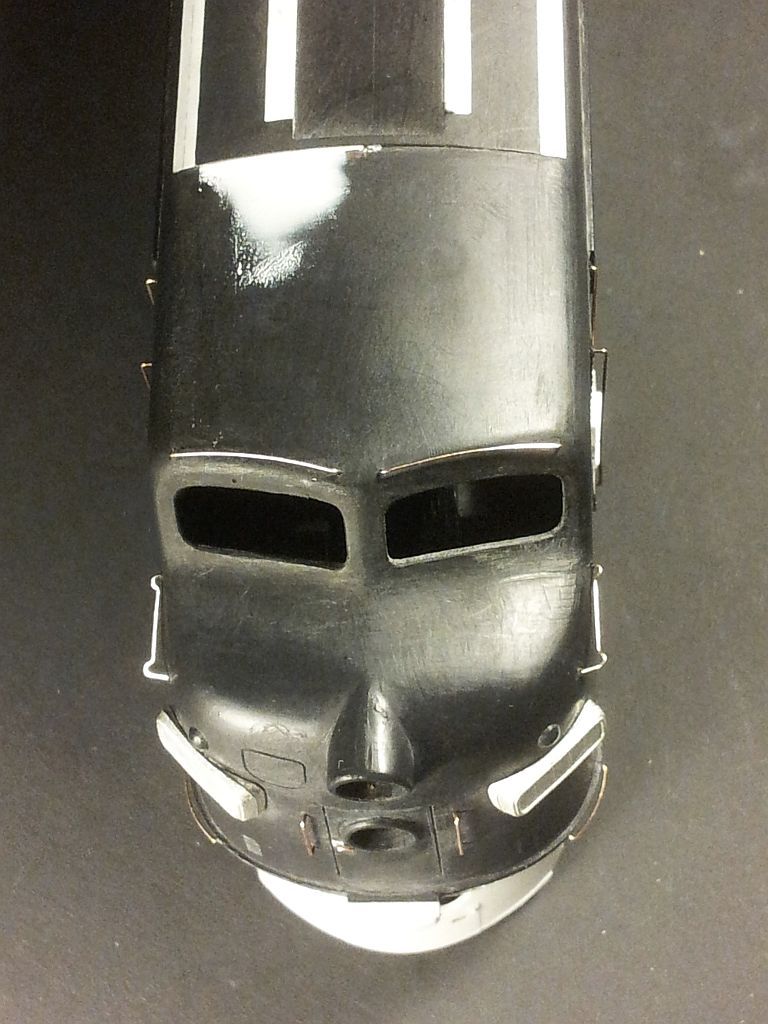 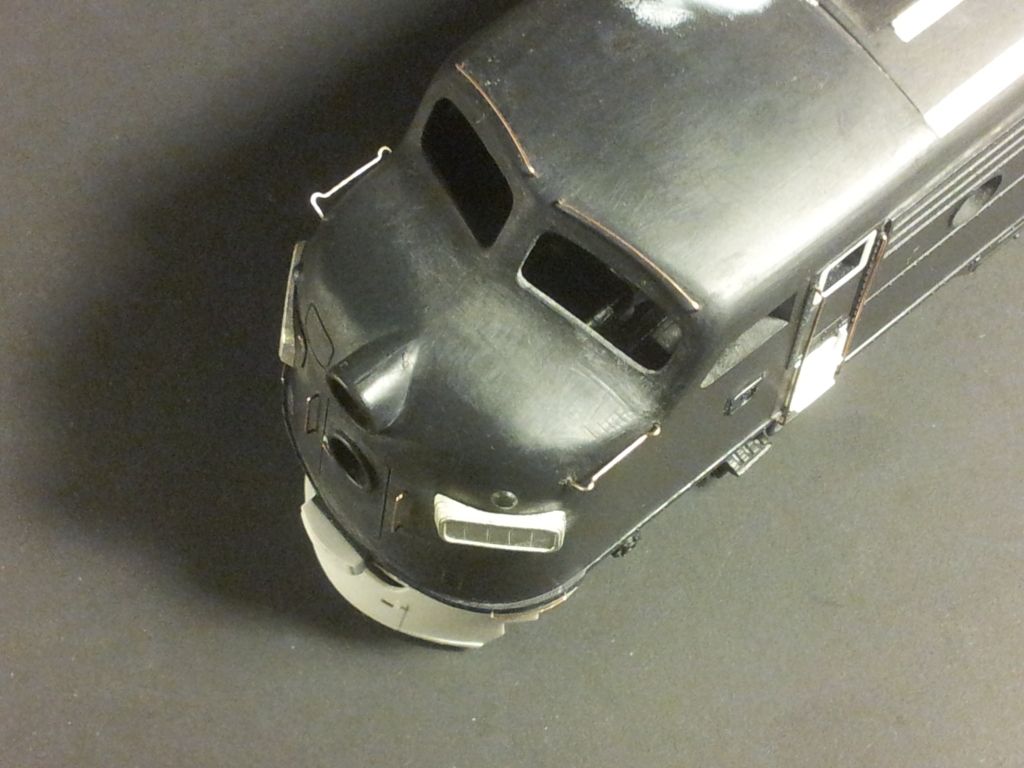 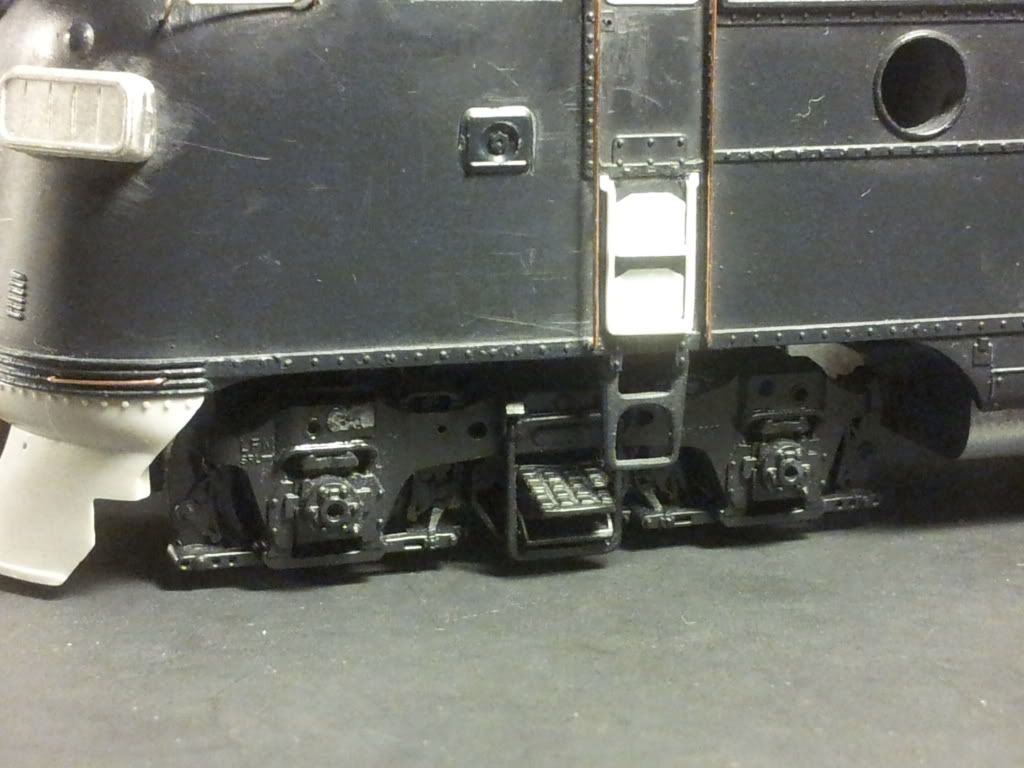 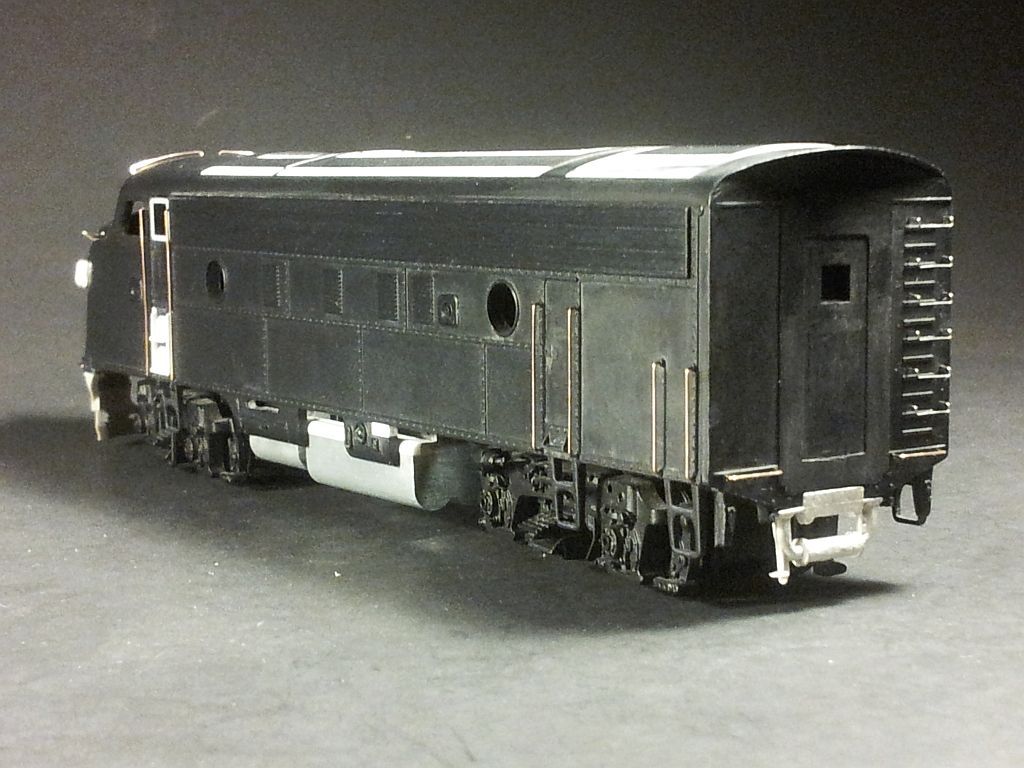  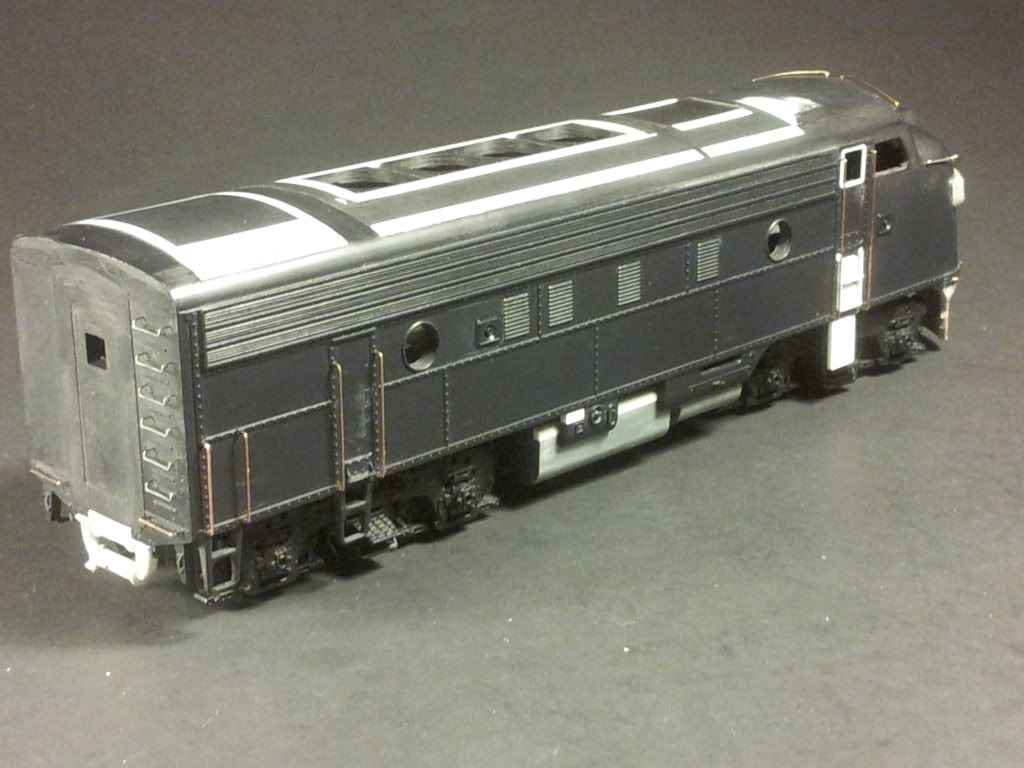 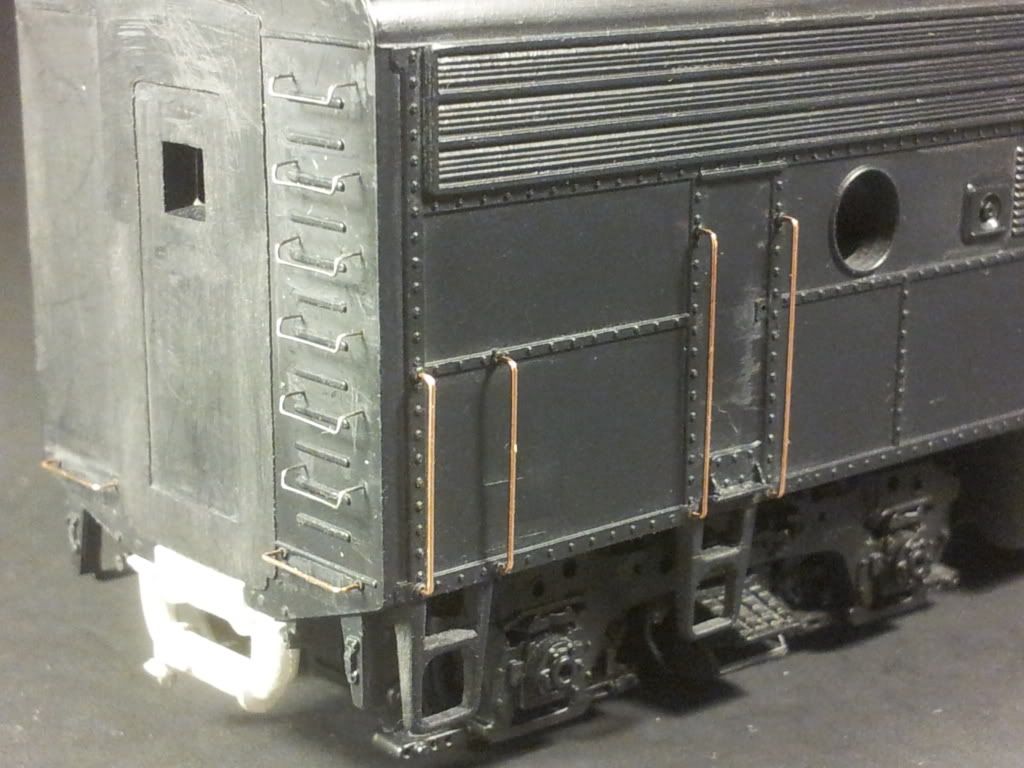 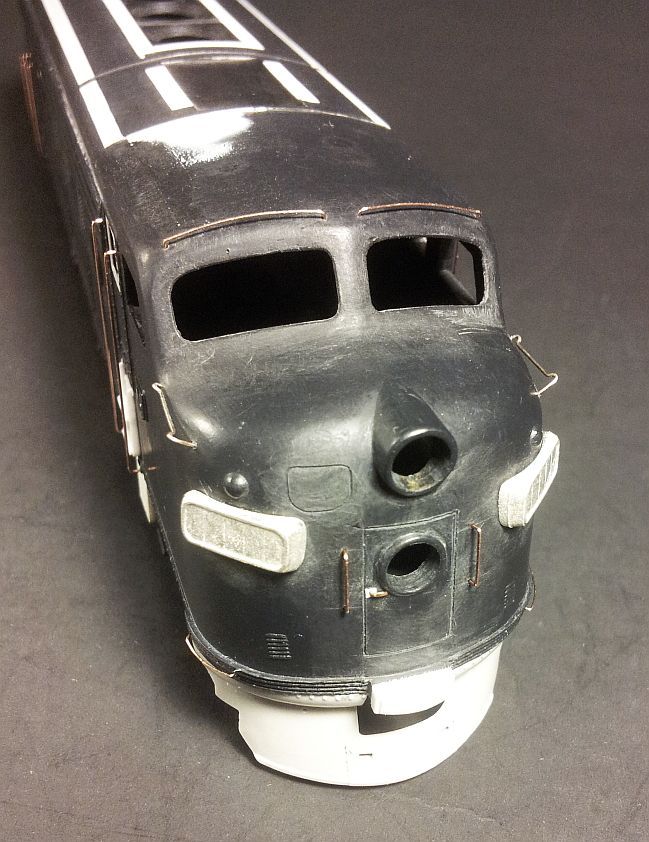
|
|
|
|
Post by onequiknova on Oct 18, 2014 19:56:11 GMT -8
Donnell,
That is really some astounding workmanship. What really jumps out at me is how cleanly you scribed the nose door and MU door. Care to share your method?
|
|
|
|
Post by catt on Oct 19, 2014 5:13:10 GMT -8
Donnell,
to my way of thinking this has to be more fun and satisfying than opening a box and putting the loco on rails.My someday F projects aren't blue box they are ATLAS FP-7s but they still will get some serious "remodeling" including new Hep units.
Looking forward to more updates cause these are looking good.
|
|
|
|
Post by Donnell Wells on Oct 22, 2014 5:36:15 GMT -8
Donnell, That is really some astounding workmanship. What really jumps out at me is how cleanly you scribed the nose door and MU door. Care to share your method?
Hello John,
The MU door was carefully scribed using a couple of templates that I cut and shaped from brass strip and held against the nose. I can't remember if I used a pin or sharp hobby knife to lightly trace the edge of the template, but I do know that I didn't do it all in one shot. I used a series of light strokes, removing just a little material at a time allowing the groove to successively get deeper until I reached a depth I felt looked good.
The nose door was scribed using a small straight edge for the vertical portions, and for the horizontal scribe marks, I think I used a custom curved straight edge made from brass. The same method used to scribe the MU door was used to scribe the nose door.
Donnell |
|
|
|
Post by bar on Oct 22, 2014 7:37:12 GMT -8
Donnell, good to see honest to goodness craftsmanship endures. Just a tip -- when I cut inspection holes in the skirting of my Proto BL2, I used a motor tool to carefully thin the shell in the area. You may want to consider this around your cab side windows and side skirts since the thick shell shows in your closeup photos. For standard layout viewing of the rest of my locos, I plan to forego further shell surgery and switch to black decals to replicate the inspection holes!
|
|
|
|
Post by benscaro on Feb 15, 2015 8:42:49 GMT -8
What an interesting thread. And the F in semi finished condition does look good.
I'm trying to come up with a decent F nose/cab for TT scale and this does give me food for thought.
Cheers, Ben
|
|
|
|
Post by catt on Feb 16, 2015 7:09:07 GMT -8
Ok Donnell,Where are the updates/Your F fans are waiting.  |
|
|
|
Post by Donnell Wells on Feb 16, 2015 20:44:11 GMT -8
Hello Johnathan,
Unfortunately, I have been unable to do any modeling since May of last year. I am in the process of designing a small workshop that will hopefully incorporate everything I'll need to aid in model building. This project is probably the one I am most anxious to finish! Thanks for asking!
Best Regards,
Donnell
|
|


