|
|
Post by Great-Northern-Willmar Div on Jan 10, 2015 11:42:10 GMT -8
I'll add the steam lines, but I'm not sure I'll make it extendable, as cool as it is. I need to figure out what the steam line mounts to under the pilot. |
|
|
|
Post by onequiknova on Jan 16, 2015 21:25:51 GMT -8
Just a small update. After finding out what the back of an E8 tank should look like, I set out to try to model it correctly. I needed to add that round cut out and sump shown earlier in the thread. The sump was easy enough, I just had to mill a flat spot on the bottom, then glue on a piece of .080"x.050" styrene strip. The round depression took a little more thought. I ended up buying a set of fly cutters for the mill. The tool is designed to put a smooth surface on a large flat area, but I planned to use it as a circle cutter instead. There is probably a competent machinist cringing at my set up, but it got the job done.  The clear acrylic proves difficult to photograph, but they should get the point across. I made the recess .080" deep. 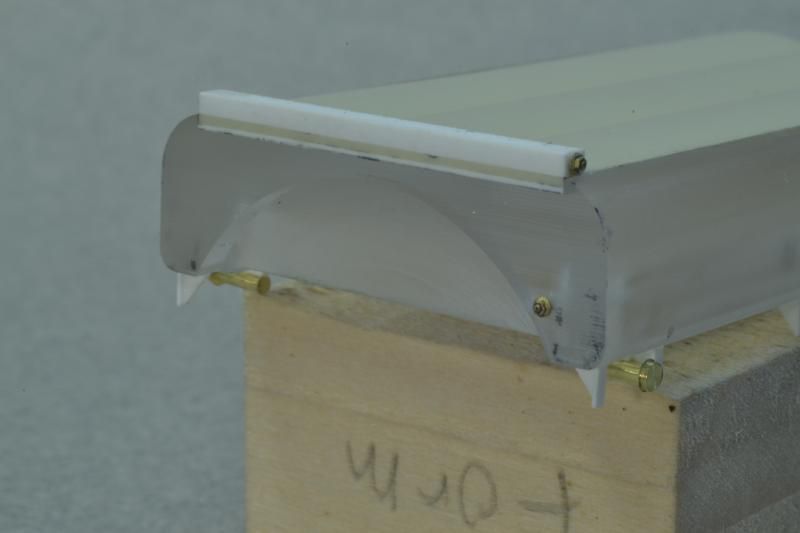 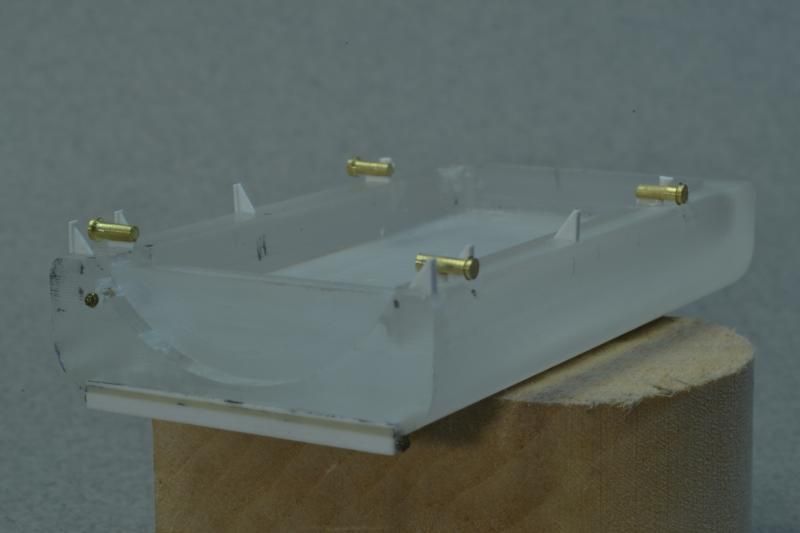 I've spot primed the nose splices and plugged port holes and sanded any problem areas smooth. 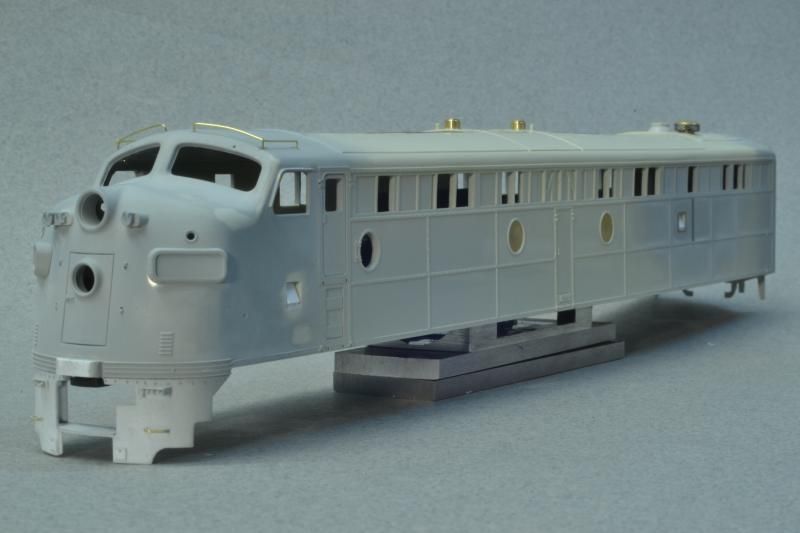 The new sand filler hatches... The extra batten was added by the RI, and is from the etches I did for my E7. 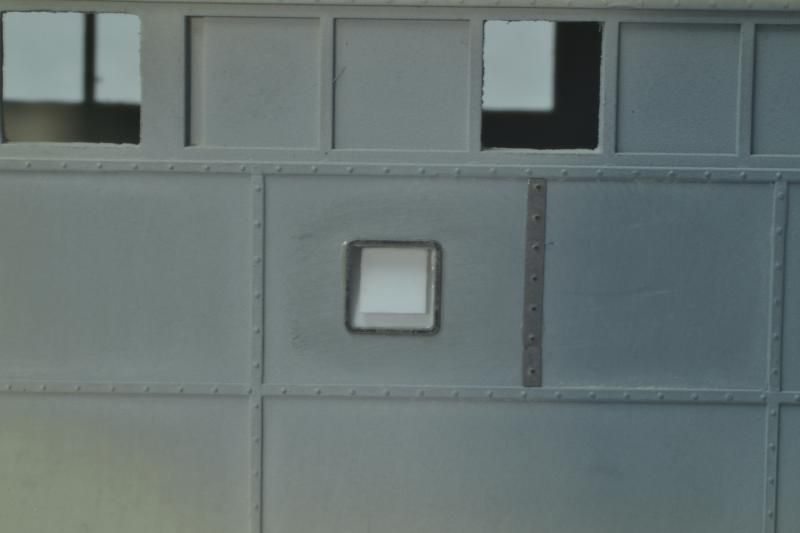 The two inner port holes on the fireman's side weren't shaved like some of the others. Instead they just painted over them. Likely replacing the glass with sheet metal first. The easy thing to do would be to use the BLI porthole glass, but it doesn't fit very well. I ended up turning some brass plugs for a tight fit. The exhaust stacks were also replaced with brass tubing. The little step is to hold the not yet finished spark arrestors.  the intake and exhaust for the steam generator had to be moved. I used a Highliner exhaust and since I wasn't happy with any intakes I had here, I tried turning on eon the lathe. The etched mesh is obviously too large, but it's one of those deals where it's physically impossible to be completely scale here. the prototype mesh is just too small.  |
|
|
|
Post by stevef45 on Jan 16, 2015 22:07:32 GMT -8
just curious why you used the mill to make those C channel pieces and not just used flat brass strips and bend them?
|
|
|
|
Post by onequiknova on Jan 16, 2015 22:14:14 GMT -8
just curious why you used the mill to make those C channel pieces and not just used flat brass strips and bend them? That was my first approach, but I wasn't happy with the sharpness of the bends and over all shape. The smaller one measures about .040x.0120. At those sizes I just couldn't get an acceptable part. I also felt a plastic to plastic joint would be more durable. The brass parts can be seen in my first post . |
|
|
|
Post by mrsocal on Jan 16, 2015 22:15:45 GMT -8
John I am going to call you an Extremest, you seam to set the bar with a few others. Always such attention to detail in every part of the build. This is just another beautiful look at what an HO model can really look like with some effort and determination. Oh ya... and a few buck!!
|
|
|
|
Post by stevef45 on Jan 16, 2015 22:46:30 GMT -8
just curious why you used the mill to make those C channel pieces and not just used flat brass strips and bend them? That was my first approach, but I wasn't happy with the sharpness of the bends and over all shape. The smaller one measures about .040x.0120. At those sizes I just couldn't get an acceptable part. I also felt a plastic to plastic joint would be more durable. The brass parts can be seen in my first post . ok i misread what you typed. I thought you made those brass pieces at the bottom of hte pilot out of milled brass. Thats why i was like "why not just bend strips?" lol |
|
|
|
Post by onequiknova on Jan 16, 2015 22:50:15 GMT -8
That was my first approach, but I wasn't happy with the sharpness of the bends and over all shape. The smaller one measures about .040x.0120. At those sizes I just couldn't get an acceptable part. I also felt a plastic to plastic joint would be more durable. The brass parts can be seen in my first post . ok i misread what you typed. I thought you made those brass pieces at the bottom of hte pilot out of milled brass. Thats why i was like "why not just bend strips?" lol Haha. I look for any excuse to use the mill, but that would be a bit excessive. |
|
|
|
Post by stevef45 on Jan 16, 2015 22:59:58 GMT -8
i hope someday i'll actually be living in a house where I can set up a mill or something. The possibilities are endless.
|
|
|
|
Post by onequiknova on Jan 16, 2015 23:17:18 GMT -8
It is by far, the most versatile tool I own, and I'm just scratching the surface.
|
|
|
|
Post by buffalobill on Jan 18, 2015 20:07:45 GMT -8
John, some incredible modeling, you are really raising the bar. Which already was really high. This unit is going to be incredible. The detail is phenomenal. The E-8 unit you did for Tom was beautiful, but this baby is really going to surpass that one.
Bill
|
|
|
|
Post by onequiknova on Jan 20, 2015 14:48:57 GMT -8
I went to work on the underframe. I milled the frame to accept the C channel frame rails and mounted the air tanks. The BLI tanks are too small in diameter, so I turned some new tanks out of brass. The pipe flanges on the tanks were scratch built from styrene. I carved a piece of styrene into a diamond shape, sliced off a piece and drilled a hole in the middle. They sit on a slice of round styrene to replicate the bung welded to the tank. 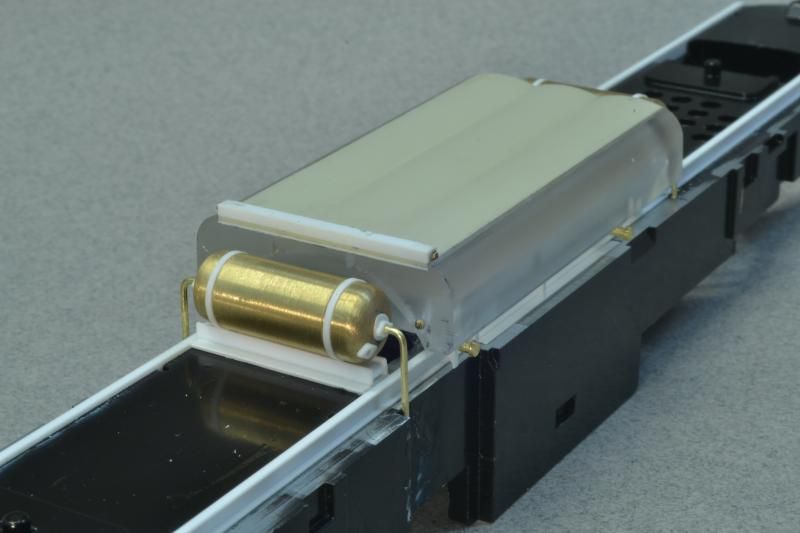 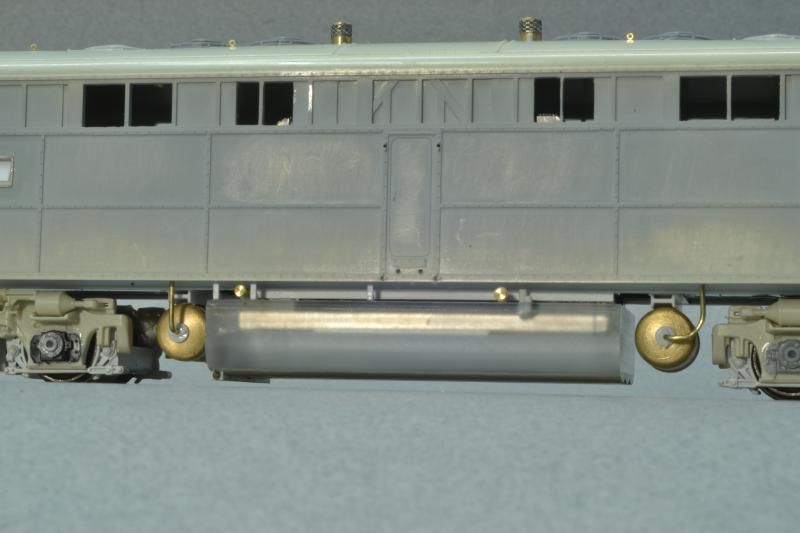 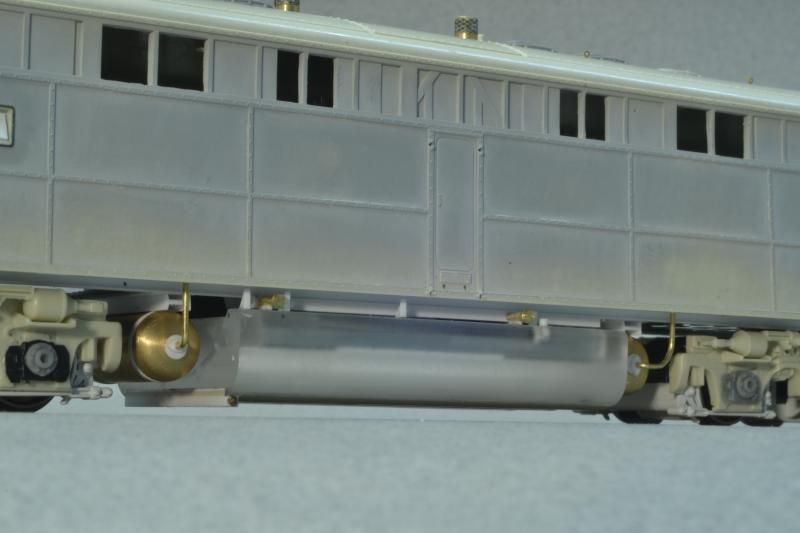 I've also been working on the roof as well. 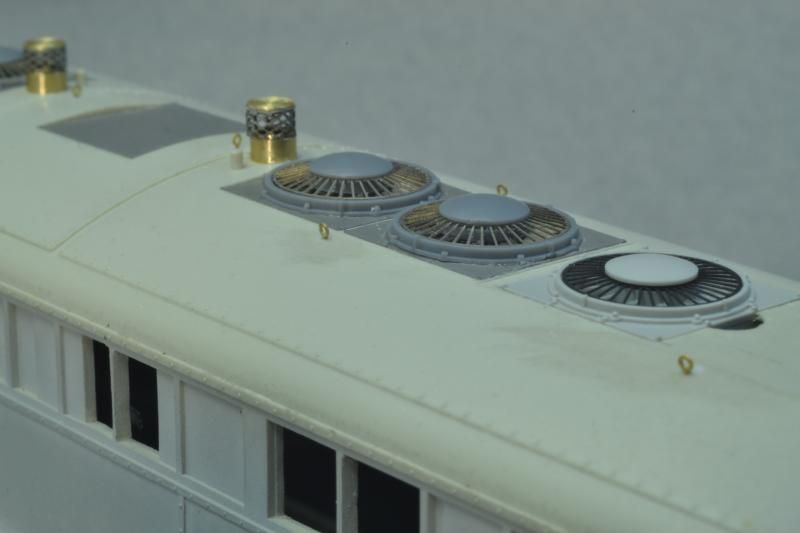 The Highliner fan will be under the winterization hatch, so the difference in the fans won't be noticeable. This pic does a good job of showing just how much nicer the Cannon fans look compared to the Highliner fans. Maybe it's just me, but I just can't get enough dome to the fan grill the way Highliner suggests. The spark arrestors were scratch built using the same mesh I used earlier on the steam generator intake. One thing I haven't mentioned is the dynamic block off plate. As far as I know, every E8/9 should have a 48" dynamic fan, but a roof top image clearly shows a block off plate for a 36" fan. I would guess this unit received a dynamic hatch from a F unit. When it got it, or if the dynamics were functional is anyone's guess. basic cab roof details. The square with the hole in the middle is a beacon base. The beacon was removed by the RI, but the base remained. The corner post on the roof grabs are tiny eyelets I made by smashing the end of the brass wire in a vice, drilling a #80 hole, then shaping the end. 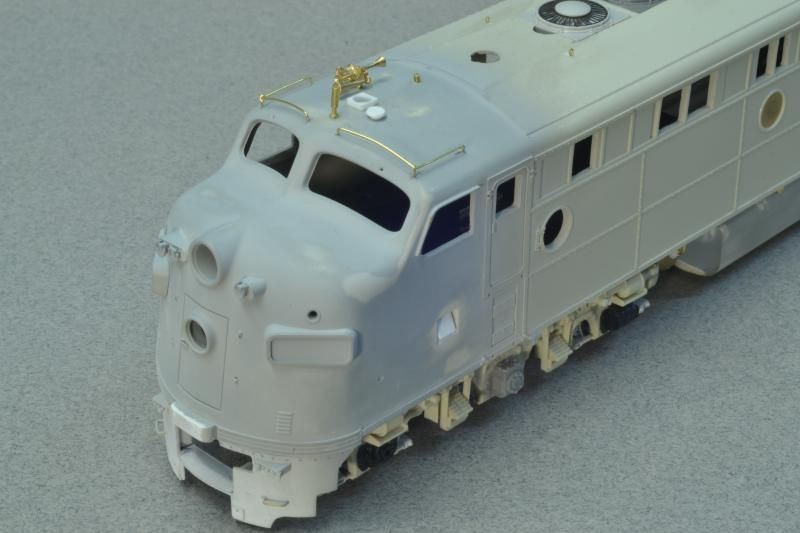 |
|
Deleted
Deleted Member
Posts: 0
|
Post by Deleted on Jan 20, 2015 14:59:47 GMT -8
I see you obtained a lathe as well. Loads of fun when you have the right tools.
Did you make a contoured lathe bit to cut the air cylinders? If not, what did you do to get the correct curvatures? When I build another GE, this would come in VERY handy for cutting the air cylinders.
Brian
|
|
|
|
Post by onequiknova on Jan 20, 2015 15:54:40 GMT -8
I passed on that 7x10 lathe we talked about a couple months back. The clothes dryer broke later that same day, so I didn't want to spend the money on toys. Turned out I fixed the dryer for $10.00, but by then the lathe was gone. A couple months later, a better deal showed up on craislist, so I jumped on it.
I did grind a bit to make the domed end, but it's not perfect. My grinding wheel has too large of a corner radius. I used the tool, then finished the shape with a mill file while the tank spun in the lathe.
|
|
|
|
Post by Great-Northern-Willmar Div on Jan 20, 2015 16:14:56 GMT -8
I passed on that 7x10 lathe we talked about a couple months back. The clothes dryer broke later that same day, so I didn't want to spend the money on toys. Turned out I fixed the dryer for $10.00, but by then the lathe was gone. A couple months later, a better deal showed up on craislist, so I jumped on it. I did grind a bit to make the domed end, but it's not perfect. My grinding wheel has too large of a corner radius. I used the tool, then finished the shape with a mill file while the tank spun in the lathe. Jiminy Crickets that is some FINE modeling. |
|
Deleted
Deleted Member
Posts: 0
|
Post by Deleted on Jan 21, 2015 5:23:13 GMT -8
I passed on that 7x10 lathe we talked about a couple months back. The clothes dryer broke later that same day, so I didn't want to spend the money on toys. Turned out I fixed the dryer for $10.00, but by then the lathe was gone. A couple months later, a better deal showed up on craislist, so I jumped on it. I did grind a bit to make the domed end, but it's not perfect. My grinding wheel has too large of a corner radius. I used the tool, then finished the shape with a mill file while the tank spun in the lathe. I need to get a grinder as well to cut my own bits. About a 1000 years ago I took a basic machinist class. Part of my drafting certificate requirements. I ground a lathe bit and it was not all that hard. Part of my trip to the St. Louis RPM meet this year will be to the Illinois Railway museum. I'll measure the contour of the U30C air tanks and maybe a few others. I do have the contour for the GP7/9 tanks. Just have to figure out the curvatures using geometry. I learned all that in drafting class as well on how to find the center of an arc and all that. I have one of those contour tools. They work pretty good. Press it up against the part and then trace it out on a sheet of paper. It is great to see you modeling this way John. VERY enjoyable. Brian |
|
|
|
Post by markfj on Jan 21, 2015 9:27:33 GMT -8
Good gravy man! That is some serious, over-the-top modeling. Thanks for sharing.
|
|
|
|
Post by onequiknova on Jan 24, 2015 14:47:56 GMT -8
Another small update. I've been working on installing all the grab irons. Although this is an ex UP unit, the Rock Island removed the original UP grab iron arrangement and installed their standard grab/walkway arrangement on the nose. 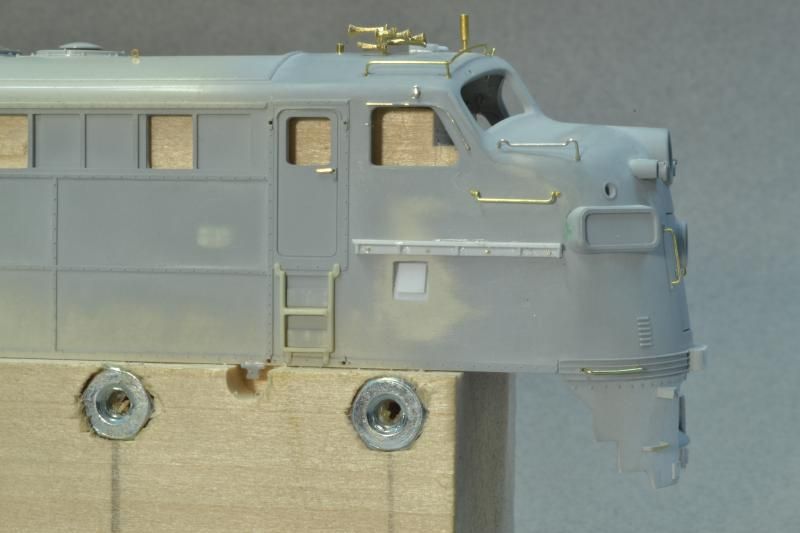 I used etched brass grab iron flanges/bolts. The grabs are a combination of DA and hand bent grabs. Also notice the GP style jacking pads directly behind the cab ladder. There is one over the rear truck as well. The walkway was scratched. I first made a J channel out of styrene on the mill, then added the bolt heads and angular braces. 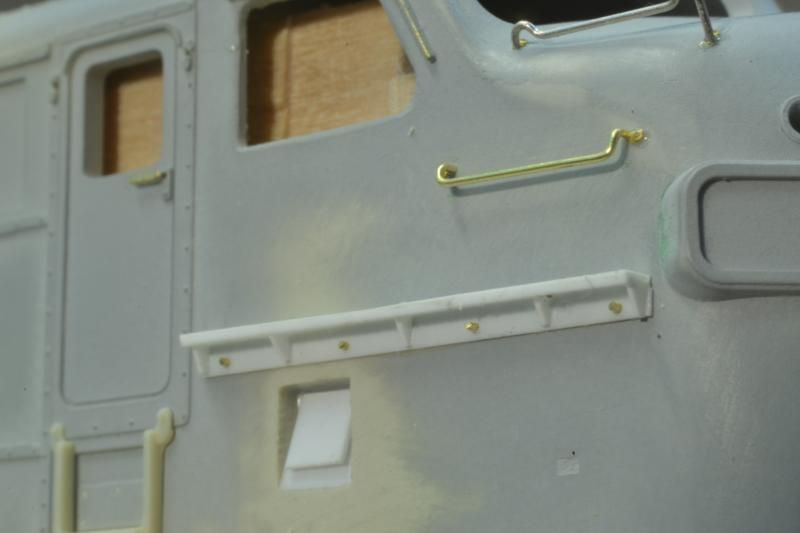 The rear kept the UP grab iron arrangement, along with the hour glass shaped roof vents. 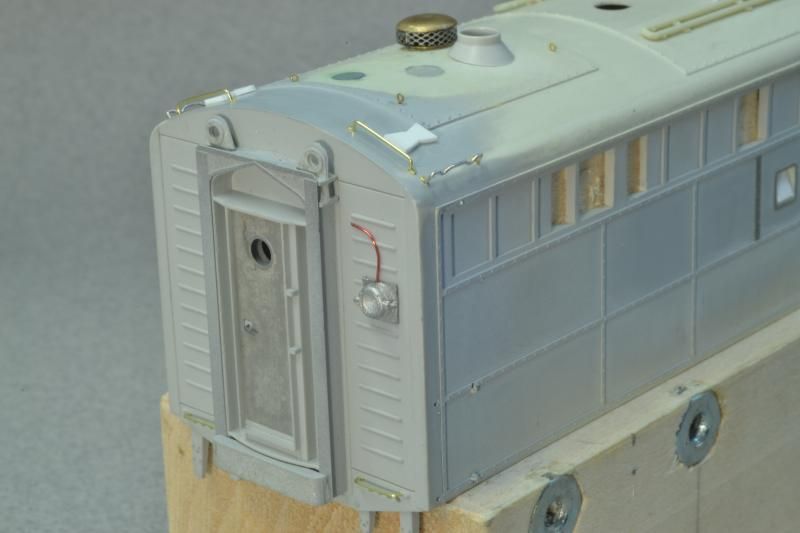 The Highliner door was detailed with the Highliner F9 etches along with a Details West buffer and reverse light. I still need to do the MU connections over the door. |
|
|
|
Post by mrsocal on Jan 24, 2015 15:08:58 GMT -8
Small, tedious, time consuming and head throbbing work.... a great respect for the efforts that you bring to the bench in not just this model but in every build you do and post up for us all to learn from and auh at. It is truly something to just touch the bar let alone grab it and put a chin up to it. Fellas like me can only dream of owning such a model, I look forward to seeing where you take this build.
|
|
|
|
Post by Great-Northern-Willmar Div on Jan 24, 2015 15:15:17 GMT -8
Another small update. I've been working on installing all the grab irons. Although this is an ex UP unit, the Rock Island removed the original UP grab iron arrangement and installed their standard grab/walkway arrangement on the nose.  I used etched brass grab iron flanges/bolts. The grabs are a combination of DA and hand bent grabs. Also notice the GP style jacking pads directly behind the cab ladder. There is one over the rear truck as well. The walkway was scratched. I first made a J channel out of styrene on the mill, then added the bolt heads and angular braces.  The rear kept the UP grab iron arrangement, along with the hour glass shaped roof vents.  The Highliner door was detailed with the Highliner F9 etches along with a Details West buffer and reverse light. I still need to do the MU connections over the door. Interesting that the back up light is on the right on this ex-UP E8. Normally the UP had the back-up light on the left and a ladder to the roof on the right. CNW 502 a Crandall cab ex-UP E8B  UP 942, used in Chicago commuter service as CNW 510 and RTA 510.  The hourglass shaped vents are battery box vents if anyone is into picky details. |
|
|
|
Post by onequiknova on Jan 24, 2015 15:34:04 GMT -8
Jim, I thought it was odd too. It's opposite of most engines I've looked at. This is the only image of the rear of 658 that I have been able to find, but it shows the reverse light. 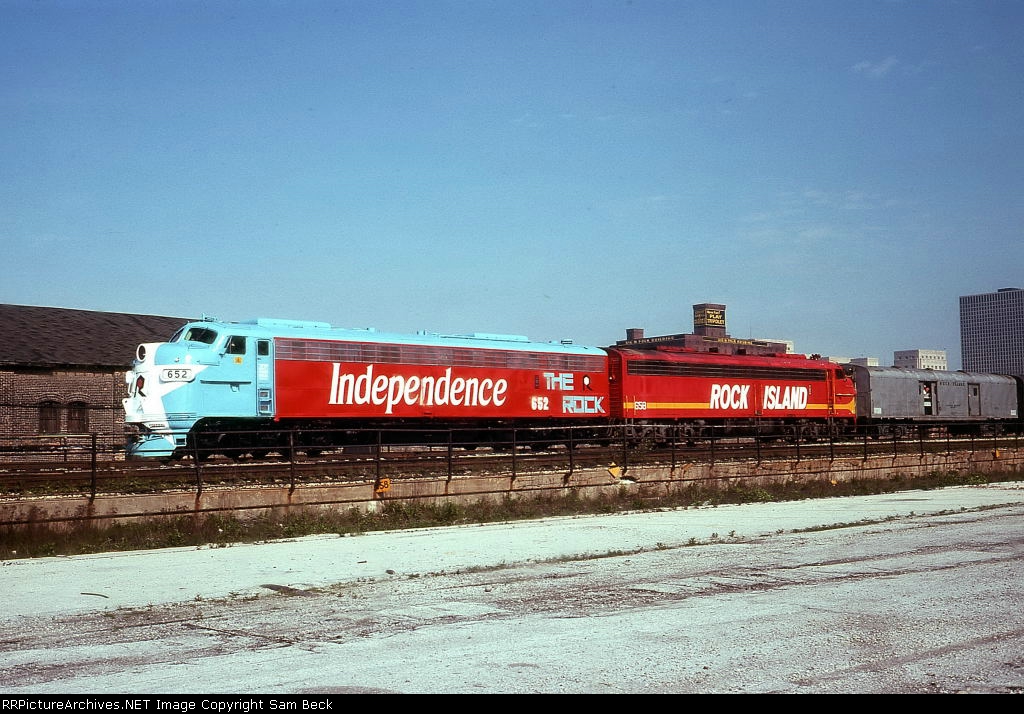 I've been using this picture of 928 as a guide. RI 658 is ex UP 929, so it's one number off.  Thanks for the info on the roof vents. I didn't know they were for the batteries. FWIW, the RI normally used the same round vents you would find on the cab roof. |
|
|
|
Post by onequiknova on Jan 24, 2015 15:37:46 GMT -8
Small, tedious, time consuming and head throbbing work.... a great respect for the efforts that you bring to the bench in not just this model but in every build you do and post up for us all to learn from and auh at. It is truly something to just touch the bar let alone grab it and put a chin up to it. Fellas like me can only dream of owning such a model, I look forward to seeing where you take this build. I just strive to build a better, cleaner, more accurate model with each successive build. I can already think of a few things I would like to improve upon on my next build. I think it's a sickness. |
|
|
|
Post by dhs12001 on Jan 24, 2015 16:16:14 GMT -8
A very impressive build. The cab walkway is spot on. Are the etched brass grab iron flanges/bolts your design or a commercial part. They look a lot better than the cast plastic nut castings I use.
Dave Street
|
|
|
|
Post by mrsocal on Jan 24, 2015 16:35:19 GMT -8
John I so totally agree with the sickness! But being in the age of the horse and buggy as compared to the new sports car age of modeling it is so very hard to keep pace with the 3D printing of parts and the printing of new decals to suit the need. Turning parts on lathes to the .0005 of an inch, just to big a bar for guys like me to do the full chin up on. I do listen and grab the info that you, Tony, Hammer Dave as well as a host of others put up to learn from but in reality will never come to match. In the end it will still make a better modeler of each of us as we continue to try to get that look and prestige of the models that you upper class builders put out on the table.
|
|
|
|
Post by Great-Northern-Willmar Div on Jan 24, 2015 16:36:33 GMT -8
UP 928 and 929 were from a five unit order delivered between May and August 1950. According to the site Utah Rails. www.utahrails.net/up-diesel-roster/up-diesel-roster-18.php#e8a-925 UP 929 went to Amtrak, while UP 930 went to the CRIP. Utah Rails lists the following units to CRIP UP 900 - Built May 1956 UP 901 - Built May 1956 UP 903 - Built February 1956 UP 905 - Built January 1956 These four were E9A's and were built from traded in UP E7's and 6's. All from same 15 unit order The following E8A's were listed as going to the CRIP UP 925 - Built June 1952 - One unit order UP 930 - Built August 1950 - Part of a five unit order UP 935 - Built April 1953 UP 937 - Built April 1953 UP 941 - Built May 1953 UP 935, 937 and 941 were part of a 12 unit order The following E8B's are listed as going to the CRIP UP 930B - Built August 1950 UP 931B - Built February 1953 UP 936B - Built February 1953 UP 937B - Built February 1953 UP 938B - Built March 1953 UP 939B - Built March 1953 UP 946B - Built April 1953 UP 947B - Built April 1953 All from same 19 unit order CNW 502 is former UP 913B an E9B built in December 1963 UP 942 also CNW 510 and RTA 510 was built in May 1953 and part of a 12 unit order. Former UP 935, 937 and 941 which went to the CRIP were part of this order. |
|
|
|
Post by mrsocal on Jan 24, 2015 16:45:43 GMT -8
Jim you are another one of the great modelers that I can just not believe that you are not going to build just because of a move to a new location. Me and a lot of other folks live breath and learn from what you post up on the bench. Your knowledge and experience is so very important to the continuance of the hobby.... I am only as good as those whom teach me!
|
|
|
|
Post by theengineshed on Jan 24, 2015 17:23:47 GMT -8
John- I'm awestruck! That's an amazing build, very inspiring...
|
|
|
|
Post by onequiknova on Jan 24, 2015 17:29:16 GMT -8
A very impressive build. The cab walkway is spot on. Are the etched brass grab iron flanges/bolts your design or a commercial part. They look a lot better than the cast plastic nut castings I use. Dave Street They came with Railflyer's grab irons, but good luck finding any now. When I run out, I'll likely design my own etch. I can't go back to the D/A NBW casting now. I'll try to post a better picture later. They are SMALL, and have to be orientated correctly. Installing them is one of the few times I need to break out my Optivisor. |
|
|
|
Post by onequiknova on Jan 24, 2015 17:33:13 GMT -8
Thanks for that run down Jim.
Apparently 658 isn't ex UP 929 as I stated. The reference I've seen must be wrong. I've seen it referenced as ex 930 as well, so that must be correct.
|
|
|
|
Post by onequiknova on Jan 24, 2015 19:51:30 GMT -8
Here's a couple close ups of the grab iron flange, bolt etch. 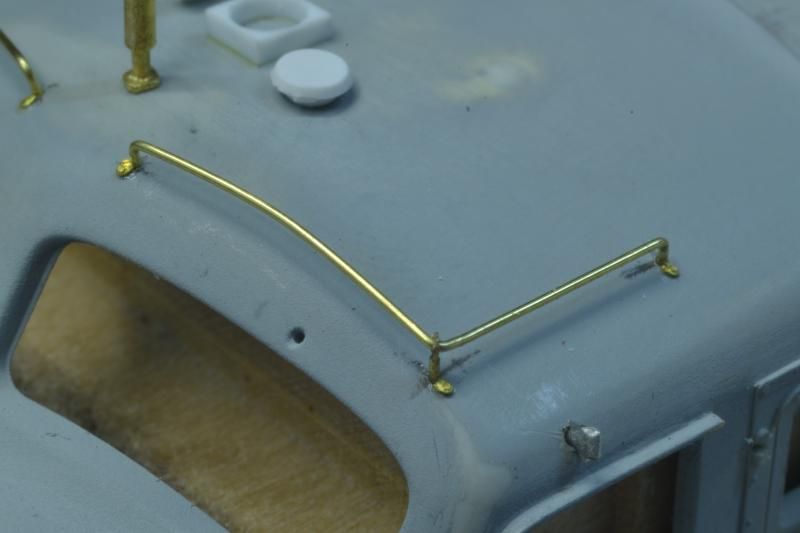  Like I said, they are a PITA to install and orientate correctly, but it's the best looking option short of the ones cast into the shell. |
|
|
|
Post by dhs12001 on Jan 24, 2015 20:24:30 GMT -8
John
Thanks for the close-up shots. Those are nice casting details. Its a shame their no longer available. The cab roof grab corner support is a neat little detail. I'll file it away for future use
Dave Street
|
|