|
|
Post by rockfan on Jan 25, 2015 8:07:25 GMT -8
You're making RI #658? According to my RI diesel book that's ex UP #930
|
|
|
|
Post by onequiknova on Jan 25, 2015 8:55:29 GMT -8
You're making RI #658? According to my RI diesel book that's ex UP #930 Yeah, I figured that out after Jim's post. FWIW, rrpicturearchives is where it's listed as ex 929. www.rrpicturearchives.net/locoList.aspx?id=CRIP&Page=4 At any rate, they are both from the same order as 928, so the major components of the rear should hopefully be the same. |
|
|
|
Post by rockfan on Jan 25, 2015 8:56:42 GMT -8
Keep up the awesome work!
|
|
|
|
Post by Great-Northern-Willmar Div on Feb 3, 2015 7:45:21 GMT -8
A keen eye will spot a little detail that is probably wrong for every other E8 except this one. 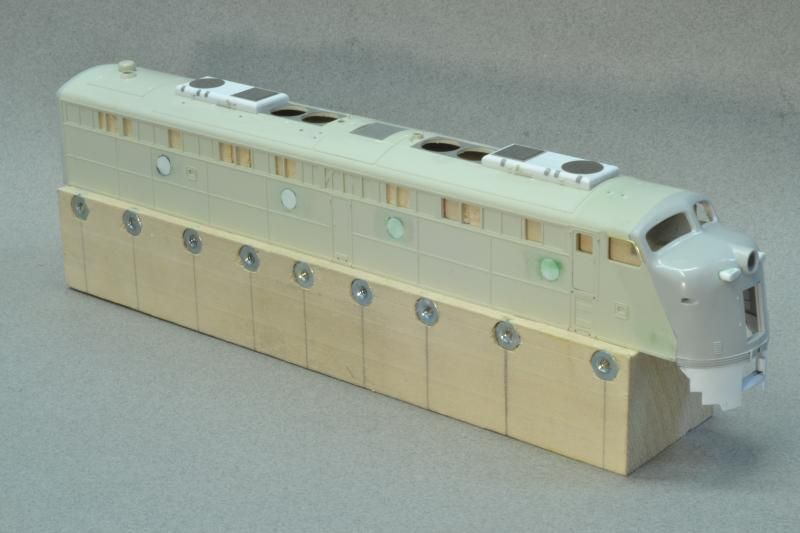 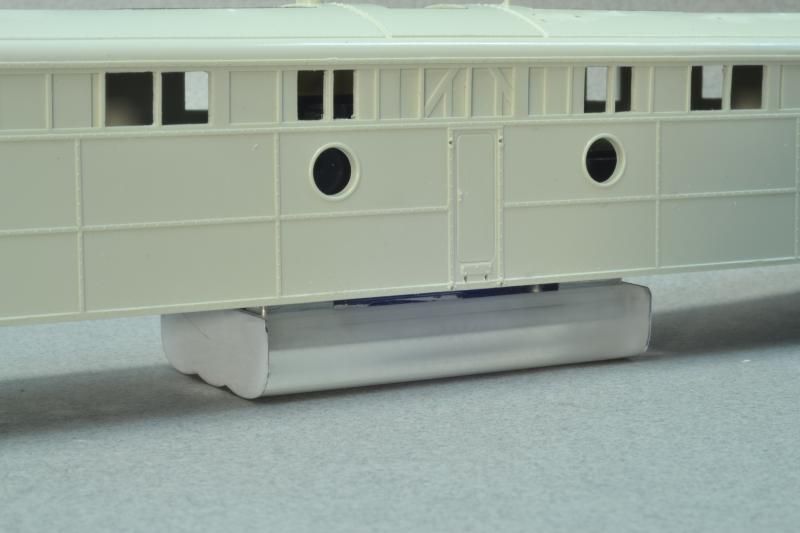 That's pretty much where I'm at. Why you no open up the sides under the grilles of the dynamic brakes? I kind of doubt Rock Island plated over the opening or even bothered to remove the grids because that hunk o' steel and the labor to remove the grids costs money. Something the Rock Island didn't have even on its better days.  |
|
|
|
Post by onequiknova on Feb 3, 2015 8:20:23 GMT -8
When looking at this picture, all I see is red behind the grilles in the dynamic area. www.rrpicturearchives.net/showPicture.aspx?id=491229 I'm not too sure what's under that dynamic hatch. The dynamic hatch on 658 had provisions for a 36" fan, which tells me the original dynamic hatch was removed and replaced with an F unit hatch. Who knows why, or if they were ever functional that way. I'm going to assume that since they took the time to block off the dynamic fan, they would also block the openings in the side. I was actually thinking I should add some styrene in that area to block that area off. |
|
|
|
Post by Great-Northern-Willmar Div on Feb 3, 2015 9:24:14 GMT -8
When looking at this picture, all I see is red behind the grilles in the dynamic area. www.rrpicturearchives.net/showPicture.aspx?id=491229 I'm not too sure what's under that dynamic hatch. The dynamic hatch on 658 had provisions for a 36" fan, which tells me the original dynamic hatch was removed and replaced with an F unit hatch. Who knows why, or if they were ever functional that way. I'm going to assume that since they took the time to block off the dynamic fan, they would also block the openings in the side. I was actually thinking I should add some styrene in that area to block that area off. Originally the E8's had 36" dynamic brake fans. It was in later production and retrofits that the E's got 48" fans. |
|
|
|
Post by onequiknova on Feb 3, 2015 9:33:03 GMT -8
When looking at this picture, all I see is red behind the grilles in the dynamic area. www.rrpicturearchives.net/showPicture.aspx?id=491229 I'm not too sure what's under that dynamic hatch. The dynamic hatch on 658 had provisions for a 36" fan, which tells me the original dynamic hatch was removed and replaced with an F unit hatch. Who knows why, or if they were ever functional that way. I'm going to assume that since they took the time to block off the dynamic fan, they would also block the openings in the side. I was actually thinking I should add some styrene in that area to block that area off. Originally the E8's had 36" dynamic brake fans. It was in later production and retrofits that the E's got 48" fans. That thought had crossed my mind, but I couldn't find another example on other UP E units. That make more sense than a F unit hatch though. |
|
|
|
Post by onequiknova on Feb 5, 2015 20:47:22 GMT -8
|
|
|
|
Post by GP40P-2 on Feb 5, 2015 21:42:32 GMT -8
Awesome work. You have a knack for making E-units look like absolute beasts; showing every "struggle" that the Rock was going through as it was applied to the fleet.
|
|
|
|
Post by rockisland652 on Feb 6, 2015 7:49:21 GMT -8
|
|
Deleted
Deleted Member
Posts: 0
|
Post by Deleted on Feb 6, 2015 13:39:16 GMT -8
That thing is just crying for some Sergent Engineering tightlock couplers, then it will be complete.
|
|
|
|
Post by Great-Northern-Willmar Div on Feb 6, 2015 18:02:49 GMT -8
Only mistake I see with the model is the lack of a "shelf" under the steam line. Look at Tom's head on photo, you'll see the shelf. In fact most Rock Island E's had a shelf under the steam line to hold it up. The CB&Q E5A at IRM has a shelf under the steam line to hold it up. So does Milwaukee Road commuter E9A number 37A. I know 37A has a shelf for when I installed the bell on 37A above the front truck, I was squeezed between the end of the truck frame, steam line and back of the pilot. There is not a lot of real estate between the front truck, back of the pilot, draft gear and frame on an E9A!
For all those interested.....bells are VERY HEAVY. Still think I've got dirt in my hair from being under 37A and I was wearing a hat!
Sorry for being a picky. The model is perfect.
|
|
|
|
Post by rockfan on Feb 7, 2015 9:42:00 GMT -8
I can't wait to see her when she's painted!
|
|
|
|
Post by onequiknova on Feb 11, 2015 20:05:18 GMT -8
A few pics fresh from the paint shop. The colors are a bit washed out in these pics. I wish I knew how to edit photos. 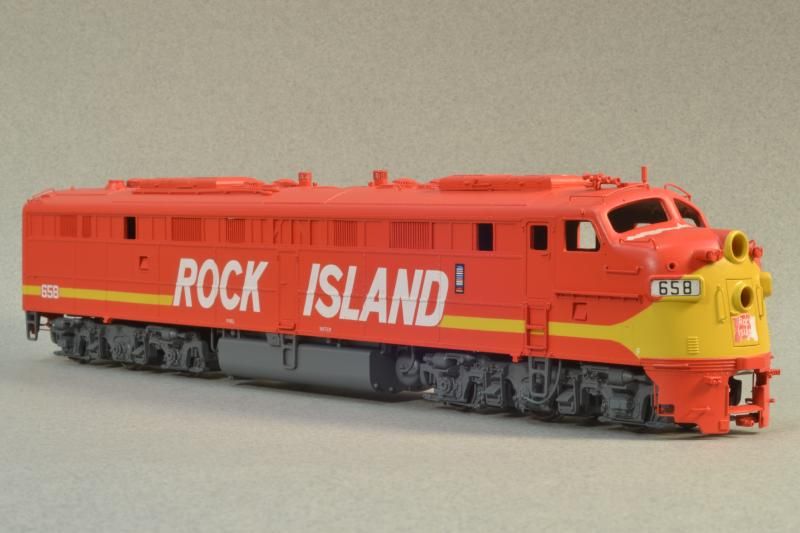 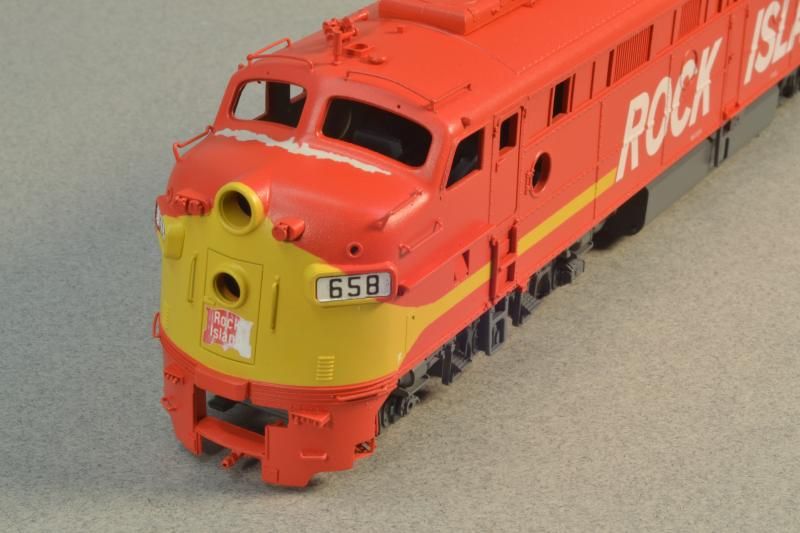 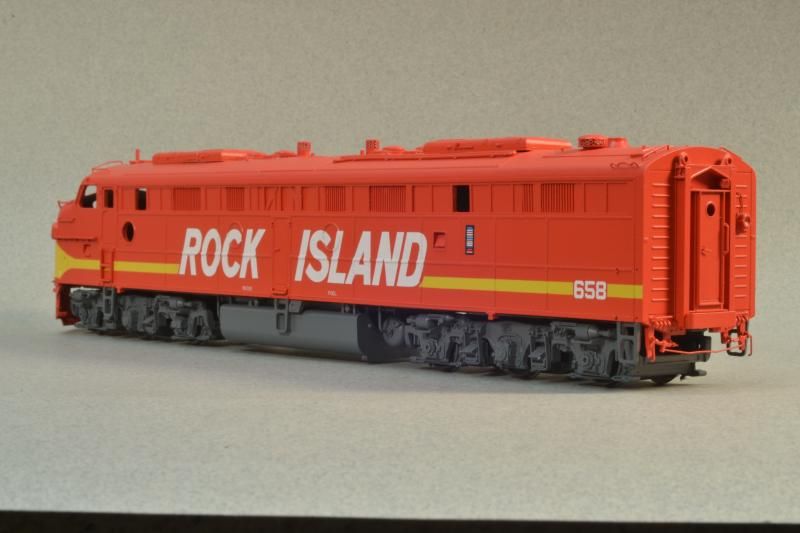 I have done a couple pre-weathering steps already. The chipping on the top of the nose, like in the proto photo below was done with AK Interactive chipping fluid. www.flickr.com/photos/5632/6377554881/sizes/l/ Thanks to Brian Banna for turning me onto the stuff. The herald was another road block. The standard stick on herald the RI used had a red border, and this is how most the decals I have here are made. They are too wide to fit on the nose door, and incorrect for this unit. After playing around with some caboose heralds and any other herald I had here, none would work, so I went back to the original herald with the red border and with my 10x lens in the Optivisor, carefully trimmed off the red border free hand while still on the paper. This left a thin white stripe as the new border. I also took this time to fade the herald like the above proto pic. While still on the decal paper, I thinned out some white enamel and applied washes and streaks to fade the red background. Once try, the decal was applied like any other decal. |
|
|
|
Post by Great-Northern-Willmar Div on Feb 11, 2015 20:34:48 GMT -8
Damn son that is some pretty paint work. I should be so gifted.  |
|
|
|
Post by onequiknova on Feb 11, 2015 20:42:03 GMT -8
Trust me, it's not without it's flaws.
Tryinging to wrap the masking tape over the headlight, then down under the MU receptacle blocks and over the number boards was a challenge of my patience. It gets a little fuzzy at the top of the number board. I'll have to touch that up.
|
|
|
|
Post by onequiknova on Feb 11, 2015 20:43:04 GMT -8
I finally found a decent pic of the shelf under the steam line. I'll have to add that before I start weathering.
|
|
|
|
Post by Great-Northern-Willmar Div on Feb 11, 2015 20:49:44 GMT -8
I finally found a decent pic of the shelf under the steam line. I'll have to add that before I start weathering. Told you there was a shelf under the steam line. I my feet and legs wrapped around the steam line and its shelf when I put the bell on Milwaukee Road E9A #37A. |
|
|
|
Post by brotherlove on Feb 11, 2015 20:50:05 GMT -8
That is a fine looking E Unit!!!!!Painting and details are awesome.
|
|
|
|
Post by Great-Northern-Willmar Div on Feb 11, 2015 20:55:32 GMT -8
|
|
|
|
Post by onequiknova on Feb 11, 2015 20:58:52 GMT -8
I finally found a decent pic of the shelf under the steam line. I'll have to add that before I start weathering. Told you there was a shelf under the steam line. I feet and legs wrapped steam line and its shelf when I put the bell on Milwaukee Road E9A #37A. I believed you, I just need to know what it looked like so I could model it correctly. I found a decent pic of 658 showing the shelf in one of my books. |
|
|
|
Post by onequiknova on Feb 11, 2015 21:01:04 GMT -8
That is an interesting pic of 9911 with the coupler swung off to the side. I always figured the coupler retracted somehow.
|
|
|
|
Post by Great-Northern-Willmar Div on Feb 11, 2015 21:08:54 GMT -8
That is an interesting pic of 9911 with the coupler swung off to the side. I always figured the coupler retracted somehow. Just in case you are interested swinging that coupler out isn't easy. The sucker is heavy, damn type H tightlocks. |
|
Deleted
Deleted Member
Posts: 0
|
Post by Deleted on Feb 12, 2015 5:12:54 GMT -8
John, I think you took right to it. The chipping effect looks perfect.
Try using a flash. I was having the same problems and then tried a flash and all the color came back. Played around with shutter settings some more light and the flash.
Now it is time to dazzle us with some weathering.
Brian
|
|
|
|
Post by buffalobill on Feb 12, 2015 5:16:59 GMT -8
John, incredible model, washed out color or not. Can't wait to see it complete. It should be beautiful.
Bill
|
|
|
|
Post by rockfan on Feb 12, 2015 7:27:57 GMT -8
Awesome
|
|
|
|
Post by dhs12001 on Feb 12, 2015 8:42:26 GMT -8
A very well done locomotive, as usual. (smiley-face)
I always impressed with the detail you incorporate into your rolling stock. I have studied the photos you post, and others I have, of the locomotives your working on. When you post the model photos I discover details being made that I never focus on or even saw. An example being the peeling paint below the windshield. I studied the same picture earlier and skipped on past, assuming simply it was a trick of lighting and shadows when the photo was taken. I’m pretty sure that’s part of what makes the few outstanding modelers like you , way ahead of us mediocre folks.
Maybe its time to get back to my E7, following your earlier project, of course. (I also believe in the monkey see, monkey do as Jim says)
Dave
How in the world do you get those smiley faces?
|
|
|
|
Post by carrman on Feb 12, 2015 13:21:55 GMT -8
John, you should change your forum handle to the "King of E's"!!!!!
Dave
|
|
|
|
Post by markfj on Feb 13, 2015 11:23:33 GMT -8
John, you should change your forum handle to the "King of E's"!!!!! Dave +1 Way too cool!  |
|
|
|
Post by carrman on Feb 13, 2015 13:15:40 GMT -8
In all seriousness, your Highliner nose transplants are noting short of genius. I tip my hat to you sir.
Dave
|
|