|
|
Post by onequiknova on Jan 3, 2015 21:27:30 GMT -8
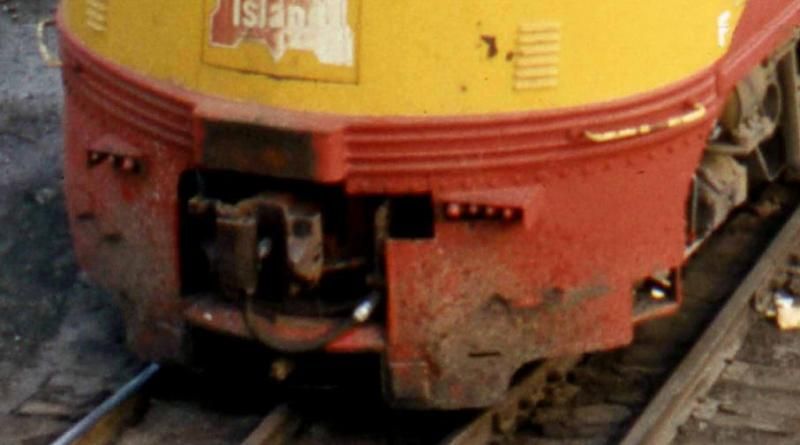
Another winter, another Rock Island E unit build. Same old same old I know, but get used to it, I've got a ton of E's here to build.  I'll try to just highlight some of the new techniques and details here and just glaze over stuff I've covered before like plugging port holes and splicing Highliner noses. So here are some proto shots, www.rrpicturearchives.net/showPicture.aspx?id=491229www.rrpicturearchives.net/locoPicture.aspx?id=61055 This build is a little different from my last two since this is an Ex Union Pacific E8. While the RI brought most of the unit up to their "standards" for such things as grabs and horns go, some UP details remain obvious. I'll start out with the pilot. This particular pilot is not the original pilot. Gone is the gracefully sloped pilot with nose doors. Instead, in it's place is a vertical flat slab of rolled steel with whatever holes cut into it they saw fit. since nobody makes such an ugly pilot, I decided my best route was to scratch build one. First thing I did was make a wooden puck with the correct pilot shape. I made this on a bench top belt sander. 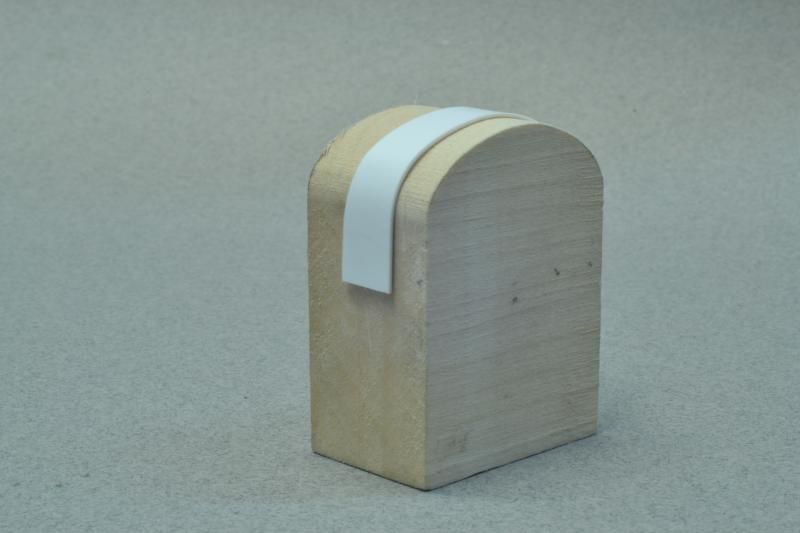 Using this puck, I could clamp some 1/2" wide strips of .020" styrene to it and dunk it in boiling water for 10 seconds or so, effectively making the styrene take the shape of the puck. With a strip glued inside the shell for support, I glued the shaped styrene to the shell and scribe the outline of the pilot. 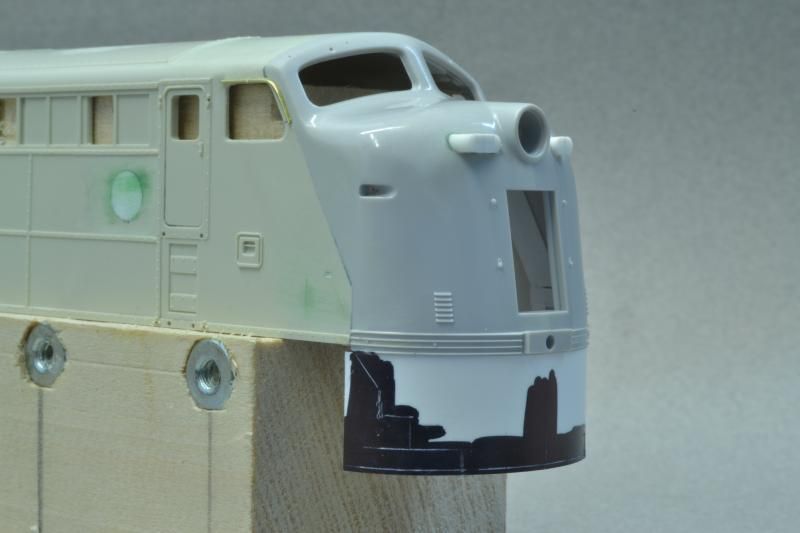 With the outline done, time for the coupler opening. 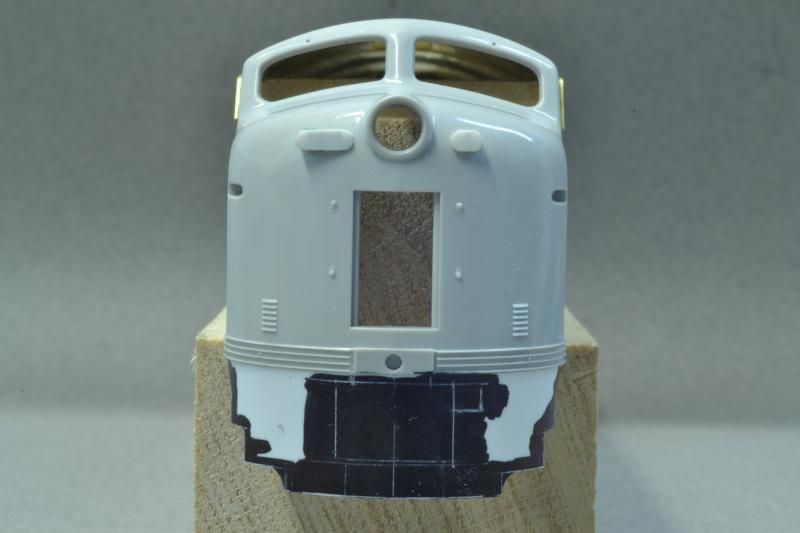 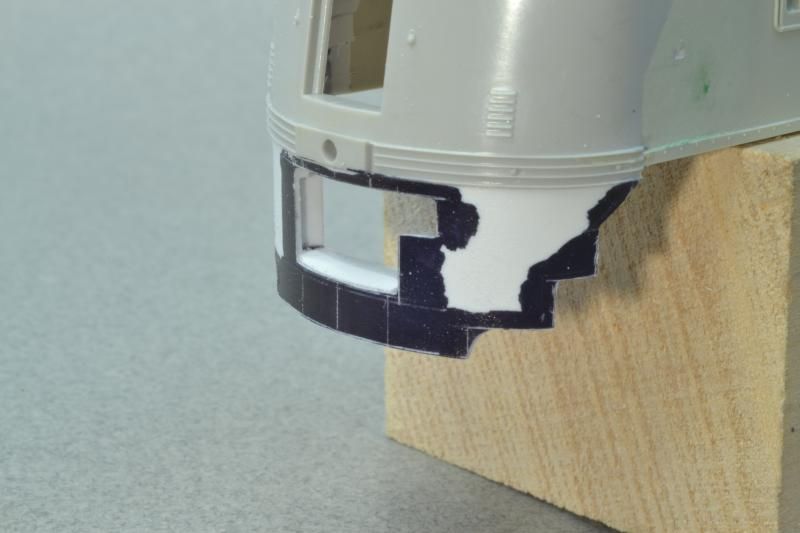 Before opening up the bottom of the pilot, which was for access to the steam connections, I built the internal bracing for fear the pilot would want to spring open with most of it's support gone. This bracing closely follows what I could see in prototype pics. 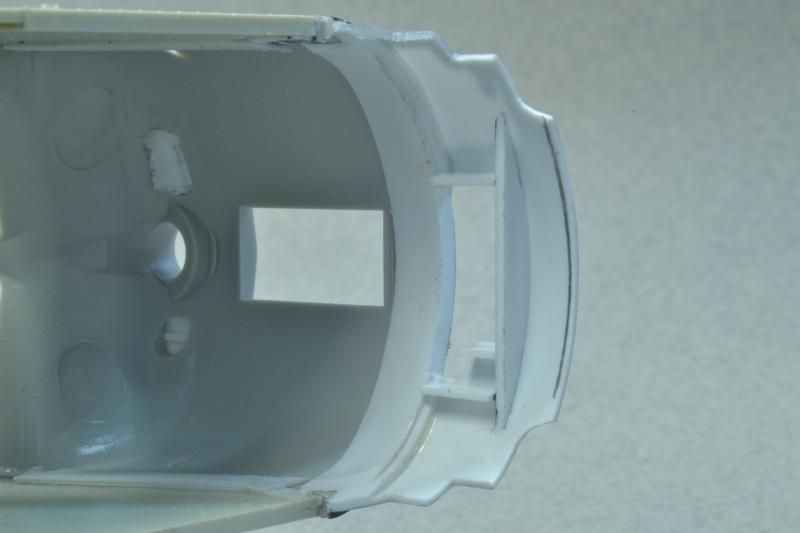 And where it's at now. Just a few small details left to add. 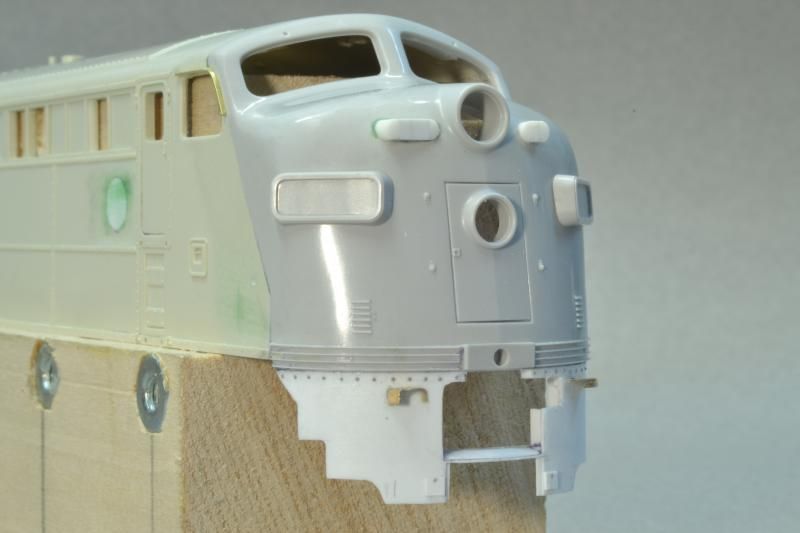 The large oval chunks on the nose were left over from it's UP days, and are for MU receptacles. Before I glued the Highliner nose to the BLI shell, I chucked it into my mill and milled the oval shaped openings into the nose. |
|
|
|
Post by SOMECALLMETIM on Jan 3, 2015 21:36:17 GMT -8
Always amazes me what people can do with styrene. Great looking model.
|
|
|
|
Post by onequiknova on Jan 3, 2015 21:39:43 GMT -8
Another view of the MU lugs. 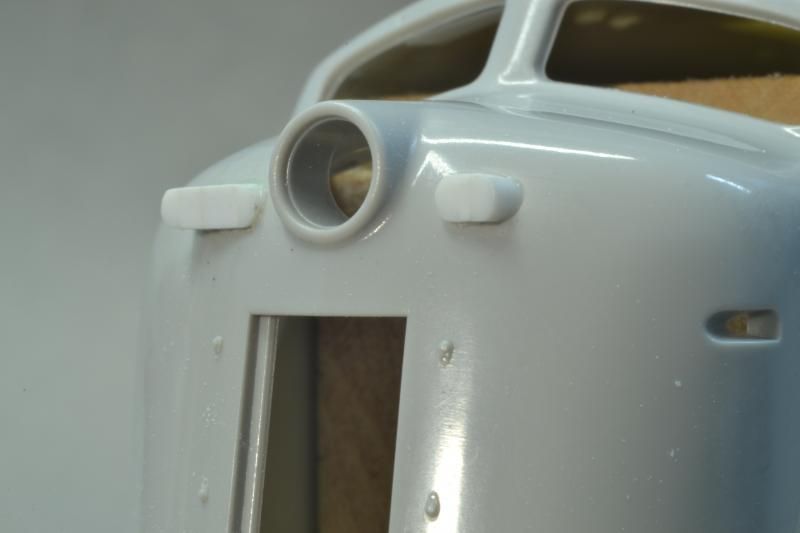 Like the nose, the rear of the Highliner shell is worlds better than the BLI end. Instead of just splicing in the door like my last build, leaving the over sized BLI ribs on the end, I just spliced the entire rear wall. Again I used my mill and it provided a perfect 90* splice. 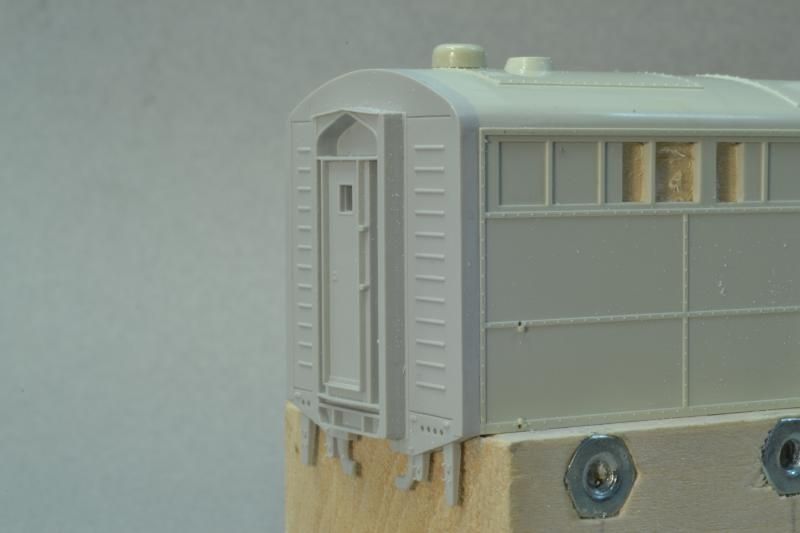 I showed these hatches last week in SPF, but here they are on the model. The hatches were made on the mill, and I designed the etches to finish them, The original BLI hatches ate too short and too narrow. I also designed the fan hatch etches. 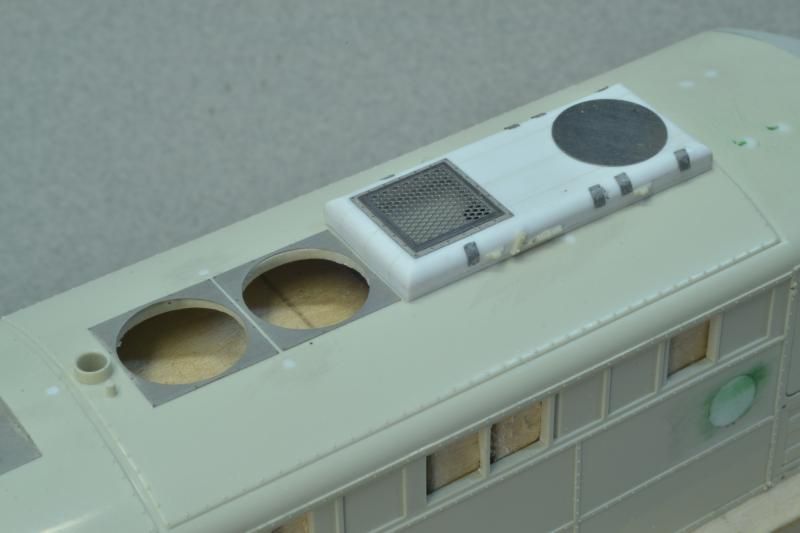 A keen eye will spot a little detail that is probably wrong for every other E8 except this one. 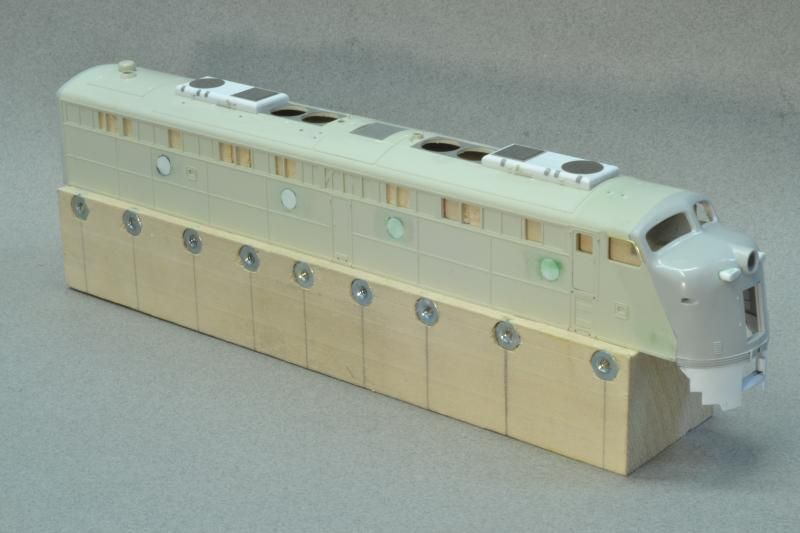 The fuel tank is another weak point on the BLIi unit. I milled a new on from clear acrylic. 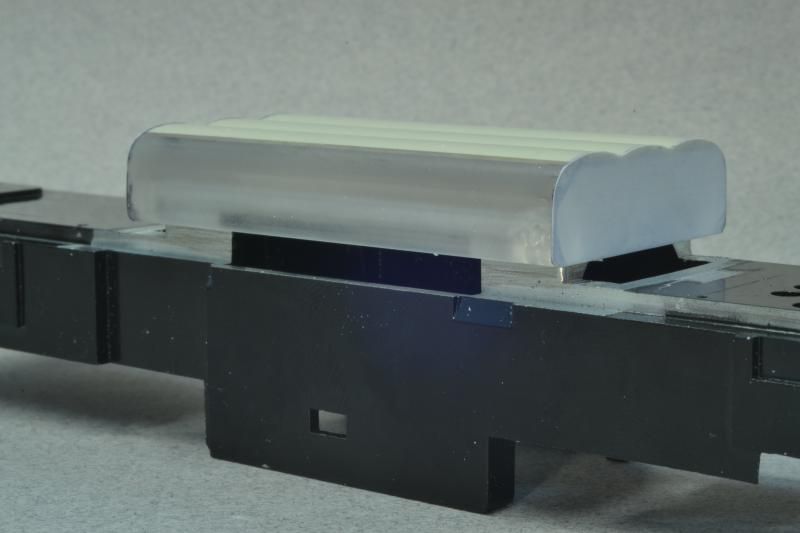 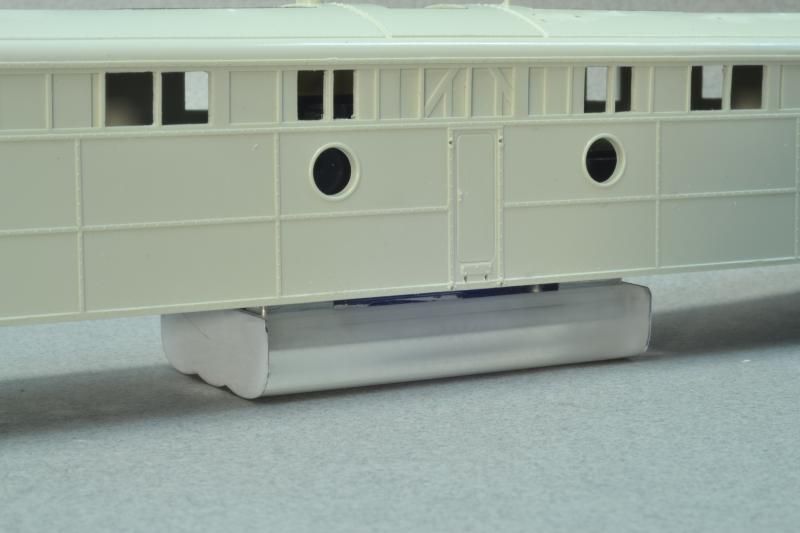 That's pretty much where I'm at. |
|
|
|
Post by rockisland652 on Jan 3, 2015 22:15:15 GMT -8
Great start!
|
|
|
|
Post by onequiknova on Jan 3, 2015 22:34:26 GMT -8
One more thing I wanted to point out before I forgot. The BLI side cab windows are too short in height by about .020". Here they have been opened up to the correct height using an etched Highliner window as a gauge. The original rain gutter was a casualty of the nose swap, so a new one was made from .010"x.030" flat brass stock. While I was in there, I slightly radiused the edge of the opening all the way around the window like the on the prototype. 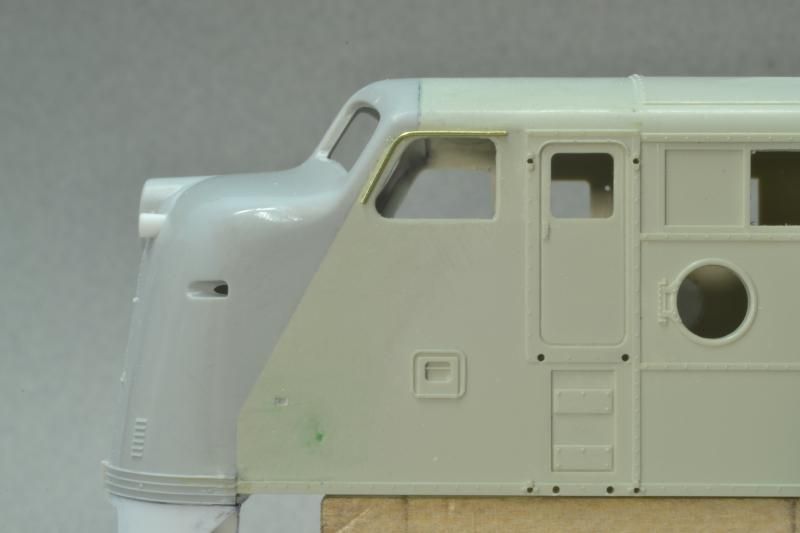 The Highliner kits come with two sizes of etched wing windows. The short one is for early units, while the tall one is for F9's. F9's and E8/9's had the same size windows. |
|
Deleted
Deleted Member
Posts: 0
|
Post by Deleted on Jan 3, 2015 22:39:38 GMT -8
Just a quick clarification. RI only had 4 E9's, 662-665. 658 fell into the group of 19 E8's, 643-661. Even the group of B units that they got from UP were E8B's. Great project none the less.
|
|
|
|
Post by onequiknova on Jan 3, 2015 22:44:46 GMT -8
Just a quick clarification. RI only had 4 E9's, 662-665. 658 fell into the group of 19 E8's, 643-661. Even the group of B units that they got from UP were E8B's. Great project none the less. Thank you. The lack of headlight gaskets should have been my first clue. I will make the proper corrections. |
|
|
|
Post by rockisland652 on Jan 3, 2015 22:52:52 GMT -8
A little detail...hmmm.
No MU cutouts in the pilot? Different ones, anyway.
|
|
|
|
Post by onequiknova on Jan 3, 2015 22:59:37 GMT -8
A little detail...hmmm. No MU cutouts in the pilot? Different ones, anyway. They're not recessed like the RI normally did. They have a sheet metal shield oner the top of them. That's what those brass pieces are supossed to be. farm7.staticflickr.com/6040/6377554881_ee5a19c54e_b.jpg |
|
|
|
Post by rockisland652 on Jan 3, 2015 23:02:58 GMT -8
A little detail...hmmm. No MU cutouts in the pilot? Different ones, anyway. They're not recessed like the RI normally did. They have a sheet metal shield oner the top of them. That's what those brass pieces are supossed to be. farm7.staticflickr.com/6040/6377554881_ee5a19c54e_b.jpgThat shot show the pilot details. It also shows the cover over the hole in the winterization hatches, plus the blanked out dynamic brake fan. |
|
|
|
Post by onequiknova on Jan 3, 2015 23:11:37 GMT -8
That shot show the pilot details. It also shows the cover over the hole in the winterization hatches, plus the blanked out dynamic brake fan. Yes, that shot is pretty invaluable for this build. Modeling that open cab door would be cool. Would be fairly easy with the etched doors I made last year. |
|
|
|
Post by mrsocal on Jan 4, 2015 8:11:48 GMT -8
Always amazes me what people can do with styrene. Great looking model. Yes, it is always fascinating to watch a PLASTIC SURGEON do his thing. Another great looking build John. |
|
|
|
Post by carrman on Jan 4, 2015 8:44:27 GMT -8
I said it on the old forum when you built the AB6, I'll say it again. This is your world, the rest of us just live in it!
Dave
|
|
|
|
Post by Donnell Wells on Jan 4, 2015 8:45:15 GMT -8
John, that scratch-built pilot is ingenious! You just gave me the answer for how to do my commuter E9s! Of course, I'm starting with an inferior Roco/Model Power shell, but nonetheless!
I also love the the fuel tank, winterization hatch, and splices, but can you expound on the fixture that the shell is resting on?
Sincerely,
Donnell
|
|
|
|
Post by roadkill on Jan 4, 2015 9:41:27 GMT -8
Very nice! Any chance of selling some of those fuel tanks  ? |
|
|
|
Post by Great-Northern-Willmar Div on Jan 4, 2015 10:07:11 GMT -8
When I see what John does and then I look at what I put out. Its like comparing prime rib to garbage. I don't know why I even bother documenting my feeble efforts.
The only good news is my move to the west means you won't have to hurl when you see my work. Since, I'll be completely out of the hobby.
|
|
|
|
Post by carrman on Jan 4, 2015 10:49:00 GMT -8
When I see what John does and then I look at what I put out. Its like comparing prime rib to garbage. I don't know why I even bother documenting my feeble efforts. The only good news is my move to the west means you won't have to hurl when you see my work. Since, I'll be completely out of the hobby. Oh quit it, you build some really nice stuff. You even took that slab of resin and made a nice SDP40F out of it! Stop running your own efforts down. Dave |
|
|
|
Post by kentuckysouthernrwy on Jan 4, 2015 11:03:41 GMT -8
When I see what John does and then I look at what I put out. Its like comparing prime rib to garbage. I don't know why I even bother documenting my feeble efforts. The only good news is my move to the west means you won't have to hurl when you see my work. Since, I'll be completely out of the hobby. Jim that gets tiring, get over it, your stuff rocks. |
|
|
|
Post by onequiknova on Jan 4, 2015 11:58:16 GMT -8
Thanks guys, Donnell, I made the fixture so I could clamp the E7/8 shell into my mill. I simply hold the shell to the fixture with a handful of rubber bands. 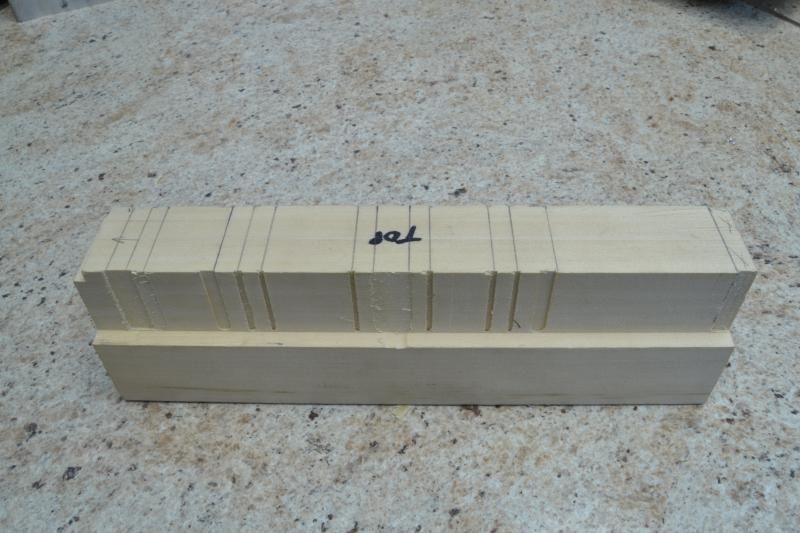 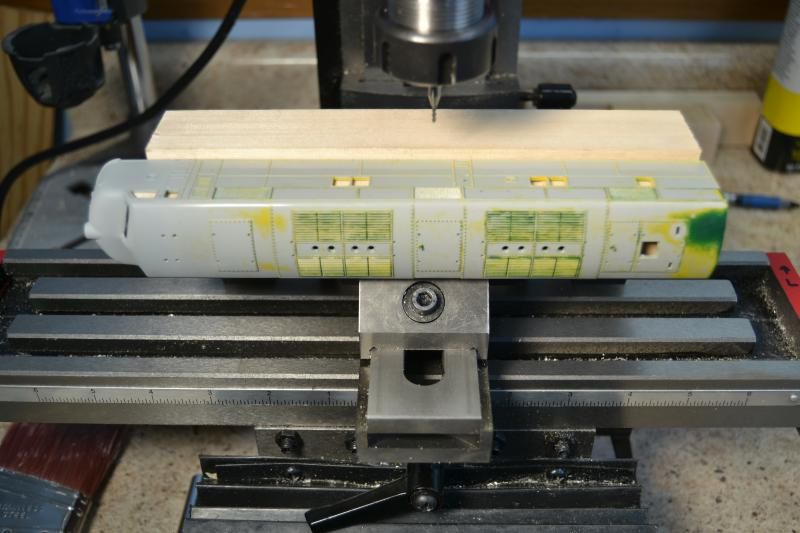 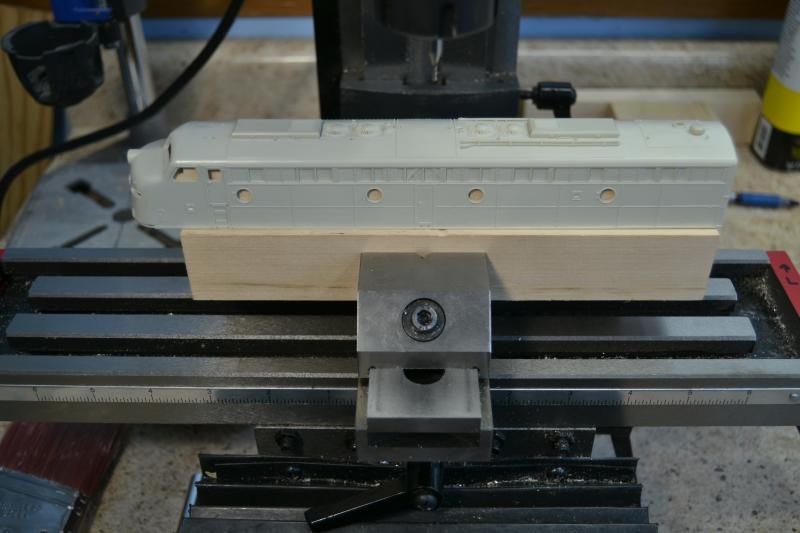 I was hoping to be able to mill off port hole frames and whatever other details I would need to shave off the sides, but the sides of the BLI shells are hardly flat. The nuts you see glued into the sides earlier in this thread was an attempt at a clamping system to hold the sides flush with the fixture, but it didn't work out very well. The fixture is still useful though, I used it to mill the dynamic recess in the roof, mill off the fan hatches and open up the areas behind the intake grilles. I also used it to hold the shell while I milled off the end of the BLI shell. |
|
|
|
Post by GP40P-2 on Jan 4, 2015 12:00:44 GMT -8
Like Donnell asked, I would love to hear about that fixture, its function and anything else. Looks like a great "tool" for these projects!
And you answered it as I posted this!
|
|
|
|
Post by tankcarsrule on Jan 4, 2015 13:59:21 GMT -8
When I see what John does and then I look at what I put out. Its like comparing prime rib to garbage. I don't know why I even bother documenting my feeble efforts. The only good news is my move to the west means you won't have to hurl when you see my work. Since, I'll be completely out of the hobby. Jim that gets tiring, get over it, your stuff rocks. Jim, you're not a good model builder, you're a OUTSTANDING modeler! Regards, Bobby |
|
Deleted
Deleted Member
Posts: 0
|
Post by Deleted on Jan 5, 2015 6:08:00 GMT -8
John,
You are taking right nicely to working with your mill. Great job on this build. I bet you are VERY happy you invested in the mill setup.
On the fuel tank. Did you get a custom cutter made to do the rounded surfaces or did you just cut the outside piece with a corner rounding bit and glue it to the rest of the tank? A while back I found a shop that makes custom router bits. you supply them with a drawing of the contour you need and they will make the bit. Never got a price on anything, but it is an avenue for getting a custom cutter to make fuel tanks. You would need two. One for the top slope and the other for the bottom contours. So far I have not found a need for them anymore since I can get decent fuel tanks from Athearn.
I cannot say this is true for E units, but for F units, GP's and SD's the end sheet on fuel tanks do not follow all the curvatures along the bottom of the tank. They follow the outside curve and then go straight across. You may want to check this for the E units. Most likely it is the same.
I really like seeing that winterization hatch you made. great stuff. I am going to have to look into a set of those corner rounding bits.
Brian
|
|
|
|
Post by rockisland652 on Jan 5, 2015 6:28:06 GMT -8
This is a tough picture for RI fans and E & F unit fans as well. It is a shot of the carnage at Chrome Crankshaft from 1981. However, look at the pile of fuel tanks to the right. I believe those may be E8/E9 fuel tanks with the separate water reservoir being the round shape on top. Yes, they appear to be upside down. 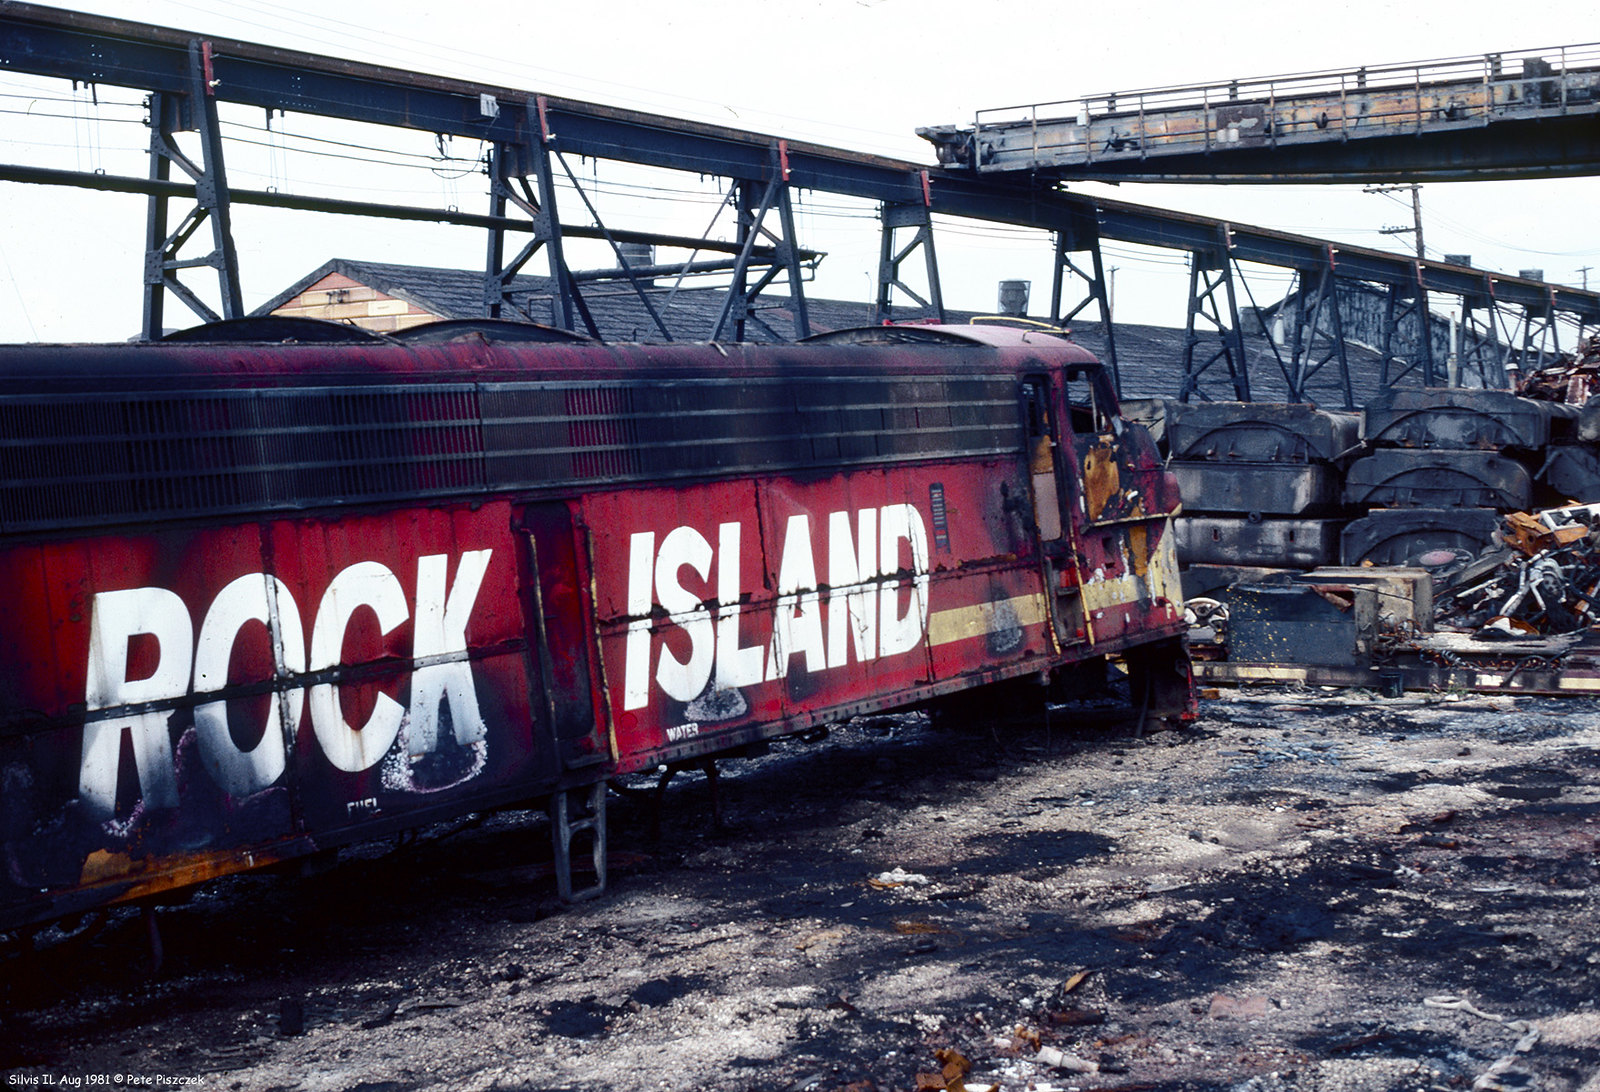 [/url] |
|
|
|
Post by onequiknova on Jan 5, 2015 8:23:05 GMT -8
John, You are taking right nicely to working with your mill. Great job on this build. I bet you are VERY happy you invested in the mill setup. On the fuel tank. Did you get a custom cutter made to do the rounded surfaces or did you just cut the outside piece with a corner rounding bit and glue it to the rest of the tank? A while back I found a shop that makes custom router bits. you supply them with a drawing of the contour you need and they will make the bit. Never got a price on anything, but it is an avenue for getting a custom cutter to make fuel tanks. You would need two. One for the top slope and the other for the bottom contours. So far I have not found a need for them anymore since I can get decent fuel tanks from Athearn. I cannot say this is true for E units, but for F units, GP's and SD's the end sheet on fuel tanks do not follow all the curvatures along the bottom of the tank. They follow the outside curve and then go straight across. You may want to check this for the E units. Most likely it is the same. I really like seeing that winterization hatch you made. great stuff. I am going to have to look into a set of those corner rounding bits. Brian HI Brian, Yes, the mill is worth every penny I paid for it. It's a blast to use. I look for any excuse to us it. For the fuel tank, I used corner rounding end mills. Here is a quick run down of what I did. I first milled the sides of the tank with a 2 or 3 degree angle. Wider at the top of the tank, narrower at the bottom. 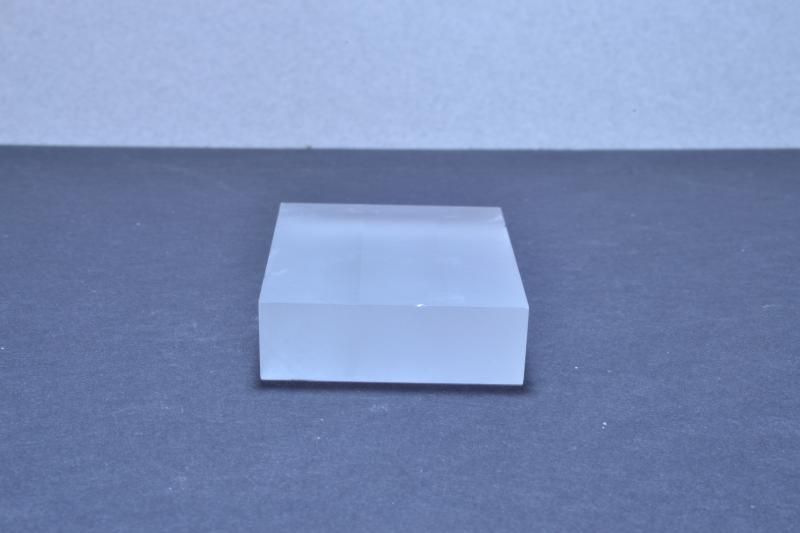 The bottom radius was made with a 5/32" corner rounding end mill. 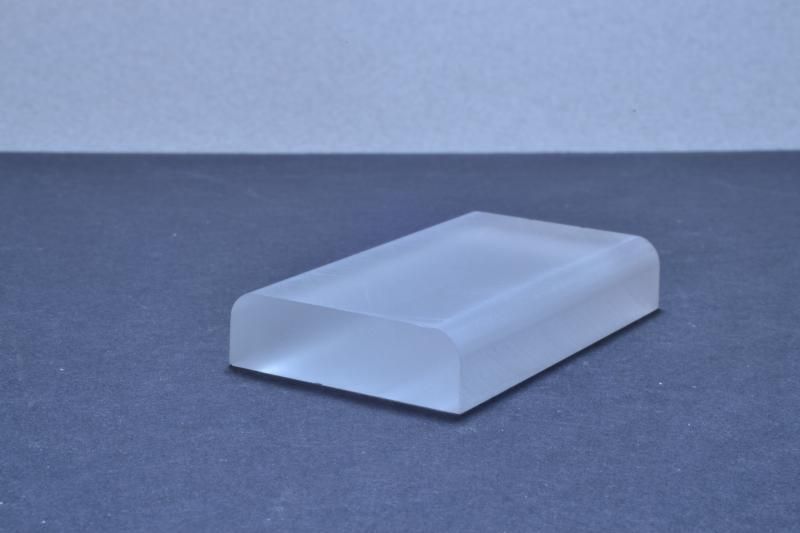 The top radius was done with a 1/16". 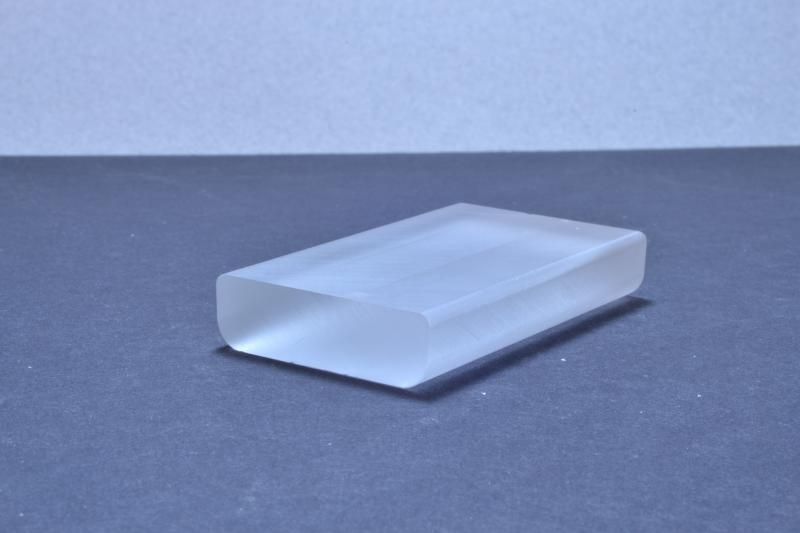 The scalloped bottom was removed from the BLI tank using a fixture I made for the mill, then a slot was cut into the new tank to accept the BLI tank bottom. 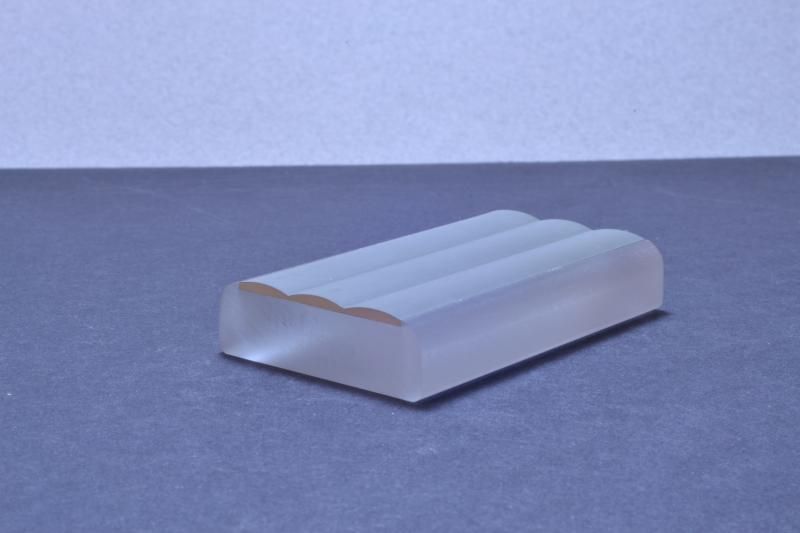 As far as the end sheets go, They followed the scallops on the tank as far as I can tell, at least at the front. www.railpictures.net/viewphoto.php?id=142010 This picture I just found shows the small tanks Tom pointed out in that scrap yard scene. donstrack.smugmug.com/UtahRails/Locomotive-Details/Locomotive-Details/i-PVz9H5SI'm assuming that odd shaped tank is on the rear of the fuel tank. I'm going to have to do some more research I guess. It wouldn't be a big deal to correct the fuel tank at this point. |
|
|
|
Post by onequiknova on Jan 5, 2015 8:26:48 GMT -8
Tom,
Any idea what number that one is? Judging by the water fill decal, I'm guessing it's not an HEP unit. Did that thing burn, or is it scorched from the cutting torches?
I also spy in that pile of tanks what appears to be 610's, 639 or 642's fuel and water tanks.
|
|
|
|
Post by rockisland652 on Jan 5, 2015 10:34:40 GMT -8
Judging from the tattered ACI barcode and the peculiar filth/rust pattern around the batten strips, I think this unfortunate victim is 660. Here she sits near the Rocket House in 1979: www.rrpicturearchives.net/showPicture.aspx?id=1796870And, yes that appears to be the homemade water tanks that were under the E7s. They went quickly. |
|
|
|
Post by markfj on Jan 6, 2015 13:58:40 GMT -8
Jim, I wanted to share this photo of PRR E8 #5898 since it is a good (and rather rare) shot of the roof details. It looks like this unit has the same winter hatches as the one you’re modeling. Sorry for the quality of the image, it’s actually a clear picture from a magazine, but due to the file size limits for attachments, I had to copy the scan into a Word document. (Hopefully future upgrades to this forum will include larger file size limits.  ) PRR E8 5898.docx (1.32 MB) Mark |
|
|
|
Post by onequiknova on Jan 9, 2015 21:38:31 GMT -8
 I first attempted to make the shields over the MU hose connections out of brass, but I didn't care for the way they looked. They can be seen earlier in this thread. For my second attempt, I decided to try styrene. I turned to the mill again to create some C channel of the proper dimensions. I had to make two since each side is a different size. I made sure to make enough C channel to give me plenty of tries to get the pie shaped piece cut from the C channel properly. This is how they came out. the MU hose connections are just scraps of styrene elbows. 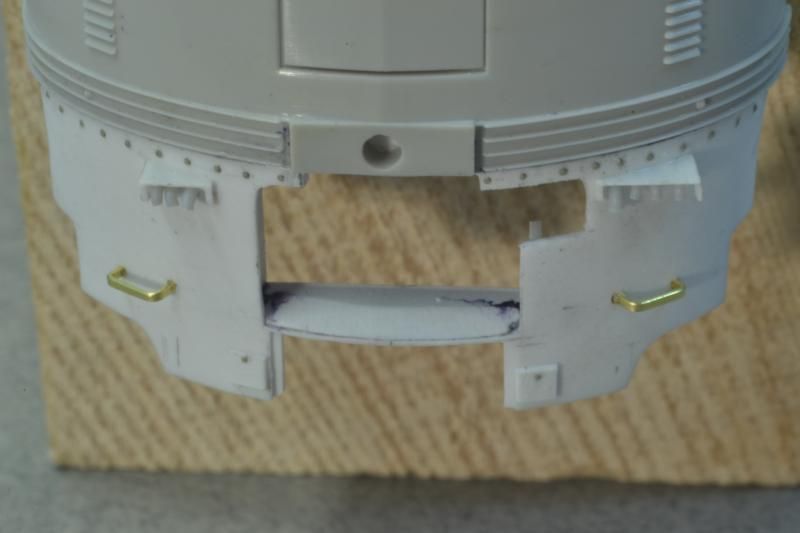 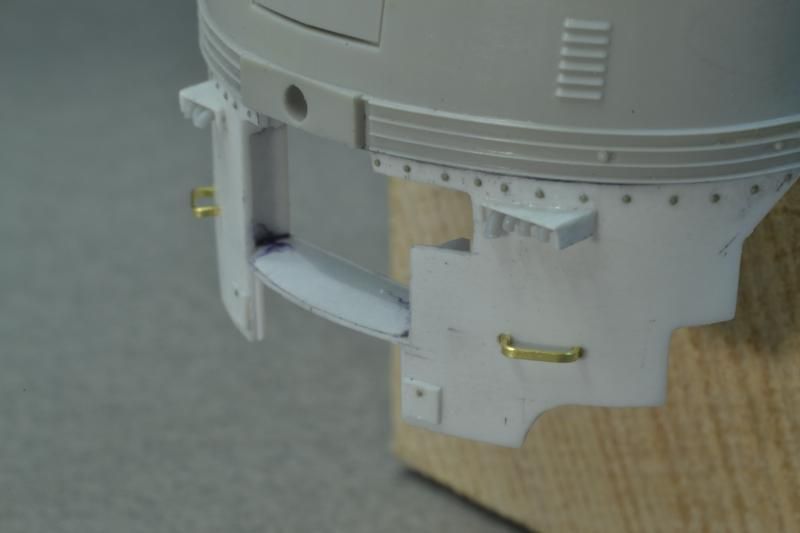 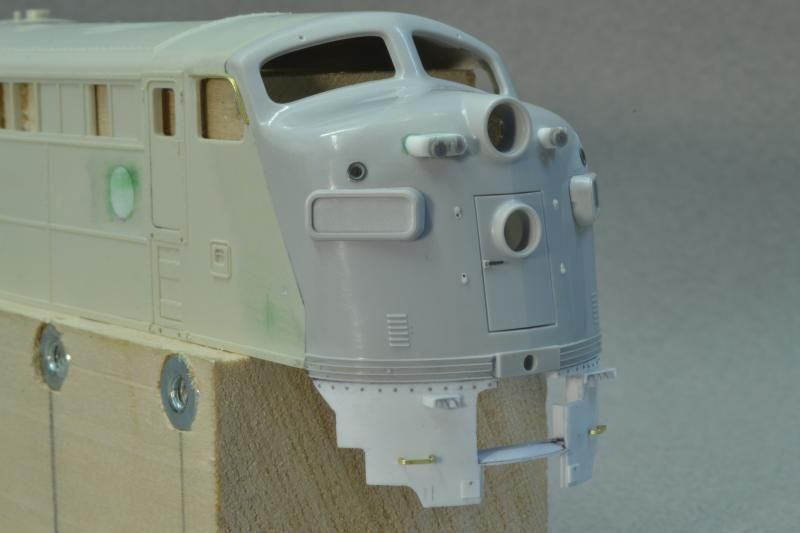 |
|
|
|
Post by Great-Northern-Willmar Div on Jan 10, 2015 5:21:45 GMT -8
 I first attempted to make the shields over the MU hose connections out of brass, but I didn't care for the way they looked. They can be seen earlier in this thread. For my second attempt, I decided to try styrene. I turned to the mill again to create some C channel of the proper dimensions. I had to make two since each side is a different size. I made sure to make enough C channel to give me plenty of tries to get the pie shaped piece cut from the C channel properly. This is how they came out. the MU hose connections are just scraps of styrene elbows.    Are you going to have the steam line sticking its tongue out of the bottom like the prototype? Maybe build the steam line so it can be extended for service and recoiled when not in use?   Had to plant the seed. I cut up two of the Cal-Scale steam line castings and pieced them together sanding flats where the joint are and drilling a #80 hole and inserting some 0.012" brass wire. I maybe smarter than the average bear, but with your crazy talent and machinery you should be able to REALY do it. |
|
|
|
Post by onequiknova on Jan 10, 2015 9:11:01 GMT -8
I'll add the steam lines, but I'm not sure I'll make it extendable, as cool as it is.
I need to figure out what the steam line mounts to under the pilot.
|
|




 ?
?


 [/url]


